Creating a Apache SSL Self-Signed Certificate
Next, we will create a self-signed certificate that will identify the server to our clients (please note that this method is not the best option for production environments; for such use you may want to consider buying a certificate verified by a 3rd trusted certificate authority, such as DigiCert).
To create a new NSS-compliant certificate for box1 which will be valid for 365 days, we will use the genkey command. When this process completes:
# genkey --nss --days 365 box1
Choose Next:
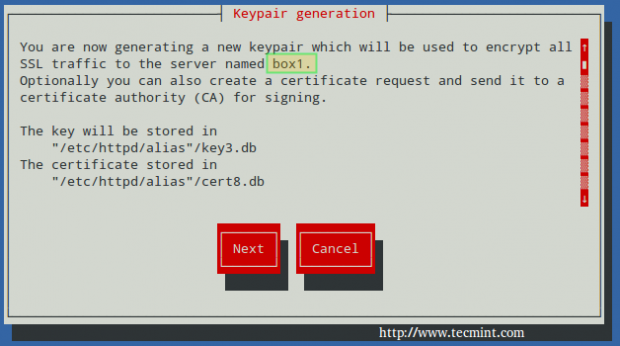
You can leave the default choice for the key size (2048), then choose Next again:

Wait while the system generates random bits:

To speed up the process, you will be prompted to enter random text in your console, as shown in the following screencast. Please note how the progress bar stops when no input from the keyboard is received. Then, you will be asked to:
1. Whether to send the Certificate Sign Request (CSR) to a Certificate Authority (CA): Choose No, as this is a self-signed certificate.
2. to enter the information for the certificate.
Finally, you will be prompted to enter the password to the NSS certificate that you set earlier:
# genkey --nss --days 365 box1

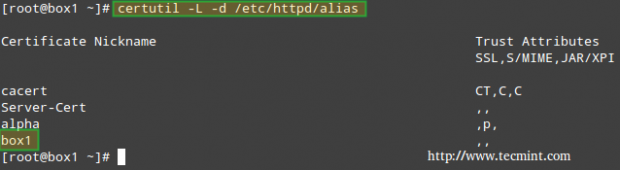
At anytime, you can list the existing certificates with:
# certutil –L –d /etc/httpd/alias
And delete them by name (only if strictly required, replacing box1 by your own certificate name) with:
# certutil -d /etc/httpd/alias -D -n "box1"
if you need to.c
Testing Apache SSL HTTPS Connections
Finally, it’s time to test the secure connection to our web server. When you point your browser to https://<web server IP or hostname>, you will get the well-known message “This connection is untrusted“:
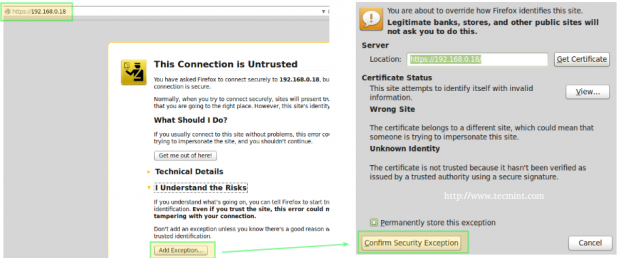
In the above situation, you can click on Add Exception and then Confirm Security Exception – but don’t do it yet. Let’s first examine the certificate to see if its details match the information that we entered earlier (as shown in the screencast).
To do so, click on View… –> Details tab above and you should see this when you select Issuer from the list:
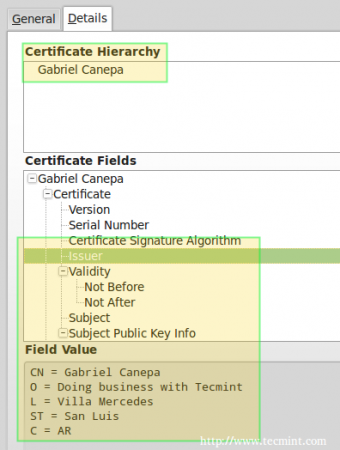
Now you can go ahead, confirm the exception (either for this time or permanently) and you will be taken to your web server’s DocumentRoot directory via https, where you can inspect the connection details using your browser’s builtin developer tools:
In Firefox you can launch it by right clicking on the screen, and choosing Inspect Element from the context menu, specifically through the Network tab:
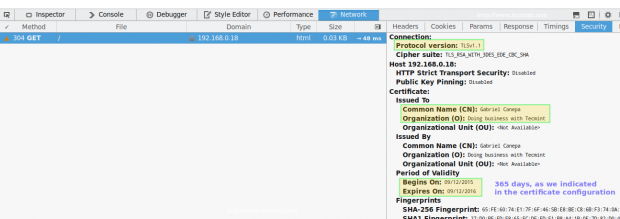
Please note that this is the same information as displayed before, which was entered during the certificate previously. There’s also a way to test the connection using command line tools:
On the left (testing SSLv3):
# openssl s_client -connect localhost:443 -ssl3
On the right (testing TLS):
# openssl s_client -connect localhost:443 -tls1
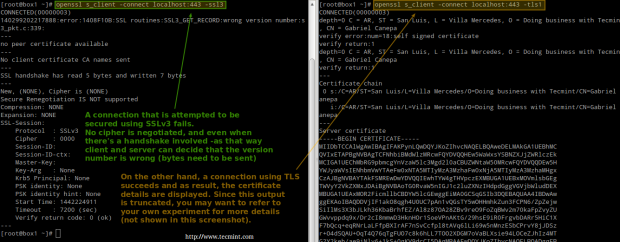
Refer to the screenshot above for more details.
Summary
As I’m sure you already know, the presence of HTTPS inspires trust in visitors who may have to enter personal information in your site (from user names and passwords all the way to financial / bank account information).
In that case, you will want to get a certificate signed by a trusted Certificate Authority as we explained earlier (the steps to set it up are identical with the exception that you will need to send the CSR to a CA, and you will get the signed certificate back); otherwise, a self-signed certificate as the one used in this tutorial will do.
For more details on the use of NSS, please refer to the online help about mod-nss. And don’t hesitate to let us know if you have any questions or comments.


Hi Dear Gabriel,
The first time I execute
certutil -W -d /etc/httpd/alias/it asks for a pre-stored password that I don’t have.It is expected that the system should ask for a new password and confirmation.
any suggestions?
whenever I come across this step, I get the below error. I am running a VM, and tried creating 3 different VMs and loading fresh OS, but still no luck. Any help on this?
SEC_ERROR_CERT_SIGNATURE_ALGORITHM_DISABLED: The certificate was signed using a signature algorithm that is disabled because it is not secure.
certutil: unable to create cert (The certificate was signed using a signature algorithm that is disabled because it is not secure.)
=======================================
The below output is when I run the connectivity test
———————
—–END CERTIFICATE—–
subject=/C=US/O=example.com/CN=tecmint.linuxnewz.com
issuer=/C=US/O=example.com/CN=Certificate Shack
—
No client certificate CA names sent
Server Temp Key: ECDH, P-256, 256 bits
—
SSL handshake has read 2136 bytes and written 315 bytes
—
New, TLSv1/SSLv3, Cipher is ECDHE-RSA-AES256-SHA
Server public key is 2048 bit
Secure Renegotiation IS supported
Compression: NONE
Expansion: NONE
No ALPN negotiated
SSL-Session:
Protocol : TLSv1
Cipher : ECDHE-RSA-AES256-SHA
Session-ID: 064C3C977F424BBB10EAFF2AF8012D243F517B9AB8B235DC8BE4EF7C1EF81E65
Session-ID-ctx:
Master-Key: F99E9AE9C79952C4AB875DB2C8039F1AB3F8A93195607F6118491EBDB4EB261645B1A6E1E3F28EA81B691325D741E63E
Key-Arg : None
Krb5 Principal: None
PSK identity: None
PSK identity hint: None
Start Time: 1526052089
Timeout : 7200 (sec)
Verify return code: 19 (self signed certificate in certificate chain)
Does the NSS work for keys from Letsencrypt. If yes, then how can we place the key file, as the file /etc/httpd/alias is looked for the certificate.
In the last step, this asks me for a password. I did not set any password, infact setting it now.
Can you please help. I followed the steps mentioned here.
I followed what Harmon20 mentioned below, and it works. Thanks M8.
Just a quick tip, you can pass multiple services:
# firewall-cmd –permanent –add-service={http,https}
It does save you time during the exam.
@Tomas,
Thank you for pointing that out :).
I’m using this as a step by step recipe and ran into some problems. I’ll post them as I found them to help anyone else that ran into difficulty because of being as ignorant of what they were doing as I was.
In the step where specifying listening ports in the nss.conf file, the Virtual host line is in gt and lt brackets, XML style. Leave the gt/lt brackets in place; do not remove them so that the line in your nss.conf file looks exactly like the line shown on this page.
In step 5 of NSS Config, when running certutil I was prompted for a password. I tried for a couple days to get it right and it was always invalid. I discovered after trial-and-much-error that the first time through I had to just hit Enter for a blank password, then I was prompted for the new one. I then entered the password from step 2(b).
Regarding step 2(b): It should be stated that after step 2(a) is accomplished the editor should be exited to save nss.conf, then proceed to step 2(b).
After I created my cert my server still handed out the default cert rather than the one I’d generated. It was not stated in the instructions, but I had to go back into nss.conf, find the virutal host section, find the line that starts “NSSNickname” and replace it with the name of the cert I’d generated. In this example it was named “box1”. (ignore all quotes, in practice)
@Harmon20,
Please know how much we appreciate your involvement and your time to point this out. Thank you for sharing your findings with the rest of the community.
Hi Gabriel
Can you please add this NSSNickname to article, I didn’t check comments and like Harmon20 had to check nss.conf file to find it.
Thanks for your great effort.
Regards,
Aidin
Hi,
Very useful article
thanks a lot