Setting up RAID 1 (Mirroring) using ‘Two Disks’ in Linux – Part 3

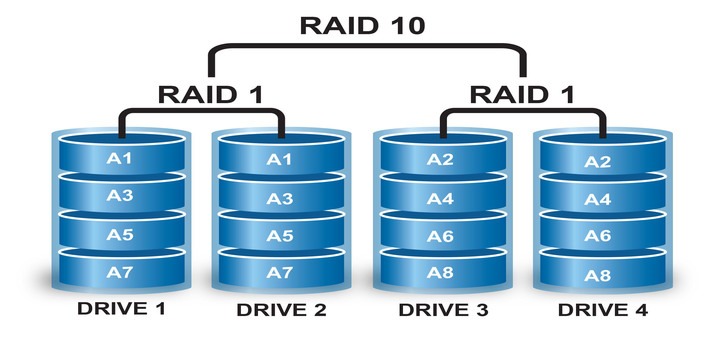
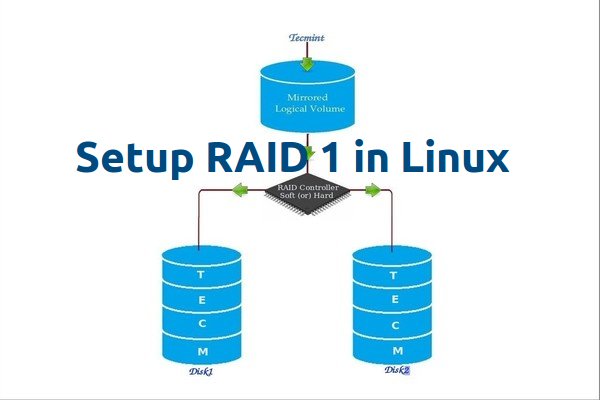
RAID Mirroring means an exact clone (or mirror) of the same data writing to two drives. A minimum two number of disks are more required in an array to create RAID1 and it’s useful only, when read performance or reliability is more precise than the data storage capacity.
Create Raid1 in Linux
Setup Raid1 in Linux

Mirrors are created to protect against data loss due to disk failure. Each disk in a mirror involves an exact copy of the data. When one disk fails, the same data can be retrieved from other functioning disk. However, the failed drive can be replaced from the running computer without any user interruption.

Features of RAID 1

  1. Mirror has Good Performance.
  2. 50% of space will be lost. Means if we have two disk with 500GB size total, it will be 1TB but in Mirroring it will only show us 500GB.
  3. No data loss in Mirroring if one disk fails, because we have the same content in both disks.
  4. Reading will be good than writing data to drive.

Requirements

Minimum Two number of disks are allowed to create RAID 1, but you can add more disks by using twice as 2, 4, 6, 8. To add more disks, your system must have a RAID physical adapter (hardware card).

Here we’re using software raid not a Hardware raid, if your system has an inbuilt physical hardware raid card you can access it from it’s utility UI or using Ctrl+I key.

Read Also: Basic Concepts of RAID in Linux

My Server Setup
Operating System :	CentOS 6.5 Final
IP Address	 :	192.168.0.226
Hostname	 :	rd1.tecmintlocal.com
Disk 1 [20GB]	 :	/dev/sdb
Disk 2 [20GB]	 :	/dev/sdc

This article will guide you through a step-by-step instructions on how to setup a software RAID 1 or Mirror using mdadm (creates and manages raid) on Linux Platform. Although the same instructions also works on other Linux distributions such as RedHat, CentOS, Fedora, etc.

Step 1: Installing Prerequisites and Examine Drives

1. As I said above, we’re using mdadm utility for creating and managing RAID in Linux. So, let’s install the mdadm software package on Linux using yum or apt-get package manager tool.

# yum install mdadm		[on RedHat systems]
# apt-get install mdadm 	[on Debain systems]

2. Once ‘mdadm‘ package has been installed, we need to examine our disk drives whether there is already any raid configured using the following command.

# mdadm -E /dev/sd[b-c]
Check RAID on Disks
Check RAID on Disks

As you see from the above screen, that there is no any super-block detected yet, means no RAID defined.

Step 2: Drive Partitioning for RAID

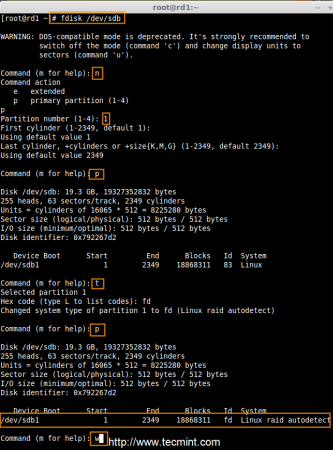
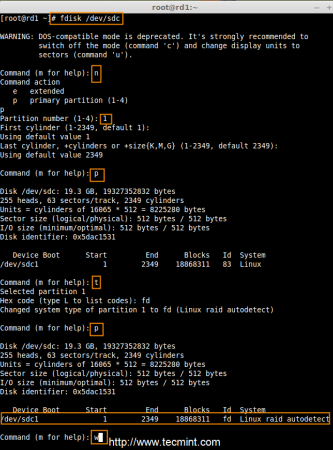
3. As I mentioned above, that we’re using minimum two partitions /dev/sdb and /dev/sdc for creating RAID1. Let’s create partitions on these two drives using ‘fdisk‘ command and change the type to raid during partition creation.

# fdisk /dev/sdb
Follow the below instructions
  1. Press ‘n‘ for creating new partition.
  2. Then choose ‘P‘ for Primary partition.
  3. Next select the partition number as 1.
  4. Give the default full size by just pressing two times Enter key.
  5. Next press ‘p‘ to print the defined partition.
  6. Press ‘L‘ to list all available types.
  7. Type ‘t‘to choose the partitions.
  8. Choose ‘fd‘ for Linux raid auto and press Enter to apply.
  9. Then again use ‘p‘ to print the changes what we have made.
  10. Use ‘w‘ to write the changes.
Create Disk Partitions

After ‘/dev/sdb‘ partition has been created, next follow the same instructions to create new partition on /dev/sdc drive.

# fdisk /dev/sdc
Create Second Partitions

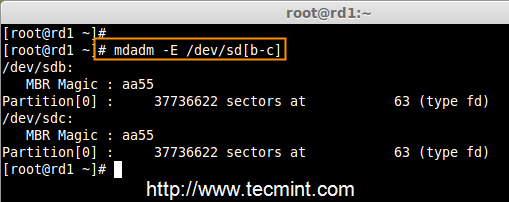
4. Once both the partitions are created successfully, verify the changes on both sdb & sdc drive using the same ‘mdadm‘ command and also confirm the RAID type as shown in the following screen grabs.

# mdadm -E /dev/sd[b-c]
Verify Partitions Changes
Check RAID Type
Check RAID Type

Note: As you see in the above picture, there is no any defined RAID on the sdb1 and sdc1 drives so far, that’s the reason we are getting as no super-blocks detected.

Step 3: Creating RAID1 Devices

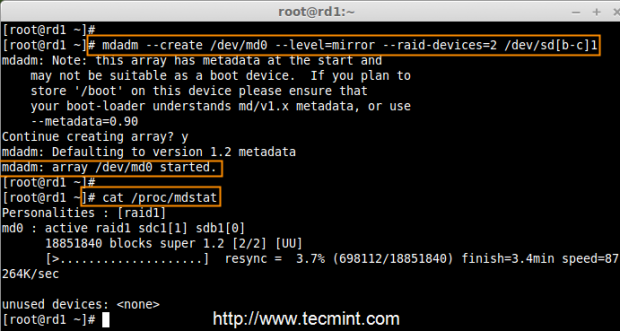
5. Next create RAID1 Device called ‘/dev/md0‘ using the following command and verity it.

# mdadm --create /dev/md0 --level=mirror --raid-devices=2 /dev/sd[b-c]1
# cat /proc/mdstat
Create RAID Device
Create RAID Device

6. Next check the raid devices type and raid array using following commands.

# mdadm -E /dev/sd[b-c]1
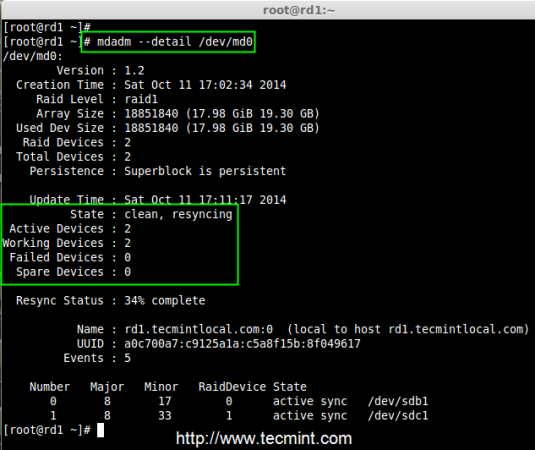
# mdadm --detail /dev/md0
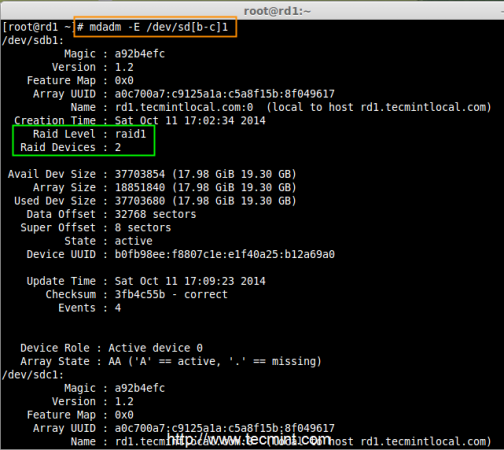
Check RAID Device type
Check RAID Device Array

From the above pictures, one can easily understand that raid1 have been created and using /dev/sdb1 and /dev/sdc1 partitions and also you can see the status as resyncing.

Step 4: Creating File System on RAID Device

7. Create file system using ext4 for md0 and mount under /mnt/raid1.

# mkfs.ext4 /dev/md0
Create RAID Device Filesystem

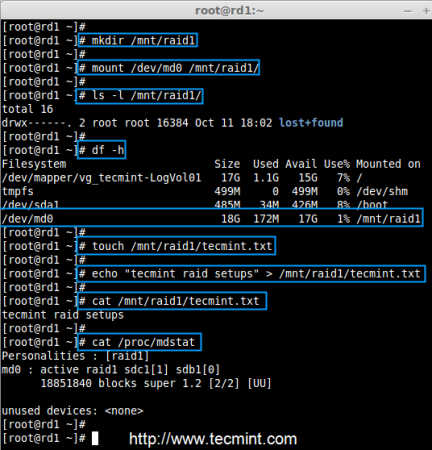
8. Next, mount the newly created filesystem under ‘/mnt/raid1‘ and create some files and verify the contents under mount point.

# mkdir /mnt/raid1
# mount /dev/md0 /mnt/raid1/
# touch /mnt/raid1/tecmint.txt
# echo "tecmint raid setups" > /mnt/raid1/tecmint.txt
Mount Raid Device
Mount Raid Device

9. To auto-mount RAID1 on system reboot, you need to make an entry in fstab file. Open ‘/etc/fstab‘ file and add the following line at the bottom of the file.

/dev/md0                /mnt/raid1              ext4    defaults        0 0
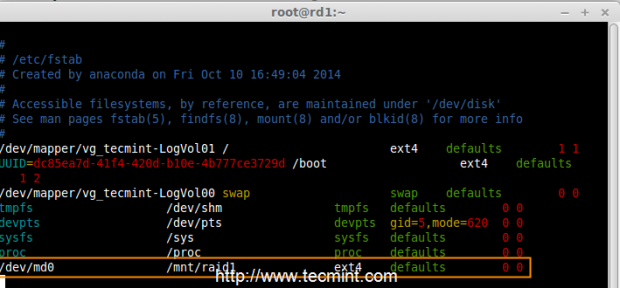
Raid Automount Device

10. Run ‘mount -a‘ to check whether there are any errors in fstab entry.

# mount -av
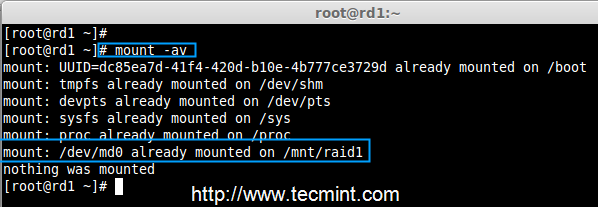
Check Errors in fstab

11. Next, save the raid configuration manually to ‘mdadm.conf‘ file using the below command.

# mdadm --detail --scan --verbose >> /etc/mdadm.conf
Save Raid Configuration

The above configuration file is read by the system at the reboots and load the RAID devices.

Step 5: Verify Data After Disk Failure

12. Our main purpose is, even after any of hard disk fail or crash our data needs to be available. Let’s see what will happen when any of disk disk is unavailable in array.

# mdadm --detail /dev/md0
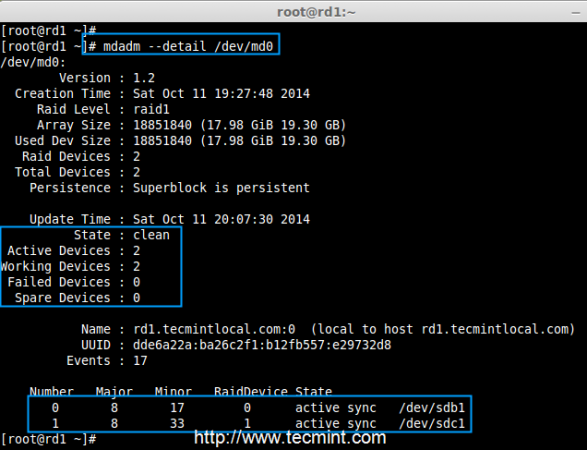
Raid Device Verify
Raid Device Verify

In the above image, we can see there are 2 devices available in our RAID and Active Devices are 2. Now let us see what will happen when a disk plugged out (removed sdc disk) or fails.

# ls -l /dev | grep sd
# mdadm --detail /dev/md0
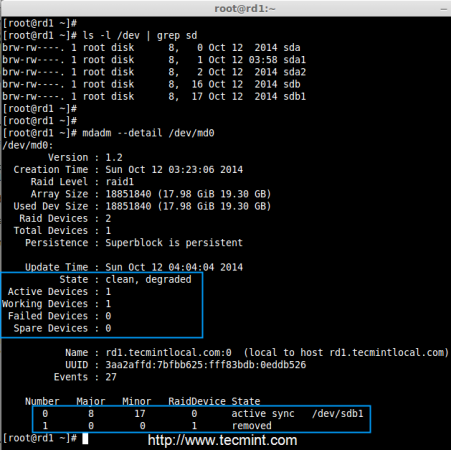
Test RAID Devices
Test RAID Devices

Now in the above image, you can see that one of our drive is lost. I unplugged one of the drive from my Virtual machine. Now let us check our precious data.

# cd /mnt/raid1/
# cat tecmint.txt
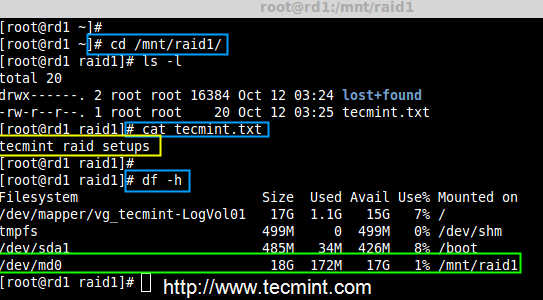
Verify RAID Data
Verify RAID Data

Did you see our data is still available. From this we come to know the advantage of RAID 1 (mirror). In next article, we will see how to setup a RAID 5 striping with distributed Parity. Hope this helps you to understand how the RAID 1 (Mirror) Works.

Babin Lonston
I'm Working as a System Administrator for last 10 year's with 4 years experience with Linux Distributions, fall in love with text based operating systems.

Each tutorial at TecMint is created by a team of experienced Linux system administrators so that it meets our high-quality standards.

Join the TecMint Weekly Newsletter (More Than 156,129 Linux Enthusiasts Have Subscribed)
Was this article helpful? Please add a comment or buy me a coffee to show your appreciation.

78 thoughts on “Setting up RAID 1 (Mirroring) using ‘Two Disks’ in Linux – Part 3”

  1. I followed your directions. For some reason, it changed md0 to md127. Adjusted /etc/fstab and /etc/mdadm/mdadm.conf and it works as advertised now. Thank you for this guide.

    Wayno

    Reply
  2. How to replugged in the hard drive after testing because once I remove the hard disk it’s always showing remove. Have you any idea how I resync the same hard disk that I remove for just testing?

    Reply
    • You might try to add in manually “sudo mdadm /dev/md0 –add /dev/sdxx” (xx being the drive that shows removed).

      Reply
  3. Just set up my raid1 on ubuntu! thanks a lot for this tutorial.

    I have a question:

    What do you need to do when one of the drives fails and you need to replace it?

    Will mdadm recognize the new drive and start copying from the old (still working) drive?

    Reply
  4. I’m running Linux Mint 20. I have to prepend “sudo” to all of the instructions. This is a good write-up of the process to create a raid1 array. Everything works (except mdadm.conf is in /etc/mdadm/mdadm.conf).

    I get to the step : sudo mdadm –detail –scan –verbose >> /etc/mdadm/mdadm.conf and get a permissions error.

    The message is:
    bash: /etc/mdadm/mdadm.conf : permission denied.

    Mint like Ubuntu doesn’t normally have access to the root account. So how do I solve this?

    Reply
    • @Chris,

      Run the following command to become the root user and run the mdadm command again.

      $ sudo -i
      # sudo mdadm –detail –scan –verbose >> /etc/mdadm/mdadm.conf
      
      Reply
  5. I wanted to set up my own RAID1 as the Seagate NAS box crashed on me. I was absolutely dejected. I luckily stumbled on this link.

    I had 2 of the 2tb and had my Linux server to fill up the NAS box for me. [Won’t trust Seagate anymore].

    I followed every step in this article with great attention.

    Man, you are awesome, you know what, I had created RAID1 in Linux for the first time. pretty excited.

    Well done mate, keep up the good work.

    Reply
  6. Many thanks for this tutorial, it still worked out for me.

    One thing that needs to be changed very urgent is on point 11.:

    # mdadm --detail --scan --verbose >> /etc/mdadm.conf 
    

    needs to be

    # mdadm --detail --scan --verbose >> /etc/mdadm/mdadm.conf
    

    Just had a problem with my raid0 being renamed to raid127 due to the missing config in /etc/mdadm folder

    Reply
  7. I need help please:

    sudo mdadm —-create /dev/md0 -—level=mirror -—raid-devices=2 /dev/sd[cd]1
    mdadm: An option must be given to set the mode before a second device
    (/dev/md0) is listed

    Reply
  8. Thank you ! Excellent Tutorials! I was able to understand with no tech background, Do you have any AWS questions dump for Solution Architect Associate exam.

    Reply
  9. mdadm E showing raid super block already exists. What is the procedure to clean it and use device for another raid level?

    Reply
  10. Thank you so much Bobin. I always follow tecmint.com when I have any doubt and I want to clear that. Really your lots of articles are very useful for me.

    Reply
  11. Why Raid is configured of partitioned disk, if we can do it on disk itself? Why extra efforts in creating partition?

    Reply
    • @Clark,

      No, You required to backup your data’s to create a DM device. Then try to setup a Raid 1.

      Thanks & Regards,
      Babin Lonston

      Reply
    • Hi Arun,

      It’s possible, But the concept of RAID is failover. When a disk failed in the array it will be available.

      In real time environments, iSCSI blocks are created on top of some disk array which already running with Hardware RAID.

      Storage –> Disk Array in a RAID –> Create a iSCSI block –> Presented to your server.

      Thanks & Regards,
      Bobin Lonston

      Reply
  12. Hello,

    Thanks for the article, it’s been helpful to me to set up a RAID1. For some reason it automatically renamed it to /dev/md127. After I modified the fstab file accordingly it worked fine.

    A problem happens though when I try to test it. I’m using a physical machine. I shutdown the machine and unplugged one of the drives but it didn’t reboot properly. I had to connect a monitor and keyboard as I think it booted into a emergency mode or something like that, SSH is not running at that stage.

    Anyway, when I run mdadm –detail /dev/md127 the state is inactive.
    So in a real world scenario how will I be able to replace a disk and add it to the RAID? Any ideas?

    Thanks again for the article.

    Reply
    • In my experience unplugging the drive didn’t work. But if I run this command before unplugging.

      # mdadm --manage /dev/md0 --remove /dev/sdb1
      

      then it boots just fine and the RAID becomes degraded. Then a new disk can be added.

      Reply
  13. On debian you need to write:

    # mdadm -detail -scan  >> /etc/mdadm/mdadm.conf
    

    not,

    # mdadm -detail -scan -verbose >> /etc/mdadm.conf
    

    otherway you cant reload server

    Reply
  14. thanks a million, I’ve used this tutorial two times as a Debian noob to set it up in my VM first and then a full machine :)

    Reply
    • @Charly,

      happy to hear from you, Try with other setups and let us know how it went through.

      Thanks & Regards,
      Babin Lonston

      Reply
  15. Hello,

    I was wondering, If I have RAID 1 already configured on my server with drive sda and sdb, Now I want to add two new drives sdc and sdd, Can i make raid 1 with new drives on the same server and if Yes, Will it impact anything?

    Reply
  16. There is no reply to this comment made by linuxonin:

    “Hi Babin, thanks for your reply but what I mean is what if i want to add my existing installed OS (CentOS) as a pair of my sdb device to make it Raid1 so it should be sda (OS installed) and sdb as Raid1.

    Is there any steps I need to follow? this one should not work because sda is currently busy running as OS.”

    Is what linuxonin saying impossible? Is it something anyone would want to do on Debian/Slackware(opensuse)/Redhat(CentOS7)? If so, why is there no documentation on how to mirror the system disk on any of the major distros?

    Reply
    • @Robert,
      //what if i want to add my existing installed OS (CentOS) as a pair of my sdb device to make it Raid1 so it should be sda (OS installed) and sdb as Raid1.//

      You will loose your Operating system. It’s not possible to add and existing OS installed drive to a RAID array..

      While the initial installation you need to setup the required RAID level and make an RAID1 or RAID5 then you need to install the Operating system on it.

      Here an example a physical HP server have 6 local disks with 300 GB each, We used to create a RAID array in 2 disks with the RAID1 level then we boot the server from RHEL or centos DVD to start the installation. You will get a Single disk of 300GB in OS level. Actually, there will be two disks if one fails you will still survive you can replace the faulty disk and you can recover it from parity.

      Now you have 4 free disks each 300GB of a size, You need to create a separate array to store user data’s. Ok, it’s done.

      If you try to add the existing OS installed disk to a new array you can’t add it. In the physical server, it will mark as already used in a different array.

      Even if you try to add in software raid it won’t allow, you need to dismantle your array to free your disk before adding it to a new array set.

      // this one should not work because sda is currently busy running as OS.”//

      You asked question and you have answered yourself, dear

      // Is what linuxonin saying impossible? //

      Yes it’s not possible to add a OS disk to RAID array. You will loose Operating system.

      // how to mirror the system disk on any of the major distros? //

      According to your RAID LEVEL you have the mirroring features except RAID 0

      Reply
  17. Hi, thanks for this article, I’ve got a problem when I want to unplug SDC in settings/storage in VB its grey so i could not even click on remove option then i tried deleting it from VB VMs but then Linux wont even start… so if you could help me somehow thanks

    Reply
    • Update, I solved a problem but after removing SDC even mdadm is not present and /mnt/raid1/ does not exist? what can be the problem? thanks again

      Reply
      • @Riso

        //even mdadm is not present and //

        Have you saved the configurations?

        # mdadm –detail –scan –verbose >> /etc/mdadm.conf

        Reply
  18. Thank you for creating this article, very great help. I have 1 question/concern on this:

    You used an example here the drives sdb and sdc, so you have no conflict to do it. How about if I want to raid1 my existing drive which is sda, would that be the same steps that you did here?

    Reply
      • Hi Babin, thanks for your reply but what I mean is what if i want to add my existing installed OS (CentOS) as a pair of my sdb device to make it Raid1 so it should be sda (OS installed) and sdb as Raid1. Is there any steps I need to follow? this one should not work because sda is currently busy running as OS.

        Reply
  19. Hello. Thank you for writing this article. After unplugging a drive and seeing the data is still available, when I plug the drive back in, what do I do? In other words, how do I repair/replace a failed hard drive in RAID1?

    Reply
  20. Using Ubuntu 15.10 the mount command will cause the OS not to boot. It tested fine via the above instructions (I had moved GBs of data to it before booting) however when booting Ubuntu stated /dev/md0 didn’t exist. I had to boot off a USB stick and remove the mount from fstab. Then it booted fine and I used the Disks app to auto mount the RAID. Which works great.

    Also mdadm.conf is located in /etc/mdadm/.

    Reply
  21. Got stuck at:
    mdadm –create –verbose –auto=yes /dev/md0 –level=1 –chunk=64 –raid-devices=2 /dev/sda1 /dev/sdb1
    mdadm: chunk size ignored for this level
    mdadm: super1.x cannot open /dev/sda1: Device or resource busy
    mdadm: ddf: Cannot use /dev/sda1: Device or resource busy
    mdadm: Cannot use /dev/sda1: It is busy
    mdadm: cannot open /dev/sda1: Device or resource busy

    I googled every where and none was able to pass this stage. How can you create RAID1 and the devices are busy? Thank you

    Reply
  22. Great article! I installed CentOS 7.x on single disk. If I add a second disk of same type and size (same parts #). Can I make the two RAID 1 and how?

    Reply
    • @ Richard,
      No we can’t add disk if it’s not a RAID Array before installing any Operating system.
      You can add two disks now and add those new two disk to a single RAID array to form RAID0 or RAID1.

      Reply
  23. Very Good Guide. A short while after getting this up and running, I received a message from MADM (I guess) that one of the drives had failed. BRAND NEW DRIVES! The mdadm –display indeed shows I am only on 1 drive. Fdisk -l does not even see the drive!

    What is the procedure to re-mirror when I replace with a new drive?

    Thanks

    Reply
    • @JD

      Check which one is failed

      # cat /proc/mdstat

      If you see the output as sdb(F)F you have lost one disk.

      Assume here sdb was failed

      mdadm –manage /dev/md0 –fail /dev/sdb1

      Then check using cat /proc/mdstat

      need to get U_ in result

      Then remove the failed disk

      # mdadm –manage /dev/md0 –remove /dev/sdb1

      Then shut-down the machine and replace the disk

      After that partition the new disk using fdisk

      Then add the new partitioned disk to raid set using

      # mdadm –manage /dev/md0 –add /dev/sdb1

      This will rebuild the raid set. To monitor the build use command

      # cat /proc/mdstat

      Please go through every parts of RAID setups in tecmint.com you can find all above commands what i have used.

      Reply
  24. Hi, just wanted to confirm, these instructions are to create a raid 1 on an existing install of centos 6 correct?

    Reply
      • Installing Centos 7.1 as OS for an (assuming dual socket, 16G+ RAM) Apache web server using two RAID 1 arrays (one array for MariaDB)… your writing style is very clear and so I feel that this would be truly an awesome guide to see =)

        Reply
  25. Very good guide/overview. I was able to create 2 raid arrays using 4 disks without any problem in 5-10 minutes. Bookmarked it for future reference. Thanks!

    Reply
  26. Followed this tutorial. All goes well until I attempt to create /dev/md0. I get this message:

    Cannot open /dev/sda1: device or resource busy.

    Can you help?

    Reply
  27. @Babin
    Great tutorial. I used it on my new Mint17 box….although I am having but I did have a few hangups, you may wish to update your tutorial.
    On the partitioning steps, you have “Next press ‘p‘ to print the defined partition.” twice

    On step 11 when saving the raid configuration to mdadm.conf, I had to chown mdadm.conf to apply the save, then I returned ownership to root after saving.

    Here’s where I could use clarification – Upon reboot, I see: Continue to wait, Press S to skip mounting or M for manual recovery.
    I suspect this has do with the auto mounting in fstab or the mdadm.conf steps.
    mdadm.conf shows the device as md0 as well as my writing to fstab as md0, however when I ask mdadm –detail it lists as md127!?

    Thanks for any help!

    Reply
    • Playing with this it seems Mint prefers to mount drives in /media – I updated mdadm, fstab and remounted the raid in /media and everything works.
      If you would, please explain this quirk (or my misunderstanding) thx :-)

      Reply
      • @phenacomy you can mount any where you want. Create any one of the directory and mount it. By default /media will be used by some of the removable devices.

        Reply
    • @phenacomy

      Thanks for pointing out errors in the article, corrected in the writeup….

      By default you don’t have a mdadm.conf file, you have to scan drives and save the config, Could you please run the following command as root user or sudo rights and save the file?

      $ sudo mdadm --detail --scan --verbose >> /etc/mdadm.conf 
      

      If you save your RIAD configuration, it will not preserve at boot time.

      You have not saved the conf file, When ever you reboot it looks for md0 in fstab before that software raid used to load the raid configuration in kernel from mdadm.conf to get the drive details then only you can boot properly. To fix this unmount from md0 then scan and assemble [ mdadm –assemble –scan] it will bring back your md0.

      Reply
      • There was a typo in my above comment ..

        To fix this unmount from md127 then scan and assemble [ mdadm –assemble –scan] it will bring back your md0.

        Reply
  28. Need HELP!!!!!

    Now i’m going to implement this one. But im planning to use the same two hdds which i used for RAID0 tutorial. So i tried to remove the hdds from /dev/md0 but it’s giving this error message

    #mdadm /dev/md0 -f /dev/sda1 -r /dev/sda1
    mdadm: set device faulty failed for /dev/sda1: Device or resource busy

    So i stopped the /dev/md0 using

    #mdadm –stop /dev/md0
    mdadm: stopped /dev/md0

    and then again ran the previous command but is not showing any md0 device now

    mdadm: error opening /dev/md0: No such file or directory

    How do i get rid of md0 and release sda and sdb which i will use for RAID1

    Reply
    • And is it ok to proceed when i receive this message by using this command

      #mdadm –create /dev/md0 –level=mirror –raid-devices=2 /dev/sd[a-b]1

      mdadm: Note: this array has metadata at the start and
      may not be suitable as a boot device. If you plan to
      store ‘/boot’ on this device please ensure that
      your boot-loader understands md/v1.x metadata, or use
      –metadata=0.90
      Continue creating array?

      Reply
      • @Omipenguin your both disk size were little differ so what you getting the message as

        { your boot-loader understands md/v1.x metadata, or use
        –metadata=0.90
        Continue creating array?}

        Yes proceed to continue, We can use –metadata=1.2 to change the meta data while creating raid.

        Please use # man mdadm to know more about RAID.

        Reply
    • Need HELP!!!!!

      Now i’m going to implement this one. But im planning to use the same two hdds which i used for RAID0 tutorial. So i tried to remove the hdds from /dev/md0 but it’s giving this error message

      #mdadm /dev/md0 -f /dev/sda1 -r /dev/sda1
      mdadm: set device faulty failed for /dev/sda1: Device or resource busy

      {{{{{{{{{{{

      # first you have to unmount the filesystem from your mount point.

      # umount /mnt/your_point

      If umount not helped use a lazy umount

      # umount -l /mnt/your_point

      Then set the disk as failed So i stopped the /dev/md0 using

      Now you can set the disk as failed

      # mdadm /dev/md0 –fail /dev/sda1

      # mdadm /dev/md0 –fail /dev/sdb1

      Then you have to remove the disk from RAID set using

      # mdadm –remove /dev/md0 /dev/sda1

      # mdadm –remove /dev/md0 /dev/sdb1

      Then stop the RAID set

      # mdadm –stop /dev/md0

      Run the examine command if you found superblock, we have to use zero superblock, Read the answer in bottom of the reply.

      }}}}}}}}}}}}}}}}}}}}

      And then again ran the previous command but is not showing any md0 device now

      {{{{{{{{{{{{{{{{

      To start again you need to run

      # mdadm –assemble –scan

      }}}}}}}}}}}}}

      mdadm: error opening /dev/md0: No such file or directory

      How do i get rid of md0 and release sda and sdb which i will use for RAID1

      {{{{{{{{{{{{{{

      Before Creating a new RAID setup using Same disk we have to use

      # mdadm –zero-superblock /dev/sda1

      # mdadm –zero-superblock /dev/sdb1

      If we don’t set the zero superblock we will get the said raid setup what we used before.

      }}}}}}}}}}}}}}

      Reply
    • @Melissa tmpfs is a temporary file storage system.
      Using ext4 will not cause any harm. Ext4 file system supports for large size of volumes, files etc. Every Linux, Unix machines have tmpfs to run some process which need to be cached.

      Reply
  29. Hello,

    I have setup raid1 on AWS EC2, and on testing found that its working fine.

    Concern is that I am doing this first time, I dont know how to host my site to work with raid1?

    Thanks in advance.

    Reply
  30. @ venu After Installing Operating system we have to install the mdadm package, Evem we can Configure the RAID while installation time too.

    Reply
  31. Before loading the raid software, we should load the centos operating systems in both the hard disks or only in one disk.

    please suggest me

    Reply

Got something to say? Join the discussion.

Thank you for taking the time to share your thoughts with us. We appreciate your decision to leave a comment and value your contribution to the discussion. It's important to note that we moderate all comments in accordance with our comment policy to ensure a respectful and constructive conversation.

Rest assured that your email address will remain private and will not be published or shared with anyone. We prioritize the privacy and security of our users.