The previous Arch Linux ‘LEMP’ article just covered basic stuff, from installing network services (Nginx, MySQL database and PhpMyAdmin) and configure minimal security required for MySQL server and PhpMyadmin.
This topic it’s strictly related to former Installation of LEMP on Arch Linux and will guide you through setting more complex configurations for LEMP stack, especially Nginx web server configurations, like creating Virtual Hosts, use Password Protected Directories, create and configure HTTP Secure Sockets Layer, HTTP insecure redirects to HTTPS and will also present you some useful Bash scripts that will ease the job on activating Virtual Hosts and generate SSL Certificate and Keys.
Requirements
Install LEMP with MariaDB Database in Arch Linux
Step 1: Enable Virtual Hosts on Nginx
One of the simplest method to enable Virtual Hosts is using include statements on main Nginx configuration file, which makes the job of further configurations more simpler and efficient because you can create simple files for every new host and keep main configuration file cleaner.
This approach works the same way as on Apache Web Server, the first thing you need to do is to specify the new URI path where Nginx should read file directives.
1. So, open nginx.conf main file located on /etc/nginx/ system path and at the bottom, before last curly bracket “}” add the path where future Virtual Host configuration files will reside.
$ sudo nano /etc/nginx/nginx.conf
At bottom add following statement.
include /etc/nginx/sites-enabled/*.conf;
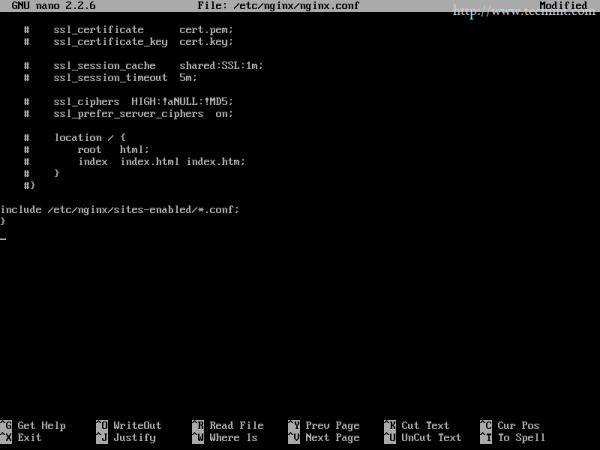
This directive tells Nginx it should read all files that are found in /etc/nginx/sites-enabled/ that ends with a .conf extension.
2. The next step is to create sites-enabled directory and another one, called sites-available, where you store all your Virtual Hosts configuration files.
$ sudo mkdir /etc/nginx/sites-available /etc/nginx/sites-enabled
3. Now it’s time to create a new Virtual Host. This example will use system IP address as Virtual Host Name, so create a new file named name-ip.conf.
sudo nano /etc/nginx/sites-available/name-ip.conf
Add the following content.
## File content ##

server {
    listen 80;
    server_name 192.168.1.33;

    access_log /var/log/nginx/192.168.1.33.access.log;
    error_log /var/log/nginx/192.168.1.33.error.log;

    root /srv/http;
    location / {
    index index.html index.htm index.php;
        autoindex on;
        autoindex_exact_size off;
        autoindex_localtime on;
 }
    location /phpmyadmin {
        rewrite ^/* /phpMyAdmin last;
    }

    location ~ \.php$ {
        #fastcgi_pass 127.0.0.1:9000; (depending on your php-fpm socket configuration)
        fastcgi_pass unix:/run/php-fpm/php-fpm.sock;
        fastcgi_index index.php;
        include fastcgi.conf;
    }
}
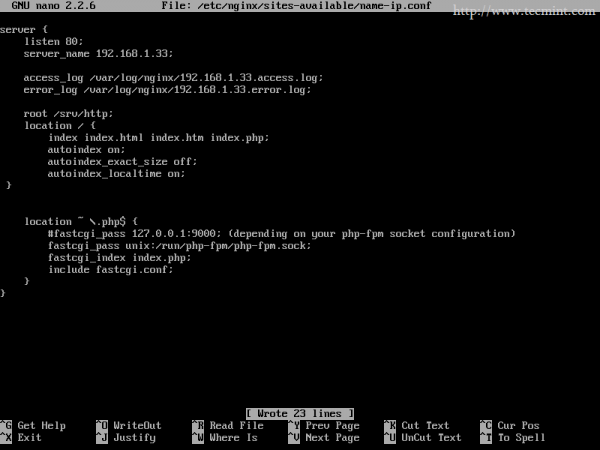
The directive that activates Virtual Host is server_name statement under listening port. Also, another important directive here is root statement that points Nginx Virtual Host to serve file content from /srv/http/ system path.
4. The last step is to create /srv/http/ directory and make name-ip.conf file configuration available for Nginx reading (using symbolic link), then restart daemon to make new configurations visible.
$ sudo mkdir /srv/http/
$ sudo ln -s /etc/nginx/sites-available/name-ip.conf /etc/nginx/sites-enabled/
$ sudo systemctl restart nginx

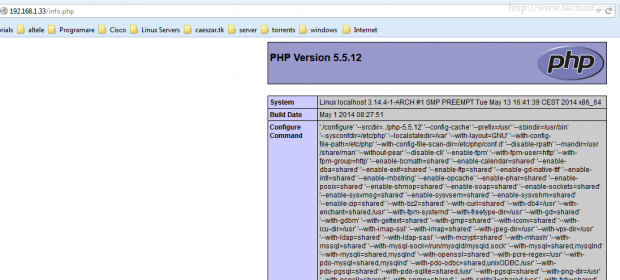
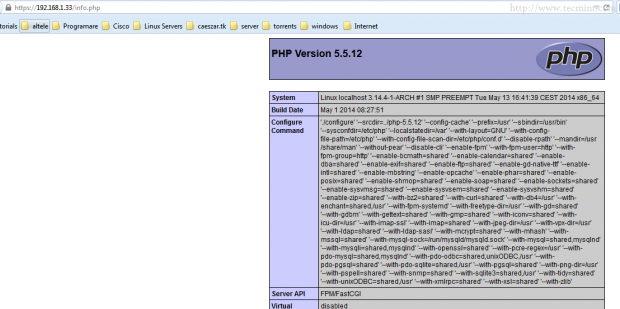
5. To verify it, point your browser to Arch system IP address and you should see that the web content is different from http://localhost. Here I’ve added a small php script that also checks FastCGI PHP configurations like in the screenshot below.
$ sudo nano /srv/http/info.php
## File content ##

<?php
phpinfo();
?>
6. Another method that I have developed myself to enable or disable Virtual Hosts on Nginx is a more elegant one and it’s inspired from Apache a2eniste script.
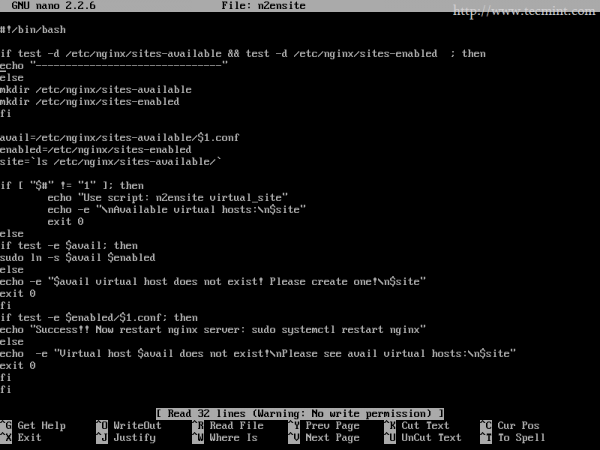
To use this method open a file editor and create a new file, called n2ensite, on your $HOME path with the below content, make it executable, run it with root privileges and pass as an option to your new Virtual Host name without .conf ending ( fill free to modify it according to your needs).
$ sudo nano n2ensite
## File content ##

#!/bin/bash
if test -d /etc/nginx/sites-available && test -d /etc/nginx/sites-enabled  ; then
echo "-----------------------------------------------"
else
mkdir /etc/nginx/sites-available
mkdir /etc/nginx/sites-enabled
fi

avail=/etc/nginx/sites-available/$1.conf
enabled=/etc/nginx/sites-enabled/
site=`ls /etc/nginx/sites-available/`

if [ "$#" != "1" ]; then
                echo "Use script: n2ensite virtual_site"
                echo -e "\nAvailable virtual hosts:\n$site"
                exit 0
else

if test -e $avail; then
sudo ln -s $avail $enabled
else
echo -e "$avail virtual host does not exist! Please create one!\n$site"
exit 0
fi
if test -e $enabled/$1.conf; then
echo "Success!! Now restart nginx server: sudo systemctl restart nginx"
else
echo  -e "Virtual host $avail does not exist!\nPlease see available virtual hosts:\n$site"
exit 0
fi
fi
Make it executable and run it as show.
$ sudo chmod +x n2ensite
$ sudo ./n2ensite your_virtual_host

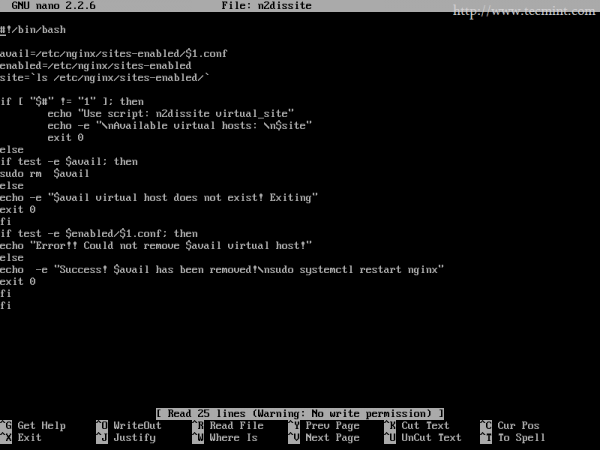
7. To disable Virtual Hosts create a new n2dissite file with the following content and apply the same settings as above.
$ sudo nano n2dissite
## File content ##

#!/bin/bash
avail=/etc/nginx/sites-enabled/$1.conf
enabled=/etc/nginx/sites-enabled
site=`ls /etc/nginx/sites-enabled/`

if [ "$#" != "1" ]; then
                echo "Use script: n2dissite virtual_site"
                echo -e "\nAvailable virtual hosts: \n$site"
                exit 0
else
if test -e $avail; then
sudo rm  $avail
else
echo -e "$avail virtual host does not exist! Exiting!"
exit 0
fi
if test -e $enabled/$1.conf; then
echo "Error!! Could not remove $avail virtual host!"
else
echo  -e "Success! $avail has been removed!\nPlease restart Nginx: sudo systemctl restart nginx"
exit 0
fi
fi
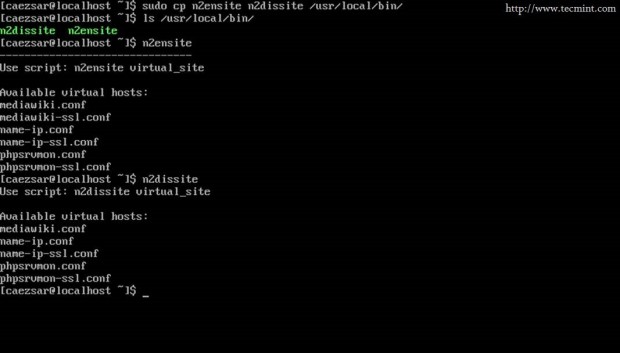
8. Now you can use this two scripts to enable or disable any Virtual Host but if you want to apply it as system wide commands just copy both scripts to /usr/local/bin/ and then you can use it without specifying path.
$ sudo cp n2ensite n2dissite /usr/local/bin/
Step 2: Enable SSL with Virtual Hosts on Nginx
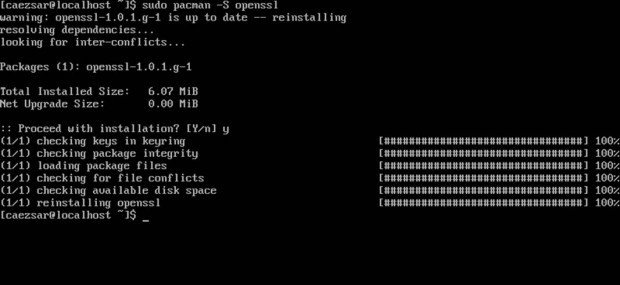
SSL (Secure Sockets Layer) is a protocol designed to encrypt HTTP connections over networks or Internet, which make data flow to be transmitted over a secure channel using symmetric/asymmetric cryptography keys and is provided in Arch Linux by OpenSSL package.
$ sudo pacman -S openssl
9. To enable HTTPS connections with Nginx the first think you need to do is to generate Virtual Hosts keys. Also, to simplify things, I have developed a small scripts that automatically generates cryptographic keys on /etc/nginx/ssl directory path, using Virtual Host naming as key names.
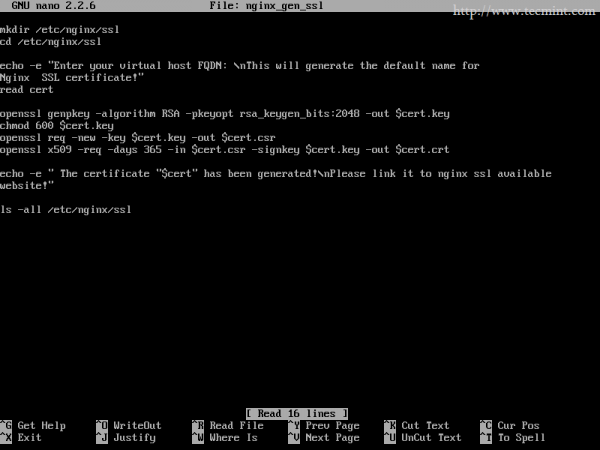
Create a file named nginx_gen_ssl and add the following content.
$ sudo nano nginx_gen_ssl
## File content ##

#!/bin/bash
mkdir /etc/nginx/ssl
cd /etc/nginx/ssl

echo -e "Enter your virtual host FQDN: \nThis will generate the default name for Nginx  SSL certificate!"
read cert

openssl genpkey -algorithm RSA -pkeyopt rsa_keygen_bits:2048 -out $cert.key
chmod 600 $cert.key
openssl req -new -key $cert.key -out $cert.csr
openssl x509 -req -days 365 -in $cert.csr -signkey $cert.key -out $cert.crt

echo -e " The certificate $cert has been generated!\nPlease link it to nginx ssl available website!"
ls -all /etc/nginx/ssl
exit 0
10. After the script has been created append execution permissions, run it and provide your Certificate options, the most important one being Common Name field ( add official domain name here) and leave Password and Optional Company fields blank.
$ sudo chmod +x nginx_gen_ssl
$ sudo ./nginx_gen_ssl


At the end of keys generating task, a listing with all available keys under Nginx ssl directory will be displayed.

Also if you want this script as to be used as a system command, copy or move it to /usr/local/bin/.
$ sudo mv nginx_gen_ssl /usr/local/bin
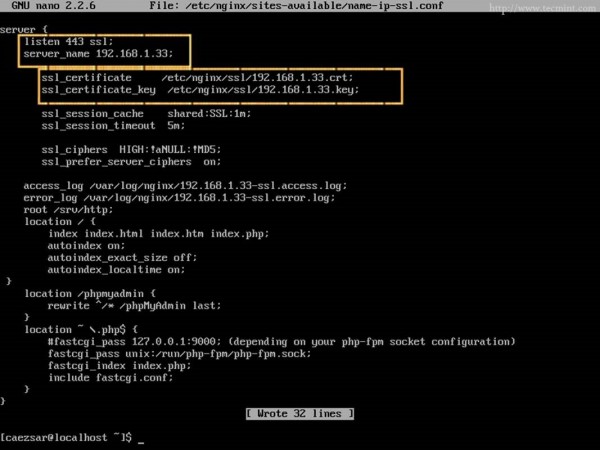
11. After we have generated keys necessary for Nginx SSL Virtual Host it’s time to actually create SSL Virtual Host configuration file. Use the same system IP address for Virtual Host as above on server_name directive but, slightly change the Virtual Host file name by appending ssl before .conf, to remind you that this file stands for name-ip SSL Virtual Host.
$ sudo nano /etc/nginx/sites-availabe/name-ip-ssl.conf
On this file change listen port statement to 443 ssl and provide SSL and certificate key files paths with the ones created earlier to look like in below excerpt.
## File content ##

server {
    listen 443 ssl;
    server_name 192.168.1.33;

       ssl_certificate     /etc/nginx/ssl/192.168.1.33.crt;
       ssl_certificate_key  /etc/nginx/ssl/192.168.1.33.key;

       ssl_session_cache    shared:SSL:1m;
       ssl_session_timeout  5m;

       ssl_ciphers  HIGH:!aNULL:!MD5;
       ssl_prefer_server_ciphers  on;

    access_log /var/log/nginx/192.168.1.33-ssl.access.log;
    error_log /var/log/nginx/192.168.1.33-ssl.error.log;
    root /srv/http;
    location / {
    index index.html index.htm index.php;
        autoindex on;
        autoindex_exact_size off;
        autoindex_localtime on;
 }
    location /phpmyadmin {
        rewrite ^/* /phpMyAdmin last;
    }
    location ~ \.php$ {
        #fastcgi_pass 127.0.0.1:9000; (depending on your php-fpm socket configuration)
        fastcgi_pass unix:/run/php-fpm/php-fpm.sock;
        fastcgi_index index.php;
        include fastcgi.conf;
    }
}
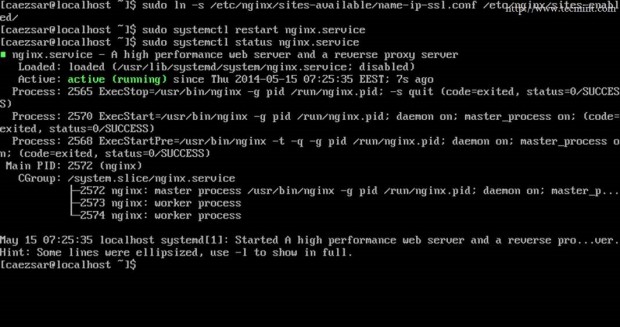
12. After the file has been created use n2ensite script or ln command line to activate it (creates a file symbolic link in sites-enabled directory), then restart Nginx daemon to apply settings.
$ sudo ./n2ensite name-ip-ssl
OR
$ sudo ln -s /etc/nginx/sites-available/name-ip-ssl.conf /etc/nginx/sites-enabled/
$ sudo systemctl restart nginx
13. Again point your browser to Arch IP URL but this time using HTTPS protocol – https://192.168.1.33 on my system- and a Connection Untrusted security error should appear ( Add and Confirm Security Exception to go further on page).
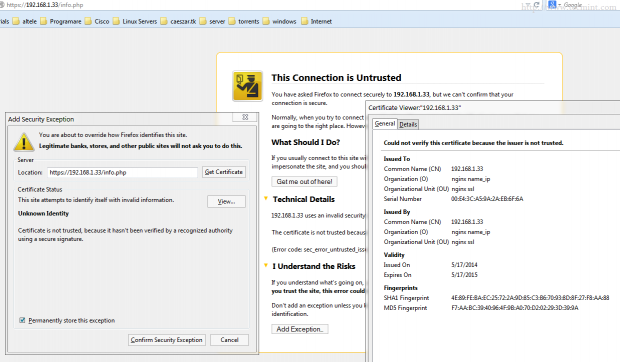

As you can now see your Nginx Virtual Host serves the same content as previous name-ip host but this time using a HTTP secure connection.
Step 3: Access PhpMyAdmin through Virtual Host
If Virtual Host is enabled on Nginx, we no longer have access to http://localhost path contents ( localhost usually serves content using loopback IP address or system IP address if is not otherwise configured) because we have used Arch system IP as server_name so our content path has changed.
14. The simplest method to gain access to PhpMyAdmin through web is to create a symbolic link between /usr/share/webapps/phpMyAdmin/ path and our new defined Virtual Host path (/srv/http).
$ sudo ln -s /usr/share/webapps/phpMyAdmin/ /srv/http/
15. After you executed the above command, refresh your page and you will see a new folder phpMyAdmin appear, if autoindex statement enabled on Nginx Virtual Host or point your URL directly to PhpMyAdmin folder https://arch_IP/phpMyAdmin.
16. If you want to sanitize phpMyAdmin string on browser edit your Virtual Hosts files and add the following content under server block.
location /phpmyadmin {
       rewrite ^/* /phpMyAdmin last;
    }

Step 4: Enable Password Protected Directory on Nginx
Unlike Apache, Nginx uses HttpAuthBasic module to enable Password Protected Directories but doesn’t provide any tools to create an encrypted .htpasswd file.
17. To achieve directory password protection with Nginx on Arch Linux install Apache web server and use its tools to generate an encrypted .htaccess file.
$ sudo pacman -S apache
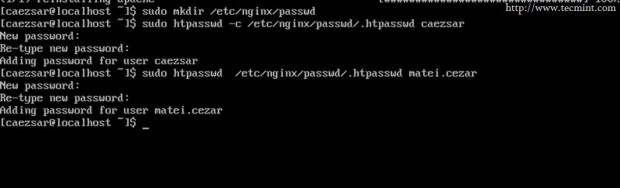
18. After you have installed Apache create a new directory under /etc/nginx/ named intuitively passwd where .htpasswd file will be stored and use htpasswd command with –c switch on first added user to generate file, then if you want to add more users use htpasswd without –c switch.
$ sudo mkdir /etc/nginx/passwd

$ sudo htpasswd -c /etc/nginx/passwd/.htpasswd first_user
$ sudo htpasswd /etc/nginx/passwd/.htpasswd second_user
$ sudo htpasswd /etc/nginx/passwd/.htpasswd third_user
19. In order to protect name-ip-ssl Virtual Host root /srv/http/ served path with all its sub folders and files beneath it add the following instructions inside your Virtual Host server block under root directive and point it to absolute .htpasswd file path.
auth_basic "Restricted Website";
auth_basic_user_file /etc/nginx/passwd/.htpasswd;

20. After you restart Nginx service, refresh page and an Authentication Required popup should appear demanding for your credentials.

Now you have successfully enabled Nginx Password Protected Directories but be aware that the same time Apache web server is installed in your system so make sure that it stays disabled and by any means do not start it because can lead to ports conflicting with Nginx.
Step 5: Redirect HTTP to HTTPS on Nginx
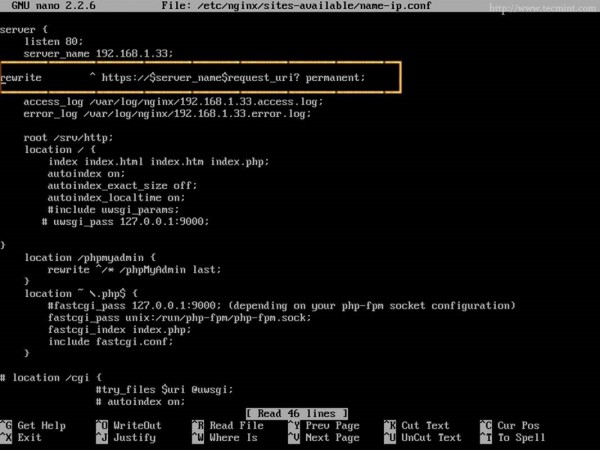
21. If you like for browsers to automatically redirect all insecure HTTP requests to HTTPS protocol open and edit you’re non-ssl Virtual Host and add the following instruction under server_name directive.
rewrite ^ https://$server_name$request_uri? permanent;
All of settings presented on this article where made under an Arch Linux system that acts as a server, but most of them, especially those regarding Nginx configurations files, are available on most of Linux systems with slightly differences.

Install Apache just to encrypt passwords? lolwut? Just use OpenSSL with the command “openssl passwd -apr1”. OpenSSL should be installed on almost all servers.
Cheers, that was a very helpful article. Particularly the scripts.