Improving your server security should be one of your top priorities when it comes to managing a linux server. By reviewing your server logs, you may often find different attempts for brute force login, web floods, exploit seeking and many others.
With an intrusion prevention software such as fail2ban, you can examine your server logs and add extra iptables rules to block problematic IP addresses.
Read Also: How to Install Fail2Ban to Protect SSH on CentOS/RHEL 8
This tutorial will show you how to install fail2ban and setup basic configuration to protect your Linux system from brute-force attacks.
Requirements
Fail2ban is written in python and the only requirement is to have python installed:
- Fail2ban branch 0.9.x requires Python >=2.6 or Python >=3.2
- Fail2ban branch 0.8.x requires Python >=2.4
- Root access to your system
- Optionally, iptables or showewall and sendmail
How to Install Fail2Ban in Linux Systems
Installation of fail2ban is relatively easy:
Install Fail2Ban on CentOS/RHEL
First, update your packages, enable the Epel repository and install fail2ban as shown.
# yum update
# yum install epel-release
# yum install fail2ban
Install Fail2Ban on Debian/Ubuntu
First, update your packages and install fail2ban as shown.
# apt-get update && apt-get upgrade -y
# apt-get install fail2ban
Optionally, if you wish to enable mail support (for mail notifications), you can install sendmail.
# yum install sendmail                   [On CentOS/RHEL]
# apt-get install sendmail-bin sendmail  [On Debian/Ubuntu]
To enable fail2ban and sendmail use the following commands:
# systemctl start fail2ban
# systemctl enable fail2ban
# systemctl start sendmail
# systemctl enable sendmail
How to Configure Fail2ban in Linux Systems
By default, fail2ban uses the .conf files located in /etc/fail2ban/ which are read first. However, those can be overridden by .local files located in the same directory.
Thus, the .local file does not need to include all settings from the .conf file, but only the ones you wish to override. Changes should be made in the .local files, not in the .conf. This will prevent overwriting changes when upgrading the fail2ban packet.
For the purpose of this tutorial, we will copy the existing fail2ban.conf file to fail2ban.local.
# cp /etc/fail2ban/fail2ban.conf /etc/fail2ban/fail2ban.local
Now you can make the changes in the .local file by using your favorite text editor. The values you can edit are:
- loglevel – this is the level of detail to be logged. Possible options are:
- CRITICAL
- ERROR
- WARNING
- NOTICE
- INFO
- DEBUG
- logtarget – log the actions in a specific file. The default value is /var/log/fail2ban.log. You can, however, change this to:
- STDOUT – output any data
- STDERR – output any errors
- SYSLOG – message-based logging
- File – output to a file
- socket – directory in which socket file will be placed.
- pidfile – location of the pidfile.
Configure Fail2ban jail.local
One of the most important files in fail2ban is jail.conf which defines your jails. This is where you define the services for which fail2ban should be enabled.
As we mentioned earlier .conf files can be altered during upgrades, thus you should create a jail.local file where you can apply your modifications.
Another way to do this is to simply copy the .conf file with:
# cp /etc/fail2ban/jail.conf /etc/fail2ban/jail.local
In case you are using CentOS or Fedora, you will need to change the backend in jail.local from “auto” to “systemd”.
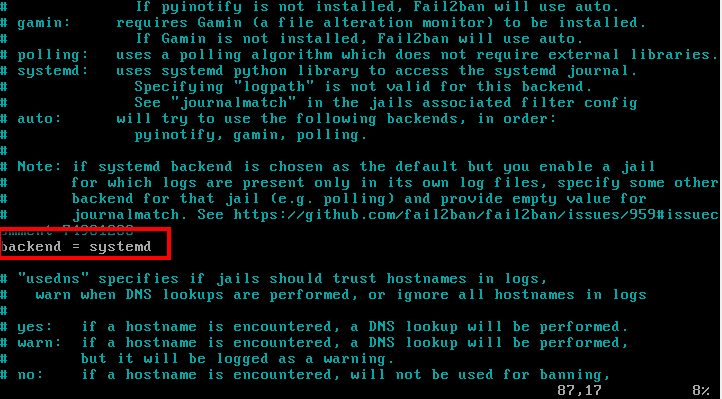
If you are using Ubuntu/Debian, there is no need to make this modification, even though they too use systemd.
The jail file will enable SSH by default for Debian and Ubuntu, but not on CentOS. If you wish to enable it, simply change the following line in /etc/fail2ban/jail.local:
[sshd]
enabled = true
Ban and Retry Times
You can configure the circumstance after which an IP address is blocked. For that purpose, fail2ban uses bantime, findtime and maxretry.
- bantime – this is the number of seconds that an IP address will remain banned (default 10 min).
- findtime – the amount of time between login attempts, before the host is banned. (default 10 min). In other words, if fail2ban is set to block an IP address after 3 failed login attempts, those 3 attempts, must be done within the findtime period (10 mins).
- maxretry – number of attempts to be made before a ban is applied. (default 3).
Whitelist IP Address
Of course, you will want to whitelist certain IP addresses. To configure such IP addresses open /etc/fail2ban/jail.local with your favorite text editor and uncomment the following line:
ignoreip = 127.0.0.1/8 ::1
Then, you can put the IP addresses that you want to be ignored. IP addresses should be separated from space or comma.
Email Alerts
If you wish to receive mail alerts upon the event, you will have to configure the following settings in /etc/fail2ban/jail.local:
- destemail – mail address, where you will receive the notification.
- Sendername – the sender that you will see when receiving the message.
- sender – email address from which fail2ban will send the emails.
The default mta (mail transfer agent) is set to sendmail.
In order to receive mail notifications, you will also need to change the “action” setting from:
Action = %(action_)s
To one of these:
action = %(action_mw)s
action = %(action_mwl)s
- %(action_mw)s – will ban the host and send a mail with a whois report.
- %(action_mwl)s – will ban the host, provide whois info and all relevant information from the log file.
Additional Fail2ban Jail Configuration
So far we have looked at the basic configuration options. If you wish to configure a jail you will need to enable it in the jail.local file. The syntax is pretty simple:
[jail_to_enable]
. . .
enabled = true
Where you should replace jail_to_enable with the actual jail, for example, “sshd”. In the jail.local file, the following values will be predefined for ssh service:
[sshd]

port = ssh
logpath = %(sshd_log)s
You can enable filter which will help identify if a line in the log is a failed one. The filter value is actually a reference to a file with the service name followed by .conf. For example: /etc/fail2ban/filter.d/sshd.conf.
The syntax is:
filter = service
For example:
filter = sshd
You can review the existing filters in the following directory: /etc/fail2ban/filter.d/.
Use fail2ban-client
Fail2ban comes with a client that can be used for reviewing and changing the current configuration. Since it provides many options, you can go through its manual with:
# man fail2ban-client
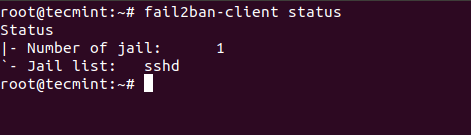
Here you will see some of the basic commands you can use. To review the current status of fail2ban or for specific jail, you can use:
# fail2ban-client status
The result will look similar to this:
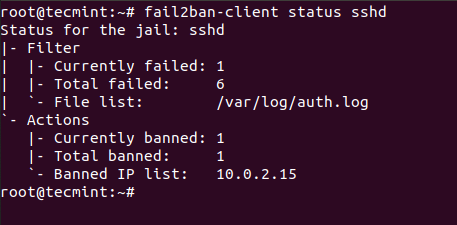
For individual jail, you can run:
# fail2ban-client status sshd
In the screenshot below, you will see that I have purposely failed multiple logins so fail2ban can block the IP address from which I was trying to connect:
Conclusion
Fail2ban is an excellent, well-documented intrusion prevention system, that provides extra security to your Linux system. It requires some time to get used to its setup and syntax, but once you familiarize yourself with it, you will feel free to change and extend its rules.


fail2ban is outstanding. But why isn’t there a common networked database of fail2ban up addresses that indicate chronically problematic IP addresses? Like a common block list. It seems this is such an obvious next step, or perhaps this is available as a separate package???
Good evening,
I have a web application (using port 80) and I would like to secure it, HLP using fail2ban-client status httpd (there’s nothing)
Os: centos 6.10
thank you in advance
For performance reasons it is far better to use ipset in-conjunction with iptables.
Then set cron to periodical save said list.
You will have to manual fake a service to get ipset to load on startup.
I just installed Fail2ban, but I type these commands on command line, no message shows to me, and # iptables -L no infomation related to Fail2ban
Chain INPUT (policy ACCEPT)
target prot opt source destination
Chain FORWARD (policy ACCEPT)
target prot opt source destination
Chain OUTPUT (policy ACCEPT)
target prot opt source destination
Am I missing something?
@Jerry,
On which Linux distribution you’ve installed Fail2ban? did you see failed login attempts in /var/log/secure file with the help of following command.
If you see failed login attempts, then it means your Fail2ban working properly..
I just want to allow following ports and deny all:
22
80
443
5060
How can I do that?
@Shahid,
In fail2ban jail.conf file, there is already a default configuration for SSH, use this example to open ports as per your requirements or you can use iptables firewall to open these ports as:
hi, after run yum: yum install fail2ban. I get message:
No package fail2ban available.
How can i continue?
thanks
@Bien,
Which OS distro you using?
You have to enable EPEL repo
https://www.tecmint.com/how-to-enable-epel-repository-for-rhel-centos-6-5/
(Not sure if my post went through first time – noscript and didn’t see anything about moderation. So if it did go through I apologise; please remove it if so).
fail2ban is NOT an intrusion prevention system. It monitors log files so technically a breach could have already occurred. Unlikely you suggest? Well, unlikely does not mean impossible. Fact of life. It could be argued that it helps prevent brute force but only if configured properly and only if you are lucky enough.
But I’ll argue this instead: there is no such thing as an intrusion prevention system. There will always be someone who can better you. Always. You can only make it as secure as possible for your skill level but do not ever rely on software or ANYTHING by itself (key words) or else you’re bound to be disappointed, very disappointed indeed.
Secondly, as for the command:
cat /var/log/secure | grep ‘Failed password’ | sort | uniq -c
Welcome to the useless use of cat award. I would also wonder why sort and uniq (at least as is, and see end of post too). Sure, the sort makes it adjacent for uniq to work, and sure the count is all fine, (but see below) but here’s the thing: even if a failed password attempt happened at the same second (so same yyyy/mm/dd hh:mm:ss) the problem is that each connection has its on PID. So for instance, the part where you see:
sshd[19079]
the number between the brackets is the PID of the spawned session. (Also, observe the port portion; that is because of the way networking works and therefore it is going to vary so another thing to keep in mind). Also, in this case, there is no hypothetical situation where the PID is going to be the same as it is the same second. So while yes, it will show you the count, it will be the total even for the same IP (and the total will need to be calculated by you by addition). Now maybe you want that but I’m just informing you in case.
Tips:
cat file | grep ‘whatever’ should just be grep ‘whatever’ file because grep (like most Unix – and its derivatives – utilities, they read files because everything in Unix is a file, even the console input, output and error (stdin, stdout, stderr)!). So that part should be:
grep ‘Failed password’ /var/log/secure
Also: many utilities will read from ‘-‘. (without the ‘s). I suggest you look at the man pages or even –help output of utilities. Examples include cat and grep.
If you wanted to just see how many failed passwords (total), just do:
grep -c ‘Failed password’ /var/log/secure
(notwithstanding log rotation).
Contrast the grep -c to grep | wc -l (which is a useless use of wc)
Please don’t take this to be offensive, I’m just pointing out the mistakes to help others (and alert them to the fallacy of fail2ban preventing intrusion and more than that that there is such a thing) as well as hoping you can learn too. If you’re curious what I mean about useless use, look up the useless use of cat award (via a search engine). Also, one more tip (sort of, sorry for the pun): you can with more advanced command lines strip the pid, the port, and in general only show certain sections. So you could for instance make it so the only part of the line that is visible is the IP then sort and count. Example:
grep ‘Failed password’ /var/log/secure |cut -d’ ‘ -f12|sort |uniq -c
… and that could be improved upon …
but would show you lines in the form of:
count IP
Oh, in case html shows it wrong, the – is the option prefix (minus sign) to the commands. So it may appear wrong. Same goes for the ‘ which is the apostrophe (could also in this case be fine with “s).
Cheers.
by default all output is going to the screen in CentOS 6.3 .
Very annoying.
Is there anyway to change that?
The setting says syslog, but i cannot work normally because of the output to screen.
Thanks for the usefull guide!
I would be interested in permanent blocking options.