A couple of months ago, the Linux Foundation announced the LFCS (Linux Foundation Certified Sysadmin) certification, an exciting new program whose aim is allowing individuals from all ends of the world to get certified in performing basic to intermediate system administration tasks on Linux systems. This includes supporting already running systems and services, along with first-hand problem-finding and analysis, plus the ability to decide when to raise issues to engineering teams.

The following video describes an brief introduction to The Linux Foundation Certification Program.
This post is Part 7 of a 10-tutorial series, here in this part, we will explain how to Manage Linux System Startup Process and Services, that are required for the LFCS certification exam.
Managing the Linux Startup Process
The boot process of a Linux system consists of several phases, each represented by a different component. The following diagram briefly summarizes the boot process and shows all the main components involved.

When you press the Power button on your machine, the firmware that is stored in a EEPROM chip in the motherboard initializes the POST (Power-On Self Test) to check on the state of the system’s hardware resources. When the POST is finished, the firmware then searches and loads the 1st stage boot loader, located in the MBR or in the EFI partition of the first available disk, and gives control to it.
MBR Method
The MBR is located in the first sector of the disk marked as bootable in the BIOS settings and is 512 bytes in size.
- First 446 bytes: The bootloader contains both executable code and error message text.
- Next 64 bytes: The Partition table contains a record for each of four partitions (primary or extended). Among other things, each record indicates the status (active / not active), size, and start / end sectors of each partition.
- Last 2 bytes: The magic number serves as a validation check of the MBR.
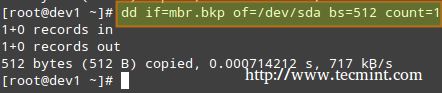
The following command performs a backup of the MBR (in this example, /dev/sda is the first hard disk). The resulting file, mbr.bkp can come in handy should the partition table become corrupt, for example, rendering the system unbootable.
Of course, in order to use it later if the need arises, we will need to save it and store it somewhere else (like a USB drive, for example). That file will help us restore the MBR and will get us going once again if and only if we do not change the hard drive layout in the meanwhile.
Backup MBR
# dd if=/dev/sda of=mbr.bkp bs=512 count=1

Restoring MBR
# dd if=mbr.bkp of=/dev/sda bs=512 count=1
EFI/UEFI Method
For systems using the EFI/UEFI method, the UEFI firmware reads its settings to determine which UEFI application is to be launched and from where (i.e., in which disk and partition the EFI partition is located).
Next, the 2nd stage boot loader (aka boot manager) is loaded and run. GRUB [GRand Unified Boot] is the most frequently used boot manager in Linux. One of two distinct versions can be found on most systems used today.
- GRUB legacy configuration file: /boot/grub/menu.lst (older distributions, not supported by EFI/UEFI firmwares).
- GRUB2 configuration file: most likely, /etc/default/grub.
Although the objectives of the LFCS exam do not explicitly request knowledge about GRUB internals, if you’re brave and can afford to mess up your system (you may want to try it first on a virtual machine, just in case), you need to run.
# update-grub
As root after modifying GRUB’s configuration in order to apply the changes.
Basically, GRUB loads the default kernel and the initrd or initramfs image. In few words, initrd or initramfs help to perform the hardware detection, the kernel module loading and the device discovery necessary to get the real root filesystem mounted.
Once the real root filesystem is up, the kernel executes the system and service manager (init or systemd, whose process identification or PID is always 1) to begin the normal user-space boot process in order to present a user interface.
Both init and systemd are daemons (background processes) that manage other daemons, as the first service to start (during boot) and the last service to terminate (during shutdown).

Starting Services (SysVinit)
The concept of runlevels in Linux specifies different ways to use a system by controlling which services are running. In other words, a runlevel controls what tasks can be accomplished in the current execution state = runlevel (and which ones cannot).
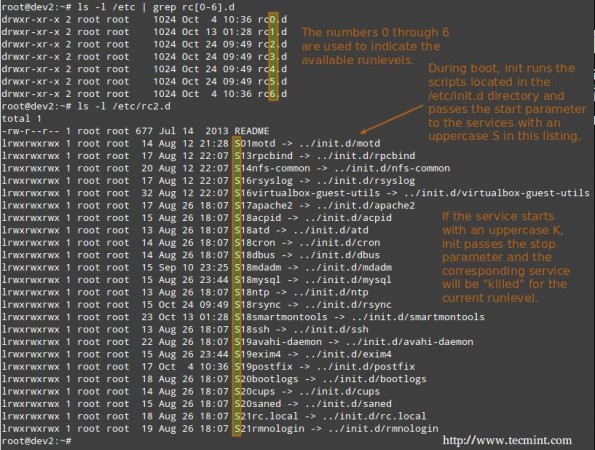
Traditionally, this startup process was performed based on conventions that originated with System V UNIX, with the system passing executing collections of scripts that start and stop services as the machine entered a specific runlevel (which, in other words, is a different mode of running the system).
Within each runlevel, individual services can be set to run, or to be shut down if running. Latest versions of some major distributions are moving away from the System V standard in favour of a rather new service and system manager called systemd (which stands for system daemon), but usually support sysv commands for compatibility purposes. This means that you can run most of the well-known sysv init tools in a systemd-based distribution.
Read Also: Why ‘systemd’ replaces ‘init’ in Linux
Besides starting the system process, init looks to the /etc/inittab file to decide what runlevel must be entered.
| Runlevel | Description |
| 0 | Halt the system. Runlevel 0 is a special transitional state used to shutdown the system quickly. |
| 1 | Also aliased to s, or S, this runlevel is sometimes called maintenance mode. What services, if any, are started at this runlevel varies by distribution. It’s typically used for low-level system maintenance that may be impaired by normal system operation. |
| 2 | Multiuser. On Debian systems and derivatives, this is the default runlevel, and includes -if available- a graphical login. On Red-Hat based systems, this is multiuser mode without networking. |
| 3 | On Red-Hat based systems, this is the default multiuser mode, which runs everything except the graphical environment. This runlevel and levels 4 and 5 usually are not used on Debian-based systems. |
| 4 | Typically unused by default and therefore available for customization. |
| 5 | On Red-Hat based systems, full multiuser mode with GUI login. This runlevel is like level 3, but with a GUI login available. |
| 6 | Reboot the system. |
To switch between runlevels, we can simply issue a runlevel change using the init command: init N (where N is one of the runlevels listed above). Please note that this is not the recommended way of taking a running system to a different runlevel because it gives no warning to existing logged-in users (thus causing them to lose work and processes to terminate abnormally).
Instead, the shutdown command should be used to restart the system (which first sends a warning message to all logged-in users and blocks any further logins; it then signals init to switch runlevels); however, the default runlevel (the one the system will boot to) must be edited in the /etc/inittab file first.
For that reason, follow these steps to properly switch between runlevels, As root, look for the following line in /etc/inittab.
id:2:initdefault:
and change the number 2 for the desired runlevel with your preferred text editor, such as vim (described in How to use vi/vim editor in Linux – Part 2 of this series).
Next, run as root.
# shutdown -r now
That last command will restart the system, causing it to start in the specified runlevel during next boot, and will run the scripts located in the /etc/rc[runlevel].d directory in order to decide which services should be started and which ones should not. For example, for runlevel 2 in the following system.
Manage Services using chkconfig
To enable or disable system services on boot, we will use chkconfig command in CentOS / openSUSE and sysv-rc-conf in Debian and derivatives. This tool can also show us what is the preconfigured state of a service for a particular runlevel.
Read Also: How to Stop and Disable Unwanted Services in Linux
Listing the runlevel configuration for a service.
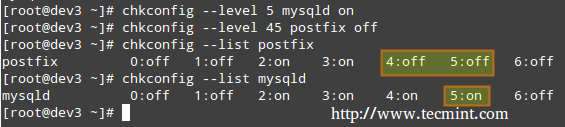
# chkconfig --list [service name]
# chkconfig --list postfix
# chkconfig --list mysqld

In the above image we can see that postfix is set to start when the system enters runlevels 2 through 5, whereas mysqld will be running by default for runlevels 2 through 4. Now suppose that this is not the expected behaviour.
For example, we need to turn on mysqld for runlevel 5 as well, and turn off postfix for runlevels 4 and 5. Here’s what we would do in each case (run the following commands as root).
Enabling a service for a particular runlevel
# chkconfig --level [level(s)] service on
# chkconfig --level 5 mysqld on
Disabling a service for particular runlevels
# chkconfig --level [level(s)] service off
# chkconfig --level 45 postfix off
We will now perform similar tasks in a Debian-based system using sysv-rc-conf.
Manage Services using sysv-rc-conf
Configuring a service to start automatically on a specific runlevel and prevent it from starting on all others.
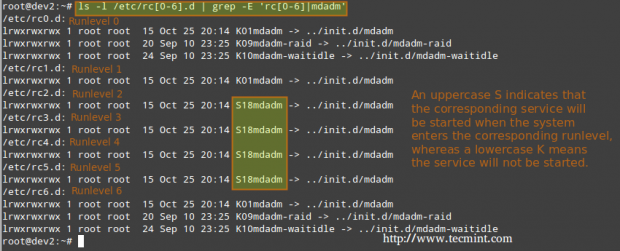
1. Let’s use the following command to see what are the runlevels where mdadm is configured to start.
# ls -l /etc/rc[0-6].d | grep -E 'rc[0-6]|mdadm'
2. We will use sysv-rc-conf to prevent mdadm from starting on all runlevels except 2. Just check or uncheck (with the space bar) as desired (you can move up, down, left, and right with the arrow keys).
# sysv-rc-conf
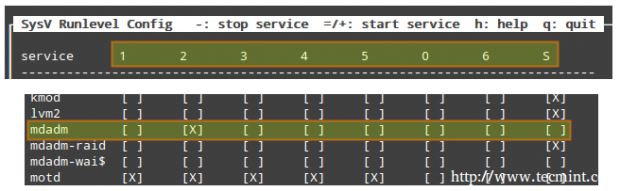
Then press q to quit.
3. We will restart the system and run again the command from STEP 1.
# ls -l /etc/rc[0-6].d | grep -E 'rc[0-6]|mdadm'
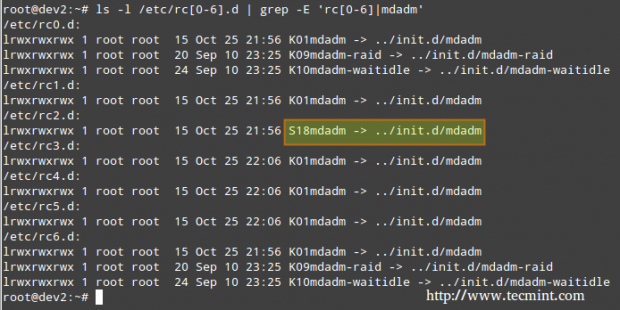
In the above image we can see that mdadm is configured to start only on runlevel 2.
What About systemd?
systemd is another service and system manager that is being adopted by several major Linux distributions. It aims to allow more processing to be done in parallel during system startup (unlike sysvinit, which always tends to be slower because it starts processes one at a time, checks whether one depends on another, and waits for daemons to launch so more services can start), and to serve as a dynamic resource management to a running system.
Thus, services are started when needed (to avoid consuming system resources) instead of being launched without a solid reason during boot.
Viewing the status of all the processes running on your system, both systemd native and SysV services, run the following command.
# systemctl
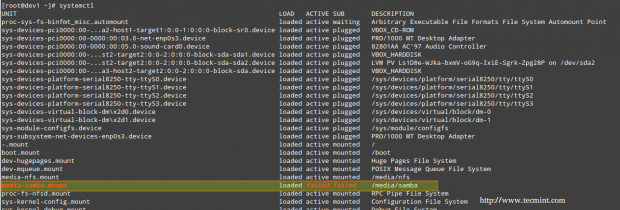
The LOAD column shows whether the unit definition (refer to the UNIT column, which shows the service or anything maintained by systemd) was properly loaded, while the ACTIVE and SUB columns show the current status of such unit.
Displaying information about the current status of a service
When the ACTIVE column indicates that an unit’s status is other than active, we can check what happened using.
# systemctl status [unit]
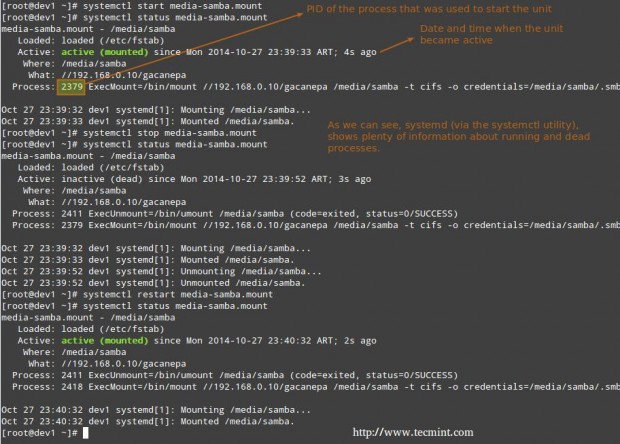
For example, in the image above, media-samba.mount is in failed state. Let’s run.
# systemctl status media-samba.mount
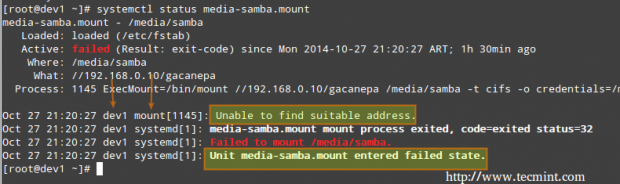
We can see that media-samba.mount failed because the mount process on host dev1 was unable to find the network share at //192.168.0.10/gacanepa.
Starting or Stopping Services
Once the network share //192.168.0.10/gacanepa becomes available, let’s try to start, then stop, and finally restart the unit media-samba.mount. After performing each action, let’s run systemctl status media-samba.mount to check on its status.
# systemctl start media-samba.mount
# systemctl status media-samba.mount
# systemctl stop media-samba.mount
# systemctl restart media-samba.mount
# systemctl status media-samba.mount
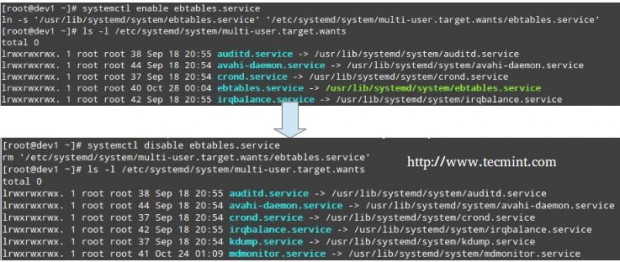
Enabling or disabling a service to start during boot
Under systemd you can enable or disable a service when it boots.
# systemctl enable [service] 		# enable a service
# systemctl disable [service] 		# prevent a service from starting at boot
The process of enabling or disabling a service to start automatically on boot consists in adding or removing symbolic links in the /etc/systemd/system/multi-user.target.wants directory.
Alternatively, you can find out a service’s current status (enabled or disabled) with the command.
# systemctl is-enabled [service]
For example,
# systemctl is-enabled postfix.service
In addition, you can reboot or shutdown the system with.
# systemctl reboot
# systemctl shutdown
Upstart
Upstart is an event-based replacement for the /sbin/init daemon and was born out of the need for starting services only, when they are needed (also supervising them while they are running), and handling events as they occur, thus surpassing the classic, dependency-based sysvinit system.
It was originally developed for the Ubuntu distribution, but is used in Red Hat Enterprise Linux 6.0. Though it was intended to be suitable for deployment in all Linux distributions as a replacement for sysvinit, in time it was overshadowed by systemd. On February 14, 2014, Mark Shuttleworth (founder of Canonical Ltd.) announced that future releases of Ubuntu would use systemd as the default init daemon.
Because the SysV startup script for system has been so common for so long, a large number of software packages include SysV startup scripts. To accommodate such packages, Upstart provides a compatibility mode: It runs SysV startup scripts in the usual locations (/etc/rc.d/rc?.d, /etc/init.d/rc?.d, /etc/rc?.d, or a similar location). Thus, if we install a package that doesn’t yet include an Upstart configuration script, it should still launch in the usual way.
Furthermore, if we have installed utilities such as chkconfig, you should be able to use them to manage your SysV-based services just as we would on sysvinit based systems.
Upstart scripts also support starting or stopping services based on a wider variety of actions than do SysV startup scripts; for example, Upstart can launch a service whenever a particular hardware device is attached.
A system that uses Upstart and its native scripts exclusively replaces the /etc/inittab file and the runlevel-specific SysV startup script directories with .conf scripts in the /etc/init directory.
These *.conf scripts (also known as job definitions) generally consists of the following:
- Description of the process.
- Runlevels where the process should run or events that should trigger it.
- Runlevels where process should be stopped or events that should stop it.
- Options.
- Command to launch the process.
For example,
# My test service - Upstart script demo description "Here goes the description of 'My test service'" author "Dave Null <[email protected]>"
# Stanzas

#
# Stanzas define when and how a process is started and stopped
# See a list of stanzas here: http://upstart.ubuntu.com/wiki/Stanzas#respawn
# When to start the service
start on runlevel [2345]
# When to stop the service
stop on runlevel [016]
# Automatically restart process in case of crash
respawn
# Specify working directory
chdir /home/dave/myfiles
# Specify the process/command (add arguments if needed) to run
exec bash backup.sh arg1 arg2
To apply changes, you will need to tell upstart to reload its configuration.
# initctl reload-configuration
Then start your job by typing the following command.
$ sudo start yourjobname
Where yourjobname is the name of the job that was added earlier with the yourjobname.conf script.
A more complete and detailed reference guide for Upstart is available in the project’s web site under the menu “Cookbook”.
Summary
A knowledge of the Linux boot process is necessary to help you with troubleshooting tasks as well as with adapting the computer’s performance and running services to your needs.
In this article we have analyzed what happens from the moment when you press the Power switch to turn on the machine until you get a fully operational user interface. I hope you have learned reading it as much as I did while putting it together. Feel free to leave your comments or questions below. We always look forward to hearing from our readers!


Excellent article, very well done, Gabriel.
You hit this thing out of the park with your perfect explanations just when I started to have a question. Well written and explained.
Hi, First of thank you for the perfect guide. I would like to know instead of SysVinit, can we use systemd in exam? If yes how can we change runlevel with systemctl? Thank you for reading
Hi, First of all thank you for the perfect guide. I would like to know instead of SysVinit, can we use systemd in exam? If yes how can we change runlevel with systemctl? Thank you for reading
Hi Agil, as you can see in point “101.2 Boot the system” of Exam 101 Objetives Version 4.0, both, SysVinit and systemd are included.
And here you are a table of equivalences: http://mamchenkov.net/wordpress/wp-content/uploads/2011/11/services-500×196.png
Also, please refer to this link: https://fedoraproject.org/wiki/Systemd#How_do_I_change_the_target_.28runlevel.29.3F (How do I change the target (runlevel)? )
Superb, Gabriel. I’ll pass your post.
Best regards from Spain.
and my question is what about /sbin/init/ in systemd does it replaced?
Great Job guys thank you
Excellent!!
@Freddy,
Thank you for your comment! Please spread the word!
@Baloshi,
I take it you’re referring to 14.04, and yes, you are correct. Inittab has been replaced by /etc/init/rc-sysinit.conf in that version.
hey…you people are awesome…i just want to correct that latest Debian and Ubuntu System don’t have inittab configuration file….its been replaced by /etc/init/rc-sysinit.conf
plz correct it
Thank you.