Testing the Bond Configuration
Once all the changes to this file have been made, be sure to save those changes. At this point all of the network interfaces should be brought down and then the bond interface should be brought up.
PLEASE NOTE: if the device is being configured vis SSH/telnet or some other remote network protocol, these commands will likely terminate the session. If the interfaces file isn’t configured properly, the administrator may not be able to remote back into the system to fix the issue! The task of bringing up the bond is easily accomplished with a series of commands; ‘ifdown‘ and ‘ifup‘.
- ifdown eth0 eth1 – This will bring both network interfaces down.
- ifup bond0 – This will tell the system to bring the bond0 interface on-line and subsequently also bring up eth0 and eth1 as slaves to the bond0 interfaces
If all goes according to plan the system should bring eth0 and eth1 down and then bring up bond0. By bringing up bond0, eth0 and eth1 will be reactivated and made to be members of the active-backup NIC team created in the interfaces file earlier. This can be confirmed one of two ways:
1. ifconfig – This utility will show all of the currently active network interfaces
# ifconfig
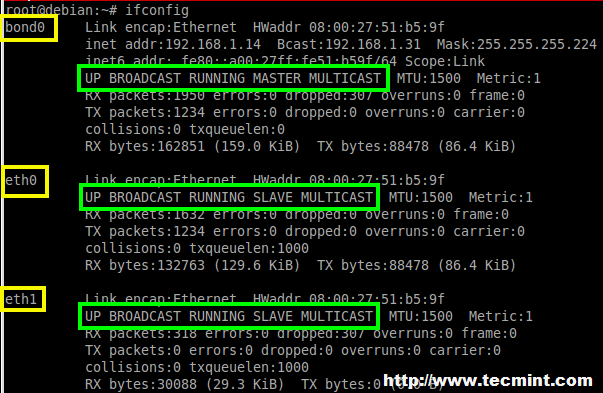
2. This will show pertinent information about the bond mode and the associated interfaces.
# cat /proc/net/bonding/bond0
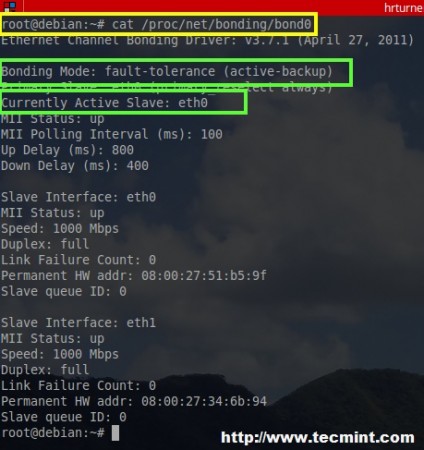
From the output here, it can be determined that this bonded interface is indeed up an running and working in the appropriate mode as configured in the network interfaces file. At this point the bond will have an IP address and be accessible across the network. It is always a good idea however to verify that fail-over does happen in the event that one of the links in the bond goes down.
The easiest way to see if this happens is to watch the syslog file when the currently active interface is disconnected.
# tail -f /var/log/syslog
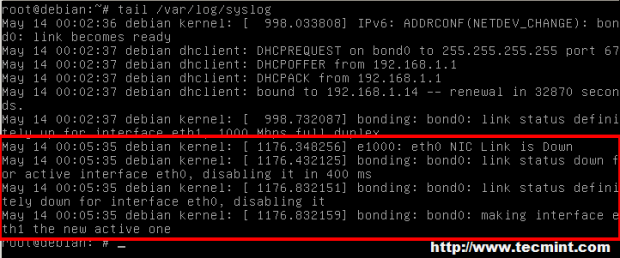
The red highlighting shows the messages reported by the kernel about the status of the bond0 link. Originally the bond was using eth0 as the primary interface but when the network cable was disconnected, the bond had to determine the link was indeed down, then wait the configured 400 ms to completely disable the interface, and then bring one of the other slave interfaces up to handle traffic (eth1 in this example). This can be confirmed again by viewing the status of the bond with the following command:
# cat /proc/net/bonding/bond0
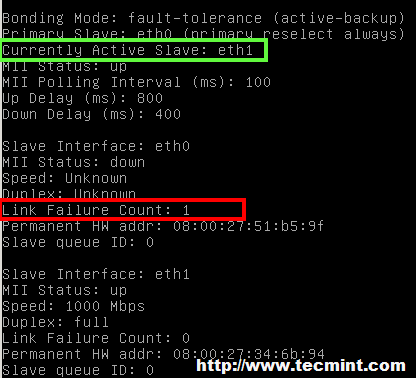
This output shows that eth0 has had a link failure and the bonding module corrected the problem by bringing the eth1 slaved interface on-line to continue handling the traffic for the bond.
At this point the bond is functioning in an active-backup state as was configured! While this particular guide only went through active-backup teaming, the other methods are very simple to configure as well but will require different parameters depending on which bonding method is chosen. Remember though that of the six bond options available, bond mode 4 will require special configuration on the switches that the particular system is connected.
For more information about the other bond modes please feel free to ask questions below or reference Kernel.org’s bonding documentation at the following URL:
Reference Links: https://www.kernel.org/doc/Documentation/networking/bonding.txt


bonding is not the same as teaming
Jester,
Can you please explain the difference between the two?
This doesn’t seem to work, when the 2 links are up,
bond0will show the IP address of the first card. If I remove the cable, the logs indeed showeth1being assigned as active, however it won’t get a new IP address therefore you can’t ping it.In your interfaces declaration you don’t specify what to do with eth0 and eth1 themselves.
it is not necessary to load the kernel module, the system will load it as it sees bond* stanza in /etc/network/interfaces
you should install ifenslave and no more ifenslave-2.6
regards
Outdated. Ifenslave isn’t even part of debian anymore.
Not exactly sure what you mean by this but according to the ifenslave package on Debian’s site, ifenslave is still very active and is in Jessie (newest release), Stretch (next release), and Sid (testing) currently.
For your reference: https://packages.debian.org/search?keywords=ifenslave
can you read up on teaming it is not the same as bonding