We continue the PyGObject programming series with you on the Linux desktop, in the 4th part of the series we’ll explain how to package the programs and applications that we created for the Linux desktop using PyGObject as a Debian package.
Debian packages (.deb) are the most used format to install programs under Linux, the “dpkg” system which deals with .deb packages is the default on all Debian-based Linux distributions like Ubuntu and Linux Mint. That’s why we’ll be only explaining how to package our programs for Debian.
Create a Debian Package from your PyGObject Applications
First, you should have some basic knowledge about creating Debian packages, this following guide will help you a lot.
In brief, if you have project called “myprogram” it must contain the following files and folders so that you can package it.
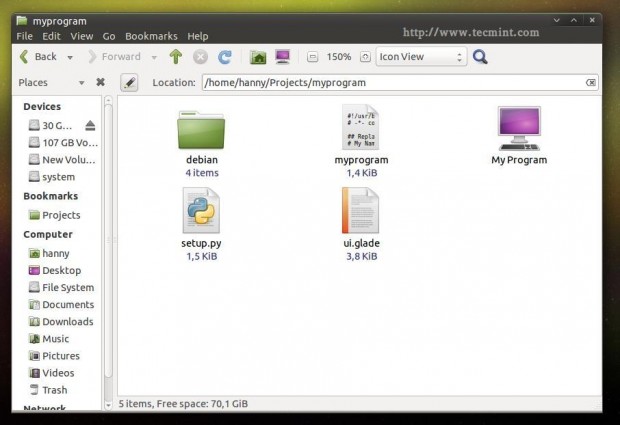
- debian (Folder): This folder includes all information about the Debian package divided to many sub-files.
- po (Folder): The po folder includes the translation files for the program (We’ll explain it in part 5).
- myprogram (File): This is the Python file we created using PyGObject, it’s the main file of the project.
- ui.glade (File): The graphical user interface file.. If you created the application’s interface using Glade, you must include this file in
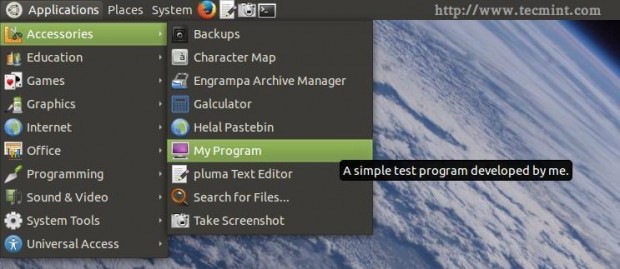
your project. - bMyprogram.desktop (File): This is the responsible file for showing the application in the applications menu.
- setup.py (File): This file is the responsible for installing any Python program into the local system, it’s very important in any Python program, it has many other ways of usage as well.
Of course.. There are many other files and folders that you can include in your project (in fact you can include anything you want) but those are the basic ones.
Now, let’s start packaging a project. Create a new folder called “myprogram”, create a file called “myprogram” and add the following code to it.
#!/usr/bin/python
# -*- coding: utf-8 -*-

## Replace your name and email.
# My Name <[email protected]>

## Here you must add the license of the file, replace "MyProgram" with your program name.
# License:
#    MyProgram is free software: you can redistribute it and/or modify
#    it under the terms of the GNU General Public License as published by
#    the Free Software Foundation, either version 3 of the License, or
#    (at your option) any later version.
#
#    MyProgram is distributed in the hope that it will be useful,
#    but WITHOUT ANY WARRANTY; without even the implied warranty of
#    MERCHANTABILITY or FITNESS FOR A PARTICULAR PURPOSE.  See the
#    GNU General Public License for more details.
#
#    You should have received a copy of the GNU General Public License
#    along with MyProgram.  If not, see <http://www.gnu.org/licenses/>.

from gi.repository import Gtk
import os

class Handler:

  def openterminal(self, button):
    ## When the user clicks on the first button, the terminal will be opened.
    os.system("x-terminal-emulator ")

  def closeprogram(self, button):
    Gtk.main_quit()

# Nothing new here.. We just imported the 'ui.glade' file.
builder = Gtk.Builder()
builder.add_from_file("/usr/lib/myprogram/ui.glade")
builder.connect_signals(Handler())
window = builder.get_object("window1")
window.connect("delete-event", Gtk.main_quit)
window.show_all()
Gtk.main()
Create a ui.glade file and fill it up with this code.
<?xml version="1.0" encoding="UTF-8"?>
<!-- Generated with glade 3.16.1 -->
<interface>
<requires lib="gtk+" version="3.10"/>
<object class="GtkWindow" id="window1">
<property name="can_focus">False</property>
<property name="title" translatable="yes">My Program</property>
<property name="window_position">center</property>
<property name="icon_name">applications-utilities</property>
<property name="gravity">center</property>
<child>
<object class="GtkBox" id="box1">
<property name="visible">True</property>
<property name="can_focus">False</property>
<property name="margin_left">5</property>
<property name="margin_right">5</property>
<property name="margin_top">5</property>
<property name="margin_bottom">5</property>
<property name="orientation">vertical</property>
<property name="homogeneous">True</property>
<child>
<object class="GtkLabel" id="label1">
<property name="visible">True</property>
<property name="can_focus">False</property>
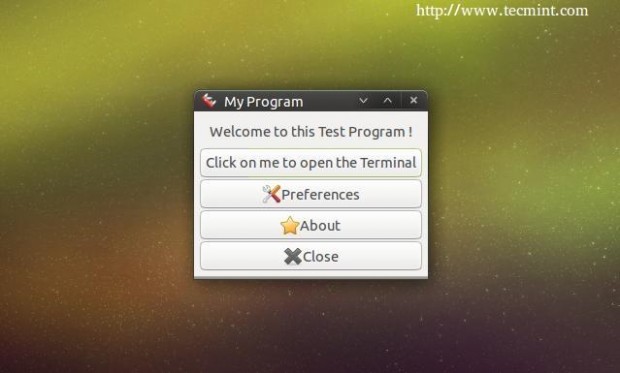
<property name="label" translatable="yes">Welcome to this Test Program !</property>
</object>
<packing>
<property name="expand">False</property>
<property name="fill">True</property>
<property name="position">0</property>
</packing>
</child>
<child>
<object class="GtkButton" id="button2">
<property name="label" translatable="yes">Click on me to open the Terminal</property>
<property name="visible">True</property>
<property name="can_focus">True</property>
<property name="receives_default">True</property>
<signal name="clicked" handler="openterminal" swapped="no"/>
</object>
<packing>
<property name="expand">False</property>
<property name="fill">True</property>
<property name="position">1</property>
</packing>
</child>
<child>
<object class="GtkButton" id="button3">
<property name="label">gtk-preferences</property>
<property name="visible">True</property>
<property name="can_focus">True</property>
<property name="receives_default">True</property>
<property name="use_stock">True</property>
</object>
<packing>
<property name="expand">False</property>
<property name="fill">True</property>
<property name="position">2</property>
</packing>
</child>
<child>
<object class="GtkButton" id="button4">
<property name="label">gtk-about</property>
<property name="visible">True</property>
<property name="can_focus">True</property>
<property name="receives_default">True</property>
<property name="use_stock">True</property>
</object>
<packing>
<property name="expand">False</property>
<property name="fill">True</property>
<property name="position">3</property>
</packing>
</child>
<child>
<object class="GtkButton" id="button1">
<property name="label">gtk-close</property>
<property name="visible">True</property>
<property name="can_focus">True</property>
<property name="receives_default">True</property>
<property name="use_stock">True</property>
<signal name="clicked" handler="closeprogram" swapped="no"/>
</object>
<packing>
<property name="expand">False</property>
<property name="fill">True</property>
<property name="position">4</property>
</packing>
</child>
</object>
</child>
</object>
</interface>
There’s nothing new until now.. We just created a Python file and its interface file. Now create a “setup.py” file in the same folder, and add the following code to it, every line is explained in the comments.
# Here we imported the 'setup' module which allows us to install Python scripts to the local system beside performing some other tasks, you can find the documentation here: https://docs.python.org/2/distutils/apiref.html
from distutils.core import setup

setup(name = "myprogram", # Name of the program.
      version = "1.0", # Version of the program.
      description = "An easy-to-use web interface to create & share pastes easily", # You don't need any help here.
      author = "TecMint", # Nor here.
      author_email = "[email protected]",# Nor here :D
      url = "http://example.com", # If you have a website for you program.. put it here.
      license='GPLv3', # The license of the program.
      scripts=['myprogram'], # This is the name of the main Python script file, in our case it's "myprogram", it's the file that we added under the "myprogram" folder.

# Here you can choose where do you want to install your files on the local system, the "myprogram" file will be automatically installed in its correct place later, so you have only to choose where do you want to install the optional files that you shape with the Python script
      data_files = [ ("lib/myprogram", ["ui.glade"]), # This is going to install the "ui.glade" file under the /usr/lib/myprogram path.
                     ("share/applications", ["myprogram.desktop"]) ] ) # And this is going to install the .desktop file under the /usr/share/applications folder, all the folder are automatically installed under the /usr folder in your root partition, you don't need to add "/usr/ to the path.
Now create a “myprogram.desktop” file in the same folder, and add the following code, it’s explained as well in the comments.
# This is the .desktop file, this file is the responsible file about showing your application in the applications menu in any desktop interface, it's important to add this file to your project, you can view more details about this file from here: https://developer.gnome.org/integration-guide/stable/desktop-files.html.en
[Desktop Entry]
# The default name of the program.
Name=My Program
# The name of the program in the Arabic language, this name will be used to display the application under the applications menu when the default language of the system is Arabic, use the languages codes to change the name for each language.
Name[ar]=برنامجي
# Description of the file.
Comment=A simple test program developed by me.
# Description of the file in Arabic.
Comment[ar]=برنامج تجريبي بسيط تم تطويره بواسطتي.
# The command that's going to be executed when the application is launched from the applications menu, you can enter the name of the Python script or the full path if you want like /usr/bin/myprogram
Exec=myprogram
# Do you want to run your program from the terminal?
Terminal=false
# Leave this like that.
Type=Application
# Enter the name of the icon you want to use for the application, you can enter a path for the icon as well like /usr/share/pixmaps/icon.png but make sure to include the icon.png file in your project folder first and in the setup.py file as well. Here we'll use the "system" icon for now.
Icon=system
# The category of the file, you can view the available categories from the freedesktop website.
Categories=GNOME;GTK;Utility;
StartupNotify=false
We’re almost done here now.. We just have to create some small files under the “debian” folder in order to provide information about our package for the “dpkg” system.
Open the “debian” folder, and create a the following files.
control
compat
changelog
rules
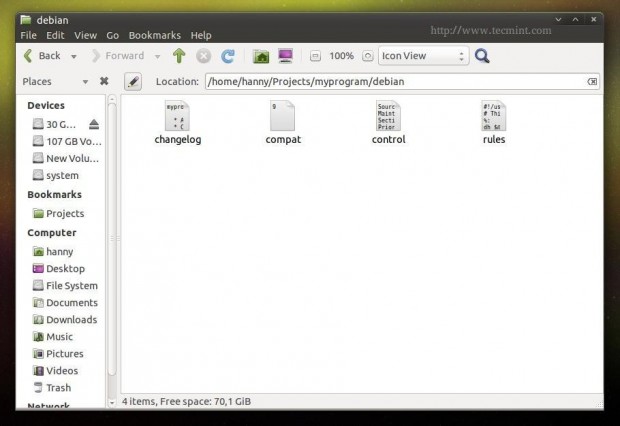
control: This file provides the basic information about the Debian package, for more details, please visit Debian Package Control Fields.
Source: myprogram
Maintainer: My Name <[email protected]>
Section: utils
Priority: optional
Standards-Version: 3.9.2
Build-Depends: debhelper (>= 9), python2.7

Package: myprogram
Architecture: all
Depends: python-gi
Description: My Program
Here you can add a short description about your program.
compat: This is just an important file for the dpkg system, it just includes the magical 9 number, leave it like that.
9
changelog: Here you’ll be able to add the changes you do on your program, for more information, please visit Debian Package Changelog Source.
myprogram (1.0) trusty; urgency=medium

  * Add the new features here.
  * Continue adding new changes here.
  * And here.

 -- My Name Here <[email protected]>  Sat, 27 Dec 2014 21:36:33 +0200
rules: This file is responsible about running the installation process on the local machine to install the package, you can view more information
about this file from here: Debian Package Default Rules.
Though you won’t need anything more for your Python program.
#!/usr/bin/make -f
# This file is responsible about running the installation process on the local machine to install the package, you can view more information about this file from here: https://www.debian.org/doc/manuals/maint-guide/dreq.en.html#defaultrules Though you won't need anything more for your Python program.
%:
    dh $@
override_dh_auto_install:
    python setup.py install --root=debian/myprogram --install-layout=deb --install-scripts=/usr/bin/ # This is going to run the setup.py file to install the program as a Python script on the system, it's also going to install the "myprogram" script under /usr/bin/ using the --install-scripts option, DON'T FORGET TO REPLACE "myprogram" WITH YOUR PROGRAM NAME.
override_dh_auto_build:
Now thats we created all the necessary files for our program successfully, now let’s start packaging it. First, make sure that you have installed some dependences for the build process before you start.
$ sudo apt-get update
$ sudo apt-get install devscripts
Now imagine that the “myprogram” folder is in your home folder (/home/user/myprogram) in order to package it as a Debian package, run the following commands.
$ cd /home/user/myprogram
$ debuild -us -uc
Sample Output
hanny@hanny-HP-Pavilion-15-Notebook-PC:~/Projects/myprogram$
debuild -us -uc dpkg-buildpackage -rfakeroot -D -us -uc
dpkg-buildpackage: source package myprogram
dpkg-buildpackage: source version 1.0
dpkg-buildpackage: source distribution trusty
dpkg-buildpackage: source changed by My Name Here
<[email protected]>
dpkg-source --before-build myprogram
dpkg-buildpackage: host architecture i386
fakeroot debian/rules clean
dh clean
dh_testdir
dh_auto_clean
....
.....
Finished running lintian.
And that’s it ! Your Debian package was created successfully:
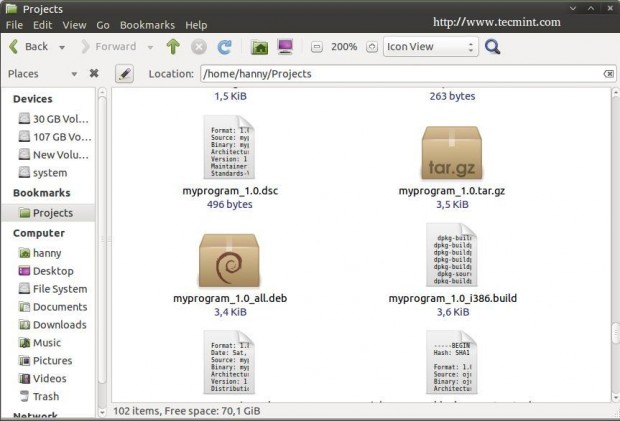
In order to install it on any Debian-based distribution, run.
$ sudo dpkg -i myprogram_1.0_all.deb
Don’t forget to replace the above file with the name of the package.. Now after you install the package, you can run the program from the applications menu.
And it will work..
Here ends the 4th part of our series about PyGObject.. In the next lesson we’ll explain how to localize the PyGObject application easily, till then stay tunned for it…

I also have a problem, when I run the following command on the terminal.
It gives me following error…
dpkg-buildpackage -rfakeroot -us -uc failed
I’m on a German pc but i says the no binary packet is there.
Please help me fixing this.
i have done every thing still I have a problem
“toufik@toufik-Lenovo-G550:~/myprogram$ debuild -us -uc
dpkg-buildpackage -rfakeroot -D -us -uc
dpkg-buildpackage: paquet source myprogram
dpkg-buildpackage: version source 1.0
dpkg-buildpackage: distribution source trusty
dpkg-buildpackage: source changé par My Name Here
dpkg-source –before-build myprogram
dpkg-buildpackage: architecture hôte i386
fakeroot debian/rules clean
debian/rules:4: *** séparateur manquant . Arrêt.
dpkg-buildpackage: erreur: fakeroot debian/rules clean a produit une erreur de sortie de type 2
debuild: fatal error at line 1364:
dpkg-buildpackage -rfakeroot -D -us -uc failed”
Hello.
in the rules file, line 4, before “dh $@” you should insert a “Tab”, just remove the spaces before “dh $@” and click on the tab button to add a tab char.
Do the same thing in line 6 as well before “python setup.py install”.