We will begin this article by outlining some LDAP basics (what it is, where it is used and why) and show how to set up a LDAP server and configure a client to authenticate against it using Red Hat Enterprise Linux 7 systems.

As we will see, there are several other possible application scenarios, but in this guide we will focus entirely on LDAP-based authentication. In addition, please keep in mind that due to the vastness of the subject, we will only cover its basics here, but you can refer to the documentation outlined in the summary for more in-depth details.
For the same reason, you will note that I have decided to leave out several references to man pages of LDAP tools for the sake of brevity, but the corresponding explanations are at a fingertip’s distance (man ldapadd, for example).
That said, let’s get started.
Our Testing Environment
Our test environment consists of two RHEL 7 boxes:
Server: 192.168.0.18. FQDN: rhel7.mydomain.com
Client: 192.168.0.20. FQDN: ldapclient.mydomain.com
If you want, you can use the machine installed in Part 12: Automate RHEL 7 installations using Kickstart as client.
What is LDAP?
LDAP stands for Lightweight Directory Access Protocol and consists in a set of protocols that allows a client to access, over a network, centrally stored information (such as a directory of login shells, absolute paths to home directories, and other typical system user information, for example) that should be accessible from different places or available to a large number of end users (another example would be a directory of home addresses and phone numbers of all employees in a company).
Keeping such (and more) information centrally means it can be more easily maintained and accessed by everyone who has been granted permissions to use it.
The following diagram offers a simplified diagram of LDAP, and is described below in greater detail:
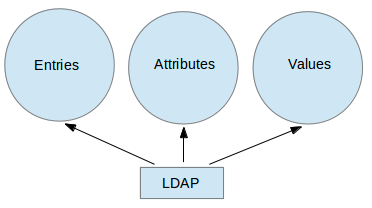
Explanation of above diagram in detail.
- An entry in a LDAP directory represents a single unit or information and is uniquely identified by what is called a Distinguished Name.
- An attribute is a piece of information associated with an entry (for example, addresses, available contact phone numbers, and email addresses).
- Each attribute is assigned one or more values consisting in a space-separated list. A value that is unique per entry is called a Relative Distinguished Name.
That being said, let’s proceed with the server and client installations.
Installing and Configuring a LDAP Server and Client
In RHEL 7, LDAP is implemented by OpenLDAP. To install the server and client, use the following commands, respectively:
# yum update && yum install openldap openldap-clients openldap-servers
# yum update && yum install openldap openldap-clients nss-pam-ldapd
Once the installation is complete, there are some things we look at. The following steps should be performed on the server alone, unless explicitly noted:
1. Make sure SELinux does not get in the way by enabling the following booleans persistently, both on the server and the client:
# setsebool -P allow_ypbind=0 authlogin_nsswitch_use_ldap=0
Where allow_ypbind is required for LDAP-based authentication, and authlogin_nsswitch_use_ldap may be needed by some applications.
2. Enable and start the service:
# systemctl enable slapd.service
# systemctl start slapd.service
Keep in mind that you can also disable, restart, or stop the service with systemctl as well:
# systemctl disable slapd.service
# systemctl restart slapd.service
# systemctl stop slapd.service
3. Since the slapd service runs as the ldap user (which you can verify with ps -e -o pid,uname,comm | grep slapd), such user should own the /var/lib/ldap directory in order for the server to be able to modify entries created by administrative tools that can only be run as root (more on this in a minute).
Before changing the ownership of this directory recursively, copy the sample database configuration file for slapd into it:
# cp /usr/share/openldap-servers/DB_CONFIG.example /var/lib/ldap/DB_CONFIG
# chown -R ldap:ldap /var/lib/ldap
4. Set up an OpenLDAP administrative user and assign a password:
# slappasswd
as shown in the next image:

and create an LDIF file (ldaprootpasswd.ldif) with the following contents:
dn: olcDatabase={0}config,cn=config
changetype: modify
add: olcRootPW
olcRootPW: {SSHA}PASSWORD
where:
- PASSWORD is the hashed string obtained earlier.
- cn=config indicates global config options.
- olcDatabase indicates a specific database instance name and can be typically found inside /etc/openldap/slapd.d/cn=config.
Referring to the theoretical background provided earlier, the ldaprootpasswd.ldif file will add an entry to the LDAP directory. In that entry, each line represents an attribute: value pair (where dn, changetype, add, and olcRootPW are the attributes and the strings to the right of each colon are their corresponding values).
You may want to keep this in mind as we proceed further, and please note that we are using the same Common Names (cn=) throughout the rest of this article, where each step depends on the previous one.
5. Now, add the corresponding LDAP entry by specifying the URI referring to the ldap server, where only the protocol/host/port fields are allowed.
# ldapadd -H ldapi:/// -f ldaprootpasswd.ldif
The output should be similar to:

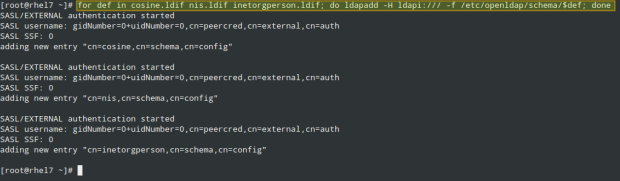
and import some basic LDAP definitions from the /etc/openldap/schema directory:
# for def in cosine.ldif nis.ldif inetorgperson.ldif; do ldapadd -H ldapi:/// -f /etc/openldap/schema/$def; done
6. Have LDAP use your domain in its database.
Create another LDIF file, which we will call ldapdomain.ldif, with the following contents, replacing your domain (in the Domain Component dc=) and password as appropriate:
dn: olcDatabase={1}monitor,cn=config
changetype: modify
replace: olcAccess
olcAccess: {0}to * by dn.base="gidNumber=0+uidNumber=0,cn=peercred,cn=external,cn=auth"
  read by dn.base="cn=Manager,dc=mydomain,dc=com" read by * none

dn: olcDatabase={2}hdb,cn=config
changetype: modify
replace: olcSuffix
olcSuffix: dc=mydomain,dc=com

dn: olcDatabase={2}hdb,cn=config
changetype: modify
replace: olcRootDN
olcRootDN: cn=Manager,dc=mydomain,dc=com

dn: olcDatabase={2}hdb,cn=config
changetype: modify
add: olcRootPW
olcRootPW: {SSHA}PASSWORD

dn: olcDatabase={2}hdb,cn=config
changetype: modify
add: olcAccess
olcAccess: {0}to attrs=userPassword,shadowLastChange by
  dn="cn=Manager,dc=mydomain,dc=com" write by anonymous auth by self write by * none
olcAccess: {1}to dn.base="" by * read
olcAccess: {2}to * by dn="cn=Manager,dc=mydomain,dc=com" write by * read
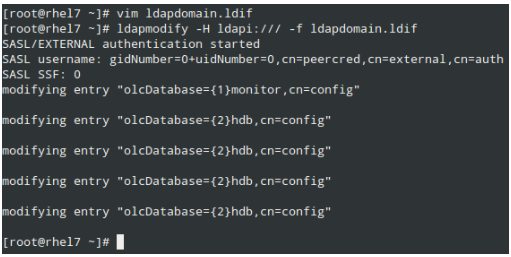
Then load it as follows:
# ldapmodify -H ldapi:/// -f ldapdomain.ldif
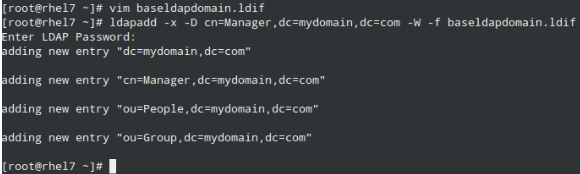
7. Now it’s time to add some entries to our LDAP directory. Attributes and values are separated by a colon (:) in the following file, which we’ll name baseldapdomain.ldif:
dn: dc=mydomain,dc=com
objectClass: top
objectClass: dcObject
objectclass: organization
o: mydomain com
dc: mydomain

dn: cn=Manager,dc=mydomain,dc=com
objectClass: organizationalRole
cn: Manager
description: Directory Manager

dn: ou=People,dc=mydomain,dc=com
objectClass: organizationalUnit
ou: People

dn: ou=Group,dc=mydomain,dc=com
objectClass: organizationalUnit
ou: Group
Add the entries to the LDAP directory:
# ldapadd -x -D cn=Manager,dc=mydomain,dc=com -W -f baseldapdomain.ldif
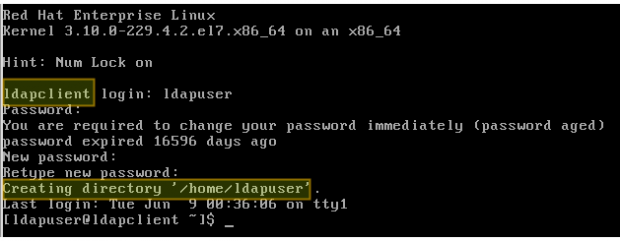
8. Create a LDAP user called ldapuser (adduser ldapuser), then create the definitions for a LDAP group in ldapgroup.ldif.
# adduser ldapuser
# vi ldapgroup.ldif
Add following content.
dn: cn=Manager,ou=Group,dc=mydomain,dc=com
objectClass: top
objectClass: posixGroup
gidNumber: 1004
where gidNumber is the GID in /etc/group for ldapuser) and load it:
# ldapadd -x -W -D "cn=Manager,dc=mydomain,dc=com" -f ldapgroup.ldif
9. Add a LDIF file with the definitions for user ldapuser (ldapuser.ldif):
dn: uid=ldapuser,ou=People,dc=mydomain,dc=com
objectClass: top
objectClass: account
objectClass: posixAccount
objectClass: shadowAccount
cn: ldapuser
uid: ldapuser
uidNumber: 1004
gidNumber: 1004
homeDirectory: /home/ldapuser
userPassword: {SSHA}fiN0YqzbDuDI0Fpqq9UudWmjZQY28S3M
loginShell: /bin/bash
gecos: ldapuser
shadowLastChange: 0
shadowMax: 0
shadowWarning: 0
and load it:
# ldapadd -x -D cn=Manager,dc=mydomain,dc=com -W -f ldapuser.ldif

Likewise, you can delete the user entry you just created:
# ldapdelete -x -W -D cn=Manager,dc=mydomain,dc=com "uid=ldapuser,ou=People,dc=mydomain,dc=com"
10. Allow communication through the firewall:
# firewall-cmd --add-service=ldap
11. Last, but not least, enable the client to authenticate using LDAP.
To help us in this final step, we will use the authconfig utility (an interface for configuring system authentication resources).
Using the following command, the home directory for the requested user is created if it doesn’t exist after the authentication against the LDAP server succeeds:
# authconfig --enableldap --enableldapauth --ldapserver=rhel7.mydomain.com --ldapbasedn="dc=mydomain,dc=com" --enablemkhomedir --update
Summary
In this article we have explained how to set up basic authentication against a LDAP server. To further configure the setup described in the present guide, please refer to Chapter 13 – LDAP Configuration in the RHEL 7 System administrator’s guide, paying special attention to the security settings using TLS.
Feel free to leave any questions you may have using the comment form below.