Testing the DNS Server
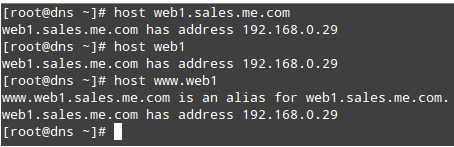
At this point we are ready to query our DNS server for local and outside names and addresses. The following commands will return the IP address associated with the host web1:
# host web1.sales.me.com
# host web1
# host www.web1
How can we find out who is handling emails for sales.me.com? It’s easy to find out – just query the MX records for the domain:
# host -t mx sales.me.com

Likewise, let’s perform a reverse query. This will help us find out the name behind an IP address:
# host 192.168.0.28
# host 192.168.0.29

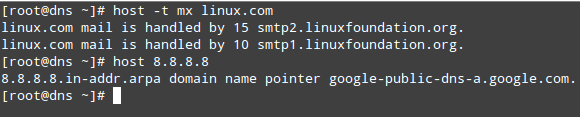
You can try the same operations for outside hosts:
# host -t mx linux.com
# host 8.8.8.8
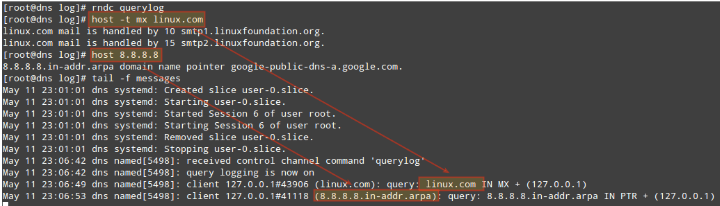
To verify that queries are indeed going through our DNS server, let’s enable logging:
# rndc querylog
And check the /var/log/messages file (in CentOS and openSUSE):
# host -t mx linux.com
# host 8.8.8.8
To disable DNS logging, type again:
# rndc querylog
In Ubuntu, enabling logging will require adding the following independent block (same level as the options block) to /etc/bind/named.conf:
logging {
	channel query_log {
    	file "/var/log/bind9/query.log";
    	severity dynamic;
    	print-category yes;
    	print-severity yes;
    	print-time yes;
	};
	category queries { query_log; };
};
Note that the log file must exist and be writable by named.
Summary
In this article, we have explained how to set up a basic recursive, caching DNS server and how to configure zones for a domain.
The mystery of name to IP resolution (and vice versa) is not such anymore! To ensure the proper operation of your DNS server, don’t forget to allow the service in your firewall (port TCP 53) as explained in Part 8 of the LFCE series (“Setup an Iptables Firewall to Enable Remote Access to Services“) and other articles in this same site such as Firewall Essentials and Network Traffic Control Using FirewallD and Iptables.
We hope you have found this article helpful – don’t hesitate to let us know if you have questions or comments. We always enjoy hearing from our readers!


There are 2 typos (well two digits transposed) in the sample reverse DNS zone example given above.
Here’s the text provided:
zone "0.168.192.in-addr.arpa" IN {
    type master;
    file "/var/named/0.162.198.in-addr.arpa.zone";
};
The file directive has the 2 and the 8 transposed. The file name should be “/var/named/0.168.192.in-addr.arpa.zone“
@BJ,
Thanks, I have corrected the file in the article…
Hi Gabriel Cánepa,
could you help me here..?
https://serverfault.com/questions/930206/centos6-9-not-possible-to-resolv-two-windows-domain-controllers-at-a-time-using
Hello Mr Canepa,
First of all I would like to thank you for a very good articles in order to help me to prepare for LFCS. I studied all of them very carefully, but unfortunately I was stuck at the DNS.
It is about 3th part of this chapter. I don’t know if files /var/named/sales.me.com.zone and /var/named/0.168.192.in-addr.arpa.zone should be appeared automatically or should I append them on my own?
There are differences between CentOS and Ubuntu because of location of these files – in Ubuntu these files supposed to be in /var/cache/bind…
I will be thankful for your support.
Hello again,
I would like to inform that all questions mentioned above I solved. I just created require zone-files in /etc/bind/.
Unfortunately I met another issue and I tried to handled with that all the day – without result. When I try to check the answer with host command I received always the same error: “Host ….. not found: 3(NXDOMAIN)“.
The zone files and option files are done correctly without any errors.
Could someone help me with that and point me where I should looking for a mistake..? Many thanks in advance.
Radek.