Since computers seldom work as isolated systems, it is to be expected that as a system administrator or engineer, you know how to set up and maintain a network with multiple types of servers.
In this article and in the next of this series we will go through the essentials of setting up Samba and NFS servers with Windows/Linux and Linux clients, respectively.
This article will definitely come in handy if you’re called upon to set up file servers in corporate or enterprise environments where you are likely to find different operating systems and types of devices.
Since you can read about the background and the technical aspects of both Samba and NFS all over the Internet, in this article and the next we will cut right to the chase with the topic at hand.
Step 1: Installing Samba Server
Our current testing environment consists of two RHEL 7 boxes and one Windows 8 machine, in that order:
1. Samba / NFS server [box1 (RHEL 7): 192.168.0.18],
2. Samba client #1 [box2 (RHEL 7): 192.168.0.20]
3. Samba client #2 [Windows 8 machine: 192.168.0.106]

On box1, install the following packages:
# yum update && yum install samba samba-client samba-common
On box2:
# yum update && yum install samba samba-client samba-common cifs-utils
Once the installation is complete, we’re ready to configure our share.
Step 2: Setting Up File Sharing Through Samba
One of the reason why Samba is so relevant is because it provides file and print services to SMB/CIFS clients, which causes those clients to see the server as if it was a Windows system (I must admit I tend to get a little emotional while writing about this topic as it was my first setup as a new Linux system administrator some years ago).
Adding system users and setting up permissions and ownership
To allow for group collaboration, we will create a group named finance with two users (user1 and user2) with useradd command and a directory /finance in box1.
We will also change the group owner of this directory to finance and set its permissions to 0770 (read, write, and execution permissions for the owner and the group owner):
# groupadd finance
# useradd user1
# useradd user2
# usermod -a -G finance user1
# usermod -a -G finance user2
# mkdir /finance
# chmod 0770 /finance
# chgrp finance /finance
Step 3: Configuring SELinux and Firewalld
In preparation to configure /finance as a Samba share, we will need to either disable SELinux or set the proper boolean and security context values as follows (otherwise, SELinux will prevent clients from accessing the share):
# setsebool -P samba_export_all_ro=1 samba_export_all_rw=1
# getsebool –a | grep samba_export
# semanage fcontext –at samba_share_t "/finance(/.*)?"
# restorecon /finance
In addition, we must ensure that Samba traffic is allowed by the firewalld.
# firewall-cmd --permanent --add-service=samba
# firewall-cmd --reload
Step 4: Configure Samba Share
Now it’s time to dive into the configuration file /etc/samba/smb.conf and add the section for our share: we want the members of the finance group to be able to browse the contents of /finance, and save / create files or subdirectories in it (which by default will have their permission bits set to 0770 and finance will be their group owner):
[finance]
comment=Directory for collaboration of the company's finance team
browsable=yes
path=/finance
public=no
valid users=@finance
write list=@finance
writeable=yes
create mask=0770
Force create mode=0770
force group=finance
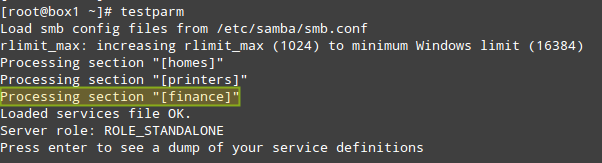
Save the file and then test it with the testparm utility. If there are any errors, the output of the following command will indicate what you need to fix. Otherwise, it will display a review of your Samba server configuration:
Should you want to add another share that is open to the public (meaning without any authentication whatsoever), create another section in /etc/samba/smb.conf and under the new share’s name copy the section above, only changing public=no to public=yes and not including the valid users and write list directives.
Step 5: Adding Samba Users
Next, you will need to add user1 and user2 as Samba users. To do so, you will use the smbpasswd command, which interacts with Samba’s internal database. You will be prompted to enter a password that you will later use to connect to the share:
# smbpasswd -a user1
# smbpasswd -a user2
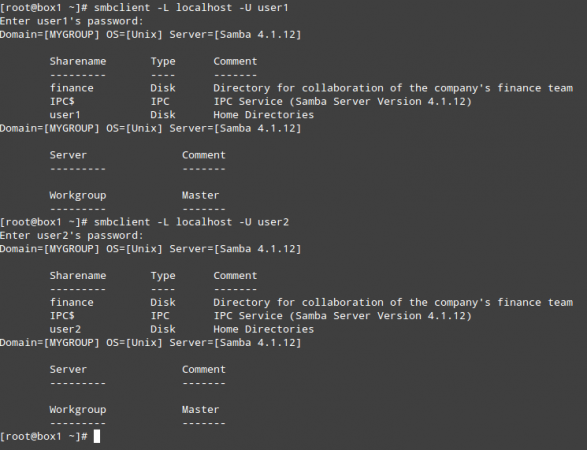
Finally, restart Samba, enable the service to start on boot, and make sure the share is actually available to network clients:
# systemctl start smb
# systemctl enable smb
# smbclient -L localhost –U user1
# smbclient -L localhost –U user2
At this point, the Samba file server has been properly installed and configured. Now it’s time to test this setup on our RHEL 7 and Windows 8 clients.
Step 6: Mounting the Samba Share in Linux
First, make sure the Samba share is accessible from this client:
# smbclient –L 192.168.0.18 -U user2
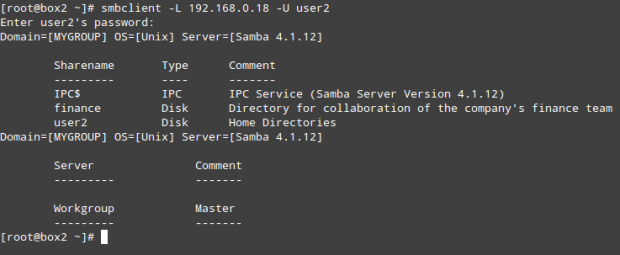
(repeat the above command for user1)
As any other storage media, you can mount (and later unmount) this network share when needed:
# mount //192.168.0.18/finance /media/samba -o username=user1

(where /media/samba is an existing directory)
or permanently, by adding the following entry in /etc/fstab file:
//192.168.0.18/finance /media/samba cifs credentials=/media/samba/.smbcredentials,defaults 0 0
Where the hidden file /media/samba/.smbcredentials (whose permissions and ownership have been set to 600 and root:root, respectively) contains two lines that indicate the username and password of an account that is allowed to use the share:
username=user1
password=PasswordForUser1
Finally, let’s create a file inside /finance and check the permissions and ownership:
# touch /media/samba/FileCreatedInRHELClient.txt

As you can see, the file was created with 0770 permissions and ownership set to user1:finance.
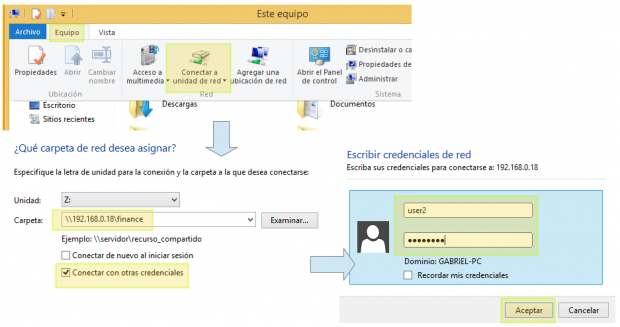
Step 7: Mounting the Samba Share in Windows
To mount the Samba share in Windows, go to My PC and choose Computer, then Map network drive. Next, assign a letter for the drive to be mapped and check Connect using different credentials (the screenshots below are in Spanish, my native language):
Finally, let’s create a file and check the permissions and ownership:
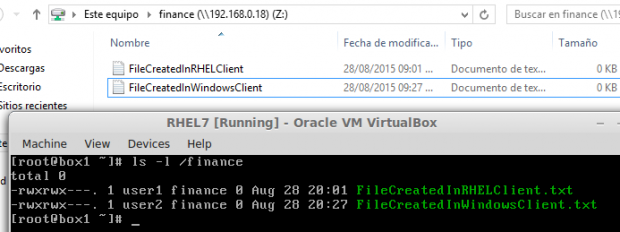
# ls -l /finance
This time the file belongs to user2 since that’s the account we used to connect from the Windows client.
Summary
In this article we have explained not only how to set up a Samba server and two clients using different operating systems, but also how to configure the firewalld and SELinux on the server to allow the desired group collaboration capabilities.
Last, but not least, let me recommend the reading of the online man page of smb.conf to explore other configuration directives that may be more suitable for your case than the scenario described in this article.
As always, feel free to drop a comment using the form below if you have any comments or suggestions.