In a previous article, we explained how to use tmux, (Terminal MUltipleXer), to access and control a number of terminals (or windows) from a single terminal.
Now we will introduce you to wemux (a multi-user version of tmux), which not only includes the features provided by tmux, but also allows users to host a multi-terminal environment where clients can join in viewing or collaborative mode.
In other words, you can host a session where others can view what you do in the terminal (to perform a demonstration, for example), or to collaborate with them.
To help you get the most of wemux, I highly recommend you take a look at the previous guide about tmux before going through the present article.
Installing and Configuring Wemux Multi-User Terminal
As a prerequisite before installing wemux, we will use git to clone the project’s repository in our local system. If the following command shows that git is not found in your system:
# which git
as indicated by:
/usr/bin/which: no git in (/usr/local/sbin:/usr/local/bin:/sbin:/bin:/usr/sbin:/usr/bin:/root/bin)
Install it before proceeding (use yum or aptitude depending on your distribution):
# yum install git       [On RedHat based systems]
# dnf install git       [On Fedora 22+ versions]
# aptitude install git  [On Debian based systems]
Then,
1. Clone the remote repository.
# git clone git://github.com/zolrath/wemux.git /usr/local/share/wemux
2. Create a symbolic link to the wemux executable inside /usr/local/bin or another directory in your $PATH variable.
# ln -s /usr/local/share/wemux/wemux /usr/local/bin/wemux
3. Copy the configuration sample configuration file into /usr/local/etc.
# cp /usr/local/share/wemux/wemux.conf.example /usr/local/etc/wemux.conf
And insert the following line:
host_list=(user1 user2 user3)
where user1, user2, and user3 are users who are allowed to start wemux servers. You can add as many users as needed separated by spaces. Other users will be able to connect to a running wemux server but will not be allowed to start one.
Introducing wemux Multi-User Terminal
To simplify things, please keep in mind that you can think of wemux as a tool that facilitates console viewing and mutual collaboration on the same tmux session.
As explained earlier, in the configuration file (/usr/local/etc/wemux.conf), you must have already indicated which users will be allowed to start a wemux server, or in other words, a tmux session that other users will be able to attach to. In this context, these “users” are called clients.
To summarize:
- Wemux server: a tmux session.
- Wemux clients: users joining the tmux session described above.
These are the commands that are used to manage wemux servers:
- wemux or wemux start: starts a new wemux server (if none exists; otherwise creates a new one) and creates a socket in
/tmp/wemux-wemuxwhose permissions need to be set to 1777 so that other users may connect or attach to it: - wemux attach hooks you up to an existing wemux server.
- wemux stop kills the wemux server and removes the socket created earlier. This command needs to be executed from a separate terminal. Alternatively, you can use the exit shell builtin to close panes and eventually to return to your regular shell session.
- wemux kick username gets rid of the user currently logged on via SSH from the wemux server and removes his / her rogue sessions (more on this in a minute). This command requires that the wemux server has been started as root or with sudo privileges.
- wemux config opens the configuration file in the text editor indicated by the environment variable $EDITOR (only if such variable is configured in your system, which you can verify with echo $EDITOR).
# chmod 1777 /tmp/wemux-wemux
All of the tmux commands listed previously are valid within wemux, with the advantage that the client may attach to a wemux server in one of three modes.
To do so, execute the command found in the COMMAND column below in a “prospective client“, so to speak (it will become an actual client once it has joined the wemux server):
| Mode | Description | Commands |
| Mirror | Read-only, non-interactive | wemux mirror |
| Pair | Interactive, client shares cursor with the server | wemux pair |
| Rogue | Joins an existing session but allows the client to uses independent windows | wemux rogue |
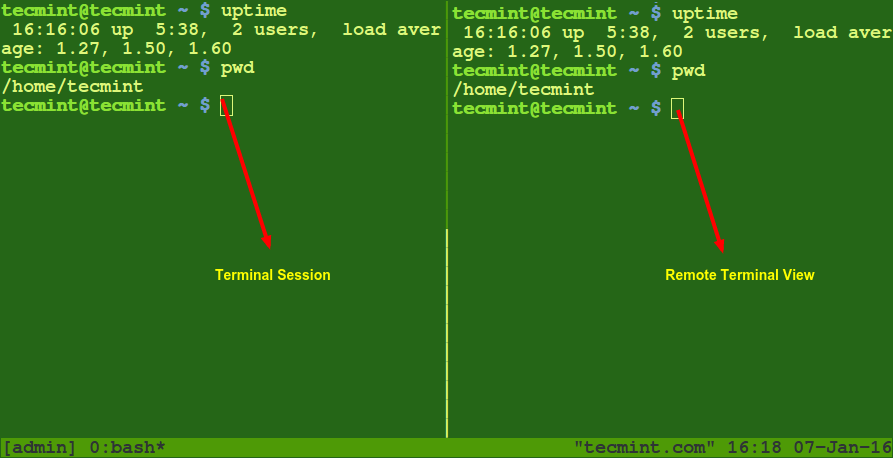
Let’s take a look at the following screencast for a brief demonstration of the three client modes outlined in the above table (same order). Please note that I used Terminator in order to start the server (as user gacanepa) in the left pane and connect a client (as user test) in the right pane.
Thus, you can easily see how a wemux server works while interacting with one client. By repeating the the process that is used by a client to join a wemux server, you can have multiple clients do the same simultaneously.
Other Features of wemux Terminal
If the above paragraphs didn’t give you enough reasons to give wemux a try, hopefully the following features will convince you.
Users that are allowed to start wemux servers (as per the host_list directive in /usr/local/etc/wemux.conf file) can host multiple sessions simultaneously if the allow_server_change directive is set to true:
allow_server_change="true"
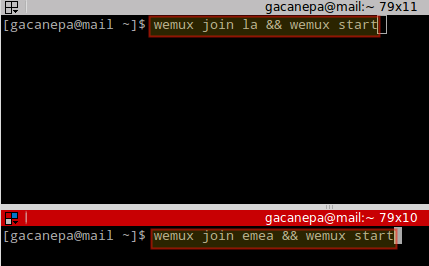
To start two sessions named la and emea, execute the following commands in two different terminals:
# wemux join la && wemux start
# wemux join emea && wemux start
Again, we will use Terminator to view the two terminals at the same time (this is similar to what you could expect by switching to different consoles with Ctrl+Alt+F1 through F7):
After you press Enter, both sessions are started separately:
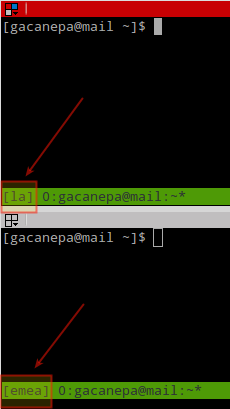
Then you can have a client join either session with:
# wemux join la && wemux attach
Or
# wemux join emea && wemux attach
Finally, to have a remote user (connecting via SSH) start automatically on wemux after logon and disconnect them from the server when they detach, append the follow stanza to its ~/.bash_profile file:
wemux [mode]; exit
where [mode] is one of the client modes listed earlier.
Alternatively, a client can switch from one server to another using:
# exit
# wemux join [server name here] && wemux [mode]
Summary
In this article we have explained how to use wemux to set up remote viewing of your terminal (and even mutual collaboration) very easily. Being released under the MIT license, wemux is open source software and you can further customize it according to your needs.
The source code is found in wemux Github and available in your system in /usr/local/bin/wemux. In the same Github repository you can find more information about this program.
Did you find this post useful? Please let us know what you think using the form below.
Reference: https://github.com/zolrath/wemux


Why not just use tmux, which already allows you to do this.
@Jake,
Good point. But as the README document in the GitHub repository says, “wemux enhances tmux to make multi-user terminal multiplexing both easier and more powerful.“. Although it is true tmux has similar capabilities, I’d like to see it perform the way wemux does in a multi-user setup.
Reference: https://github.com/zolrath/wemux/blob/master/README.md