We are all aware of the most popular commands called ‘useradd‘ or ‘adduser‘ in Linux. There are times when a Linux System Administrator is asked to create user accounts on Linux with specific properties, limitations, or comments.
In Linux, the ‘useradd‘ command is a low-level utility used for adding or creating user accounts in Linux and other Unix-like operating systems. The ‘adduser‘ command is very similar to the ‘useradd‘ command, as it is just a symbolic link to it.
In some Linux distributions, the ‘useradd‘ command may have a slightly different version. I suggest reading your documentation before using our instructions to create new user accounts in Linux.
When we run the ‘useradd‘ command in the Linux terminal, it performs the following major tasks:
- It edits /etc/passwd, /etc/shadow, /etc/group, and /etc/gshadow files for the newly created user accounts.
- Creates and populates a home directory for the new user.
- Sets permissions and ownerships to the home directory.
Useradd Command Syntax
The basic syntax of the ‘useradd‘ command is:
useradd [options] username
In this article, we will demonstrate the 15 most commonly used ‘useradd‘ commands with practical examples in Linux.
1. How to Add a New User in Linux
To add or create a new user, you have to use the ‘useradd‘ or ‘adduser‘ command followed by the ‘username‘. The ‘username‘ is the login name a user uses to log into the system.
Only one user can be added, and the username must be unique, and not already exist on the system.
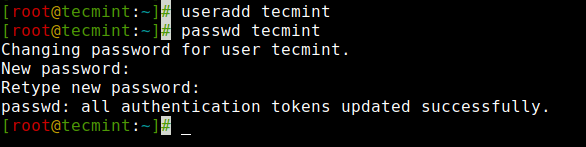
For example, to add a new user named ‘tecmint‘ use the following command:
useradd tecmint
When we add a new user in Linux with the ‘useradd‘ command, it gets created in a locked state. To unlock that user account, we need to set a password for that account using the ‘passwd‘ command.
passwd tecmint

Changing password for user tecmint.
New UNIX password:
Retype new UNIX password:
passwd: all authentication tokens updated successfully.
Once a new user is created, its entry is automatically added to the ‘/etc/passwd‘ file. This file is used to store the user’s information, and the entry should be.
tecmint:x:1000:1000:tecmint:/home/tecmint:/bin/bash

The above entry contains a set of seven colon-separated fields, each field having its own meaning.
Let’s see what these fields are:
- Username – The user login name is used to log into the system. It should be between 1 and 32 characters long.
- Password – The user password (or
'x'character) is stored in the ‘/etc/shadow‘ file in an encrypted format. - User ID (UID) – Every user must have a User ID (UID), which stands for User Identification Number. By default, UID 0 is reserved for the root user, and UIDs ranging from 1 to 99 are reserved for other predefined accounts. Additionally, UIDs ranging from 100 to 999 are reserved for system accounts and groups.
- Group ID (GID) – The primary Group ID (GID), which stands for Group Identification Number, is stored in the ‘/etc/group‘ file.
- User Info – This field is optional and allows you to define extra information about the user, such as the user’s full name. This information can be filled in using the finger command.
- Home Directory – The absolute location of the user’s home directory.
- Shell – The absolute location of a user’s shell i.e. /bin/bash.
2. How to Create a User with a Different Home Directory
By default, the ‘useradd‘ command creates a user’s home directory under the ‘/home‘ directory with the username. For example, as seen above, the default home directory for the user ‘tecmint‘ is ‘/home/tecmint‘.
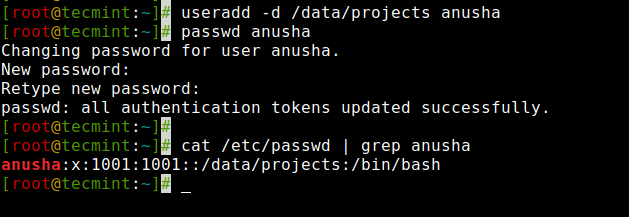
However, this behavior can be changed by using the '-d' option along with the location of the new home directory (e.g., ‘/data/projects‘). For instance, the following command will create a user ‘anusha‘ with a home directory set to ‘/data/projects‘.
# useradd -d /data/projects anusha
# passwd anusha
You can view the user’s home directory and other user-related information, such as user ID, group ID, shell, and comments using the following cat command.
cat /etc/passwd | grep anusha

anusha:x:1001:1001::/data/projects:/bin/bash
3. How to Create a User with a Specific User ID
In Linux, every user has their own UID (Unique Identification Number). By default, when we create a new user account in Linux, it assigns user IDs 500, 501, 502, and so on.
However, we can create users with custom user IDs using the '-u' option. For example, the following command will create a user ‘navin‘ with a custom user ID ‘1002‘.
useradd -u 1002 navin
Now, let’s verify that the user created with a defined userid (1002) using the following command.
cat /etc/passwd | grep navin

navin:x:1002:1002::/home/navin:/bin/bash
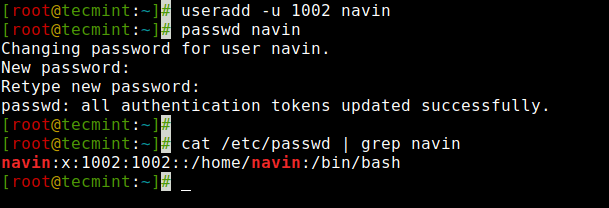
NOTE: Make sure the value of a user ID must be unique from any other already created users on the system.
4. How to Create a User with a Specific Group ID
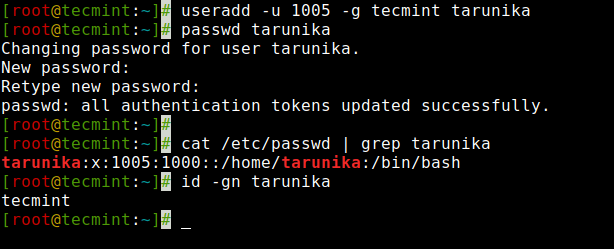
Similarly, every user has their own GID (Group Identifier). We can create users with specific group IDs as well using the '-g' option.
In this example, we will add a user ‘tarunika‘ with a specific UID and GID simultaneously with the help of the '-u' and '-g' options.
useradd -u 1005 -g tecmint tarunika
Now, check the assigned user ID and group ID in the ‘/etc/passwd‘ file.
cat /etc/passwd | grep tarunika

tarunika:x:1005:1000::/home/tarunika:/bin/bash
To verify the user’s GID, use the id command:
id -gn tarunika
5. How to Add a User to Multiple Groups
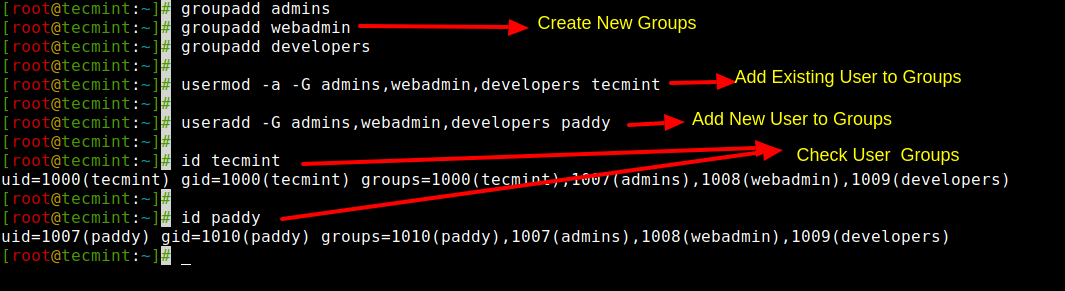
The '-G' option is used to add a user to additional groups. Each group name is separated by a comma, with no intervening spaces.
In this example, we are adding a user ‘tecmint‘ to multiple groups, such as admins, webadmin, and developers.
groupadd admins
groupadd webadmin
groupadd developers
usermod -a -G admins,webadmin,developers tecmint
useradd -G admins,webadmin,developers paddy
Next, verify that the multiple groups are assigned to the user with the id command.
id tecmint

uid=1000(tecmint) gid=1000(tecmint)
groups=1000(tecmint),1007(admins),1008(webadmin),1009(developers)
context=root:system_r:unconfined_t:SystemLow-SystemHigh
6. How to Add a User Without Home Directory
In certain situations, where we don’t want to assign home directories for a user due to security reasons, the user’s home directory will be root when they log into a system that has just restarted. When such a user uses the ‘su‘ command, their login directory will be the previous user’s home directory.
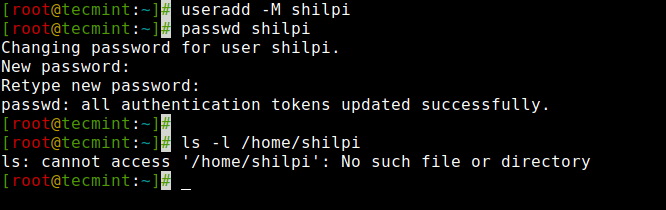
To create users without their home directories, the '-M' option is used. For example, the following command will create a user ‘shilpi‘ without a home directory.
useradd -M shilpi
Now, let’s verify that the user is created without a home directory using the ls command.
ls -l /home/shilpi

ls: cannot access /home/shilpi: No such file or directory
7. How to Create a User With an Expiry Date in Linux
By default, when we add users with the ‘useradd‘ command, the user account never expires, meaning their expiry date is set to 0 (which means never expired).
However, we can set the expiry date using the '-e' option, which should be in the YYYY-MM-DD format. This is helpful for creating temporary accounts for a specific period of time.
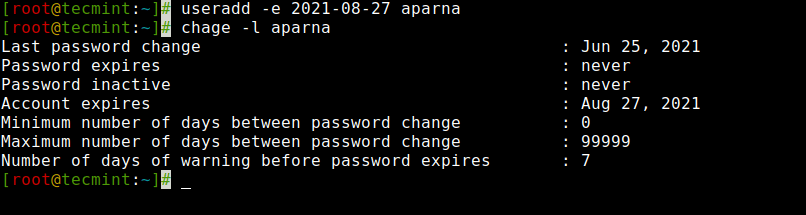
In this example, we create a user ‘aparna‘ with an account expiry date, which is 27th August 2021, in the YYYY-MM-DD format.
useradd -e 2021-08-27 aparna
Next, verify the account and password aging information using the ‘chage‘ command for the user ‘aparna‘ after setting the account expiry date.
chage -l aparna

Last password change					: Jun 25, 2021
Password expires					: never
Password inactive					: never
Account expires						: Aug 27, 2021
Minimum number of days between password change		: 0
Maximum number of days between password change		: 99999
Number of days of warning before password expires	: 7
8. How to Create a User with Password Expiry Date
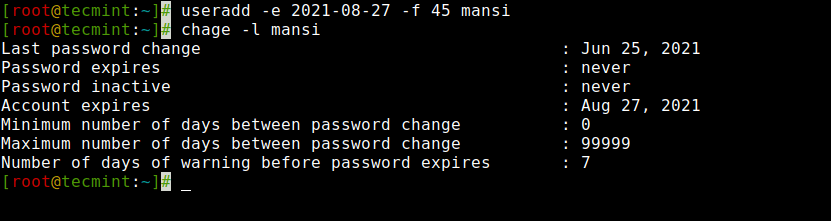
The '-f' argument is used to define the number of days after a password expires. A value of 0 inactivates the user account as soon as the password has expired. By default, the password expiry value is set to -1, which means it never expires.
In this example, we will set an account password expiry date, which is 45 days, for a user ‘mansi‘ using the '-e' and '-f' options.
useradd -e 2014-04-27 -f 45 mansi
9. How to Add a User with Comments in Linux
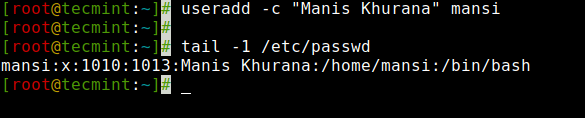
The '-c' option allows you to add custom comments, such as the user’s full name, phone number, etc., to the ‘/etc/passwd‘ file. The comment can be added as a single line without any spaces.
For example, the following command will add a user ‘mansi‘ and insert that user’s full name, Manis Khurana, into the comment field.
useradd -c "Manis Khurana" mansi
You can view the inserted comment in the ‘/etc/passwd‘ file in the comments section using the tail command.
tail -1 /etc/passwd

mansi:x:1010:1013:Manis Khurana:/home/mansi:/bin/sh
10. How to Create a User Login Shell in Linux
Sometimes, we add users who have nothing to do with the login shell or sometimes we are required to assign different shells to our users. We can assign different login shells to each user with the ‘-s‘ option.
Here in this example, will add a user ‘tecmint‘ without a login shell i.e. ‘/sbin/nologin‘ shell.
useradd -s /sbin/nologin tecmint
You can check the assigned shell to the user in the ‘/etc/passwd‘ file.
tail -1 /etc/passwd

tecmint:x:1011:1014::/home/tecmint:/sbin/nologin

11. How to Create a User with Specified Home, Shell, and Comment
The following command will create a user ‘ravi‘ with a home directory ‘/var/www/tecmint‘, a default shell of /bin/bash, and additional information about the user.
useradd -m -d /var/www/ravi -s /bin/bash -c "TecMint Owner" -U ravi
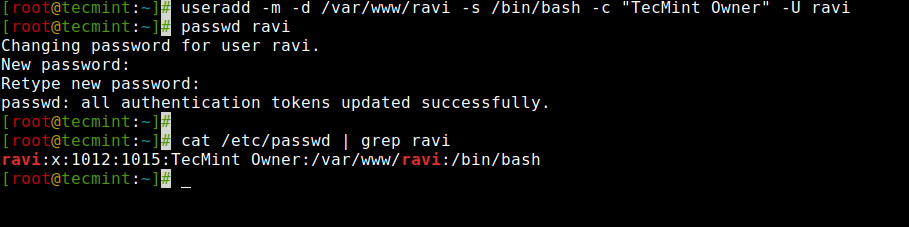
In the above command, the options '-m' and '-d' creates a user with a specified home directory, and the '-s' option sets the user’s default shell to /bin/bash. The '-c' option adds extra information about the user and the '-U' argument creates/adds a group with the same name as the user.
12. How to Create a User with a Defined Home, Shell, Comment, UID/GID
The command is very similar to the one above, but here we define the shell as ‘/bin/zsh‘ and set custom UID and GID for a user ‘tarunika‘. The '-u' option defines the new user’s UID (i.e., 100), and the '-g' option defines the GID (i.e., 1000).
useradd -m -d /var/www/tarunika -s /bin/zsh -c "TecMint Technical Writer" -u 1000 -g 100 tarunika

13. How to Create a User with Home, No Shell, Comment, and UID
The following command is very similar to the above two commands. The only difference is that here, we disabled the login shell for a user called ‘avishek‘ with a custom User ID (i.e., 1019).
The '-s' option sets the default shell to /bin/bash, but in this case, we set the login shell to ‘/usr/sbin/nologin‘. That means the user ‘avishek‘ will not be able to log into the system.
useradd -m -d /var/www/avishek -s /usr/sbin/nologin -c "TecMint Sr. Technical Writer" -u 1019 avishek

14. How to Create a User with a Specified Home, Shell, Skeleton, and UID
The only change in this command is that we used the '-k' option to set the custom skeleton directory to /etc/custom.skell instead of the default one, /etc/skel. We also used the '-s' option to define a different shell, /bin/tcsh, for the user ‘navin‘.
useradd -m -d /var/www/navin -k /etc/custom.skell -s /bin/tcsh -c "No Active Member of TecMint" -u 1027 navin

15. How to Create a User without Home, Shell, or Group, with Comment
The following command is very different from the other commands explained above. Here, we used the '-M' option to create a user without the user’s home directory, and the '-N' option is used to instruct the system to only create a username (without a group). The '-r' option is for creating a system user.
useradd -M -N -r -s /bin/false -c "Disabled TecMint Member" clayton

For more information and options about ‘useradd‘, run the ‘useradd‘ command in the terminal to see the available options
useradd
If you want to modify user account attributes such as modifying the username, user ID (UID), home directory, shell, and more, use the usermod command.