This tutorial will explain the first basic steps you need to go through after installing a minimal CentOS 7 system with no graphical environment in order to obtain information about the installed system, the hardware on top of which runs the system and configure other specific system tasks, such as networking, root privileges, software, services and others.
Requirements
Important: RHEL 7 users, can follow this article to do a Initial Server Setup on RHEL 7.
Update CentOS 7 System
The first step you need to perform on a fresh installed CentOS system is to make sure the system is up-to-date with the latest kernel and system security patches, software repositories and packages.
To fully update a CentOS 7 system, issue the following commands with root privileges.
# yum check-update
# yum upgrade
After the upgrade process completes, in order to release disk space you can remove all downloaded packages that where used in the process of upgrading alongside with all cached repositories information by executing the following command.
# yum clean all

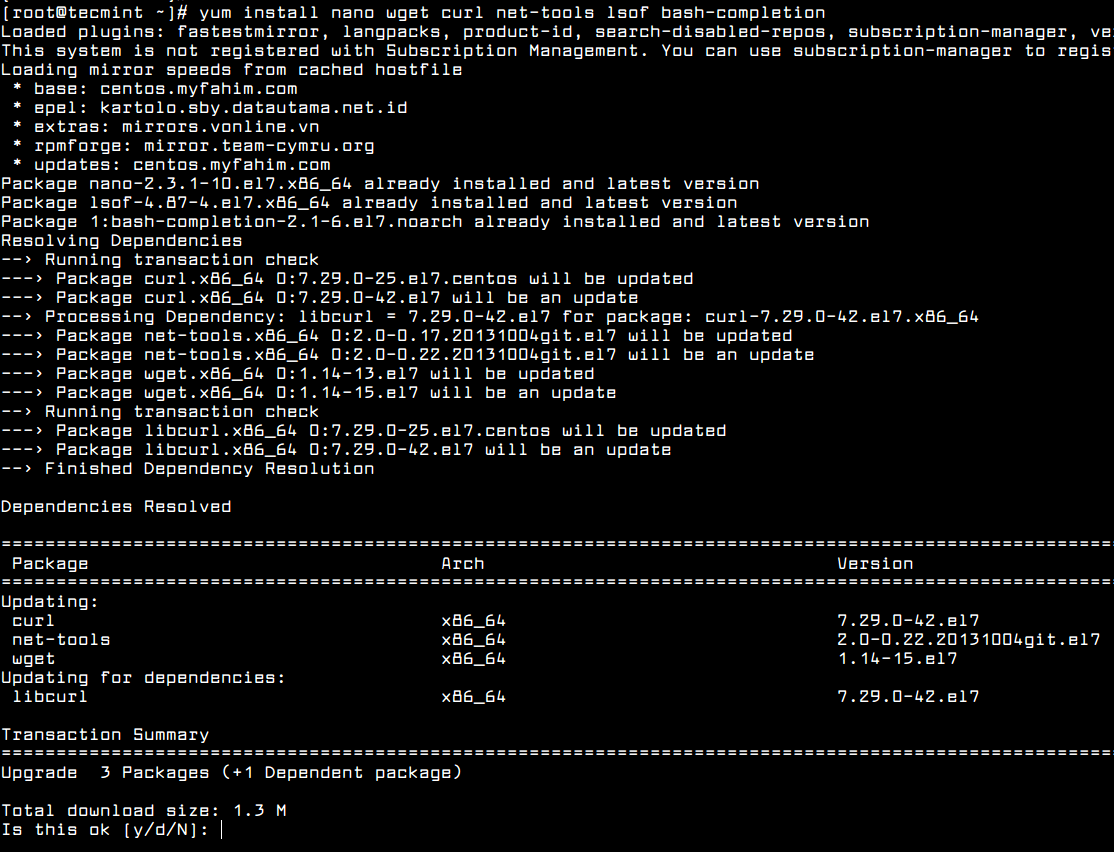
Install System Utilities on CentOS 7
The following utilities packages can prove to be useful for day-by-day system administration: nano (text editor to replace vi editor), wget, curl (utilities used for downloading packages over network mostly) net-tools, lsof (utilities for managing local networking) and bash-completion (command line autocomplete).
Install them all in one-shot by executing the below command.
# yum install nano wget curl net-tools lsof bash-completion
Setup Networking in CentOS 7
CentOS 7 has a wide range of tools that can be used to configure and manage networking, from manually editing the network configuration file to using commands such as ip, ifconfig, nmtui, nmcli or route.
The easiest utility a beginner can use to manage and change network configurations is nmtui graphical command line.
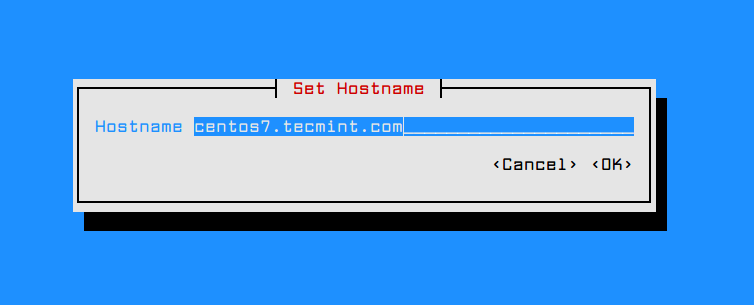
In order to change the system hostname via nmtui utility, execute nmtui-hostname command, set your machine hostname and press OK to finish, as illustrated in the below screenshot.
# nmtui-hostname
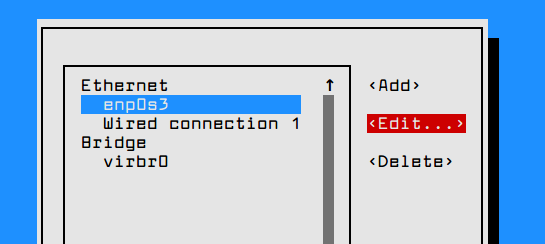
To manipulate a network interface, execute nmtui-edit command, choose the interface you want to edit and select edit from the right menu, as shown in the below screenshot.
# nmtui-edit
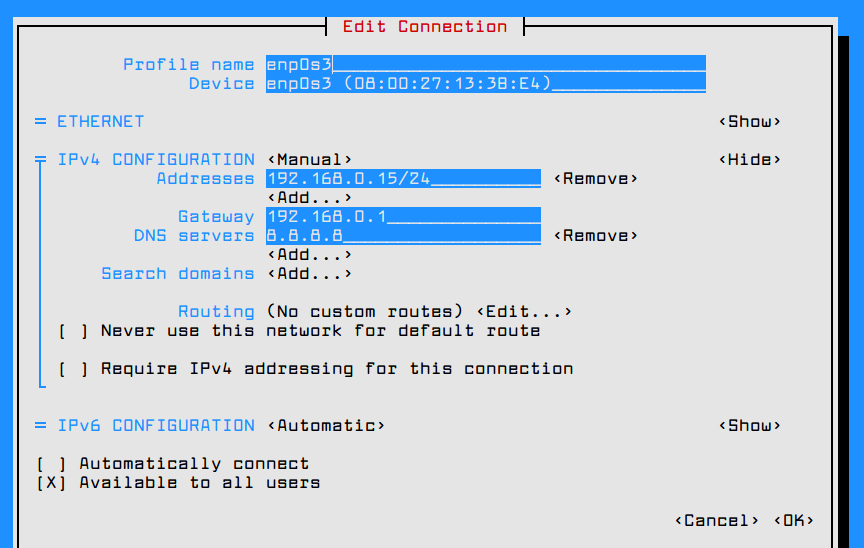
Once you’re in the graphical interface provided by nmtui utility you can setup the network interface IP settings as illustrated in the below screenshot. When you finish, navigate to OK using [tab] key to save the configuration and quit.
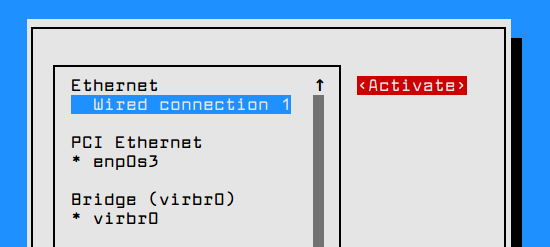
In order to apply the network interface new configuration, execute nmtui-connect command, select the interface you want to manage and hit on Deactivate/Activate option to decommission and rise-up the interface with the IP settings, as presented in the below screenshots.
# nmtui-connect
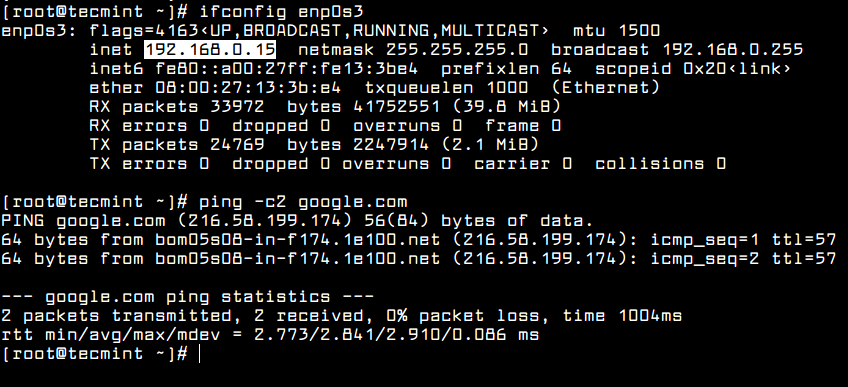
In order to view the network interface settings, you can inspect the content of the interface file or you can issue the below commands.
# ifconfig enp0s3
# ip a
# ping -c2 google.com
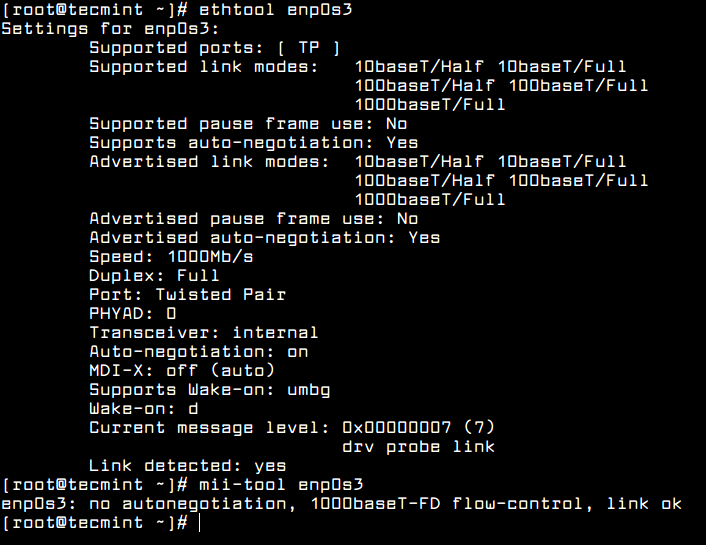
Other useful utilities that can be used to manage speed, link state or obtain information about machine network interfaces are ethtool and mii-tool.
# ethtool enp0s3
# mii-tool enp0s3
An important aspect of your machine networking is to list all open network sockets in order to see what programs are listening on what ports and what’s the state of the established network connections.
To list all servers that have opened TCP or UDP sockets in listening state issue the following commands. However, UDP server won’t list any socket state due to the fact that UDP is a connectionless protocol which only sends packets over network and doesn’t establish connections.
# netstat -tulpn
# ss -tulpn
# lsof -i4 -6
Manage Services in CentOS 7
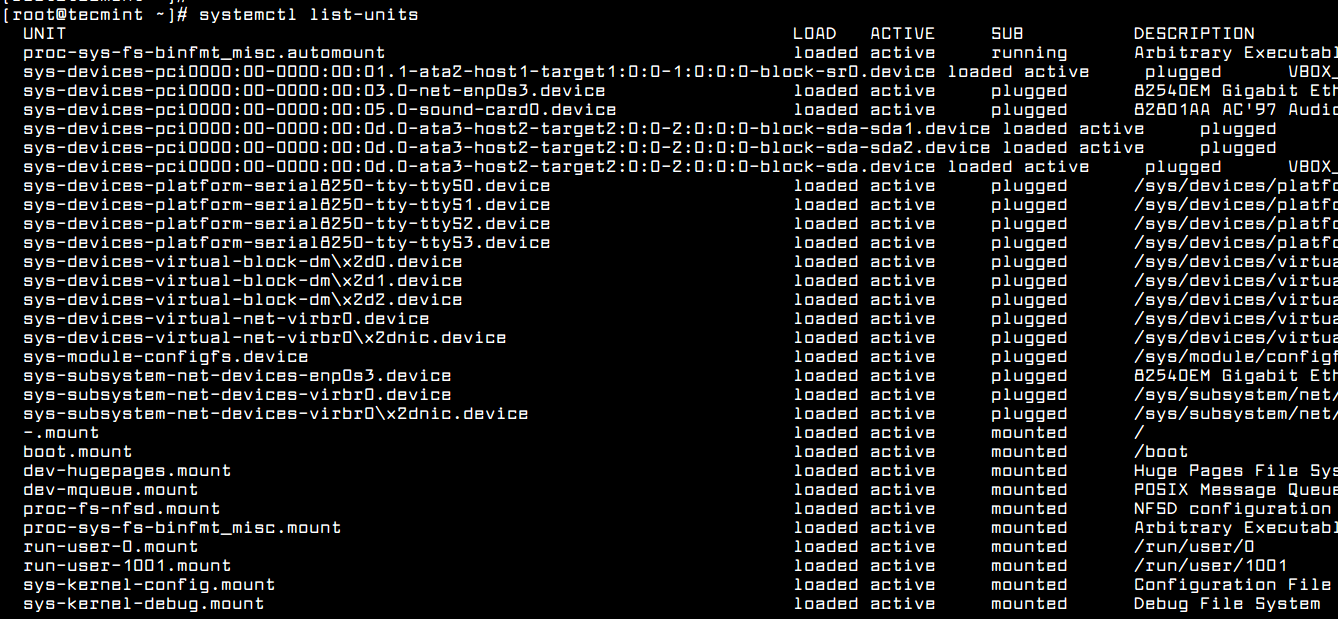
CentOS 7 manages daemons or service via systemctl utility. In order to list all services state, issue the following command.
# systemctl list-units
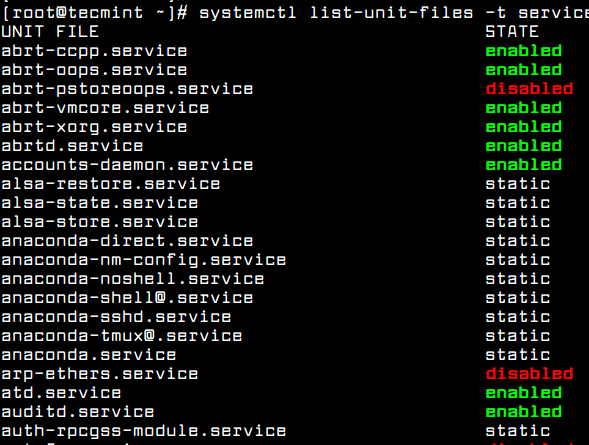
To check if a daemon or service is enabled to automatically start when the system starts, issue the following command.
# systemctl list-unit-files -t service
To list the old SysV services present in your system and disable them issue the following chkconfig commands.
# chkconfig --list
# chkconfig service_name off
5. Disable Unwanted Services in CentOS 7
It’s recommended after installing CentOS 7, to list what services are running in the system by running the above commands and disable and remove them in order to reduce the attacks vectors against your system.
For instance, Postfix daemon is installed and enabled by default in CentOS 7. If your system don’t require running a mail server, it’s best to stop, disable and remove the postfix service by issuing the below commands.
# systemctl stop postfix
# systemctl disable postfix
# yum remove postfix
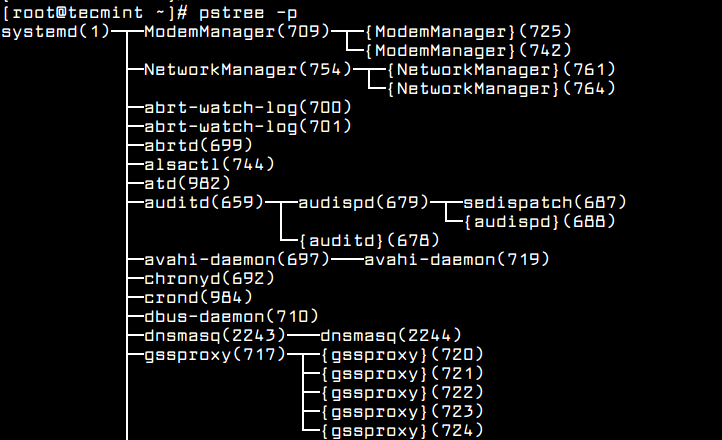
In addition to netstat, ss, lsof or systemctl commands, you can also run ps, top or pstree commands in order to discover and identify what unwanted services are running in your system and disable or remove them.
By default, pstree utility is not installed in CentOS 7. To install it execute the following command.
# yum install psmisc
# pstree -p
Enable Firewall in CentOs 7
Firewalld is the main firewall utility that uses interacts with in order to manage iptables rules.
To enable and start and verify the firewall in CentOS 7, execute the following commands.
# systemctl enable firewalld
# systemctl start firewalld
# systemctl status firewalld
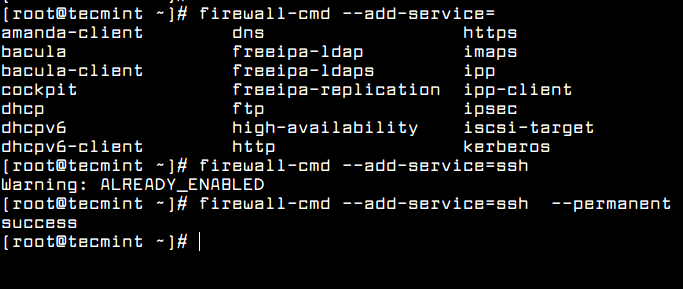
In order to open a specific service to incoming connections, first verify if the application is already present in firewalld rules and, then, add the rule for the service, as shown in the below example which allows SSH incoming connections. Use --permanent switch to add the rule permanently.
# firewall-cmd --add-service=[tab]  #List services
# firewall-cmd --add-service=ssh
# firewall-cmd --add-service=ssh --permanent
In case the service is now already defined in firewalld rules, you can manually add the service port, as shown in the below example.
# firewall-cmd --add-port=22/tcp --permanent
# firewall-cmd --reload     #Apply the rule on-fly
Enable Sudo Permissions on User Accounts
In order to grant root permissions for a normal user, first create the user by issuing adduser command, set the password for the user and grant root permissions to the user by executing the below command which adds the new user to the administrative wheel group.
# adduser tecmint
# passwd tecmint
# usermod -aG wheel tecmint
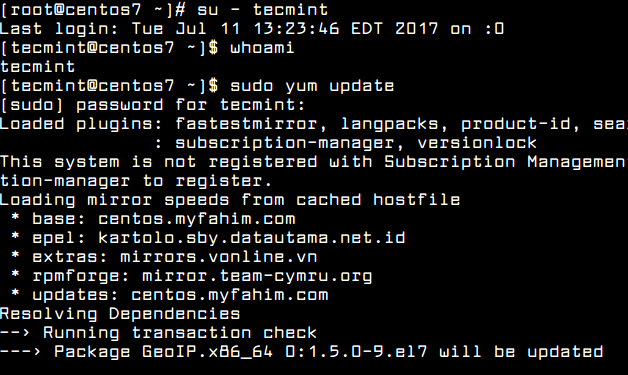
To test if the new user has root privileges, login to the system with user’s credentials and run yum command with sudo permissions, as shown in the below excerpt.
# su - tecmint
# sudo yum update
Configure SSH Public Key Authentication on CentOS 7
In order to secure SSH your server and set up public key authentication to increase the security of your server with a private SSH key to log in, first generate a SSH Key Pair with a following command.
Don’t not enter a passphrase in case you want to automate server management via SSH.
# ssh-keygen -t RSA
After the SSH key pairs had been generated, copy the key to the server you want to connect to by issuing the below command. Initially, enter you remote SSH user password in order to copy the public key.
# ssh-copy-id remote_user@SSH_SERVER_IP
After the SSH public key has been copied to the remote server, login to the remote SSH server with the following command.
# ssh remote_user@SSH_SERVER_IP
Finally, in order to secure the SSH server, make sure you disallow remote SSH access to the root account by opening the configuration SSH file /etc/ssh/sshd_config with your text editor as root and change it from Yes to No.
PermitRootLogin no
To apply the setting you need to restart the SSH service so that it will use the new configuration.
# systemctl restart sshd
That’s all! These are just a few basic settings and commands every system administrator needs to know and apply on a fresh installed CentOS system or in order to perform day to day tasks on the system.
To secure and harden CentOS 7 server, check out these following articles.
- The Mega Guide To Harden and Secure CentOS 7 – Part 1
- The Mega Guide To Harden and Secure CentOS 7 – Part 2
If you’re planning to deploy websites on this CentOS 7 system, learn how to setup and configure LAMP stack or LEMP stack.


Hi,
Please help how to install and setup the configuration of Zimbra in CentOS. Thanks!
@Lester,
Follow this article to setup Zimbra on CentOS.
Hi, This is Narendra,
I Want to install the CentOS on my windows10 operating system as you know Windows recently added an option for developer.
Through that how can i know install the CentOs.
@Narendar,
You mean CentOS Dual Boot with Windows? if yes, you should read this article – https://www.tecmint.com/install-fedora-27-with-windows-10-or-8-in-dual-boot/
Server (desktop pc) which is minimall centos 7, encrypted partitions, how to make it accessible after a power failure recovery. As the system stops at the screen for asking of the passphrase to boot.
Is it possible to make it booted and accessed remotely and at the same time in front of physical (Desktop pc) monitor stay not logged in?