Let us start by defining a bad sector/block, it’s a section on a disk drive or flash memory that can not be read from or written to anymore, as a result of a fixed physical damage on the disk surface or failed flash memory transistors.
As bad sectors continue to accumulate, they can undesirably or destructively affect your disk drive or flash memory capacity or even lead to a possible hardware failure.
It is also important to note that the presence of bad blocks should alert you to start thinking of getting a new disk drive or simply mark the bad blocks as unusable.
Therefore, in this article, we will go through the necessary steps that can enable you determine the presence or absence of bad sectors on your Linux disk drive or flash memory using certain disk scanning utilities.
That said, below are the methods:
Check Bad Sectors in Linux Disks Using badblocks Tool
A badblocks program enables users to scan a device for bad sectors or blocks. The device can be a hard disk or an external disk drive, represented by a file such as /dev/sdc.
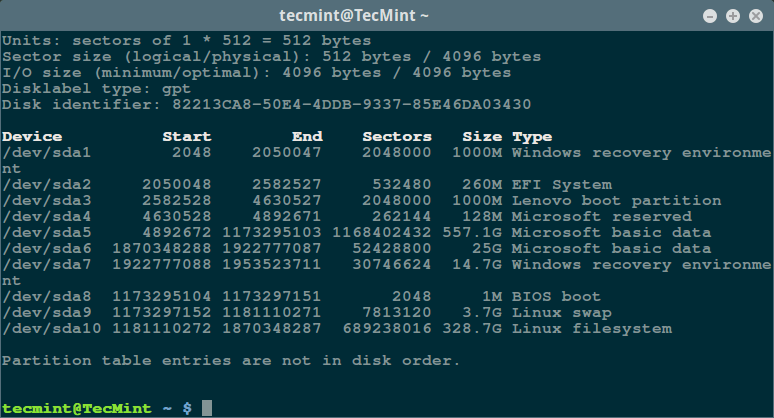
Firstly, use the fdisk command with superuser privileges to display information about all your disk drives or flash memory plus their partitions:
$ sudo fdisk -l
Then scan your Linux disk drive to check for bad sectors/blocks by typing:
$ sudo badblocks -v /dev/sda10 > badsectors.txt
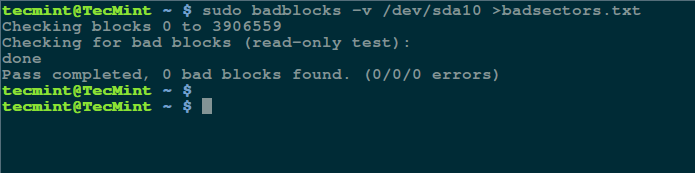
In the command above, badblocks is scanning device /dev/sda10 (remember to specify your actual device) with the -v enabling it to display details of the operation. In addition, the results of the operation are stored in the file badsectors.txt by means of output redirection.
In case you discover any bad sectors on your disk drive, unmount the disk and instruct the operating system not to write to the reported sectors as follows.
You will need to employ e2fsck (for ext2/ext3/ext4 file systems) or fsck command with the badsectors.txt file and the device file as in the command below.
The -l option tells the command to add the block numbers listed in the file specified by filename (badsectors.txt) to the list of bad blocks.
------------ Specifically for ext2/ext3/ext4 file-systems ------------
$ sudo e2fsck -l badsectors.txt /dev/sda10

OR

------------ For other file-systems ------------
$ sudo fsck -l badsectors.txt /dev/sda10
Scan Bad Sectors on Linux Disk Using Smartmontools
This method is more reliable and efficient for modern disks (ATA/SATA and SCSI/SAS hard drives and solid-state drives) which ship in with a S.M.A.R.T (Self-Monitoring, Analysis and Reporting Technology) system that helps detect, report and possibly log their health status, so that you can figure out any impending hardware failures.
You can install smartmontools by running the command below:
------------ On Debian/Ubuntu based systems ------------
$ sudo apt-get install smartmontools

------------ On RHEL/CentOS based systems ------------
$ sudo yum install smartmontools
Once the installation is complete, use smartctl which controls the S.M.A.R.T system integrated into a disk. You can look through its man page or help page as follows:
$ man smartctl
$ smartctl -h
Now execute the smartctrl command and name your specific device as an argument as in the following command, the flag -H or --health is included to display the SMART overall health self-assessment test result.
$ sudo smartctl -H /dev/sda10

The result above indicates that your hard disk is healthy, and may not experience hardware failures any soon.
For an overview of disk information, use the -a or --all option to print out all SMART information concerning a disk and -x or --xall which displays all SMART and non-SMART information about a disk.
In this tutorial, we covered a very important topic concerning disk drive health diagnostics, you can reach us via the feedback section below to share your thoughts or ask any questions and remember to always stay connected to Tecmint.


My Seagate 8TB external hard drive was working fine for the past three months. However, now that I am trying to use it, although it is connected to my PC and the light is on, it doesn’t appear under ‘Disks‘ on the left side. I’ve tried various commands on Linux, but none of them show any device under 8TB in size.
I am not proficient in IT or Linux, but I have friends who have been using Linux for at least 18 years without any problems. This issue is a significant concern for me as I have downloaded many files for my hobbies. Being 75 years old, this is my way to stay alert.
Please help me locate my device on my PC and guide me on how to use it again. If possible, could you provide different commands to retrieve my 8TB drive? I am also trying to understand some terminology such as swap, GPT, etc.
Thank you for your assistance, and I appreciate any guidance you can provide.
Why did no one mention just using the
-coption with e2fsck?i.e.
$ sudo e2fsck -c /dev/sda3
or even
-cc:$ sudo e2fsck -cc /dev/sda3
They will do it in one go.
$ man e2fsck:
The
-coption causes e2fsck to use badblocks(8) program to do a read-only scan of the device in order to find any bad blocks. If any bad blocks are found, they are added to the bad block inode to prevent them from being allocated to a file or directory.If this option is specified twice, then the bad block scan will be done using a non-destructive read-write test.
It would be helpful if the article provided sample output for:
After all, you do provide sample output for other commands that you run.
Hello,
There are bad blocks found on my Ubunutu18.04. So then I tried to employe
I get that my disk is mounted.
I used umount but then redoing the previous step gives me that the directory is not found.
Thanks
Kamal, /dev/sda10 was an example partition device. You can see your partition names with “df” or “lsblk“.
Whatever you do, do NOT umount the partition that is mounted as
"/".Good Luck,
Adam
Nicely done, thank you.
Seagate boot is a serious program. This is 90’s stuff.
How do you mount Ubuntu ISO in Ram in the grub boot menu?
@Breng,
Check this article – How to Run Any Linux Distribution Directly from Hard Disk in Ubuntu Using Grub Menu
I was doing this for a slightly impaired external drive, and it worked fine up until the actual call to fsck. Using your command verbatim,
gave me a message that “fsck: the -l option can be used with one device only — ignore“; apparently because it was interpreting the text file as an additional device. However, thinking it over,
with an opening angle bracket before the file, in case it gets edited out) worked perfectly. I think you may have lost a symbol to HTML formatting there.
@Michael
Okay, many thanks for sharing this. Allow us to check this out.
This wont work on large partitions (here is an example).
badblocks: Value too large for defined data type invalid end block (5502015488): must be 32-bit value
@J
Oops, we will investigate this further. Thanks for the useful feedback.
To overcome this error, set bigger block size with
-b, e.g.Thanks for the information :)
Very useful information! Help me to recover from an “Emergency mode” on Opensuse. Thanks
Whenever I try to start my pc, it shows like I/O buffer error, logical block error fsck exited with status code 8, Could this be a zero-length partition? I am completely new to it. So please help me I had some important documents in there. I don’t wanna format my hard drive as well. I would be really grateful if anyone could help me
@Jonathen
With which file system type was it formatted?
/dev/sda1I don’t wanna lose any of the data as some are very important. I hadn’t formatted anything before. So please help me figure it out.I think what Aaron means is which formatted system have you use for your device /dev/sda1?
You can use this command and look at column Type.
Thanks, specially for posting the article on Twitter. Very useful and informative.
@Frederick
Many thanks for the feedback.
Thanks much for the help on this topic. I’m reading at
https://linux.die.net/man/8/badblocksthat it’s better to use the-coption of e2fsck, which ensures that the numbering system for the blocks in badsectors.txt is correct, skipping the direct use of badblocks.See also the
https://linux.die.net/man/8/e2fsckdiscussion of the-loption on this score. Also, if someone is planning on using a live Linux install DVD in rescue mode then with an unmounted disk I don’t understand how a*.txtfile could be referenced (this said by someone who’s never actually really studied Linux or disk drives).I’ve found smartctl to be pretty much useless. It always says “test passed” on every disk I’ve tried it on, including ones with bad sectors.
It will only say “failed” if sector 0 is destroyed.
e2fsck won’t run on a mounted filesystem, but my disk with bad sectors is the system disk. How can I run e2fsck on the system disk?
@Robert,
First, boot into single-user mode and unmout file system.
Make sure to replace
/dev/sdawith your disk name.Then, run e2fsck command.
Since my drive is portable, how every OS can identify the bad sector in bad sector.txt file not use again rather than give not use it in a specific OS
The badsectors.txt file is only used by e2fsck -l. Once you’ve run
e2fsck -l, the bad sectors are marked as such within the filesystem itself, so you no longer need the badsectors.txt file.Using badblocks this way (manually) can result in problems as the (assumed) block sizes may not match between badblocks and fsck. Better to run the appropriate fsck.ext2/3 tool with the
-coption to let it scan by itself and ensure the block size is correct.@Maarten
Oops, okay, we will do more research about this. Thanks for the heads up.
please let me know how to remove read only error from the flash drive
@Virender
We will write a how-to guide on this topic very soon, as you have requested, therefore i kindly ask you to patiently wait for it.
So much fail. None of these will ever work for SSDs.
@Anon
I presume you have tasted the methods above with SSDs, and may you give us an explanation for your conclusion. That will help us understand better, why you have said so and probably find other ways to deal with bad sectors on SSDs.
So much fail in this article. Modern drives remap bad sectors so the bad blocks command will not detect them. Smartmontools are better but you need to examine individual readings to determine drive health.
I have a 2 TB that developed about 2500 remapped sectors before drive health changed from good.
@HankB
Good concern here and thanks for letting us know about the behavior of modern disks while detecting bad sectors in relation to badblocks utility, there are two methods offered in the article, a user can employ the two approaches to determine disk health(badblocks for older disks and smartmontools for modern disks as you have explained).
Again, smartctl which controls S.M.A.R.T system has multiple other options that you can try as per the descriptions in the man page, if you suspect a critical issue with your disk drive, you may probably want to check individual partitions for better diagnostics.
I see the first method is Read Only, to be clear, the second method is a “Passive” (Read Only) Check as well? I would want to minimize unnecessary Read/Writes to an SSD.
If a bad sector is found, will these methods try ‘testing’ the sector?
Thanks.
@Greg
For the case of badblocks utility you can enable write-mode test to all sectors by using the -w. This option allows badblocks command to scan for bad sectors by writing some patterns such as 0xaa, 0x55, 0xff, 0x00 on every block of the device, reading every sector and comparing the contents.
However, do not use the -w flag on a disk with an existing file system, you can read more about this warning from the badblocks man page.
Then, smartctl utility will print out an error or “failed” overall health test result after S.M.A.R.T tests all bad sector to show an imminent hardware failure.