Continuing the series of tutorials regarding RHEL/CentOS 7 PXE Network Boot Server Environment, where so far I have only discussed integrating and installing Linux distributions over PXE Server.

This tutorial will be concentrate around Windows based systems and will show you how to add and manually install Windows 7, both 32-bit and 64-bit architectures, over a PXE Server and Samba shares.
Requirements
- Install PXE Network Boot Server for Multiple OS Installations in RHEL/CentOS 7
- A Samba fully accessed directory share setup on PXE Server machine.
- A computer with Windows 7 operating system installed.
- Windows Automated Installation Kit (AIK) installed on Windows 7 computer.
- Both Windows 7 32-bit/64-bit DVD ISO Images.
Before proceeding with the installation process, I will explain how this guide is structured.
The first part will cover the configurations needed to setup the environment on RHEL/CentOS 7 PXE Server premises, by installing and configuring a Samba fully accessed shared directory with no authentication needed, where both Windows 7 system architecture images will be deployed, and, also, editing PXE Server default configuration file with the options needed to boot WinPE ISO Image in order to manually proceed with Windows installation process.
The second part will be focused on building WinPE ISO image (Windows Preinstallation Enironment) with the help of Windows Automated Installation Kit (AIK) installed on a Windows 7 computer premises. This image will be then transferred to PXE Server machine via Samba shared directory and moved to TFTP server default location.
The next steps that should be made on the client-side in order to boot, access and install Windows 7 over network.
Step 1: Install and Setup Samba Share on PXE Server
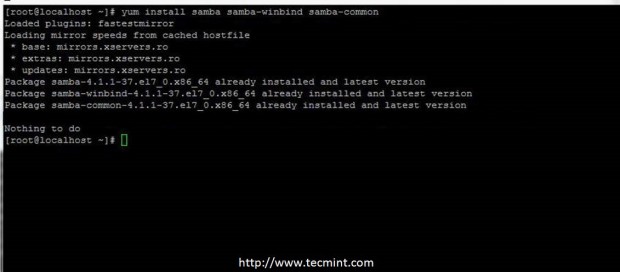
1. On the first step, login to PXE Server with root account and setup a fully accessed Samba share, where Windows 7 DVD installation sources will be deployed. Install Samba daemon by issuing the following command.
# yum install samba samba-common samba-winbind
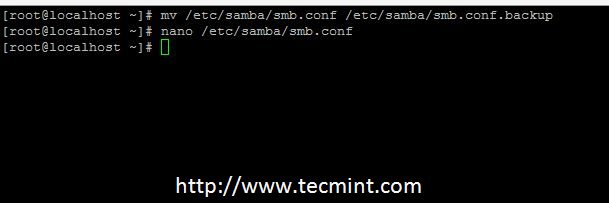
2. Next, backup samba main configuration file and create a new configuration file with your favourite text editor by running the following commands.
# mv /etc/samba/smb.conf /etc/samba/smb.conf.backup
# nano /etc/samba/smb.conf
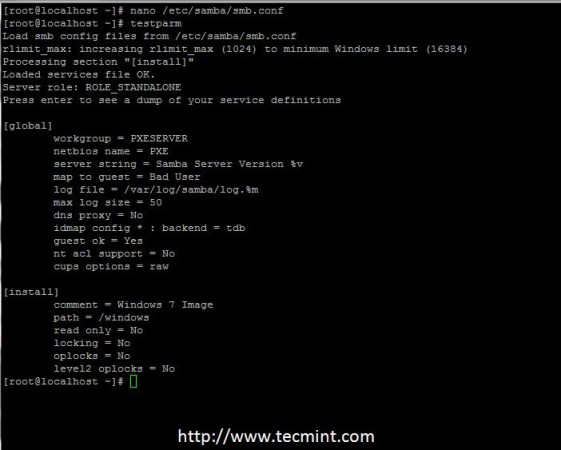
3. Now add the following configurations to samba main file as presented in the below file excerpt.
[global]
        workgroup = PXESERVER
        server string = Samba Server Version %v
        log file = /var/log/samba/log.%m
        max log size = 50
        idmap config * : backend = tdb
        cups options = raw
        netbios name = pxe
        map to guest = bad user
        dns proxy = no
        public = yes
        ## For multiple installations the same time - not lock kernel
        kernel oplocks = no
        nt acl support = no
        security = user
        guest account = nobody

[install]
        comment = Windows 7 Image
        path = /windows
        read only = no
        browseable = yes
        public = yes
        printable = no
        guest ok = yes
        oplocks = no
        level2 oplocks = no
        locking = no
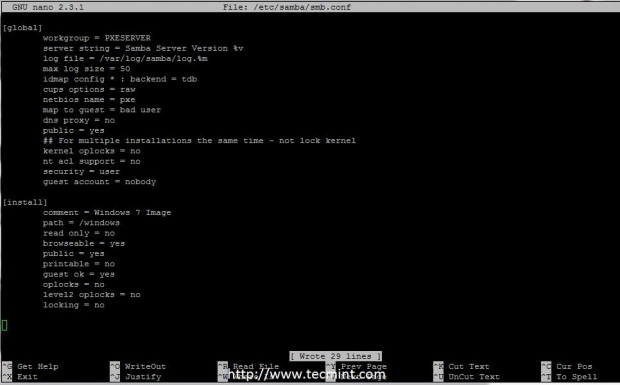
As you can see from this configuration file, I have created a shared folder named install which is located under /windows system path (on this path will copy Windows 7 DVD installation sources).
4. After finishing editing main samba configuration file run testparm command in order to check and validate the file for eventual errors or misconfigurations.
# testparm
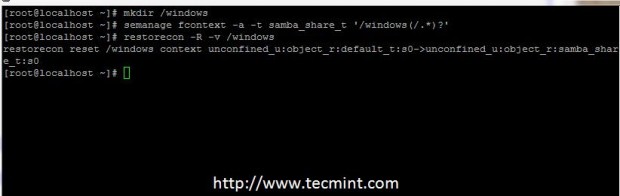
5. On the next step create the /windows directory under root path (the directory defined in samba conf file) and add SELinux contextual rules in
order to be fully accessed in case your system has enforced SELinux security.
# mkdir /windows
# semanage fcontext -a -t samba_share_t ‘/windows(/.*)?’
# restorecon -R -v /windows
Step 2: Deploy Windows 7 Installation Sources on PXE Server
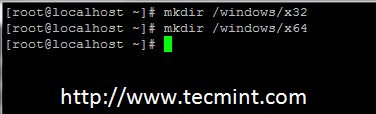
6. For this step both Windows 7 ISO DVD Images are needed. But before mounting and copy DVD content create two directories under /windows path
to separate Windows installation sources architectures.
# mkdir /windows/x32
# mkdir /windows/x64
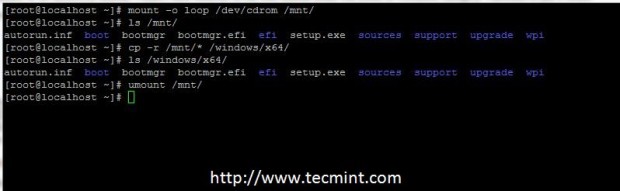
7. Now it’s time to copy Windows Installation Sources to the paths created above. First put Windows 7 32-bit DVD Image ISO on your machine DVD drive, mount the image to /mnt path and copy all DVD mounted content to samba shared directory /windows/x32/. The transfer process can take a while depending on your system resources, and, after it finishes, unmount Windows 7 32-bit DVD Image.
# mount -o loop /dev/cdrom /mnt
# cp -rf  /mnt/*  /windows/x32/
# umount  /mnt
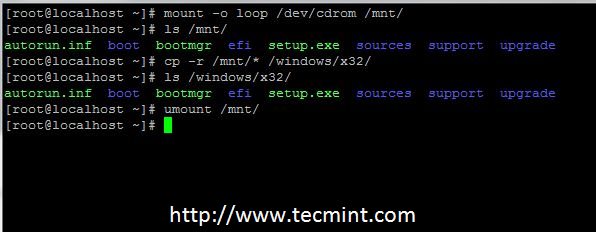
8. Repeat the above process with Windows 7 64-bit DVD Image, but this time copy DVD mounted content to /windows/x64/ shared path.
# mount -o loop /dev/cdrom /mnt
# cp -rf  /mnt/*  /windows/x64/
# umount  /mnt
Note: If your PXE server machine doesn’t have a DVD drive you can copy both Windows DVDs contents after you start samba server and access the “install” shared folder from a Windows computer.
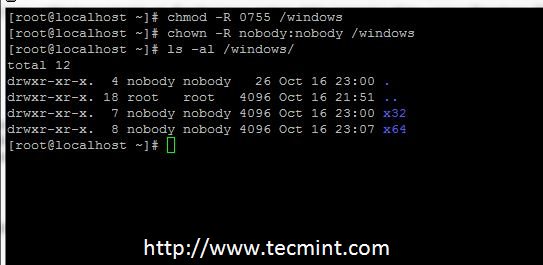
9. After both DVD’s images are copied, issue the following commands to setup the right owner and permissions in order to make the share readable and fully accessible without authentication.
# chmod -R 0755 /windows
# chown -R nobody:nobody /windows
Step 3: Add Firewall Rules, Start and Enable Samba System-Wide
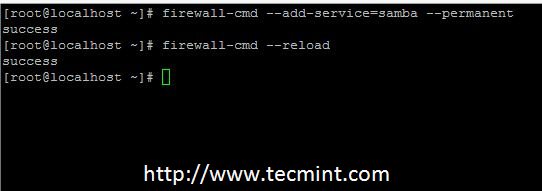
10. If you are using a Firewall on your PXE Server premises, add the following rule to Firewalld service to open Samba to outside connections.
# firewall-cmd --add-service=samba --permanent
# firewall-cmd --reload
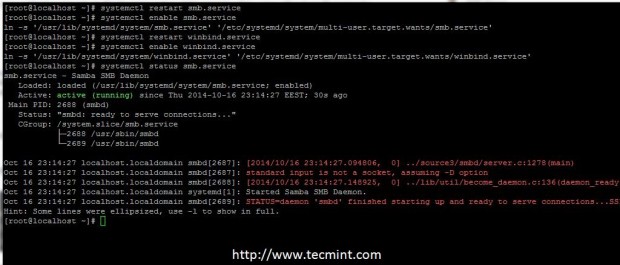
11. Now, start Samba daemons and enable it system wide, to automatically start after every reboot, by issuing the following commands.
# systemctl restart smb
# systemctl enable smb
# systemctl restart winbind
# systemctl enable winbind
# systemctl restart nmb
# systemctl enable nmb
# systemctl status smb
12. To test Samba configuration move to a Windows computer and add the IP Address of your Samba server followed by the shared path name in Windows Explorer address bar and the shared folders should appear.
\2.168.1.20\install

At this point you can now use the alternate method explained in the above note, and put Windows 7 ISO Images in your DVD drive and copy their content, depending on the system architecture, to x32 and x64 folders.
Step 4: Configure PXE Server
13. Before editing PXE Menu configuration file, create a new directory named windows on TFTP server default system path. Under this directory you will later copy WinPE ISO image, created on the Windows 7 computer using Windows Automated Installation Kit program.
# mkdir /var/lib/tftpboot/windows
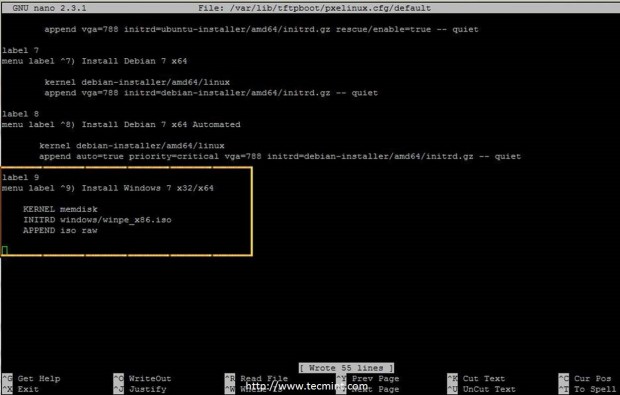
14. Now, open PXE Server default configuration file and add Windows Installation label to PXE menu, as described in the below menu excerpt.
# nano /var/lib/tftpboot/pxelinux.cfg/default
Windows 7 menu label configuration.
label 9
menu label ^9) Install Windows 7 x32/x64
                KERNEL memdisk
                INITRD windows/winpe_x86.iso
                APPEND iso raw
That’s all you need to setup on RHEL/CentOS 7 PXE Server side. Still, don’t close the console yet, because you will need it later to copy WinPE ISO image to /var/lib/tftpboot/windows/ directory.
Further let’s continue with the procedure and move onto a Windows 7 Installation on PXE Network – Part 2 of this series, and don’t forget to give your valuable feedback about the article.