RAID Mirroring means an exact clone (or mirror) of the same data writing to two drives. A minimum two number of disks are more required in an array to create RAID1 and it’s useful only, when read performance or reliability is more precise than the data storage capacity.
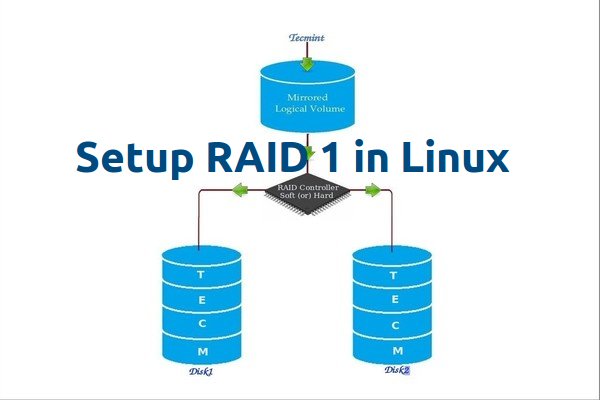
Mirrors are created to protect against data loss due to disk failure. Each disk in a mirror involves an exact copy of the data. When one disk fails, the same data can be retrieved from other functioning disk. However, the failed drive can be replaced from the running computer without any user interruption.
Features of RAID 1
- Mirror has Good Performance.
- 50% of space will be lost. Means if we have two disk with 500GB size total, it will be 1TB but in Mirroring it will only show us 500GB.
- No data loss in Mirroring if one disk fails, because we have the same content in both disks.
- Reading will be good than writing data to drive.
Requirements
Minimum Two number of disks are allowed to create RAID 1, but you can add more disks by using twice as 2, 4, 6, 8. To add more disks, your system must have a RAID physical adapter (hardware card).
Here we’re using software raid not a Hardware raid, if your system has an inbuilt physical hardware raid card you can access it from it’s utility UI or using Ctrl+I key.
Read Also: Basic Concepts of RAID in Linux
My Server Setup
Operating System :	CentOS 6.5 Final
IP Address	 :	192.168.0.226
Hostname	 :	rd1.tecmintlocal.com
Disk 1 [20GB]	 :	/dev/sdb
Disk 2 [20GB]	 :	/dev/sdc
This article will guide you through a step-by-step instructions on how to setup a software RAID 1 or Mirror using mdadm (creates and manages raid) on Linux Platform. Although the same instructions also works on other Linux distributions such as RedHat, CentOS, Fedora, etc.
Step 1: Installing Prerequisites and Examine Drives
1. As I said above, we’re using mdadm utility for creating and managing RAID in Linux. So, let’s install the mdadm software package on Linux using yum or apt-get package manager tool.
# yum install mdadm		[on RedHat systems]
# apt-get install mdadm 	[on Debain systems]
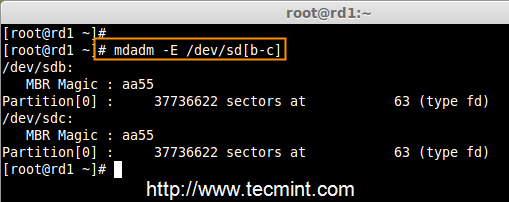
2. Once ‘mdadm‘ package has been installed, we need to examine our disk drives whether there is already any raid configured using the following command.
# mdadm -E /dev/sd[b-c]
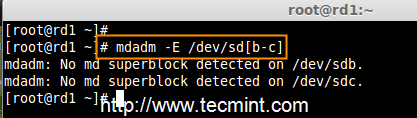
As you see from the above screen, that there is no any super-block detected yet, means no RAID defined.
Step 2: Drive Partitioning for RAID
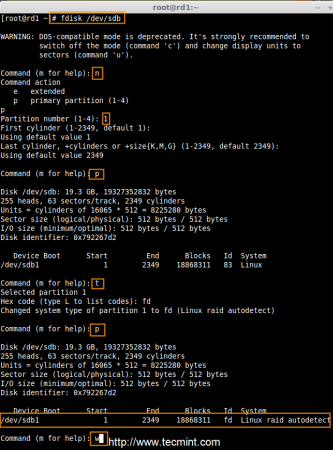
3. As I mentioned above, that we’re using minimum two partitions /dev/sdb and /dev/sdc for creating RAID1. Let’s create partitions on these two drives using ‘fdisk‘ command and change the type to raid during partition creation.
# fdisk /dev/sdb
Follow the below instructions
- Press ‘n‘ for creating new partition.
- Then choose ‘P‘ for Primary partition.
- Next select the partition number as 1.
- Give the default full size by just pressing two times Enter key.
- Next press ‘p‘ to print the defined partition.
- Press ‘L‘ to list all available types.
- Type ‘t‘to choose the partitions.
- Choose ‘fd‘ for Linux raid auto and press Enter to apply.
- Then again use ‘p‘ to print the changes what we have made.
- Use ‘w‘ to write the changes.
After ‘/dev/sdb‘ partition has been created, next follow the same instructions to create new partition on /dev/sdc drive.
# fdisk /dev/sdc

4. Once both the partitions are created successfully, verify the changes on both sdb & sdc drive using the same ‘mdadm‘ command and also confirm the RAID type as shown in the following screen grabs.
# mdadm -E /dev/sd[b-c]
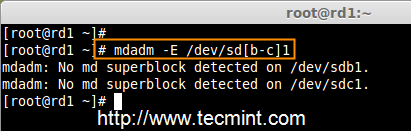
Note: As you see in the above picture, there is no any defined RAID on the sdb1 and sdc1 drives so far, that’s the reason we are getting as no super-blocks detected.
Step 3: Creating RAID1 Devices
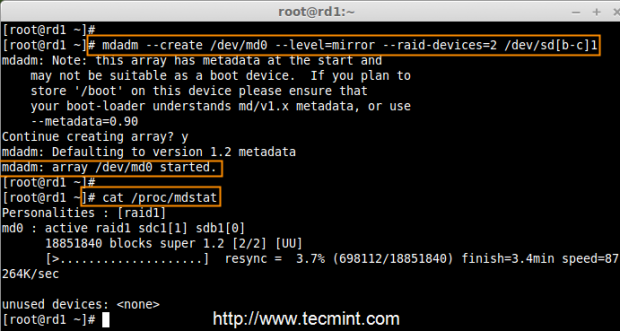
5. Next create RAID1 Device called ‘/dev/md0‘ using the following command and verity it.
# mdadm --create /dev/md0 --level=mirror --raid-devices=2 /dev/sd[b-c]1
# cat /proc/mdstat
6. Next check the raid devices type and raid array using following commands.
# mdadm -E /dev/sd[b-c]1
# mdadm --detail /dev/md0
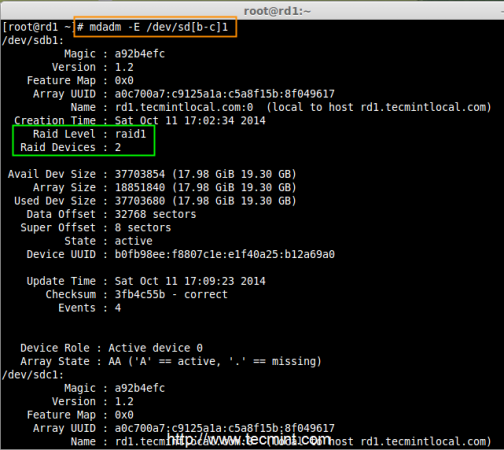
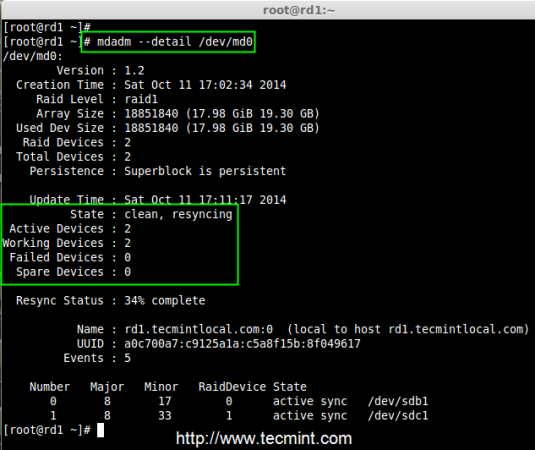
From the above pictures, one can easily understand that raid1 have been created and using /dev/sdb1 and /dev/sdc1 partitions and also you can see the status as resyncing.
Step 4: Creating File System on RAID Device
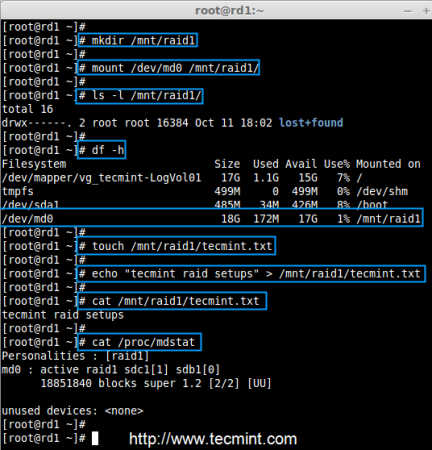
7. Create file system using ext4 for md0 and mount under /mnt/raid1.
# mkfs.ext4 /dev/md0

8. Next, mount the newly created filesystem under ‘/mnt/raid1‘ and create some files and verify the contents under mount point.
# mkdir /mnt/raid1
# mount /dev/md0 /mnt/raid1/
# touch /mnt/raid1/tecmint.txt
# echo "tecmint raid setups" > /mnt/raid1/tecmint.txt
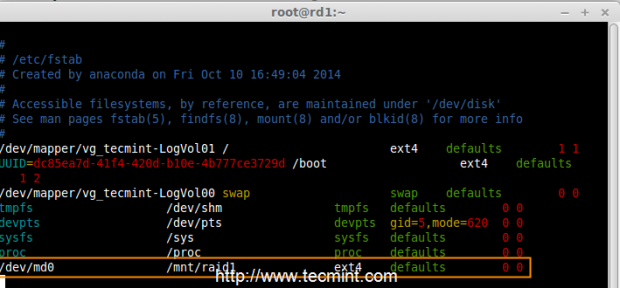
9. To auto-mount RAID1 on system reboot, you need to make an entry in fstab file. Open ‘/etc/fstab‘ file and add the following line at the bottom of the file.
/dev/md0 /mnt/raid1 ext4 defaults 0 0
10. Run ‘mount -a‘ to check whether there are any errors in fstab entry.
# mount -av

11. Next, save the raid configuration manually to ‘mdadm.conf‘ file using the below command.
# mdadm --detail --scan --verbose >> /etc/mdadm.conf
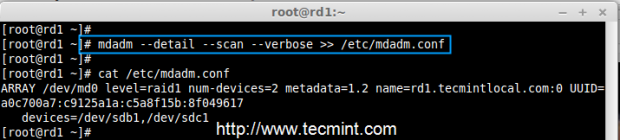
The above configuration file is read by the system at the reboots and load the RAID devices.
Step 5: Verify Data After Disk Failure
12. Our main purpose is, even after any of hard disk fail or crash our data needs to be available. Let’s see what will happen when any of disk disk is unavailable in array.
# mdadm --detail /dev/md0
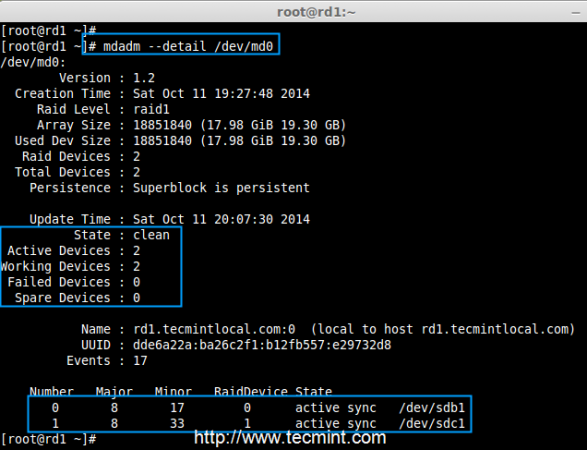
In the above image, we can see there are 2 devices available in our RAID and Active Devices are 2. Now let us see what will happen when a disk plugged out (removed sdc disk) or fails.
# ls -l /dev | grep sd
# mdadm --detail /dev/md0
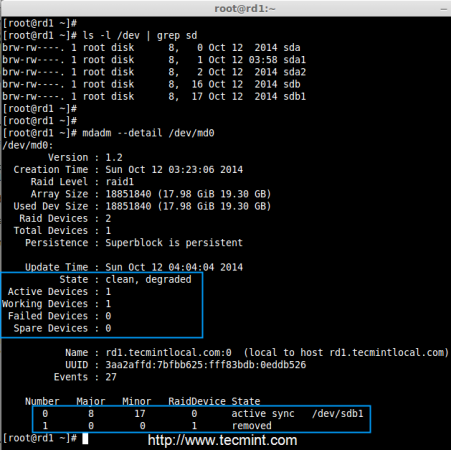
Now in the above image, you can see that one of our drive is lost. I unplugged one of the drive from my Virtual machine. Now let us check our precious data.
# cd /mnt/raid1/
# cat tecmint.txt
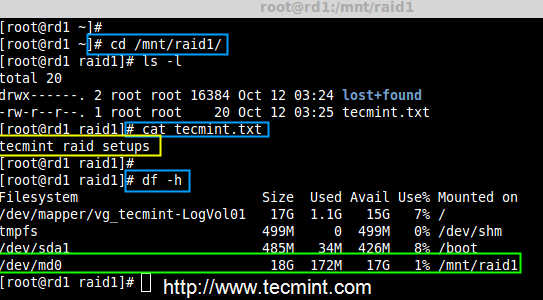
Did you see our data is still available. From this we come to know the advantage of RAID 1 (mirror). In next article, we will see how to setup a RAID 5 striping with distributed Parity. Hope this helps you to understand how the RAID 1 (Mirror) Works.