Java is a collection of software better known for it’s cross platform availability was developed by Sun Microsystems in 1995. Java platform is used by millions of applications and websites (specially used in banking sites) due to its fast, secure and reliable nature. Today, Java is everywhere, from desktops to data-centers, game consoles to scientific computers, mobile phones to the Internet, etc…
There are more than one version of Java can be installed and running on same computer and also it’s possible to have different version of JDK and JRE simultaneously on a machine, actually there are abundant of applications that requires Java-jre (Java Runtime Environment) and those who are developer required Java-sdk (Software Development Kit).
A lots of Linux distribution comes with other version of Java called OpenJDK (not the one developed by Sun Microsystems and acquired by Oracle Corporation). OpenJDK is an open source implementation of Java application.
Latest stable release of Java version is 9.0.4.
Install Java 9 in Linux
1. Before installing Java, make sure to first verify the version of installed Java.
# java -version

java version "1.7.0_75"
OpenJDK Runtime Environment (IcedTea 2.5.4) (7u75-2.5.4-2)
OpenJDK 64-Bit Server VM (build 24.75-b04, mixed mode)
It’s clear from the output above that the installed version of Java is OpenJDK 1.7.0_75.
2. Make a directory where you want to install Java. For global access (for all users) install it preferably in the directory /opt/java.
# mkdir /opt/java && cd /opt/java
3. Now it’s time to download Java (JDK) 9 source tarball files for your system architecture by going to official Java download page.
For reference, we have provided the source tarball file-name, please select and download these below mentioned file only.
jdk-9.0.4_linux-x64_bin.tar.gz
Alternatively, you may use wget command to download file directly into the /opt/java directory as shown below.
# cd /opt/java
# wget --no-cookies --no-check-certificate --header "Cookie: oraclelicense=accept-securebackup-cookie" http://download.oracle.com/otn-pub/java/jdk/9.0.4+11/c2514751926b4512b076cc82f959763f/jdk-9.0.4_linux-x64_bin.tar.gz
4. Once file has been downloaded, you may extract the tarball using tar command as shown below.
# tar -zxvf jdk-9.0.4_linux-x64_bin.tar.gz
5. Next, move to the extracted directory and use command update-alternatives to tell system where java and its executables are installed.
# cd jdk-9.0.4/
# update-alternatives --install /usr/bin/java java /opt/java/jdk-9.0.4/bin/java 100
# update-alternatives --config java

6. Tell system to update javac alternatives as:
# update-alternatives --install /usr/bin/javac javac /opt/java/jdk-9.0.4/bin/javac 100
# update-alternatives --config javac
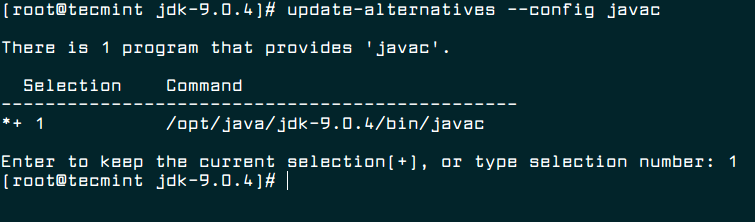
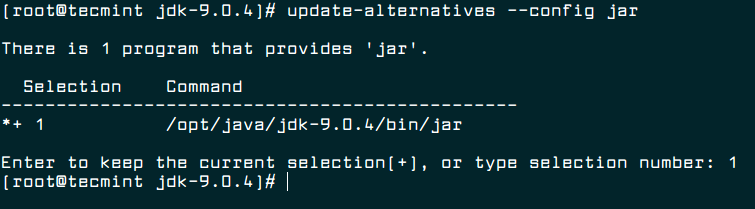
7. Similarly, update jar alternatives as:
# update-alternatives --install /usr/bin/jar jar /opt/java/jdk-9.0.4/bin/jar 100
# update-alternatives --config jar
8. Setting up Java Environment Variables.
# export JAVA_HOME=/opt/java/jdk-9.0.4/
# export JRE_HOME=/opt/java/jdk-9.0.4/jre
# export PATH=$PATH:/opt/java/jdk-9.0.4/bin:/opt/java/jdk-9.0.4/jre/bin

9. Now You may verify the Java version again, to confirm.
# java -version

java version "9.0.4"
Java(TM) SE Runtime Environment (build 9.0.4+11)
Java HotSpot(TM) 64-Bit Server VM (build 9.0.4+11, mixed mode)
Suggested: If you are not using OpenJDK (open source implementation of java), you may remove it as:
# yum remove openjdk-*      [On CentOs/RHEL]
# apt-get remove openjdk-*  [On Debian/Ubuntu]
Enable Java Support in Firefox
10. To enable Java 9 JDK Support in Firefox, you need to run following commands to enable Java module for Firefox.
On Debian, Ubuntu and Mint
# update-alternatives --install /usr/lib/mozilla/plugins/libjavaplugin.so libjavaplugin.so /opt/java/jdk-9.0.4/lib/libnpjp2.so 20000
On RHEL, CentOS and Fedora
# alternatives --install /usr/lib/mozilla/plugins/libjavaplugin.so libjavaplugin.so /opt/java/jdk-9.0.4/lib/libnpjp2.so 20000
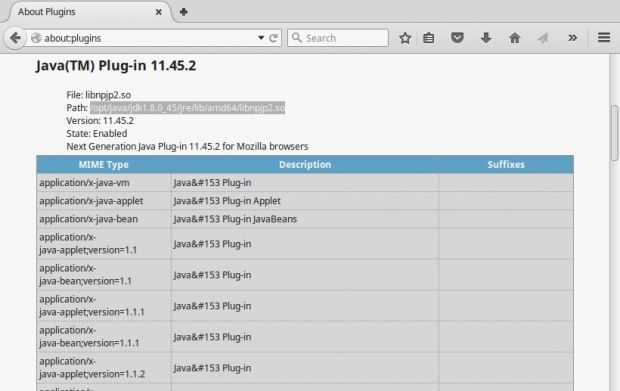
11. Now verify the Java support by restarting Firefox and enter about:plugins on the address bar. You will get similar to below screen.
That’s all for now. Hope this post of mine will help you in setting oracle Java, the easiest way. I would like to know your view on this. Keep connected, Stay tuned! Like and share us and help us get spread.