Donated by Google to the Opensource community, Kubernetes has now become the container management tool of choice. It can manage and orchestrate not just docker runtimes but also Containers and Rkt runtimes.
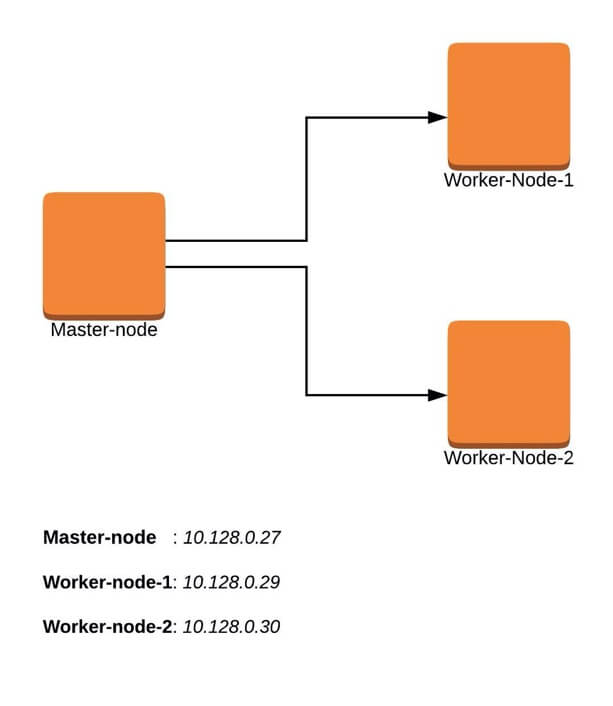
A typical Kubernetes cluster would generally have a master node and several worker-nodes or Minions. The worker-nodes are then managed from the master node, thus ensuring that the cluster is managed from a central point.
It’s also important to mention that you can also deploy a single-node Kubernetes cluster which is generally recommended for very light, non-production workloads. For this, you can use Minikube, which is a tool that runs a single-node Kubernetes cluster in a virtual machine on your node.
Recommended Read: How to Install a Kubernetes Cluster on CentOS 8
For this tutorial, we will walk-through a multi-node Kubernetes cluster installation on CentOS 7 Linux. This tutorial is command-line based so you will need access to your terminal window.
Prerequisites
- Multiple servers running Centos 7 (1 Master Node, 2 Worker Nodes). It is recommended that your Master Node have at least 2 CPUs, though this is not a strict requirement.
- Internet connectivity on all your nodes. We will be fetching Kubernetes and docker packages from the repository. Equally, you will need to make sure that the yum package manager is installed by default and can fetch packages remotely.
- You will also need access to an account with sudo or root privileges. In this tutorial, I will be using my root account.
Our 3-node cluster will look something like this:
Installation of Kubernetes Cluster on Master-Node
For Kubernetes to work, you will need a containerization engine. For this installation, we will use docker as it is the most popular.
The following steps will run on the Master-Node.
Step 1: Prepare Hostname, Firewall and SELinux
On your master node, set the hostname and if you don’t have a DNS server, then also update your /etc/hosts file.
# hostnamectl set-hostname master-node
# cat <<EOF>> /etc/hosts
10.128.0.27 master-node
10.128.0.29 node-1 worker-node-1
10.128.0.30 node-2 worker-node-2
EOF
You can ping worker-node-1 and worker-node-2 to test if your updated hostfile is fine using ping command.
# ping 10.128.0.29
# ping 10.128.0.30
Next, disable SElinux and update your firewall rules.
# setenforce 0
# sed -i --follow-symlinks 's/SELINUX=enforcing/SELINUX=disabled/g' /etc/sysconfig/selinux
# reboot
Set the following firewall rules on ports. Make sure that each firewall-cmd command, returns a success.
# firewall-cmd --permanent --add-port=6443/tcp
# firewall-cmd --permanent --add-port=2379-2380/tcp
# firewall-cmd --permanent --add-port=10250/tcp
# firewall-cmd --permanent --add-port=10251/tcp
# firewall-cmd --permanent --add-port=10252/tcp
# firewall-cmd --permanent --add-port=10255/tcp
# firewall-cmd –reload
# modprobe br_netfilter
# echo '1' > /proc/sys/net/bridge/bridge-nf-call-iptables
Step 2: Setup the Kubernetes Repo
You will need to add Kubernetes repositories manually as they do not come installed by default on CentOS 7.
cat <<EOF > /etc/yum.repos.d/kubernetes.repo
[kubernetes]
name=Kubernetes
baseurl=https://packages.cloud.google.com/yum/repos/kubernetes-el7-x86_64
enabled=1
gpgcheck=1
repo_gpgcheck=1
gpgkey=https://packages.cloud.google.com/yum/doc/yum-key.gpg https://packages.cloud.google.com/yum/doc/rpm-package-key.gpg
EOF
Step 3: Install Kubeadm and Docker
With the package repo now ready, you can go ahead and install kubeadm and docker packages.
# yum install kubeadm docker -y
When the installation completes successfully, enable and start both services.
# systemctl enable kubelet
# systemctl start kubelet
# systemctl enable docker
# systemctl start docker
Step 4: Initialize Kubernetes Master and Setup Default User
Now we are ready to initialize kubernetes master, but before that you need to disable swap in order to run “kubeadm init“ command.
# swapoff -a
Initializing Kubernetes master is a fully automated process that is managed by the “kubeadm init“ command which you will run.
# kubeadm init
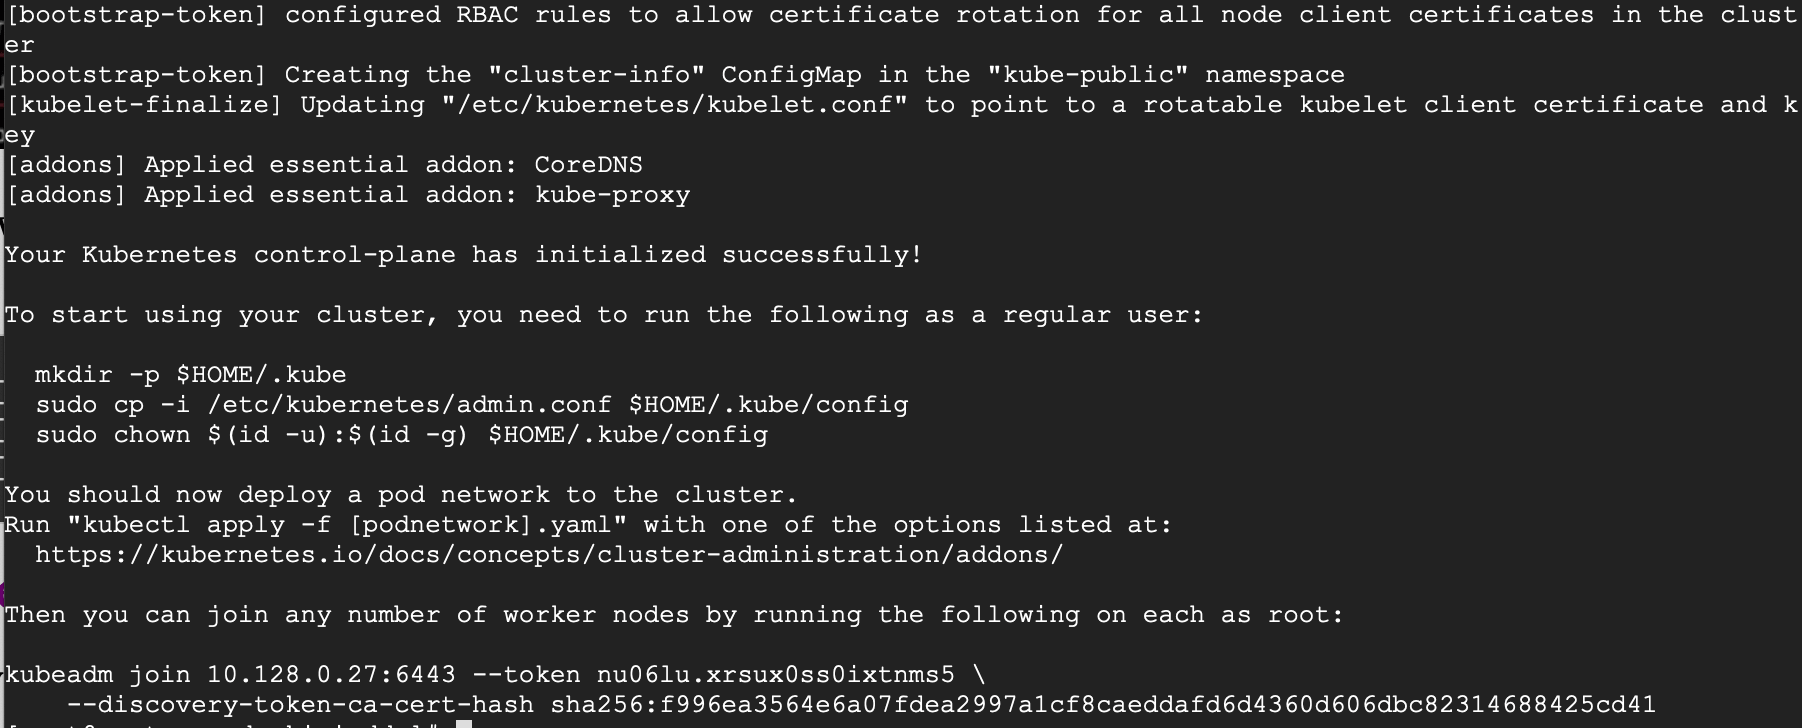
You may want to copy the last line and save it somewhere because you will need to run it on the worker nodes.
kubeadm join 10.128.0.27:6443 --token nu06lu.xrsux0ss0ixtnms5 \ --discovery-token-ca-cert-hash sha256:f996ea3564e6a07fdea2997a1cf8caeddafd6d4360d606dbc82314688425cd41
Tip: Sometimes this command might complain about the arguments (args) passed, so edit it to avoid any errors. So, you will delete the ‘\’ character accompanying the --token and your final command will look like this.
kubeadm join 10.128.0.27:6443 --token nu06lu.xrsux0ss0ixtnms5 --discovery-token-ca-cert-hash sha256:f996ea3564e6a07fdea2997a1cf8caeddafd6d4360d606dbc82314688425cd41
Having initialized Kubernetes successfully, you will need to allow your user to start using the cluster. In our case, we want to run this installation as root user, therefore we will go ahead and run these commands as root. You can change to a sudo enabled user you prefer and run the below using sudo.
To use root, run:
# mkdir -p $HOME/.kube
# cp -i /etc/kubernetes/admin.conf $HOME/.kube/config
# chown $(id -u):$(id -g) $HOME/.kube/config
To use a sudo enabled user, run:
$ mkdir -p $HOME/.kube
$ sudo cp -i /etc/kubernetes/admin.conf $HOME/.kube/config
$ sudo chown $(id -u):$(id -g) $HOME/.kube/config
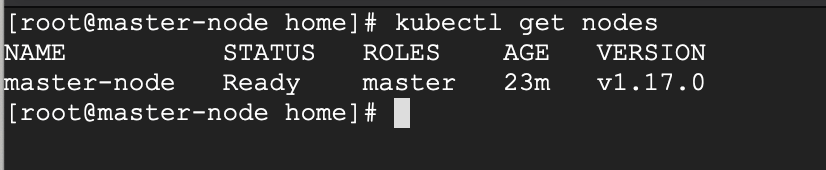
Now check to see if the kubectl command is activated.
# kubectl get nodes

At this point, you will also notice that the status of the master-node is ‘NotReady’. This is because we are yet to deploy the pod network to the cluster.
The pod Network is the overlay network for the cluster, that is deployed on top of the present node network. It is designed to allow connectivity across the pod.
Step 5: Setup Your Pod Network
Deploying the network cluster is a highly flexible process depending on your needs and there are many options available. Since we want to keep our installation as simple as possible, we will use Weavenet plugin which does not require any configuration or extra code and it provides one IP address per pod which is great for us. If you want to see more options, please check here.
These commands will be important to get the pod network setup.
# export kubever=$(kubectl version | base64 | tr -d '\n')
# kubectl apply -f "https://cloud.weave.works/k8s/net?k8s-version=$kubever"

Now if you check the status of your master-node, it should be ‘Ready’.
# kubectl get nodes
Next, we add the worker nodes to the cluster.
Setting Up Worker Nodes to Join Kubernetes Cluster
The following steps will run on the worker nodes. These steps should be run on every worker node when joining the Kubernetes cluster.
Step 1: Prepare Hostname, Firewall and SELinux
On your worker-node-1 and worker-node-2, set the hostname and in case you don’t have a DNS server, then also update your master and worker nodes on /etc/hosts file.
# hostnamectl set-hostname 'node-1'
# cat <<EOF>> /etc/hosts
10.128.0.27 master-node
10.128.0.29 node-1 worker-node-1
10.128.0.30 node-2 worker-node-2
EOF
You can ping master-node to test if your updated hostfile is fine.
Next, disable SElinux and update your firewall rules.
# setenforce 0
# sed -i --follow-symlinks 's/SELINUX=enforcing/SELINUX=disabled/g' /etc/sysconfig/selinux
Set the following firewall rules on ports. Make sure that all firewall-cmd commands, return success.
# firewall-cmd --permanent --add-port=6783/tcp
# firewall-cmd --permanent --add-port=10250/tcp
# firewall-cmd --permanent --add-port=10255/tcp
# firewall-cmd --permanent --add-port=30000-32767/tcp
# firewall-cmd  --reload
# echo '1' > /proc/sys/net/bridge/bridge-nf-call-iptables
Step 2: Setup the Kubernetes Repo
You will need to add Kubernetes repositories manually as they do not come pre-installed on CentOS 7.
cat <<EOF > /etc/yum.repos.d/kubernetes.repo
[kubernetes]
name=Kubernetes
baseurl=https://packages.cloud.google.com/yum/repos/kubernetes-el7-x86_64
enabled=1
gpgcheck=1
repo_gpgcheck=1
gpgkey=https://packages.cloud.google.com/yum/doc/yum-key.gpg https://packages.cloud.google.com/yum/doc/rpm-package-key.gpg
EOF
Step 3: Install Kubeadm and Docker
With the package repo now ready, you can go ahead and install kubeadm and docker packages.
# yum install kubeadm docker -y
Start and enable both the services.
# systemctl enable docker
# systemctl start docker
# systemctl enable kubelet
# systemctl start kubelet
Step 4: Join the Worker Node to the Kubernetes Cluster
We now require the token that kubeadm init generated, to join the cluster. You can copy and paste it to your node-1 and node-2 if you had copied it somewhere.
# kubeadm join 10.128.0.27:6443 --token nu06lu.xrsux0ss0ixtnms5 --discovery-token-ca-cert-hash sha256:f996ea3564e6a07fdea2997a1cf8caeddafd6d4360d606dbc82314688425cd41
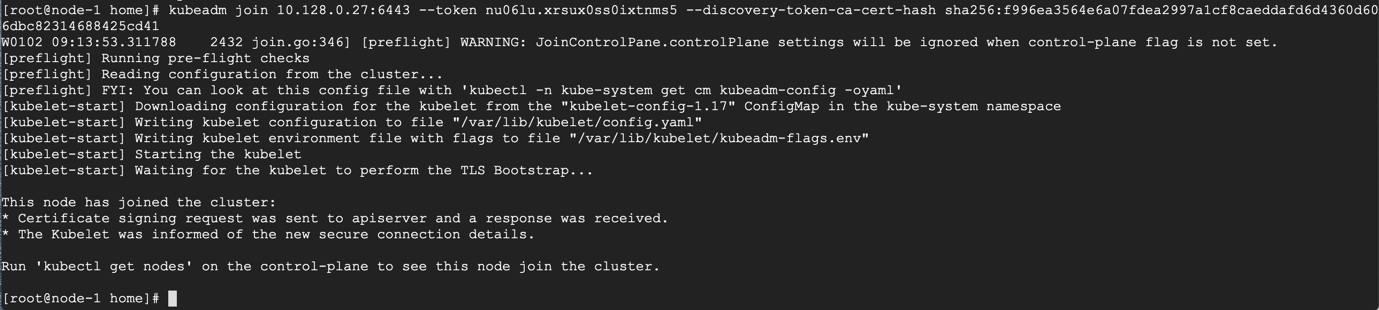
As suggested on the last line, go back to your master-node and check if worker node-1 and worker node-2 have joined the cluster using the following command.
# kubectl get nodes
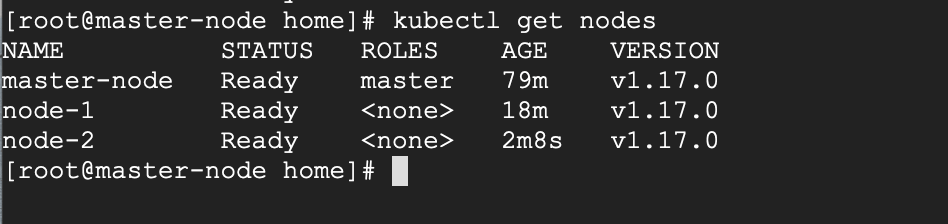
If all the steps run successfully, then, you should see node-1 and node-2 in ready status on the master-node.
Recommended Read: How to Deploy Nginx on a Kubernetes Cluster
At this point, we have successfully completed an installation of a Kubernetes cluster on Centos 7 and we have successfully on-boarded two worker-nodes. You can now begin to create your pods and deploy your services.


Good Afternoon,
At step 3:
# yum install kubeadm docker -yThere is such an error:
Help how to solve this issue, thank you.
@Tim,
The error message you’re encountering indicates that there is an issue with accessing the repository for Kubernetes, but when I tried the repository it is accessible.
It seems some temporary issues with the URL which can cause such errors. I suggest you retry the command to see if the issue persists.
Containerd – it is required after step 3.
Disable Firewall – no need to do all steps given in step 2 for firewall – use my firewall things.
Worker node –
Thanks, I was going to add that step and saw it’s already there.
@tecmint team, I think it’s better to update the page to add this missing part, otherwise it causes confusion and people get stuck at the ‘kubeadm init‘ part.
ic/configmaps/cluster-info?timeout=10s”: dial tcp 192.168.0.105:6443: connect: no route to host
I0626 14:09:49.276307 3305 token.go:217] [discovery] Failed to request cluster-info, will try again: Get “https://192.168.0.105:6443/api/v1/namespaces/kube-public/configmaps/cluster-info?timeout=10s”: dial tcp 192.168.0.105:6443: connect: no route to host
I0626 14:09:55.694361 3305 token.go:217] [discovery] Failed to request cluster-info, will try again: Get “https://192.168.0.105:6443/api/v1/namespaces/kube-public/configmaps/cluster-info?timeout=10s”: dial tcp 192.168.0.105:6443: connect: no route to host
I have followed all the steps but getting this issue.
Please help me, I was facing this issue for the last 10 days, I am new to Kubernetes.
Please help me.
Please find the logs for the same.=
=======================================================
[wait-control-plane] Waiting for the kubelet to boot up the control plane as static Pods from directory “/etc/kubernetes/manifests”. This can take up to 4m0s
[kubelet-check] Initial timeout of 40s passed.
[kubelet-check] It seems like the kubelet isn’t running or healthy.
[kubelet-check] The HTTP call equal to ‘curl -sSL
http://localhost:10248/healthz‘ failed with error: Get “http://localhost:10248/healthz“: dial tcp [::1]:10248: connect: connection refused.I followed the same steps, but getting the following error when joining node to master. Any help would be appreciated.
[preflight] Running pre-flight checks
error execution phase preflight: couldn’t validate the identity of the API Server: Get “https://10.0.2.15:6443/api/v1/namespaces/kube-public/configmaps/cluster-info?timeout=10s”: dial tcp 10.0.2.15:6443: connect: connection refused
To see the stack trace of this error execute with –v=5 or higher
This is the output of netstat -tulpn command in the master node.
tcp6 0 0 :::6781 :::* LISTEN 8516/weave-npc
tcp6 0 0 :::6782 :::* LISTEN 8802/weaver
tcp6 0 0 :::6783 :::* LISTEN 8802/weaver
tcp6 0 0 :::10250 :::* LISTEN 6116/kubelet
tcp6 0 0 :::6443 :::* LISTEN 5867/kube-apiserver
tcp6 0 0 :::10256 :::* LISTEN 6276/kube-proxy
tcp6 0 0 :::22 :::* LISTEN 1047/sshd
tcp6 0 0 ::1:25 :::* LISTEN 1306/master
[WARNING IsDockerSystemdCheck]: detected “cgroupfs” as the Docker cgroup driver. The recommended driver is “systemd”. Please follow the guide at https://kubernetes.io/docs/setup/cri/
error execution phase preflight: couldn’t validate the identity of the API Server: Get “https://172.31.69.32:6443/api/v1/namespaces/kube-public/configmaps/cluster-info?timeout=10s”: dial tcp 172.31.69.32:6443: connect: no route to host
Ram, I have had issues with Weave too.. use calico seems to do the proxying just fine.
All seems to be working fine at first!
But the DNS resolution is not working:
I followed
https://v1-16.docs.kubernetes.io/docs/tasks/administer-cluster/dns-debugging-resolution/
Any ideas?
After long days of troubleshooting, I ended up with rke and canal instead. DNS queries are resolved without a hitch. Thanks!
I have Installed Kubernetes by following your guide on AWS ec2 instance and deployed sample HTML application on it.
Now I want to access my sample app using dns name like app.example.com.
How can I do that. Any idea?
Mangesh,
This is a 2 parts solution.
Part 1 – Domain:
Arecords to the domain on your DNS management.All of this is assuming that you are using public IPs on your ec2 instances. if you are using private you will need LB with public IP OR a VPN from your local to AWS which I don’t think you would have considering the expenses in it.
Part 2 – Accessing the domain:
Part 2 assumes that you have public IPs for your nodes. If that’s not the case Option1 still works., just that you pay for LB.
Thanks a lot Vamshi. now I understood how DNS works in Kubernetes. I am exploring SkyDNS
what is the reason? Please could you help?
Ran into the same issue, but fixed it with the following command.
then re-run this:
Hi, I am getting the below error while doing Kube init.
[root@adi-dock1 /]# kubeadm init
W0323 19:50:41.915357 105851 validation.go:28] Cannot validate kube-proxy config – no validator is available
W0323 19:50:41.915462 105851 validation.go:28] Cannot validate kubelet config – no validator is available
[init] Using Kubernetes version: v1.17.4
[preflight] Running pre-flight checks
[WARNING Firewalld]: firewalld is active, please ensure ports [6443 10250] are open or your cluster may not function correctly
[WARNING HTTPProxy]: Connection to “https://10.127.200.79” uses proxy “http://72.163.217.40:8080”. If that is not intended, adjust your proxy settings
[WARNING HTTPProxyCIDR]: connection to “10.96.0.0/12” uses proxy “http://72.163.217.40:8080”. This may lead to malfunctional cluster setup. Make sure that Pod and Services IP ranges specified correctly as exceptions in proxy configuration
error execution phase preflight: [preflight] Some fatal errors occurred:
[ERROR FileAvailable–etc-kubernetes-manifests-kube-apiserver.yaml]: /etc/kubernetes/manifests/kube-apiserver.yaml already exists
[ERROR FileAvailable–etc-kubernetes-manifests-kube-controller-manager.yaml]: /etc/kubernetes/manifests/kube-controller-manager.yaml already exists
[ERROR FileAvailable–etc-kubernetes-manifests-kube-scheduler.yaml]: /etc/kubernetes/manifests/kube-scheduler.yaml already exists
[ERROR FileAvailable–etc-kubernetes-manifests-etcd.yaml]: /etc/kubernetes/manifests/etcd.yaml already exists
[ERROR DirAvailable–var-lib-etcd]: /var/lib/etcd is not empty
[preflight] If you know what you are doing, you can make a check non-fatal with `–ignore-preflight-errors=…`
To see the stack trace of this error execute with –v=5 or higher
Probably you have initiated already it before. Try “kubeadm reset” that should reset everything and you can re-initiate again.
@Kioie, Thanks for your great article. I’ve used 3 VMS in Hyper-V to build the cluster. After I completed according to your guide, I got the next information when I run `kubectl get nodes` on a master node.
The slaves are not ready. When I run `kubectl version` on the slave node, I got a message as ‘The connection to the server localhost:8080 was refused – did you specify the right host or port?’. Could you give me some advice about it? Thanks!
@cycaky
That’s very likely due to the weave network pods not running on the worker nodes. On master do ‘kubectl get pods -n kube-system -owide’ and you will see the weave pods on nodes will be struggling. If yes, can you see the pod logs to know what are they struggling with?
Hi I am stuck in the same place yours there is something missing in the steps else we need to use different network plugin instead of wave-net.
Please let me out.
RamT
For me also the same issue.
I have to restart the kubelet service and after 2 min all nodes are ready on the master node.
I appreciate this well-written guide!
Hi,
not sure, why I am getting the below error on node1. though follow the exact steps.
[root@node1 ~]# kubeadm join 192.168.0.142:6443 --token nkzqbg.fkm4ulii3ub2irsi --discovery-token-ca-cert-hash sha256:795af5d43eb5f6b47df9fd39c3462f0a42ab242aa857019fd6147f0058f80b65W0213 20:31:56.839498 4860 join.go:346] [preflight] WARNING: JoinControlPane.controlPlane settings will be ignored when control-plane flag is not set.
[preflight] Running pre-flight checks
Hi Harper,
This doesn’t look much like an error. I think you are still on the right path, despite the pre-flight warnings.
Please add a comment on your post so that the users also need to add a flag called “fail-to-swap” to FALSE on the /etc/sysconfig/kubelet config file so that the kubelet service may start without any issues on CentOS 7 systemd.
From:
TO BE:
P.S: This should be done on all servers (Master and Worker Nodes).
Hi Eduardo, thanks for noticing this. “Fail-swap-on=false” is a temporary measure to allow kubelet to run with swap on, bypassing swap checks. This is not an ideal option to run on, and so it is best not to go that direction.
I looked at the documentation and tried it on one of the machines, and basically the recommendation is to simply permanently switch off swap and it should take care of all this, including during reboots.
However, there are other situations where you would need swap on, at least temporarily. I would, therefore, give caution if you do choose to enable this option unless you are sure that is what you want.
I am getting below error while joining the worker node to master.
[root@node01 yum.repos.d]# kubeadm join 10.0.3.15:6443 --token jzwvg4.bzv2b5omdcl3kosl --discovery-token-ca-cert-hash sha256:ada901bfbb4ae0e9d26aaeb54f3794cbb7bfe60f861f90efed1416a490ce041dW0130 06:26:26.065050 10134 join.go:346] [preflight] WARNING: JoinControlPane.controlPlane settings will be ignored when control-plane flag is not set.
[preflight] Running pre-flight checks
error execution phase preflight: couldn’t validate the identity of the API Server: abort connecting to API servers after timeout of 5m0s
To see the stack trace of this error execute with –v=5 or higher
Hi Sandip, hope you managed to sort this out, if not, let me know and we can run through the installation and troubleshoot
Hi Kioie, I am also facing same issue. Please let me know how to resolve this.
Thanks
Hi Adarsh, DM me on @kioi_e on twitter and I can help troubleshoot.
This error could be arising from two things:
To troubleshoot,
Thanks Kioie for your quick response, I haven’t opened the port 6443 in security group. Thank you :)
I hope it is fine now.
Hi Kioie, I have set up the Kubernetes cluster on AWS with 1 master and 3 worker nodes running on Centos 7. I am facing issues while creating statefulset (unable to create persistent storage). Can you help me out?
PVC fails with ‘Failed to get AWS Cloud Provider. GetCloudProvider returned instead’.
Thanks.
Wonderful Article. Saved a heck of a time figuring out the install issues.
Thanks Yash!
Thank you for the article it is just about detailed enough for newbies to keep up the good work.
I am looking forward to more articles.
Thanks David!
I am following your tutorial to install the Kubernetes cluster.
I’ve got the error when trying to run “
kubeadm init” command.From Kubernetes official documentation, I found out that swap must be disabled in order to run “kubeadm init“.
Please add it to your contents.
Thank you for sharing your good knowledge with unknowns. :)
Hi @Simon
You are right, sometimes swap tends to affect the “kubeadm init“, and it is best to disable it. I will update the article to reflect this. Thanks for your feedback and thanks for reading.
@Simon
The article has been updated to reflect your suggestion. Thanks for the heads up.
I have already configured this cluster but I want to configure master and slave Kubernetes servers with 2 workers node. I also want to access the graphical mode of Kubernetes. Could you please write an article on that.
Hello Pankaj, thanks for the question. I can definitely do a follow-up article.
Just some clarification:
Why you do that if u got a good manual about kubespray?
@cryptoparty Kubespray is a great tool that can be used to automate the process, but there are many use-cases where a manual install would be necessary, and this tutorial is great as an option.
This is great documentation, looking forward to more articles on Kubernetes!
Thanks @Anabangi Keep checking for more articles