In this article we will explain how to install a LEMP stack (Linux, Nginx, MariaDB, PHP) along with PHP-FPM on RHEL/CentOS 7/6 and Fedora 26-29 servers using yum and dnf package manager.
During the process we will install and enable Epel, Remi, Nginx and MariaDB repositories in order to be able to install the latest versions of these packages.
Read Also: Install Apache, MySQL 8 or MariaDB 10 and PHP 7 on CentOS 7
Step 1: Installing EPEL and Remi Repository
EPEL (Extra Packages for Enterprise Linux) is a community based repository offers add-on software packages for RHEL-based Linux distributions.
Remi is a repository where you can find the latest versions of the PHP stack (full featured) for installation in the Fedora and Enterprise Linux distributions.
On RHEL/CentOS 7
# yum update && yum install epel-release
# rpm -Uvh http://rpms.famillecollet.com/enterprise/remi-release-7.rpm

------ For RHEL 7 Only ------
# subscription-manager repos --enable=rhel-7-server-optional-rpms
On RHEL/CentOS 6
# yum update && yum install epel-release
# rpm -Uvh http://rpms.famillecollet.com/enterprise/remi-release-6.rpm

------ For RHEL 6 Only ------
# subscription-manager repos --enable=rhel-6-server-optional-rpms
On Fedora 24-29
# rpm -Uvh http://rpms.remirepo.net/fedora/remi-release-29.rpm  [On Fedora 29]
# rpm -Uvh http://rpms.remirepo.net/fedora/remi-release-28.rpm  [On Fedora 28]
# rpm -Uvh http://rpms.remirepo.net/fedora/remi-release-27.rpm  [On Fedora 27]
# rpm -Uvh http://rpms.remirepo.net/fedora/remi-release-26.rpm  [On Fedora 26]
# rpm -Uvh http://rpms.remirepo.net/fedora/remi-release-25.rpm  [On Fedora 25]
# rpm -Uvh http://rpms.remirepo.net/fedora/remi-release-24.rpm  [On Fedora 24]
Step 2: Installing Nginx and MariaDB Repositories
The Nginx repository is only needed in RHEL and CentOS distributions. Create a file called /etc/yum.repos.d/nginx.repo and add the following lines to it.
For RHEL 7/6:
[nginx]
name=nginx repo
baseurl=http://nginx.org/packages/rhel/$releasever/$basearch/
gpgcheck=0
enabled=1
For CentOS 7/6:
[nginx]
name=nginx repo
baseurl=http://nginx.org/packages/centos/$releasever/$basearch/
gpgcheck=0
enabled=1
To enable the MariaDB repository, create a file named /etc/yum.repos.d/mariadb.repo with the following contents:
[mariadb]
name = MariaDB
baseurl = http://yum.mariadb.org/10.1/centos7-amd64
gpgkey=https://yum.mariadb.org/RPM-GPG-KEY-MariaDB
gpgcheck=1
Step 4: Installing Ngnix and MariaDB
Nginx (Engine X) is open source, robust, lightweight and high performance Web server, reverse proxy sever and also mail proxy server for HTTP, SMTP, POP3 and IMAP protocols. For further details, visit http://wiki.nginx.org/Overview.
MariaDB is a fork of the well-known MySQL, one of the world’s most popular Relational Database Management System (RDBMS). It is entirely developed by the community and as such it is intended to remain FOSS and compatible with the GPL.
To install Ngnix and MariaDB, run the following commands.
----------- Installing on RHEL/CentOS 7/6 -----------
# yum --enablerepo=remi install nginx MariaDB-client MariaDB-server php php-common php-fpm

----------- Installing on Fedora -----------
# dnf --enablerepo=remi install nginx MariaDB-client MariaDB-server php php-common php-fpm
Step 3: Installing PHP Using Remi Repository
PHP (Hypertext Preprocessor) is a Free and Open Source server-side scripting language that is best suited for web development. It can be used to produce dynamic web pages for a website and is most frequently found in *nix servers. One of the advantages of PHP is that it is easily extensible through the use of a wide variety of modules.
To install PHP, first you need to enable Remi repository by installing yum-utils, a collection of useful programs for managing yum repositories and packages.
# yum install yum-utils
Once installed, you can use yum-config-manager provided by yum-utils to enable Remi repository as the default repository for installing different PHP versions as shown.
For example, to install PHP 7.x version, use the following command.
------------- On CentOS & RHEL -------------
# yum-config-manager --enable remi-php70 && yum install php       [Install PHP 7.0]
# yum-config-manager --enable remi-php71 && yum install php       [Install PHP 7.1]
# yum-config-manager --enable remi-php72 && yum install php       [Install PHP 7.2]
# yum-config-manager --enable remi-php73 && yum install php       [Install PHP 7.3]

------------- On Fedora -------------
# dnf --enablerepo=remi install php70      [Install PHP 7.0]
# dnf --enablerepo=remi install php71      [Install PHP 7.1]
# dnf --enablerepo=remi install php72      [Install PHP 7.2]
# dnf --enablerepo=remi install php73      [Install PHP 7.3]
Next, we are going to install all these following PHP modules.
------ On RHEL/CentOS 7/6 ------
# yum --enablerepo=remi install php-mysqlnd php-pgsql php-fpm php-pecl-mongo php-pdo php-pecl-memcache php-pecl-memcached php-gd php-xml php-mbstring php-mcrypt php-pecl-apcu php-cli php-pear

------ On Fedora ------
# dnf --enablerepo=remi install php-mysqlnd php-pgsql php-fpm php-pecl-mongo php-pdo php-pecl-memcache php-pecl-memcached php-gd php-xml php-mbstring php-mcrypt php-pecl-apcu php-cli php-pear
Step 6: Stopping and Disabling Apache Service
By default, Apache and Nginx listen in same port (TCP 80). For that reason, if Apache is installed in your server, you need to stop it and disable / mask it (a stronger version of disable that links the service to /dev/null) in order to use Nginx, or you can remove it if you’re not planning on using it anymore.
# systemctl stop httpd
# systemctl disable httpd
or
# systemctl mask httpd
Step 7: Starting/Stopping Nginx, MariaDB and PHP-FPM
----------- Enable Nginx, MariaDB and PHP-FPM on Boot -----------
# systemctl enable nginx
# systemctl enable mariadb
# systemctl enable php-fpm

----------- Start Nginx, MariaDB and PHP-FPM -----------
# systemctl start nginx
# systemctl start mariadb
# systemctl start php-fpm
Step 8: Configuring Nginx and PHP-FPM
Let us now create a directory structure for your website (a virtual host, or server block as it is called in Nginx) under /srv/www/. In this example we will use www.tecmint.com, but feel free to choose another domain and main directory if you want.
# mkdir -p /srv/www/tecmint/public_html
# mkdir /srv/www/tecmint/logs
# chown -R nginx:nginx /srv/www/tecmint
Step 9: Configuring Nginx Virtual Host Directories
As you know, the ability of running several sites from the same machine is one of the distinguishing features of major web servers. Let us now proceed to create the directories to store our server blocks (known as virtual hosts in Apache) under /etc/nginx.
# mkdir /etc/nginx/sites-available
# mkdir /etc/nginx/sites-enabled
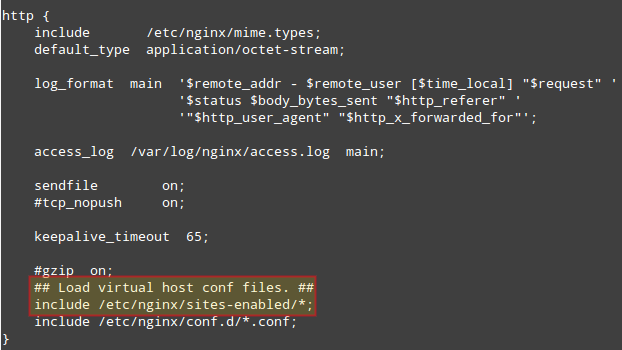
The following line of code, which must be inserted before closing the http block in /etc/nginx/nginx.conf, will ensure that configuration files inside the /etc/nginx/sites-enabled directory will be taken into account when Nginx is running:
## Load virtual host conf files. ##
include /etc/nginx/sites-enabled/*;
To create the server block for tecmint.com, add the following lines of code to /etc/nginx/sites-available/tecmint (this file will be created when you enter the full path to start your preferred text editor). This is a basic virtual host config file.
server {
	listen 80 default;
	server_name tecmint;
	access_log /srv/www/tecmint/logs/access.log;
	error_log /srv/www/tecmint/logs/error.log;
	root /srv/www/tecmint/public_html;
	location ~* \.php$ {
	fastcgi_index   index.php;
	fastcgi_pass    127.0.0.1:9000;
	include         fastcgi_params;
	fastcgi_param   SCRIPT_FILENAME    $document_root$fastcgi_script_name;
	fastcgi_param   SCRIPT_NAME        $fastcgi_script_name;
	}
}
The process of “activating” a virtual host consists of creating a symbolic link from the definition of the tecmint virtual host to /etc/nginx/sites-enabled.
# ln -s /etc/nginx/sites-available/tecmint /etc/nginx/sites-enabled/tecmint
In order to actually apply the changes we have been doing, we now need to restart Nginx. It is sometimes useful to check the configuration files for syntax errors before doing so:
# nginx -t
# systemctl restart nginx
# systemctl status nginx

To access your newly created virtual host, you need to add the following line to /etc/hosts as a basic method of domain name resolution.
192.168.0.18 www.tecmint.com tecmint.com
Step 10: Testing Nginx, MySQL, PHP and PHP-FPM
Let’s stick with the classic way of testing PHP. Create a file called test.php under /srv/www/tecmint/public_html/ and add the following lines of code to it.
The phpinfo() function shows a great deal of information about the current PHP installation:
<?php
	phpinfo();
?>
Now point your web browser to http://tecmint/test.php and check the presence of the installed modules and additional software:
Congratulations! You now have a working installation of a LEMP stack. If something did not go as expected, feel free to contact us using the form below. Questions and suggestions are also welcome.