Do you own an NVIDIA graphics card and want to use NVIDIA drivers instead of the default Nouveau driver in Fedora to enhance your gaming, video editing, and 3D rendering experience? If so, don’t worry, because this blog will explain various methods for installing NVIDIA Drivers on your Fedora, allowing you to unlock your GPU’s full potential.
Note: If you are a beginner Fedora user or prefer a more automated and easy method, we recommend you opt for the RPM Fusion method. However, if you are an experienced Fedora user, you can install NVIDIA Drivers manually to get more control over the versions of your drivers that best suit your GPU.
Let’s jump straight into the process of installing NVIDIA Drivers on Fedora.
Table of Contents
Check NVIDIA GPU in Fedora
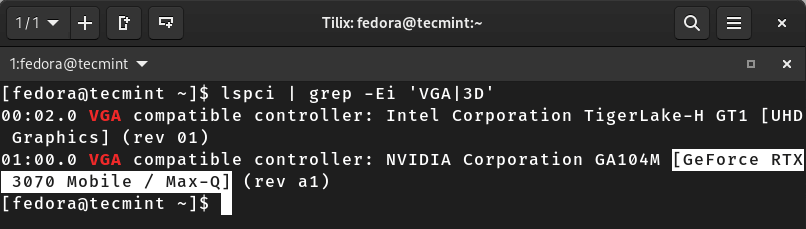
To determine if an NVIDIA GPU is installed on your computer, execute the following command, which will display information about the graphics and 3D acceleration devices connected to your system.
lspci | grep -Ei 'VGA|3D'
Sample Output:
00:02.0 VGA compatible controller: Intel Corporation TigerLake-H GT1 [UHD Graphics] (rev 01)
01:00.0 VGA compatible controller: NVIDIA Corporation GA104M [GeForce RTX 3070 Mobile / Max-Q] (rev a1)
For the proprietary/official NVIDIA GPU drivers to function properly, you must update all the pre-installed packages using the following dnf command.
sudo dnf update --refresh
Now that your system is up-to-date, you can install your NVIDIA drivers to get the best performance out of your GPU.
Method 1: Installing NVIDIA Drivers Using RPM Fusion in Fedora
RPM Fusion is a third-party repository that offers numerous Fedora packages that are not available in the official repositories, and one of these packages is NVIDIA Drivers.
Many users prefer the RPM Fusion Repository for installing NVIDIA drivers as it is a more hassle-free method. Moreover, it may not offer the most recent drivers, but it surely offers the latest drivers that are tested and supported by the Fedora community.
However, if you utilize the RPM Fusion repository for NVIDIA driver installation, they will automatically receive updates alongside your system.
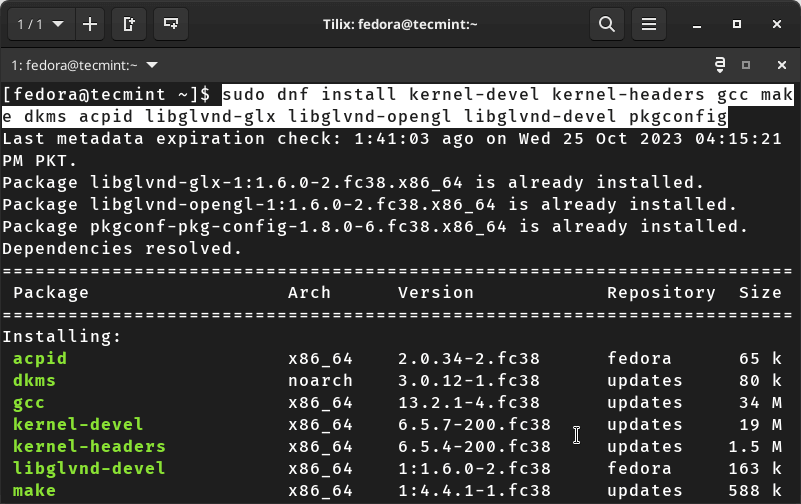
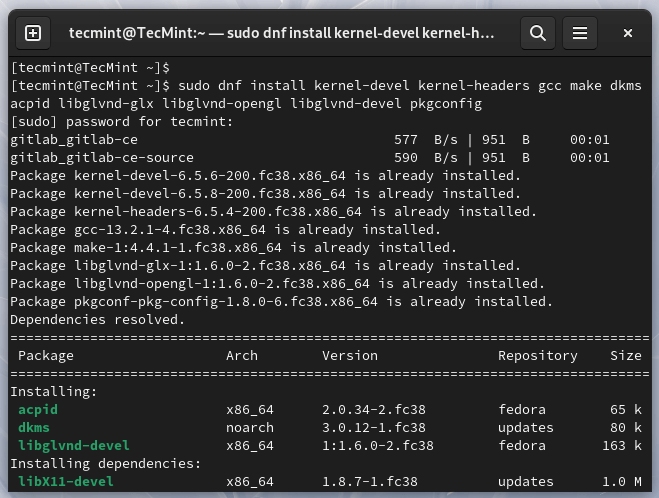
Install Kernel Headers and Development Tools
To install NVIDIA Drivers via RPM Fusion, you need to first install kernel development tools and kernel headers required for NVIDIA driver installation by running the following command:
sudo dnf install kernel-devel kernel-headers gcc make dkms acpid libglvnd-glx libglvnd-opengl libglvnd-devel pkgconfig
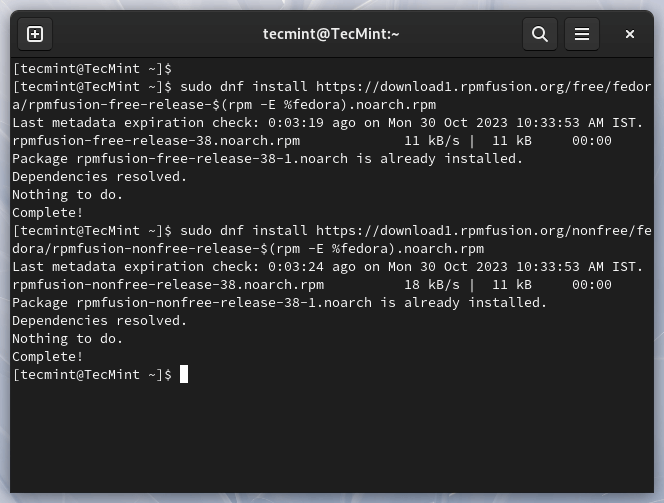
Install RPM Fusion Repositories in Fedora
After installing the required tools, you must execute the commands given below to add free and non-free RPM Fusion repositories to your system.
sudo dnf install https://download1.rpmfusion.org/free/fedora/rpmfusion-free-release-$(rpm -E %fedora).noarch.rpm
sudo dnf install https://download1.rpmfusion.org/nonfree/fedora/rpmfusion-nonfree-release-$(rpm -E %fedora).noarch.rpm
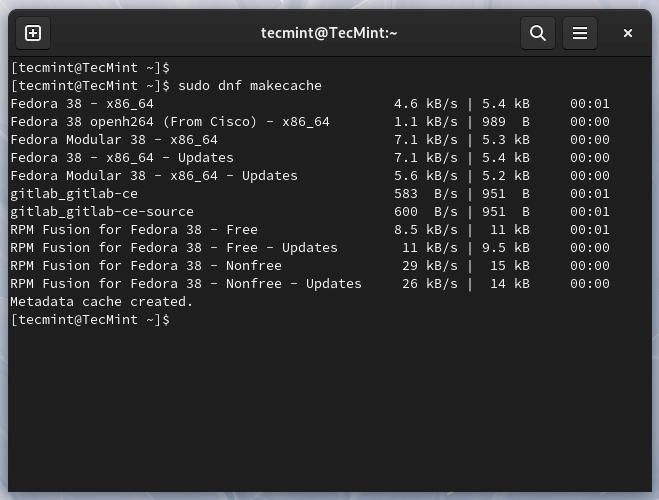
Once the repositories are added, you must update the package repository cache by executing the following command.
sudo dnf makecache
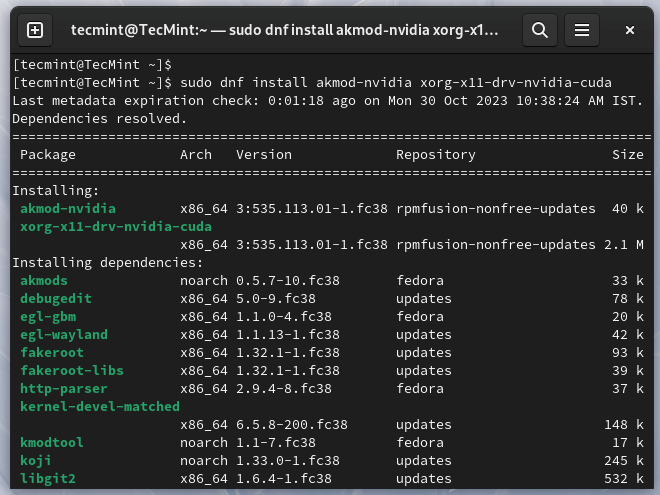
Install NVIDIA Driver and CUDA Support in Fedora
After updating the package repository, you can install NVIDIA drivers and CUDA toolkit for graphics-intensive tasks and GPU development using the command stated below.
sudo dnf install akmod-nvidia xorg-x11-drv-nvidia-cuda
Finally, reboot your system to ensure that changes take place and auto-disable the Nouveau drivers so that you get to experience optimal performance for graphics-intensive tasks because of NVIDIA Drivers.
Method 2: Installing NVIDIA Drivers Manually in Fedora
Let’s now install NVIDIA Drivers manually using the Runfile of a specific driver version directly from the official website of NVIDIA.
Install Development Tools and Kernel Headers
You must install kernel development tools and kernel headers before installing any NVIDIA Driver by running the command stated below.
sudo dnf install kernel-devel kernel-headers gcc make dkms acpid libglvnd-glx libglvnd-opengl libglvnd-devel pkgconfig
Download NVIDIA Driver
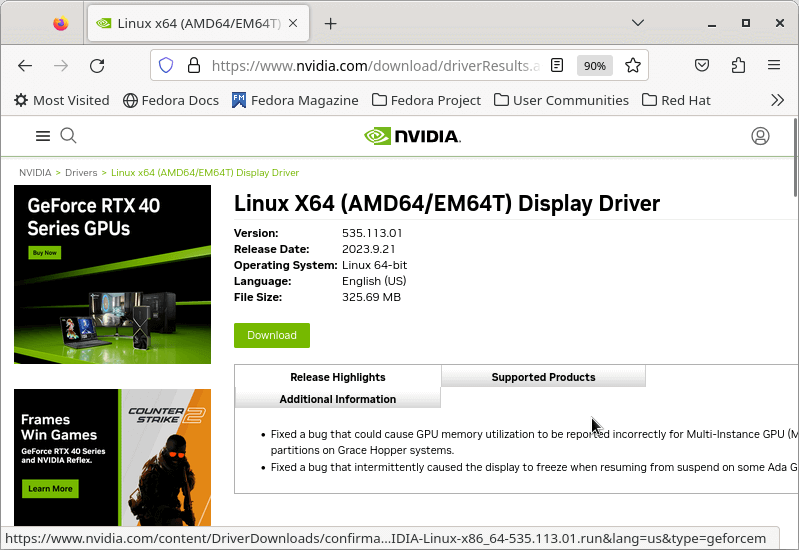
After installing the required tools and kernel headers, navigate to NVIDIA’s official website to search for the specific NVIDIA Driver by selecting “Product Type”, “Product Series” and “Product” according to your graphic card specifications/details. Also, choose “Operating System” as “Linux 64-bit” and press the “Search” button.
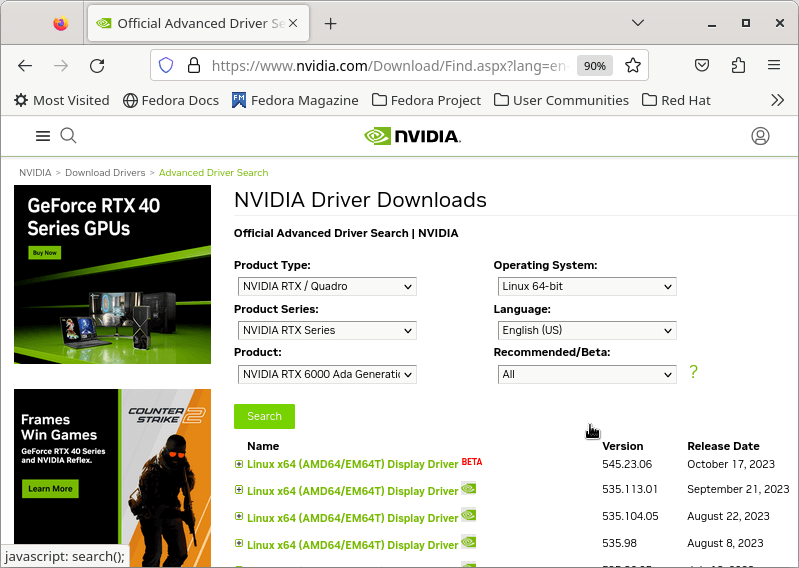
You will receive a list of drivers that meet the search criteria. Simply click on the one you want to install to view its details and press the “Download” button to download the Runfile of a specific NVIDIA driver.
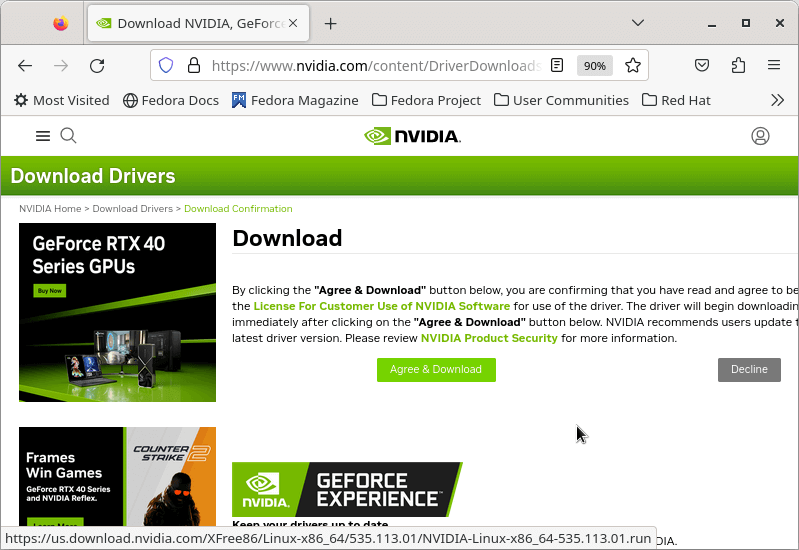
Once you click on the download button, the “Agree & Download” agreement will open. Simply, click on the “Agree & Download” button to start downloading the Runfile automatically.
While the NVIDIA Driver “.run” file is downloading, you must disable the default Nouveau Drivers of your system to install this smoothly.
Disabling Nouveau Drivers in Fedora
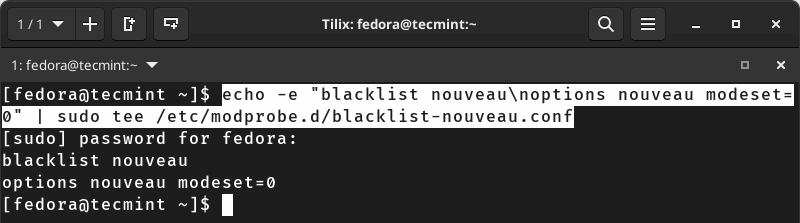
Run the command given below to blacklist the Nouveau driver and disable mode-setting for the Nouveau driver, which will ensure that your Nouveau driver does not conflict with the NVIDIA driver.
$ echo -e "blacklist nouveau\noptions nouveau modeset=0" | sudo tee /etc/modprobe.d/blacklist-nouveau.conf
Regenerate Initramfs and Reboot
Next, let’s regenerate the initramfs image with the new blacklisting configuration to prevent the Nouveau driver from loading using the command stated below.
sudo dracut --force
Next, we’ll execute the following command to configure the system’s default target as “multi-user.target“, which will result in Fedora booting into a text-based, multi-user mode instead of a graphical user interface (GUI).
sudo systemctl set-default multi-user.target
Finally, reboot your system.
sudo reboot
Install NVIDIA Driver
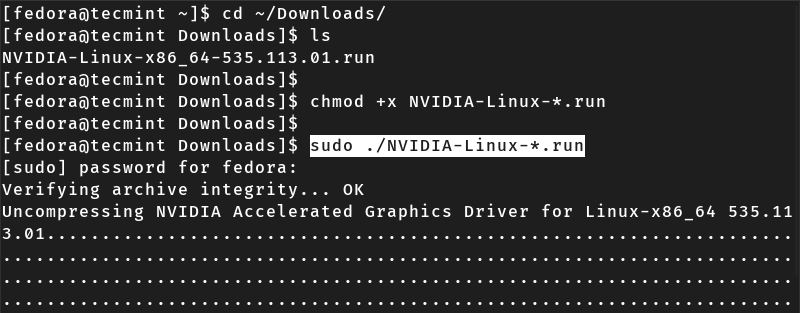
Upon restarting your system, you’ll find yourself in command-line mode, just proceed to the directory where you saved the downloaded NVIDIA Runfile.
cd ~/Downloads
Next, change the permission of the downloaded NVIDIA Driver Runfile to executable using the command mentioned below.
chmod +x NVIDIA-Linux-*.run
Finally, you can install the NVIDIA Driver by running the below command.
sudo ./NVIDIA-Linux-*.run
During the installation, you will need to respond to some prompts based on your preferences.
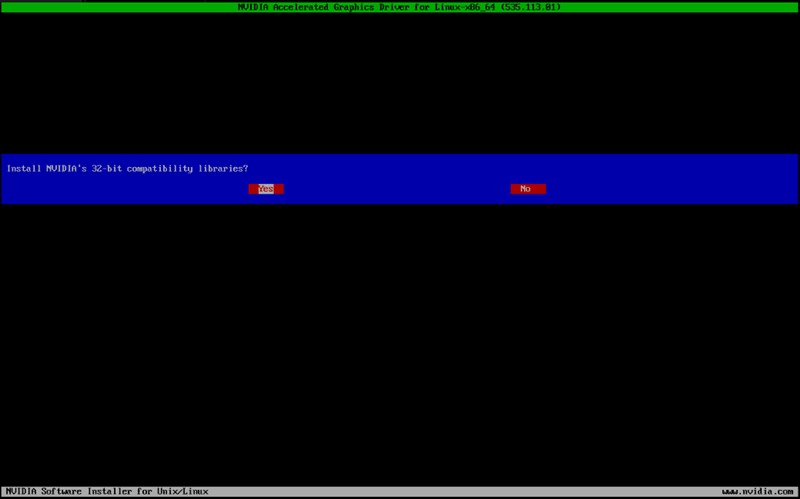
For the prompt related to “NVIDIA 32-bit C compatibility libraries”, you can choose “yes” to enable your system to run 32-bit applications.
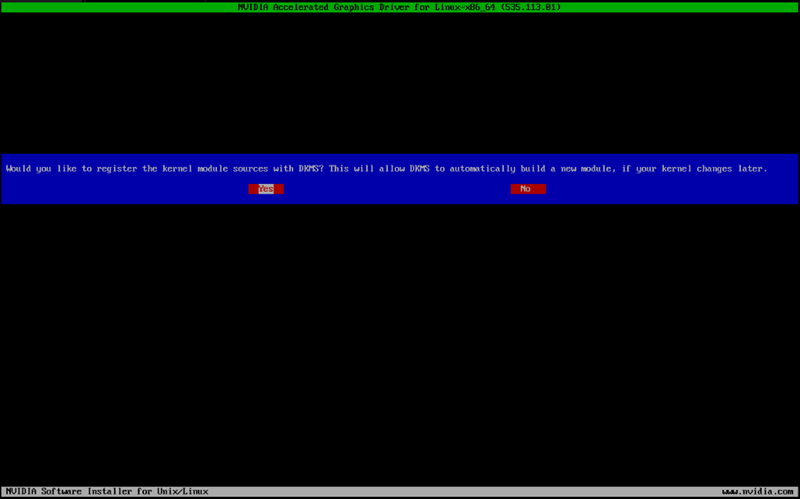
Next, when prompted about “Kernel Module Sources with DKMS”, you can choose the “Yes” option to enable DKMS for automatic module updates when your kernel is updated.
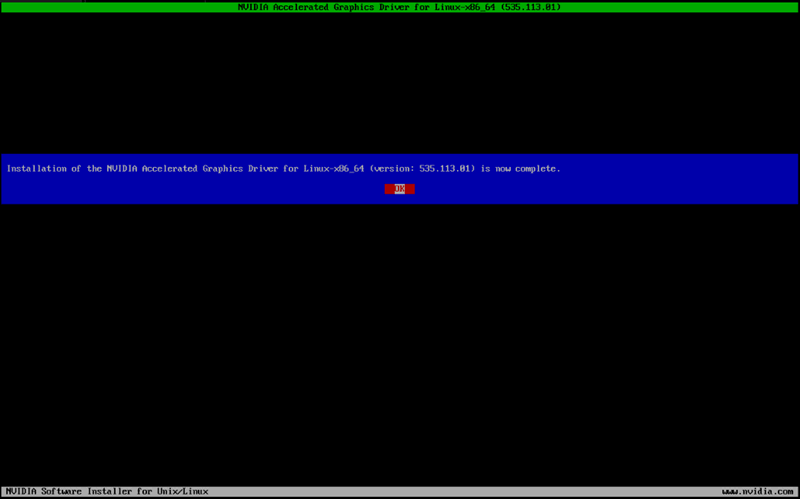
If you encounter any other prompts, choose an option according to your requirements and wait for the installation process to complete. Finally, select “OK” on the prompt that congratulates you on successfully installing the NVIDIA drivers.
Enable GUI and Reboot
Now that the NVIDIA driver is successfully installed in our system, it’s time to re-enable our system’s GUI mode by executing the command given below.
sudo systemctl set-default graphical.target
To make changes take effect and use your system in GUI mode, you need to reboot your system.
sudo reboot
If you want to confirm if the NVIDIA Driver is working or not, execute the “nvidia-smi” command.
nvidia-smi
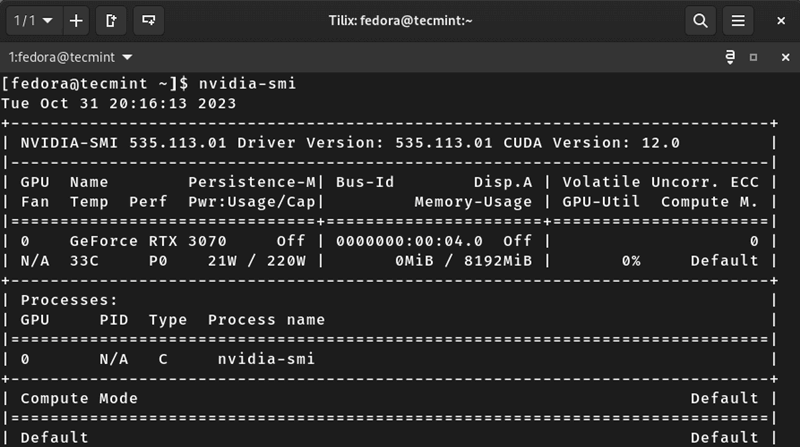
Enjoy the working of your graphic driver!
Installing NVIDIA VAAPI/VDPAU Drivers on Fedora [Optional]
Let’s conclude our blog post, by installing additional (optional) NVIDIA VAAPI/VDPAU drivers to enhance the performance of specific tasks, including video playback, streaming, and recording.
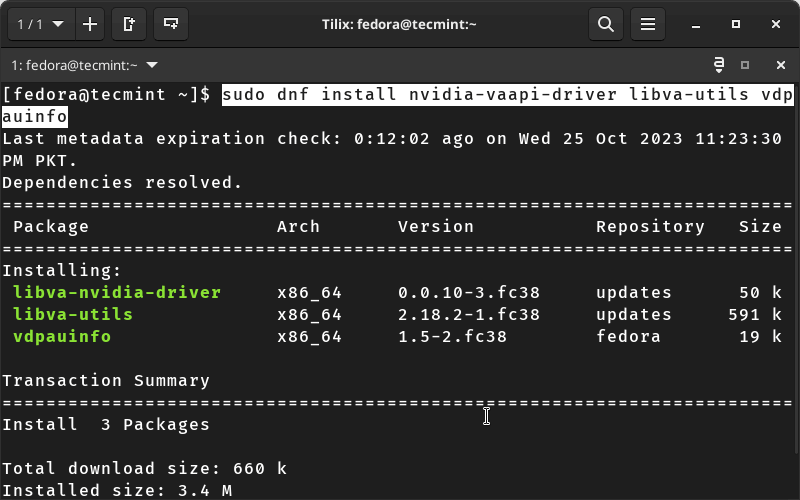
To install NVIDIA VAAPI/VDPAU drivers in your Fedora, simply run the command stated below.
sudo dnf install nvidia-vaapi-driver libva-utils vdpauinfo
Important: Don’t get confused by the installation of NVIDIA VAAPI/VDPAU drivers; they only boost the performance of your graphic card for special tasks. However, the NVIDIA drivers are required for the proper functioning of the NVIDIA graphics card.
That’s all for now! If you encounter any issues during the installation of your NVIDIA Drivers, please don’t hesitate to ask for guidance in the comment section.
You should now have the NVIDIA drivers installed on your Fedora system, and you can proceed to enjoy best games with improved graphics performance.