This article was earlier written for APC (Alternative PHP Cache), but APC is deprecated and no longer working with PHP 5.4 onwards, now you should use OPcache for better and faster performance as explained in this article…
OpCache is an advanced caching module based on opcode that works similar to other caching solutions. It significantly improves PHP performance, and your website by extension, by storing your site’s pre-compiled PHP pages in shared memory. This eliminates the need for PHP to constantly load these pages on each request by the server.
[ You might also like: 10 Top Open Source Caching Tools for Linux ]
In this guide, we will walk you through the installation of the Zend OPcache in Debian-based Linux distributions such as Ubuntu and Mint.
For demonstration purposes, we will use Ubuntu 20.04 and show you how you can install and enable the module both on Apache and Nginx web servers.
Install and Configure PHP OPcache for Apache
To set the ball rolling, launch your terminal and update your package index:
$ sudo apt update
Next, install Apache web server, PHP, and PHP modules including the php-opcache module as follows.
$ sudo apt install apache2 libapache2-mod-php php-curl php-mbstring php-opcache php-mysql php-xml php-gd
The command installs the latest Apache web server and PHP 7.4 and associated extensions. To verify the version of PHP installed, run the command:
$ php --version

The next step is to enable the OPcache caching module. Therefore, edit the php.ini configuration file.
$ sudo nano /etc/php/7.4/apache2/php.ini
OR
$ sudo vim /etc/php/7.4/apache2/php.ini
Locate and uncomment the following lines
opcache.enable=1
opcache.memory_consumption=128
opcache.max_accelerated_files=10000
opcache.revalidate_freq=200
Save the changes and exit.
Then restart Apache to apply the changes.
$ sudo systemctl restart apache2
Finally, verify that Opcache has been enabled as follows:
$ php -i | grep opcache
The following output will be displayed on your screen.
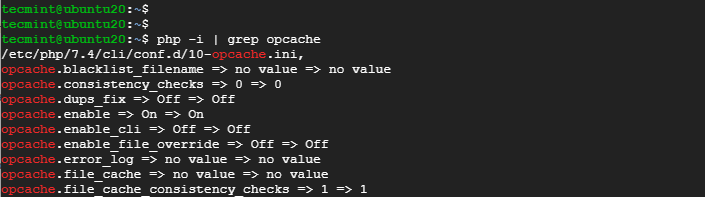
This is proof enough that the Opcache module has been successfully installed.
Install and Configure PHP OPcache for Nginx
If you are planning to have Nginx as your webserver of choice and still have Opcache installed, follow the steps below.
Install Nginx, PHP, and associated PHP extensions as before.
$ sudo apt install nginx php php-fpm php-cli php-curl php-mbstring php-opcache php-mysql php-xml php-gd
Once again, confirm the PHP version installed.
$ php -v
Next, access the php.ini configuration file to enable Opcache.
$ sudo nano /etc/php/7.4/fpm/php.ini
OR
$ sudo vim /etc/php/7.4/fpm/php.ini
As before, uncomment the following lines to enable Opcache for Nginx.
opcache.enable=1
opcache.memory_consumption=128
opcache.max_accelerated_files=10000
opcache.revalidate_freq=200
Save the changes and exit.
Then restart the Nginx web server and PHP-FPM service.
$ sudo systemctl restart nginx php7.4-fpm
Finally, confirm that Opcache was successfully installed:
$ php -i | grep opcache

And that was about it as far as the installation of the Zend Opcache caching module. Your feedback is most welcome.