Linux has always been known for its flexibility and installing packages from ISO is one of them. There are many use cases when a user wants to use ISO/DVD for downloading packages.
In this guide, we are not just going to show you how you can set up ISO for downloading packages but also what are those scenarios when installing packages from ISO can be quite helpful.
[ You might also like: How to Create Local RHEL 8 Repository ]
Reasons to Install Packages from RHEL 9 ISO/DVD
There are multiple use cases where installing packages through ISO and some of them are given below:
- Creating a local repository for your RHEL 9.
- Applying offline patches.
- Updating packages without an internet connection.
- Creating a secure RHEL 9 installation that needs to be updated without being online.
- Want to upgrade your server from RHEL 9.x to RHEL 9.y.
Sure, there are more use cases where you can benefit from a local repository. So if your need is one of these or different from the given list and wants to have a local repository of RHEL 9, let’s start the process.
Installing Software Packages via YUM/DNF Using RHEL 9 DVD
As always, we are going to complete this process in the easiest way possible so even if you are a beginner, you can learn something from this. So let’s start with our first step.
Step 1: Download RHEL 9 DVD ISO
You can easily download RHEL 9 ISO from their official download page. Please make sure to download DVD as it contains the required packages which we are going to use as a local repository for our offline use.

Step 2: Mount RHEL 9 DVD ISO
Before mounting a recently downloaded ISO file, we need to create a mounting point inside the /mnt directory. To create a mounting point at /mnt, utilize the given command:
$ sudo mkdir -p /mnt/disc
Once we are done with creating the mounting point, we have to navigate to the directory where our ISO has been downloaded. For the majority, it will be in the Downloads directory.
$ cd Downloads
Now, its time to mount our ISO at the recently created mounting point by the given command:
$ sudo mount -o loop rhel-baseos-9.0-x86_64-dvd.iso /mnt/disc

But what if you are using DVD media? There is a slight change. Just use the given command and you’ll be good to go:
$ sudo mkdir -p /mnt/disc
$ sudo mount /dev/sr0 /mnt/disc
Make sure that you cross-check the name of the drive and replace it with sr0.
Step 3: Creating Local RHEL 9 Repository
Once we have mounted RHEL 9 ISO at /mnt, we can easily get a copy of the media.repo file and paste it to our system directory /etc/yum.repos.d/ with the name of rhel9.repo.
$ sudo cp /mnt/disc/media.repo /etc/yum.repos.d/rhel9.repo
If you notice carefully, while mounting our ISO file at the mounting point, there was a warning saying it was write-protected. We are going to change the permission of copied file rhel9.repo to 0644 which will allow us to read and write and can only be done by root/sudoer.
$ sudo chmod 644 /etc/yum.repos.d/rhel9.repo
Now, open rhel9.repo file by given command:
$ sudo nano /etc/yum.repos.d/rhel9.repo
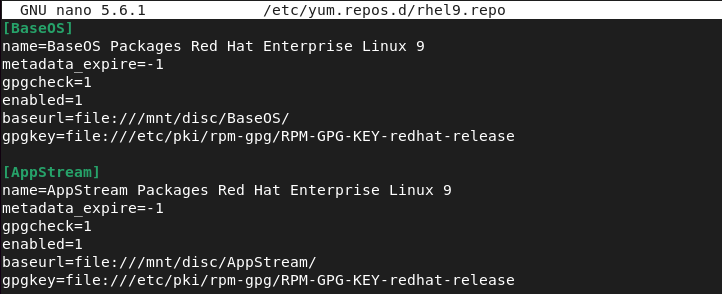
Remove the default lines and paste the given lines into your file:
[BaseOS]
name=BaseOS Packages Red Hat Enterprise Linux 9
metadata_expire=-1
gpgcheck=1
enabled=1
baseurl=file:///mnt/disc/BaseOS/
gpgkey=file:///etc/pki/rpm-gpg/RPM-GPG-KEY-redhat-release

[AppStream]
name=AppStream Packages Red Hat Enterprise Linux 9
metadata_expire=-1
gpgcheck=1
enabled=1
baseurl=file:///mnt/disc/AppStream/
gpgkey=file:///etc/pki/rpm-gpg/RPM-GPG-KEY-redhat-release
The final rhel9.repo file will look like this:
To make things work, we are required to clear the yum cache by running the following yum or dnf command.
$ sudo yum clean all
or
$ sudo dnf clean all
Now, let’s list enable repositories by the given command:
$ sudo yum repolist enabled
or
$ sudo dnf repolist enabled
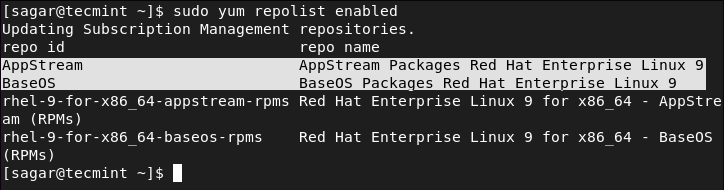
As you can see, our ISO is behaving like a local repository.
Now, let’s update our repositories so that we can benefit from the steps we have made recently.
$ sudo yum update
or
$ sudo dnf update
Step 4: Installing Packages from RHEL 9 ISO
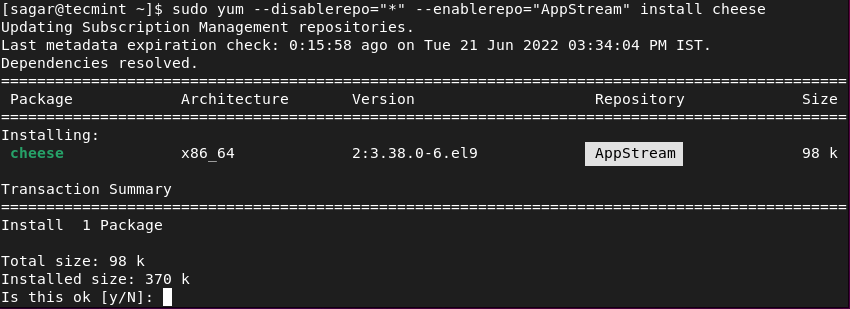
It’s time for us to install the required package from our local RHEL 9 repository. It is quite easy as everything has been set up. In the given example, I’m going to use the “AppStream” repository to install package cheese.
$ sudo yum --disablerepo="*" --enablerepo="AppStream" install cheese
or
$ sudo dnf --disablerepo="*" --enablerepo="AppStream" install cheese
Important: Using a local repository might not satisfy the dependencies so make sure you have proper knowledge of the required dependencies for the package you are going to install.
As you can see, we are using the AppStream repository for installing Cheese, which means we have managed to make a local repository from an ISO file.
This was our take on how you can easily make a local repository for installing packages from ISO files in RHEL 9. If you have any doubts, feel free to ask in the comments section.


how to mount packages on RHEL 9.
@Manikandan,
Just insert your RHEL DVD and issue following command to mount the packages.
Mann Thank You so MUCH!!, you are a Meister.
I am trying to block the CD drives in RHEL and I did that
1. cd /lib/modules/$(uname -r)/kernel/drivers/cdrom ;
2 . mv cdrom.ko cdrom.ko.bak ;
3. echo ‘blacklist sr_mod’ >> /etc/modprobe.d/blacklist.conf ;
4. echo ‘modprobe -r sr_mod’ >> /etc/rc.local ;
Now CD ROM is blocked as it’s not coming, But I have to unblock it so I removed the entry which I did in “/etc/modprobe.d/blacklist.conf” and “/etc/rc.local” also rename the .ko file to its original one. and also rebooted the system.
Now there is no file name cdrom, DVD, sr0, hdc in /dev (All are missing ) now how can I mount a CD without them…So can I bring them back?
Please help…
Thank You Very Much,
Working FINE… :)