How to Install VirtualBox 7.0 on RHEL and Debian Based Distributions

VirtualBox is an open-source cross-platform virtualization software, that can be installed on any operating system to run multiple guest virtual machines on the same computer.

For example, if you install it on your Linux system, you can run Windows operating system under it as a Guest OS or run Linux OS on your Windows system, and so on. This way, you can install and run as many guest operating systems (virtual machines) as you like, the only limit is disk space and memory.

Recently Oracle released the major stable version of Virtualbox 7.0, the newest version of VirtualBox comes with so many major changes and new features added to it.

You can see the complete new changelog details about VirtualBox 7.0 on their Official Changelog Page.

This guide explains how to install VirtualBox 7.0 on RHEL-based distributions such as RHEL, Fedora, Rocky Linux, AlmaLinux, and CentOS Stream using VirtualBox’s own repository with YUM and DNF commands.

This guide also explains how to install VirtualBox 7.0 on Debian-based distributions such as Debian, Ubuntu, and Linux Mint systems using VirtualBox’s own repository with APT-GET or APT commands.

Installing VirtualBox 7.0 in RHEL-based Systems

To install the latest stable version of VirtualBox, you need to first download the virtualbox.repo configuration file using the following wget command and then import the public key using the rpm command.

----------------- On RHEL-based Distributions ----------------- 
# wget https://download.virtualbox.org/virtualbox/rpm/rhel/virtualbox.repo -P /etc/yum.repos.d/
# rpm --import https://www.virtualbox.org/download/oracle_vbox.asc

----------------- On Fedora Linux -----------------
# wget http://download.virtualbox.org/virtualbox/rpm/fedora/virtualbox.repo -P /etc/yum.repos.d/
# rpm --import https://www.virtualbox.org/download/oracle_vbox.asc

Next, enable the EPEL repository to install build tools and dependencies on the system.

----------------- On RHEL-based 9 Release ----------------- 
# dnf install https://dl.fedoraproject.org/pub/epel/epel-release-latest-9.noarch.rpm

----------------- On RHEL-based 8 Release ----------------- 
# yum install https://dl.fedoraproject.org/pub/epel/epel-release-latest-8.noarch.rpm

----------------- On RHEL-based 7 Release ----------------- 
# yum install https://dl.fedoraproject.org/pub/epel/epel-release-latest-7.noarch.rpm

Install Dependency Packages for VirtualBox

VirtualBox uses the vboxdrv kernel module to control and allocate physical memory for the execution of guest operating systems. Without this module, you can still use VirtualBox to create and configure virtual machines, but they will not work.

So, to make VirtualBox fully functional you will need to update your system first, then install some additional modules like DKMS, kernel-headers, kernel-devel, and some dependency packages.

----------------- On RHEL-based Distributions ----------------- 
# yum update
# yum install binutils kernel-devel kernel-headers libgomp make patch gcc glibc-headers glibc-devel dkms -y

----------------- On Fedora Linux -----------------
# dnf update
# dnf install @development-tools
# dnf install kernel-devel kernel-headers dkms qt5-qtx11extras  elfutils-libelf-devel zlib-devel

Install VirtualBox 7.0 in RHEL-based Systems

Once you’ve installed all the needed dependency packages, you can install the latest version of VirtualBox using the following command.

# dnf install VirtualBox-7.0
OR
# yum install VirtualBox-7.0

At this point, you are ready to start using VirtualBox by running the following command on the terminal.

# virtualbox

If you get the following error during the Virtualbox installation, it means there is a conflict between the two Kernel versions.

This system is currently not set up to build kernel modules.
Please install the Linux kernel "header" files matching the current kernel

To resolve the issue, first, check your installed kernel and then update the Linux kernel by running the command:

# uname -r
# dnf update kernel-*
Or
# yum update kernel-*

When the update is complete, reboot your system and select the latest kernel from the grub boot menu, this entry is usually the first entry as you can see.

# reboot

Once the system is done with booting, log in and once again confirm that the kernel-devel version now matches the version of the Linux kernel.

# rpm -q kernel-devel
# uname -r

Then, re-start the build set-up process and confirm that your VirtualBox installation was successful by running:

# /sbin/vboxconfig
# systemctl status vboxdrv

Troubleshooting

If you get any error message like KERN_DIR or if your kernel source directory is not detected automatically by the build process, you can set it by using the following command. Make sure you change the kernel version according to your system as shown in red color.

# KERN_DIR=/usr/src/kernels/4.19.0-1.el7.elrepo.x86_64
# export KERN_DIR

Installing VirtualBox 7.0 in Debian, Ubuntu, and Linux Mint

To install the latest stable version of VirtualBox, you need to add the official Virtualbox repository using the following command.

$ wget -q https://www.virtualbox.org/download/oracle_vbox_2016.asc -O- | sudo apt-key add -
$ wget -q https://www.virtualbox.org/download/oracle_vbox.asc -O- | sudo apt-key add -
$ sudo apt install software-properties-common
$ echo "deb [arch=amd64] https://download.virtualbox.org/virtualbox/debian $(lsb_release -sc) contrib" | sudo tee /etc/apt/sources.list.d/virtualbox.list

Then, update the software package list and install the latest version of VirtualBox.

$ sudo apt-get install virtualbox-7.0

Simply execute the following command to start it from the terminal or use the launcher from the menu to start.

# virtualbox
VirtualBox 7.0 Screenshot
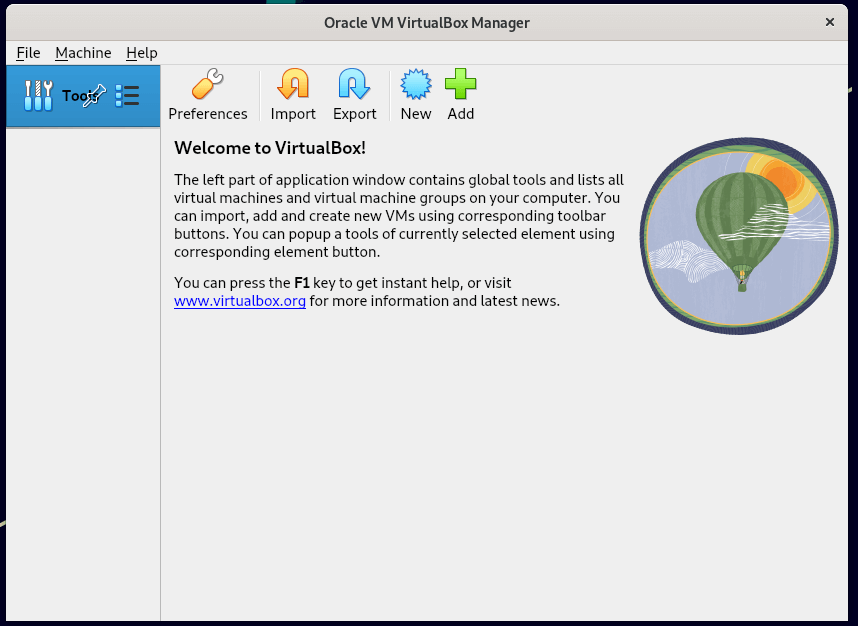
VirtualBox 7.0 Running on Rocky Linux 9

Installing VirtualBox Extension Pack in Linux

If you need some additional functionality such as VirtualBox RDP, PXE, ROM with E1000 support and USB 2.0 Host Controller support, etc. You need to download and install the VirtualBox Extension Pack using the following wget command.

# wget https://download.virtualbox.org/virtualbox/7.0.0/Oracle_VM_VirtualBox_Extension_Pack-7.0.0.vbox-extpack

To install the extension pack, you must have Virtualbox 7.0 installed, once you downloaded vbox-extpack open with Virtualbox as shown below.

If it doesn’t work out, then open Virtualbox –> File –> Preferences –> Tools –> Extension Manager and browse for the vbox-extpack to install it.
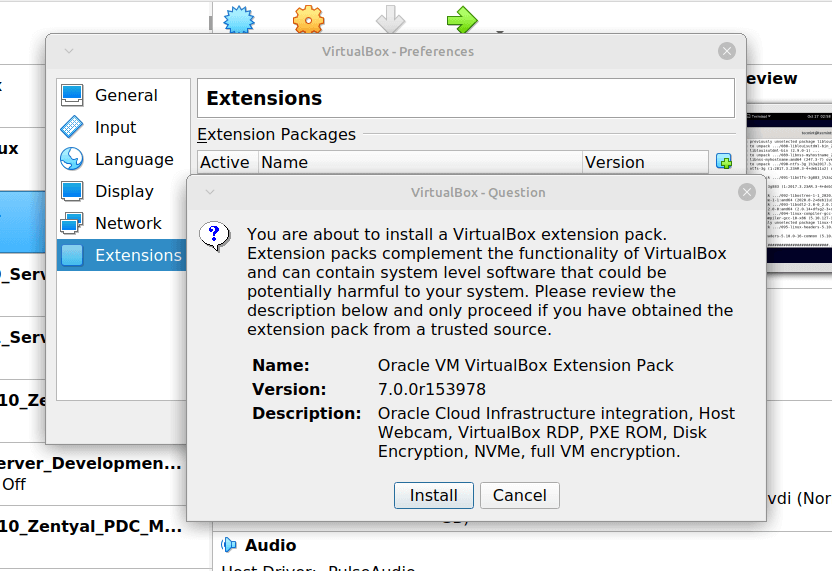
Install VirtualBox Extension Pack on Linux

[ You might also like: How to Enable USB in VirtualBox ]

Updating VirtualBox in Linux Systems

If you want to update the VirtualBox with the latest version in the future, you can simply run the following command to update it.

On RHEL-based Systems
# yum update VirtualBox-*
On Debian-based Systems
# apt-get install VirtualBox-*

Remove VirtualBox from Linux Systems

If in case you want to remove VirtualBox completely, just use the following command to remove it completely from your system.

On RHEL-based Systems
# cd /etc/yum.repos.d/
# rm -rf virtualbox.repo
# yum remove VirtualBox-*
On Debian-based Systems
# apt-get remove VirtualBox-*

You can also Download VirtualBox 7.0 for other Linux, Windows, and Mac OS X platforms.

If you read this far, tweet to the author to show them you care. Tweet a thanks
Ravi Saive
I am an experienced GNU/Linux expert and a full-stack software developer with over a decade in the field of Linux and Open Source technologies

Each tutorial at TecMint is created by a team of experienced Linux system administrators so that it meets our high-quality standards.

Join the TecMint Weekly Newsletter (More Than 156,129 Linux Enthusiasts Have Subscribed)
Was this article helpful? Please add a comment or buy me a coffee to show your appreciation.

134 thoughts on “How to Install VirtualBox 7.0 on RHEL and Debian Based Distributions”

  1. For those who still have a problem when they launch the command:

    $ sudo /sbin/vboxconfig
    

    I’ve solved my problem by disabling the “secure boot” from the bios (i am using the standard Unified Extensible Firmware Interface “UEFI”)

    My machine:
    CentOS Linux release 7.3.1611 (Core)
    Linux AP-amphi.ensm.intranet 3.10.0-514.10.2.el7.x86_64 #1 SMP Fri Mar 3 00:04:05 UTC 2017 x86_64 x86_64 x86_64 GNU/Linux

    Reply
  2. File: /var/log/vbox-install.log;

    Makefile:185: *** Error: unable to find the sources of your current Linux kernel. 
    Specify KERN_DIR= and run Make again. Stop.
    make KBUILD_VERBOSE=1 SUBDIRS=/tmp/vbox.0 SRCROOT=/tmp/vbox.0 CONFIG_MODULE_SIG= -C /usr/src/kernels/2.6.32-042stab116.1/ -j4 modules
    make[1]: warning: -jN forced in submake: disabling jobserver mode.
    test -e include/linux/autoconf.h -a -e include/config/auto.conf || (            \
            echo;                                                           \
            echo "  ERROR: Kernel configuration is invalid.";               \
            echo "         include/linux/autoconf.h or include/config/auto.conf are missing.";      \
            echo "         Run 'make oldconfig && make prepare' on kernel src to fix it.";  \
            echo;                                                           \
            /bin/false)
    

    Can any body help ?

    Reply
    • @Sevki,

      Could you show me the output of the following commands:

      # rpm -qa kernel* | sort
      # uname -mr
      # echo $KERN_DIR
      

      I suggest you to first update the system and then try to install Virtualbox.

      Reply
  3. hi.
    i currently used Ubuntu 16.04 (xenial).
    i try to update then i got flowing warning ..
    “W: GPG error: http://download.virtualbox.org/virtualbox/debian xenial InRelease: The following signatures couldn’t be verified because the public key is not available: NO_PUBKEY A2F683C52980AECF
    W: The repository ‘http://download.virtualbox.org/virtualbox/debian xenial InRelease’ is not signed.
    N: Data from such a repository can’t be authenticated and is therefore potentially dangerous to use.
    N: See apt-secure(8) manpage for repository creation and user configuration details.'”

    after install time
    WARNING: The following packages cannot be authenticated!
    virtualbox-5.1
    Install these packages without verification? [y/N]

    what to do now?
    is i continue? is this better or not?

    Reply
    • @Sayanthan,

      First you need to remove old Virtualbox keys before doing a upgarde, here is how to remove the old keys:

      $ sudo apt-key list
      

      Find the offending key (something like “virtualbox”, after “pub”, xxx/KEYHERE) and do:

      $ sudo apt-key del VirtualBox-KEYHERE
      

      Then follow the instructions as described in this article..

      Reply
  4. I used the above procedure to install VirtualBox 5.1 in a Fedora host and a Windows 7 guest, however, I have to run # /usr/lib/virtualbox/vboxdrv.sh setup each time after reboot/shutdown inorder to get any devices to appear in VB > Settings > USB > USB Device Filters. How can I make the change permanent so I don’t have to run # /usr/lib/virtualbox/vboxdrv.sh all the time?

    I posted this question a few minutes ago but the email address was wrong.
    Thanks,

    Reply
  5. I followed the installation process for VirtualBox in a Fedora 24 host and a Windows 7 guest. Everything worked fine, but I have to run # /usr/lib/virtualbox/vboxdrv.sh setup each time after a reboot/shutdown inorder to get any listings in Settings > USB > USB Device Filters.

    How can I make the USB Filter choices permanent so i don’t have to run # /usr/lib/virtualbox/vboxdrv.sh?

    Thanks.

    Reply
  6. I try to install virtualbox 5 on centos 7 but he gave the header problem then I install it but still having the issue ,plus what should I do

    # yum install kernel-devel

    Reply
    • @Busuyi,

      Could you share the exactly what error message is giving by Virtualbox? so that it will help us to better identify the problem..

      Reply
  7. i get this error when run virtualbox

    Qt FATAL: This application failed to start because it could not find or load the Qt platform plugin “xcb”.

    Available platform plugins are: xcb.

    Reinstalling the application may fix this problem.
    Aborted (core dumped)

    Reply
    • @Waleed,

      It seems xcb libraries are not installed on the system, to install just run the following command will fix the error:

      $ sudo aptitude install libdouble-conversion1 libxcb-render-util0 libxcb-image0 libxcb-icccm4 libxcb-randr0 libxcb-keysyms1 libxcb-xkb1 libxkbcommon-x11-0
      
      Reply
      • I have the same problem, I checked this list and installed the first item which was the only one missing and still get this error, I am running on Linux Mint 17.1

        Reply
          • Ravi,
            The only package that was missing was libdouble-conversion1 and I have already installed it. So all the packages listed above are installed but it still gives me this error.

          • Ravi,
            I found this on another site, if I run this
            P=/usr/lib/virtualbox; sudo LD_LIBRARY_PATH=$P:$P/plugins/platforms $P/VirtualBox
            in a terminal then Virtualbox opens like it should and it works, so doesn’t seem to be missing component.

          • @Steve,

            Thanks for sharing the tip, I hope it will help other users, who are facing similar issue….

    • First of all, many thanks for this very useful guide!

      However, in my case (CentOS 5.11) with the current VirtualBox Version 5.1.2, I ran into a problem which blocked virtualbox when started, so I could not use it at all:
      $ virtualbox
      Qt FATAL: This application failed to start because it could not find or load the Qt platform plugin “xcb”.

      Available platform plugins are: xcb.

      Reinstalling the application may fix this problem.

      After some research, I discovered, that the required “xcb” libraries are installed in /usr/lib/virtualbox and /usr/lib/virtualbox/plugins.

      So the solution is quite simple. As “root” (or using sudo) user do the following two steps:
      1. create a new file containing the two paths mentioned above
      # cd /etc/ld.so.conf.d
      # vi virtualbox-5.1.2.conf
      /usr/lib/virtualbox/
      /usr/lib/virtualbox/plugins/platforms/
      2. Update system wide configuration of “ldd”
      # /sbin/ldconfig

      Hope this helps some people to overcome this missing peace in the installation procedure of the VirtualBox package.
      Have fun!

      workaholic

      Reply
  8. @simon
    Although six weeks are gone since your question, just a hint:
    I just installed VirtualBox-5 on my Fedora-21 box. The script ‘vboxdrv.sh’ did the job for me:
    # /usr/lib/virtualbox/vboxdrv.sh setup

    Reply
    • Hi Peter,
      I have tried this. But got this error:

      Stopping VirtualBox kernel modules [ OK ]
      Uninstalling old VirtualBox DKMS kernel modules [ OK ]
      Trying to register the VirtualBox kernel modules using DKMSError! echo
      Your kernel headers for kernel 4.5.7-200.fc23.x86_64 cannot be found at
      /lib/modules/4.5.7-200.fc23.x86_64/build or /lib/modules/4.5.7-200.fc23.x86_64/source.
      [FAILED]
      (Failed, trying without DKMS)
      Recompiling VirtualBox kernel modules [FAILED]
      (Look at /var/log/vbox-install.log to find out what went wrong)

      Any help will be appreciated.
      Thanks

      Reply
      • @Dandu,

        It seems me to like a Kernel header problem, you should install kernel-headers using:

        # yum install kernel-devel
        
        Reply
  9. Hello,
    sorry for my poor English… I fail to install on Centos 7 at start stem, neither of these commands succeed:
    # /etc/init.d/vboxdrv setup
    OR
    # service vboxdrv setup

    =>

    /etc/init.d/vboxdrv setup
    bash: /etc/init.d/vboxdrv: No such file or directory

    service vboxdrv setup
    The service command supports only basic LSB actions (start, stop, restart, try-restart, reload, force-reload, status). For other actions, please try to use systemctl.

    I found no error in /var/log/vbox-install.log

    Any hints ? Thanks !

    Reply
      • similar issue for me. I installed virtualbox repo in /etc/yum.repos.d/. I am using Fedora 23. I badly need VirtualBox. Please give me some solution to make it work. Thanks!

        Reply
        • It appears there is a minor error in this guide. The suggested options for a RHEL/CentOS 7 host (or Fedora 19-24 hosts) are actually only suitable for RHEL/CentOS 5/6 hosts (or Fedora 16-18 hosts). Here is the change I made to the author’s procedure that allowed me to get VirtualBox 5.1 working on my CentOS 7 host:

          /usr/lib/virtualbox/vboxdrv.sh setup
          usermod -a -G vboxusers user_name

          NOTE: Replace “user_name” with an actual user name.

          I was able to otherwise follow this guide and just replace the portion concerning rebuilding the kernel modules with what I supplied above.

          Source: http://www.if-not-true-then-false.com/2010/install-virtualbox-with-yum-on-fedora-centos-red-hat-rhel/

          Reply
          • @John,

            Thanks a ton for pointing out, we’ve included the instructions as suggested, hope it will help other users who are facing similar issues with latest version of CentOS/RHEL and Fedora..

Leave a Reply to simon Cancel reply

Have a question or suggestion? Please leave a comment to start the discussion. Please keep in mind that all comments are moderated and your email address will NOT be published.