In most cases PHP performance can slow down the performance of websites. To optimize and accelerate website performance you need to improve the PHP performance. For this purpose, you can use opcode cachers such as eAccelerator, APC, Memcached, XCache, etc. Personally, my favourite choice is XCache.
XCache is a free, open source operation code cacher, it is designed to enhance the performance of PHP scripts execution on servers. It optimizes the performance by eliminating the compilation time of PHP code by caching the compiled version of code into the memory and this way the compiled version loads the PHP script directly from the memory. This will surety accelerate the page generation time by up to 5 times faster and also optimizes and increases many other aspects of php scripts and reduce website/server load.
May not be 5 times faster, but it will definite improves the standard PHP installation with the opcode XCaher. This article explains how to setup and integrate XCache into PHP installation on a RHEL, CentOS, Fedora and Ubuntu, Linux Mint and Debian systems.
Step 1: Installation of XCache for PHP
Users who running an Red Hat based distributions, can able to install XCache through a package manager by enabling epel repository. Once you’ve enabled epel repository, you can use the following yum command to install it.
RHEL/CentOS/Fedora
# yum install php-xcache xcache-admin
By default, XCache is available for Debian based distributions from the package manager. Therefore, you can install the XCache package by using the following apt-get command.
Debian/Ubuntu/Linux Mint
# apt-get install php5-xcache
Step 2: Configuring of XCache for PHP
The XCache.ini configuration file has couple of settings that I do recommend you to understand as they are vital to use in this plugin. The detailed information of XCache configuration settings can be found at XcacheIni. If you don’t want to change any settings, you can use default settings as they are good enough to use with XCache.
RHEL/CentOS/Fedora
# vi /etc/php.d/xcache.ini
Debian/Ubuntu/Linux Mint
# vi /etc/php5/conf.d/xcache.ini
OR
# vi /etc/php5/mods-available/xcache.ini
Step 3: Restarting Apache for XCache
Once you’re done with configuration settings, restart your Apache web server.
# /etc/init.d/httpd restart
# /etc/init.d/apache2 restart
Step 4: Verifying XCache for PHP
Once you’ve restarted web service, type the following command to verify XCache. You should see the XCache lines as shown below.
# php -v
Sample Output
PHP 5.3.3 (cli) (built: Jul  3 2012 16:40:30)
Copyright (c) 1997-2010 The PHP Group
Zend Engine v2.3.0, Copyright (c) 1998-2010 Zend Technologies
    with XCache v3.0.1, Copyright (c) 2005-2013, by mOo
    with XCache Optimizer v3.0.1, Copyright (c) 2005-2013, by mOo
    with XCache Cacher v3.0.1, Copyright (c) 2005-2013, by mOo
    with XCache Coverager v3.0.1, Copyright (c) 2005-2013, by mOo
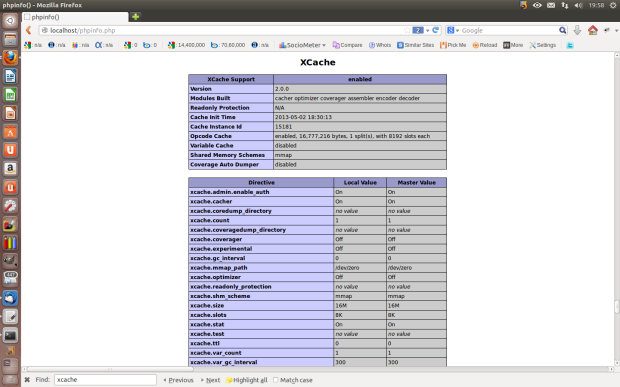
Alternatively, you can verify XCache by creating a ‘phpinfo.php‘ file under your document root directory (i.e. /var/www/html or /var/www).
vi /var/www/phpinfo.php
Next, add the following php lines to it and save the file.
<?php
phpinfo();
?>
Open a web browser and call the file like “http://your-ip-address/phpinfo.php“. You will see the following output screen shot.
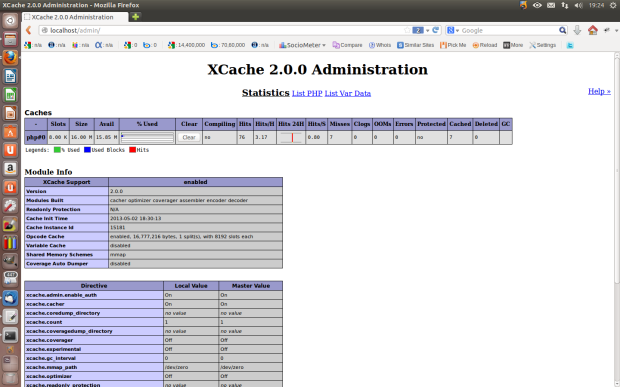
Step 5: Enabling XCache Admin Panel for PHP
By default the admin panel is protected with http-auth and in disabled state, if you’ve not set a password. To set user/password open the Xcache.ini file. But, first you have to create md5 password using following command.
# echo -n "typeyourpassword" | md5sum
Sample Output
e10adc3949ba59abbe56e057f20f883e
Now open Xcache.ini file add the generated md5 password. See the following example, add your own password md5 string.
[xcache.admin]
xcache.admin.enable_auth = On
; Configure this to use admin pages
 xcache.admin.user = "mOo"
; xcache.admin.pass = md5($your_password)
 xcache.admin.pass = "e10adc3949ba59abbe56e057f20f883e"
The simplest way to do so is copying the whole directory xcache (admin was in older release) to your web root directory (i.e. /var/www/html or /var/www).
# cp -a /usr/share/xcache/ /var/www/html/
OR
# cp -a /usr/share/xcache/htdocs /var/www/xcache
OR
cp -a /usr/share/xcache/admin/ /var/www/ (older release)
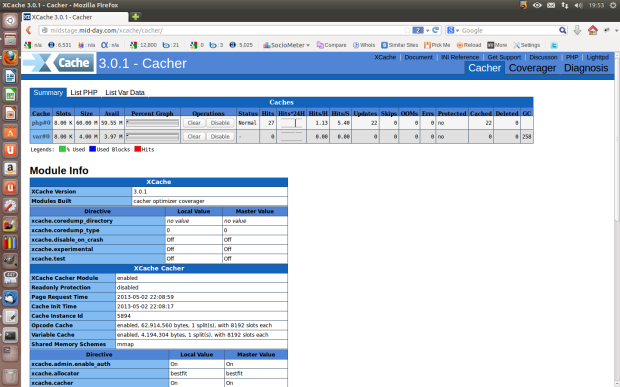
Now call it from your browser, a http-auth login prompt window will pop-up. Enter your user/pass in, and it’s done.
http://localhost/xcache
OR
http://localhost/admin (older release)
XCache 3.0 Newer Version
XCache 2.0 Older Version