It’s no secret that WordPress is one of the most popular content management systems for websites and blogs all over the Internet. In fact, 43% of the web is built on the WordPress platform.
Popularity is not only caused by the powerful blog publishing and website-building features offered by the content management system. Plugins and themes also play an important role in making WordPress a preferred choice for blog owners and web developers.
For example, plugins can help you enhance your WordPress site’s performance with advanced statistics, improve the quality of website traffic with SEO tools and even strengthen online protection from spam messages and security threats.
In this article, you will learn how to enable real-time document editing and collaboration in the WordPress platform by integrating it with ONLYOFFICE Docs via an official integration app that is available in the WordPress Plugin Directory.
About ONLYOFFICE Docs
ONLYOFFICE Docs is an online office package that is designed for on-premises deployment and comes with a free desktop application for Linux-based operating systems, Windows, and macOS.
The suite consists of office apps for text documents, spreadsheets, presentations, online forms, and PDF files that are highly compatible with the OOXNL formats by Microsoft, which makes ONLYOFFICE Docs a good alternative to Word, Excel, and PowerPoint.
ONLYOFFICE Docs offers a set of standard formatting and styling tools that allow you to create office documents for different purposes, including academic writing.
The package is also equipped with various useful features for collaborative work:
- Fast and strict co-editing modes.
- Track Changes.
- Version History.
- Document comparison.
- Comments.
- User mentions.
- Real-time communication in the built-in document chat.
- Audio and video calls via the Rainbow and Jitsi plugins.
When it comes to integration, ONLYOFFICE makes it possible to create a collaborative environment with a number of file-sharing platforms, e-learning solutions and electronic document management systems.
More particularly, you can enable document editing and co-authoring within Nextcloud, Seafile, ownCloud, Redmine, Confluence, SharePoint, Alfresco, Liferay, Moodle, etc. ONLYOFFICE integrations work via official connectors.
Step 1: Install WordPress in Linux
If you don’t have a running WordPress instance, you need to install one. Please, have a look at one of the guides below:
Step 2. Install ONLYOFFICE Docs in Linux
When it comes to ONLYOFFICE Docs, there are different ways of deploying its working instance. You can read the following guide for detailed installation instructions for Ubuntu.
Step 3: Install ONLYOFFICE Plugin for WordPress
Now that you have two running instances, ONLYOFFICE Docs (ONLYOFFICE Document Server) and WordPress, it’s time to install the official ONLYOFFICE integration app. The application is listed in the WordPress Plugin Directory and is also available on GitHub.
After downloading the ONLYOFFICE integration app, you need to log into your WordPress platform and activate it. To do so, access the WordPress admin dashboard and follow these steps:
- Find the Plugins page.
- Click Add New and choose Upload Plugin on top of the page.
- Click Choose File and select the ONLYOFFICE plugin file you downloaded earlier.
- Click the Install Now button.
- Once installed, click Activate Plugin to start using the ONLYOFFICE plugin.
Don’t forget that ONLYOFFICE Docs (ONLYOFFICE Document Server) is compatible with WordPress v.5.9.0+.
Step 4: Configure ONLYOFFICE Plugin for WordPress
When the official ONLYOFFICE connector is activated, you need to make it work properly. To configure the plugin, access the WordPress admin dashboard, click ONLYOFFICE and open the Settings page.
Specify the following parameters there:
- URL address of the ONLYOFFICE Document Server (ONLYOFFICE Docs).
- Secret key if you want to enable JWT protection.
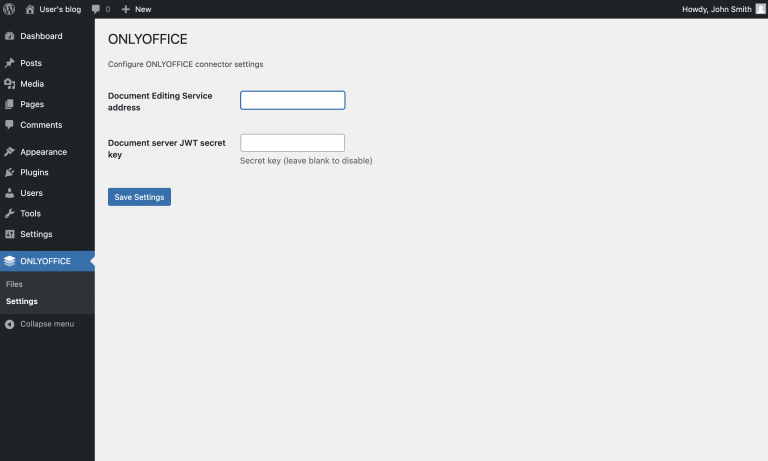
The latter parameter is optional, and you need to specify it if you want to enable JWT for better document protection. If you don’t need this feature, leave the field empty.
After you are done adjusting the parameters, click the Save Settings button.
Step 5: Using ONLYOFFICE Docs in WordPress
Once installed and properly configured, the ONLYOFFICE plugin makes it possible for WordPress administrators to work with office documents using ONLYOFFICE Docs.
With the ONLYOFFICE online editors, you can:
- Edit and collaborate on documents uploaded to the WordPress platform.
- Add ONLYOFFICE blocks to blog posts and articles.
If you upload an office file to the WordPress Media gallery, it will automatically appear on the ONLYOFFICE page that can be accessed from the WordPress admin area.

All WordPress users who have administrator rights can edit and co-author DOCX documents, XLSX spreadsheets, and PPTX presentations from the Media Library. They can switch between two co-editing modes, review changes with the Track Changes feature, leave comments and send text messages in the built-in chat.
When you click on a file on the ONLYOFFICE page, the corresponding editor will open in the same tab allowing you to make edits with ONLYOFFICE Docs. Apart from document editing and collaboration, the ONLYOFFICE plugins let you add special blocks.
When you create a new post for your WordPress blog, there is an option to add an ONLYOFFICE block. You can upload a new office file there or choose one from the WordPress Media Library.
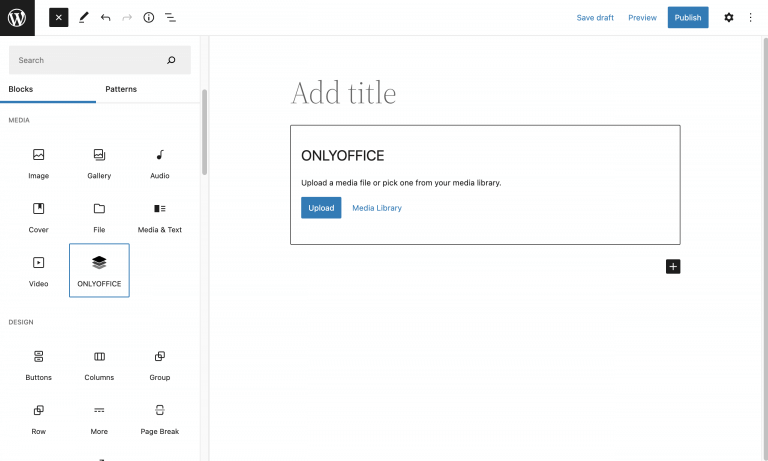
With ONLYOFFICE blocks, the visitors of your website can view the contents of your office files in Embedded mode without the need to download them.
This is how you can integrate ONLYOFFICE Docs with WordPress to enable real-time document editing and co-authoring. We hope you find this guide useful. Don’t hesitate to let us know your thoughts by leaving a comment below.