Zimbra Collaboration Suite (ZCS) is an Open Source, collaborative platform for email servers, developed in two editions, Open Source edition (Free) and Network Edition (Paid), which provides services such as LDAP, SMTP, POP and IMAP, webmail client, calendaring, tasks, antivirus, antispam and others.
This tutorial describes how to install Zimbra Collaboration Suite Open Source Edition on a CentOS/RHEL 7 server.
Requirements
- An external DNS server with both A and MX valid records to point to your Zimbra mail server IP Address.
- A clean minimal installation of CentOS 8/RHEL 8 or CentOS 7/RHEL 7 without any mail, databases, LDAP, DNS, or Http servers up and running.
- A static IP Address assigned to a network interface.
Step 1: Install System Packages
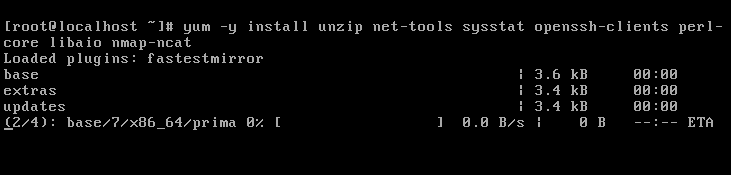
1. Before we proceed with Zimbra Collaboration Suite installation process, first log in to your server console with root privileges and install the following packages:
# yum -y install unzip net-tools sysstat openssh-clients perl-core libaio nmap-ncat libstdc++.so.6
2. Next, issue getenforce command to check if Selinux is enabled on your machine. In case the policy is set to Enforced disable it by issuing the below commands:
# getenforce
# setenforce 0
# getenforce

To completely disable Selinux on CentOS, open /etc/selinux/config file with a text editor and set the line SELINUX to disabled.
3. Assure that wget system utility is also installed on your system by issuing the following command:
# yum install wget
Step 2: Configure System Hostname
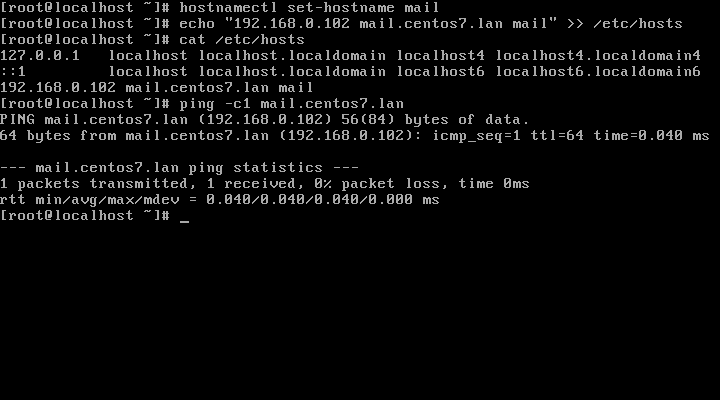
4. In order for Zimbra to function correctly you must set the local machine hostname and FQDN to point to your server IP Address by running the below hostnamectl commands from root account:
# hostnamectl set-hostname mail
# echo "192.168.0.14  mail.centos7.lan  mail " >> /etc/hosts
# cat /etc/hosts
Replace the system hostname and FQDN values accordingly in order to match your own domain settings. Test the hostname and FQDN values by issuing the ping command against both records.
# ping -c1 mail.centos7.lan
# ping -c1 mail
Step 3: Add a Static IP Address
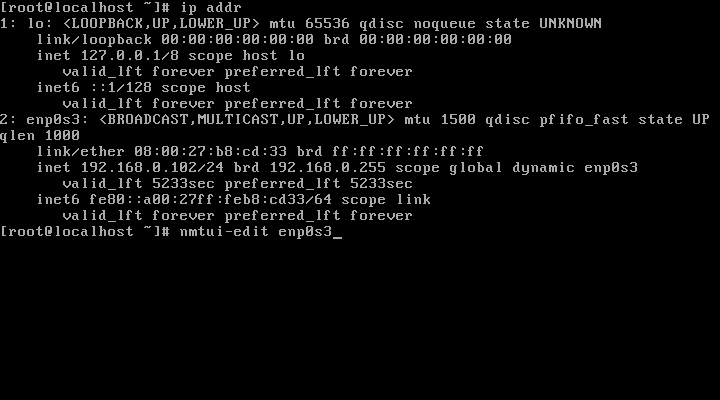
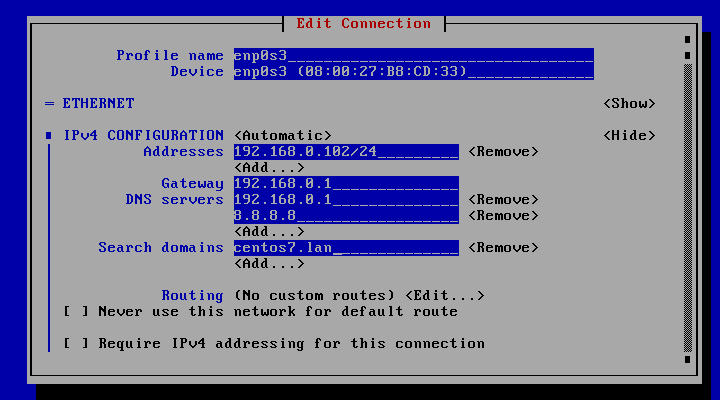
5. If your server uses a DHCP dynamic IP Address, then you need to edit your network interface card and configure to use a static IP Address. Get the network interface information using ip addr command and identify your server external NIC (usually something like enp0s3 or eth0).
# ip addr
Then, run the nmtui-edit command against the interface you need to change settings and assign the interface with a manual IP Address. Use the below screenshots as a guide.
# nmtui-edit enp0s3
Step 4: Disable Unwanted Services
6. A CentOS default installation ships with postfix daemon already installed and running. To disable and erase postfix service run the following commands:
# systemctl stop postfix
# systemctl disable postfix
# yum remove postfix
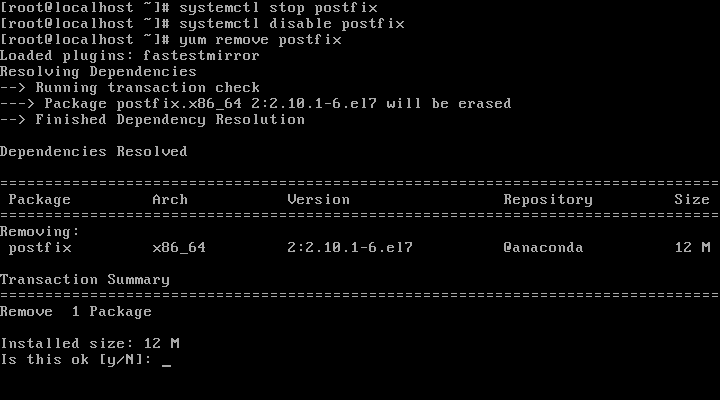
After the service has been removed issue the ss command in order to check if other daemons incompatible with Zimbra service, such as LDAP, httpd, dovecot are running on your system. If that’s the case remove them as well.
Step 5: Install Zimbra Collaboration Suite Open Source Edition
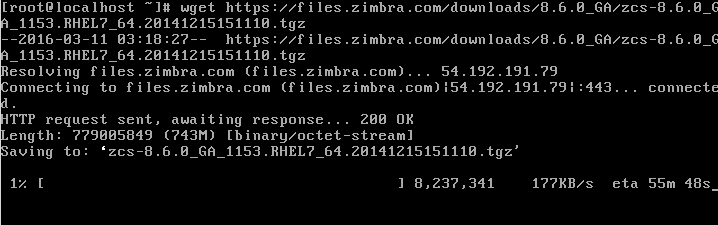
7. Now it’s time to install Zimbra Collaboration Suite. Go to Zimbra Collaboration Suite download page and grab the latest version on your system by issuing the following wget command:
----------------- For RHEL/CentOS 8 -----------------
# wget https://files.zimbra.com/downloads/8.8.15_GA/zcs-8.8.15_GA_3953.RHEL8_64.20200629025823.tgz

----------------- For RHEL/CentOS 7 -----------------
# wget https://files.zimbra.com/downloads/8.8.15_GA/zcs-8.8.15_GA_3869.RHEL7_64.20190918004220.tgz

----------------- For RHEL/CentOS 6 -----------------
# wget https://files.zimbra.com/downloads/8.8.15_GA/zcs-8.8.15_GA_3869.RHEL6_64.20190918004220.tgz
8. After the download completes, use unzip command to extract the archive, enter Zimbra extracted directory and list the directory content to locate the installer file.
# tar xfz zcs-8.8.15_GA_3953.RHEL8_64.20200629025823.tgz
# cd zcs-8.8.15_GA_3953.RHEL8_64.20200629025823/
# ls
9. Now, start Zimbra installation process by launching in execution the installer script file named install.sh.
After a series of system checks, the installer will prompt you to accept the license. Agree to the license (y) in order to continue further with the installation process.
# ./install.sh
OR
# ./install.sh --platform-override   [On different platforms other than RHEL]
Sample Output
Operations logged to /tmp/install.log.92OcKO6s
Checking for existing installation...
    zimbra-drive...NOT FOUND
    zimbra-imapd...NOT FOUND
    zimbra-patch...NOT FOUND
    zimbra-mta-patch...NOT FOUND
    zimbra-proxy-patch...NOT FOUND
    zimbra-license-tools...NOT FOUND
    zimbra-license-extension...NOT FOUND
    zimbra-network-store...NOT FOUND
    zimbra-network-modules-ng...NOT FOUND
    zimbra-chat...NOT FOUND
    zimbra-talk...NOT FOUND
    zimbra-ldap...NOT FOUND
    zimbra-logger...NOT FOUND
    zimbra-mta...NOT FOUND
    zimbra-dnscache...NOT FOUND
    zimbra-snmp...NOT FOUND
    zimbra-store...NOT FOUND
    zimbra-apache...NOT FOUND
    zimbra-spell...NOT FOUND
    zimbra-convertd...NOT FOUND
    zimbra-memcached...NOT FOUND
    zimbra-proxy...NOT FOUND
    zimbra-archiving...NOT FOUND
    zimbra-core...NOT FOUND


----------------------------------------------------------------------
PLEASE READ THIS AGREEMENT CAREFULLY BEFORE USING THE SOFTWARE.
SYNACOR, INC. ("SYNACOR") WILL ONLY LICENSE THIS SOFTWARE TO YOU IF YOU
FIRST ACCEPT THE TERMS OF THIS AGREEMENT. BY DOWNLOADING OR INSTALLING
THE SOFTWARE, OR USING THE PRODUCT, YOU ARE CONSENTING TO BE BOUND BY
THIS AGREEMENT. IF YOU DO NOT AGREE TO ALL OF THE TERMS OF THIS
AGREEMENT, THEN DO NOT DOWNLOAD, INSTALL OR USE THE PRODUCT.

License Terms for this Zimbra Collaboration Suite Software:
https://www.zimbra.com/license/zimbra-public-eula-2-6.html
----------------------------------------------------------------------


Do you agree with the terms of the software license agreement? [N] y
10. Next, the installation process will prompt you a series of questions in order to configure Zimbra daemon properly. Use the below installation excerpt in order to set up the Zimbra service further.
Use Zimbra's package repository [Y] y

Importing Zimbra GPG key

Configuring package repository

Checking for installable packages

Found zimbra-core (local)
Found zimbra-ldap (local)
Found zimbra-logger (local)
Found zimbra-mta (local)
Found zimbra-dnscache (local)
Found zimbra-snmp (local)
Found zimbra-store (local)
Found zimbra-apache (local)
Found zimbra-spell (local)
Found zimbra-memcached (repo)
Found zimbra-proxy (local)
Found zimbra-drive (repo)
Found zimbra-imapd (local)
Found zimbra-patch (repo)
Found zimbra-mta-patch (repo)
Found zimbra-proxy-patch (repo)


Select the packages to install

Install zimbra-ldap [Y] y
11. Next, it will ask you to install the Zimbra packages, press Y to install all.
Select the packages to install Install zimbra-ldap [Y]yInstall zimbra-logger [Y]yInstall zimbra-mta [Y]yInstall zimbra-dnscache [Y]yInstall zimbra-snmp [Y]yInstall zimbra-store [Y]yInstall zimbra-apache [Y]yInstall zimbra-spell [Y]yInstall zimbra-memcached [Y]yInstall zimbra-proxy [Y]yChecking required space for zimbra-core Checking space for zimbra-store Checking required packages for zimbra-store zimbra-store package check complete. Installing: zimbra-core zimbra-ldap zimbra-logger zimbra-mta zimbra-dnscache zimbra-snmp zimbra-store zimbra-apache zimbra-spell zimbra-memcached zimbra-proxy zimbra-drive zimbra-imapd zimbra-patch zimbra-mta-patch zimbra-proxy-patch zimbra-chat
12. Finally, it will start the Zimbra installation process.
The system will be modified.  Continue? [N] y

Beginning Installation - see /tmp/install.log.92OcKO6s for details...

                          zimbra-core-components will be downloaded and installed.
                          zimbra-common-core-jar will be installed.
                         zimbra-common-core-libs will be installed.
                         zimbra-common-mbox-conf will be installed.
                   zimbra-common-mbox-conf-attrs will be installed.
                    zimbra-common-mbox-conf-msgs will be installed.
                  zimbra-common-mbox-conf-rights will be installed.
                           zimbra-common-mbox-db will be installed.
                         zimbra-common-mbox-docs will be installed.
                   zimbra-common-mbox-native-lib will be installed.
                            zimbra-timezone-data will be installed.
                                     zimbra-core will be installed.
                          zimbra-ldap-components will be downloaded and installed.
                                     zimbra-ldap will be installed.
                                   zimbra-logger will be installed.
                           zimbra-mta-components will be downloaded and installed.
                                      zimbra-mta will be installed.
                      zimbra-dnscache-components will be downloaded and installed.
                                 zimbra-dnscache will be installed.
                          zimbra-snmp-components will be downloaded and installed.
                                     zimbra-snmp will be installed.
Last metadata expiration check: 0:00:56 ago on Sat 01 Aug 2020 01:56:00 AM EDT.
                       zimbra-jetty-distribution will be downloaded and installed.
                         zimbra-store-components will be downloaded and installed.
                   zimbra-mbox-admin-console-war will be installed.
                                zimbra-mbox-conf will be installed.
                                 zimbra-mbox-war will be installed.
                             zimbra-mbox-service will be installed.
                          zimbra-mbox-store-libs will be installed.
                       zimbra-mbox-webclient-war will be installed.
                                    zimbra-store will be installed.
                        zimbra-apache-components will be downloaded and installed.
                                   zimbra-apache will be installed.
                         zimbra-spell-components will be downloaded and installed.
                                    zimbra-spell will be installed.
Last metadata expiration check: 0:01:07 ago on Sat 01 Aug 2020 01:56:00 AM EDT.
                                zimbra-memcached will be downloaded and installed.
                         zimbra-proxy-components will be downloaded and installed.
                                    zimbra-proxy will be installed.
Last metadata expiration check: 0:01:18 ago on Sat 01 Aug 2020 01:56:00 AM EDT.
                                    zimbra-drive will be downloaded and installed (later).
                                    zimbra-imapd will be installed.
Last metadata expiration check: 0:01:20 ago on Sat 01 Aug 2020 01:56:00 AM EDT.
                                    zimbra-patch will be downloaded and installed (later).
Last metadata expiration check: 0:01:22 ago on Sat 01 Aug 2020 01:56:00 AM EDT.
                                zimbra-mta-patch will be downloaded and installed (later).
Last metadata expiration check: 0:01:23 ago on Sat 01 Aug 2020 01:56:00 AM EDT.
                              zimbra-proxy-patch will be downloaded and installed (later).
Last metadata expiration check: 0:01:27 ago on Sat 01 Aug 2020 01:56:00 AM EDT.
                                     zimbra-chat will be downloaded and installed (later).

Downloading packages (11):
   zimbra-core-components
   zimbra-ldap-components
   zimbra-mta-components
   zimbra-dnscache-components
   zimbra-snmp-components
   zimbra-jetty-distribution
   zimbra-store-components
   zimbra-apache-components
   zimbra-spell-components
   zimbra-memcached
   zimbra-proxy-components
      ...done

Removing /opt/zimbra
Removing zimbra crontab entry...done.
Cleaning up zimbra init scripts...done.
Cleaning up /etc/security/limits.conf...done.

Finished removing Zimbra Collaboration Server.


Installing repo packages (11):
   zimbra-core-components
   zimbra-ldap-components
   zimbra-mta-components
   zimbra-dnscache-components
   zimbra-snmp-components
   zimbra-jetty-distribution
   zimbra-store-components
   zimbra-apache-components
   zimbra-spell-components
   zimbra-memcached
   zimbra-proxy-components
      ...
13. Store configuration.
1) Status: Enabled 2) Create Admin User: yes 3) Admin user to create: [email protected] ** 4) Admin Password UNSET 5) Anti-virus quarantine user: [email protected] 6) Enable automated spam training: yes 7) Spam training user: [email protected] 8) Non-spam(Ham) training user: [email protected] 9) SMTP host: mail.centos7.lan 10) Web server HTTP port: 8080 11) Web server HTTPS port: 8443 12) Web server mode: https 13) IMAP server port: 7143 14) IMAP server SSL port: 7993 15) POP server port: 7110 16) POP server SSL port: 7995 17) Use spell check server: yes 18) Spell server URL: http://mail.centos7.lan:7780/aspell.php 19) Enable version update checks: TRUE 20) Enable version update notifications: TRUE 21) Version update notification email: [email protected] 22) Version update source email: [email protected] 23) Install mailstore (service webapp): yes 24) Install UI (zimbra,zimbraAdmin webapps): yes Select, or 'r' for previous menu [r]4# Select 4 to set admin password Password for [email protected] (min 6 characters): [54mE0RmqN]enter admin password here
Store configuration

   1) Status:                                  Enabled
   2) Create Admin User:                       yes
   3) Admin user to create:                    [email protected]
   4) Admin Password                           set
   5) Anti-virus quarantine user:              [email protected]
   6) Enable automated spam training:          yes
   7) Spam training user:                      [email protected]
   8) Non-spam(Ham) training user:             [email protected]
   9) SMTP host:                               mail.centos7.lan
  10) Web server HTTP port:                    8080
  11) Web server HTTPS port:                   8443
  12) Web server mode:                         https
  13) IMAP server port:                        7143
  14) IMAP server SSL port:                    7993
  15) POP server port:                         7110
  16) POP server SSL port:                     7995
  17) Use spell check server:                  yes
  18) Spell server URL:                        http://mail.centos7.lan:7780/aspell.php
  19) Enable version update checks:            TRUE
  20) Enable version update notifications:     TRUE
  21) Version update notification email:       [email protected]
  22) Version update source email:             [email protected]
  23) Install mailstore (service webapp):      yes
  24) Install UI (zimbra,zimbraAdmin webapps): yes

Select, or 'r' for previous menu [r] r
Main menu 1) Common Configuration: 2) zimbra-ldap: Enabled 3) zimbra-logger: Enabled 4) zimbra-mta: Enabled 5) zimbra-dnscache: Enabled 6) zimbra-snmp: Enabled 7) zimbra-store: Enabled 8) zimbra-spell: Enabled 9) zimbra-proxy: Enabled 10) Default Class of Service Configuration: s) Save config to file x) Expand menu q) Quit *** CONFIGURATION COMPLETE - press 'a' to apply Select from menu, or press 'a' to apply config (? - help)a# Apply configuration Save configuration data to a file? [Yes]EnterSave config in file: [/opt/zimbra/config.11047] Saving config in /opt/zimbra/config.11047...done. The system will be modified - continue? [No]yesOperations logged to /tmp/zmsetup01262016-002704.log Setting local config values...done. Initializing core config...Setting up CA...done. Deploying CA to /opt/zimbra/conf/ca ...done. Creating SSL zimbra-store certificate...done. Creating new zimbra-ldap SSL certificate...done. Creating new zimbra-mta SSL certificate...done. Creating new zimbra-proxy SSL certificate...done. Installing mailboxd SSL certificates...done. Installing MTA SSL certificates...done. Installing LDAP SSL certificate...done. Installing Proxy SSL certificate...done. Initializing ldap...done. Setting replication password...done. Setting Postfix password...done. Setting amavis password...done. Setting nginx password...done. Setting BES searcher password...done. Creating server entry for mail.centos7.lan...done. Setting Zimbra IP Mode...done. Saving CA in ldap ...done. Saving SSL Certificate in ldap ...done. Setting spell check URL...done. Setting service ports on mail.centos7.lan...done. Setting zimbraFeatureTasksEnabled=TRUE...done. Setting zimbraFeatureBriefcasesEnabled=TRUE...done. Setting Master DNS IP address(es)...done. Setting DNS cache tcp lookup preference...done. Setting DNS cache udp lookup preference...done. Setting DNS tcp upstream preference...done. Setting TimeZone Preference...done. Initializing mta config...done. Setting services on mail.centos7.lan...done. Adding mail.centos7.lan to zimbraMailHostPool in default COS...done. Creating domain mail.centos7.lan...done. Setting default domain name...done. Creating domain mail.centos7.lan...already exists. Creating admin account [email protected]. Creating root alias...done. Creating postmaster alias...done. Creating user [email protected]. Creating user [email protected]. Creating user [email protected]. Setting spam training and Anti-virus quarantine accounts...done. Initializing store sql database...done. Setting zimbraSmtpHostname for mail.centos7.lan...done. Configuring SNMP...done. Setting up syslog.conf...done. Starting servers...done. Installing common zimlets... com_zimbra_adminversioncheck...done. com_zimbra_attachcontacts...done. com_zimbra_attachmail...done. com_zimbra_bulkprovision...done. com_zimbra_cert_manager...done. com_zimbra_clientuploader...done. com_zimbra_date...done. com_zimbra_email...done. com_zimbra_mailarchive...done. com_zimbra_phone...done. com_zimbra_proxy_config...done. com_zimbra_srchhighlighter...done. com_zimbra_tooltip...done. com_zimbra_url...done. com_zimbra_viewmail...done. com_zimbra_webex...done. com_zimbra_ymemoticons...done. Finished installing common zimlets. Restarting mailboxd...done. Creating galsync account for default domain...done. You have the option of notifying Zimbra of your installation. This helps us to track the uptake of the Zimbra Collaboration Server. The only information that will be transmitted is: The VERSION of zcs installed (8.6.0_GA_1153_RHEL7_64) The ADMIN EMAIL ADDRESS created ([email protected]) Notify Zimbra of your installation? [Yes]noNotification skipped Setting up zimbra crontab...done. Moving /tmp/zmsetup01262016-002704.log to /opt/zimbra/log Configuration complete - press return to exit #Press Enter
Step 6: Zimba Initial Configuration
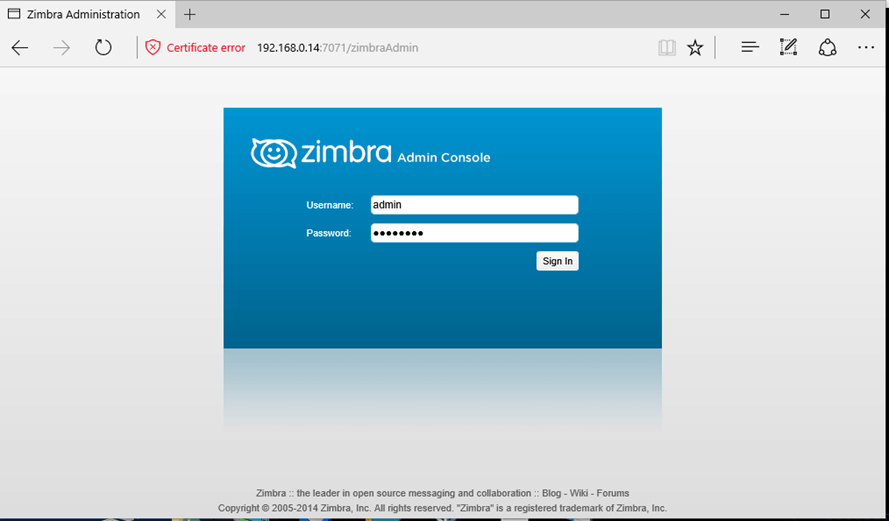
14. After the installation finishes, open a web browser and navigate to your domain name or IP address of the machine running Zimbra service, on port 7071 via HTTPS protocol, accept the certificate security error, and login with the credentials configured during the installation process. The default username for the Zimbra Admin web panel is admin.
https://mail.centos7.lan:7071
or
https://192.168.1.14:7071
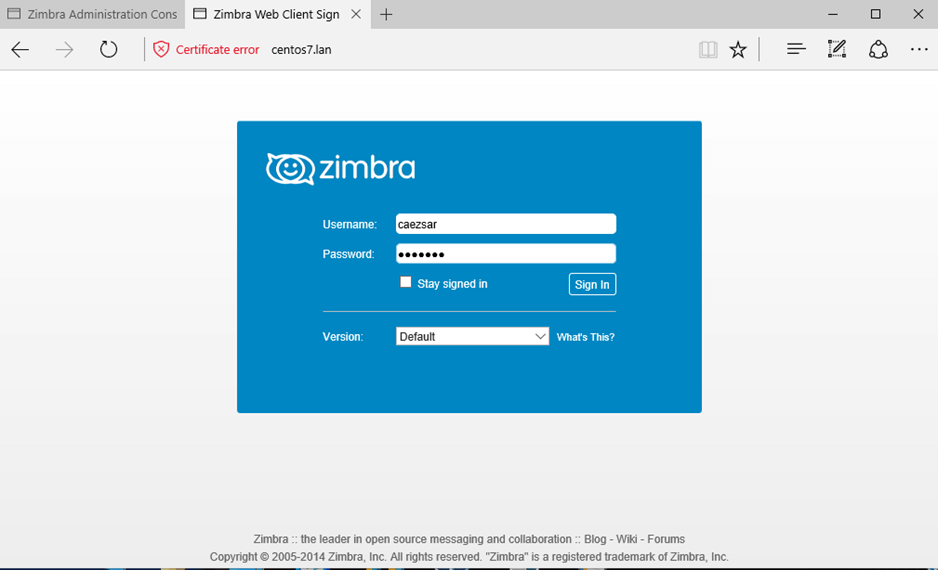
15. Once logged in the admin web console you can start adding your own SSL certificates, create mail accounts, mail aliases, and so on. Just remember that the port 7071 is used only for administrative tasks.
Clients can securely log in to their webmail boxes using the domain name or the server IP address via HTTPS protocol.
https://mail.centos7.lan
or
https://192.168.1.14

Congratulations! Now you have a full operating mail stack installed on your premises.
Step 6: Remove or Uninstall Zimbra
If you wish to uninstall Zimbra service alongside with its components run the installer script with the -u option.
# ./install.sh -u
To delete Zimbra installation archive and directory run the below commands:
# cd
# rm -rf zcs-*
As a final note, in order to run the Zimbra Collaboration Suite properly, you need a powerful machine with a minimum requirement of 4GB of RAM.