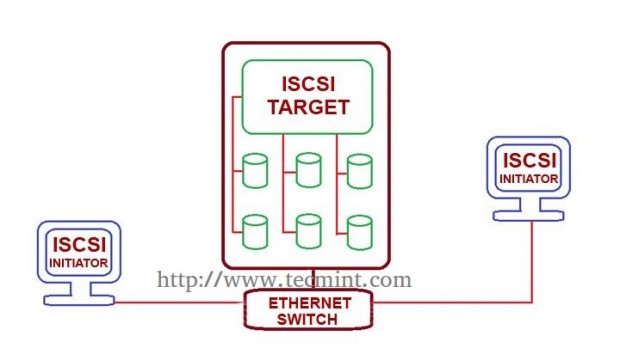
iSCSI Initiator are the clients which use to authenticated with iSCSI target servers to access the LUNs shared from target server. We can deploy any kind of Operating systems in those locally mounted Disks, just a single package need to be install to get authenticate with target server.
Features
- Can handle any kind of file systems in locally mounted Disk.
- No need of restating the system after partition using fdisk.
Requirements
- Create Centralized Secure Storage using iSCSI Target – Part 1
- Create LUN’s using LVM in Target Server – Part 2
My Client Setup for Initiator
- Operating System – CentOS release 6.5 (Final)
- iSCSI Target IP – 192.168.0.50
- Ports Used : TCP 3260
Warning: Never stop the service while LUNs Mounted in Client machines (Initiator).
Initiator Client Setup
1. In Client side, we need to install the package ‘iSCSI-initiator-utils‘, search for the package using following command.
# yum search iscsi
Sample Output
============================= N/S Matched: iscsi ================================
iscsi-initiator-utils.x86_64 : iSCSI daemon and utility programs
iscsi-initiator-utils-devel.x86_64 : Development files for iscsi-initiator-utils
2. Once you locate the package, just install the initiator package using yum command as shown.
# yum install iscsi-initiator-utils.x86_64
3. After installing the package, we need to discover the share from Target server. The client side commands little hard to remember, so we can use man page to get the list of commands which required to run.
# man iscsiadm
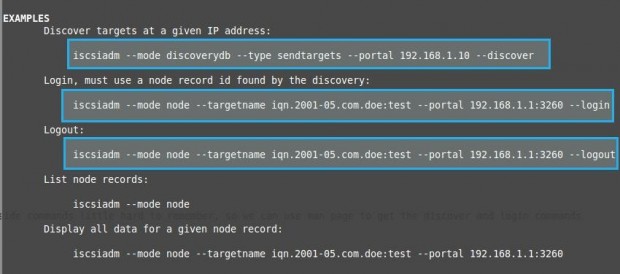
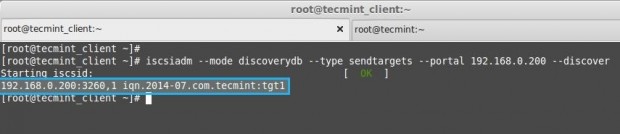
4. Press SHIFT+G to Navigate to the Bottom of the man page and scroll little up to get the login example commands. We need to replace our Target servers IP address in below command Discover the Target.
# iscsiadm --mode discoverydb --type sendtargets --portal 192.168.0.200 --discover
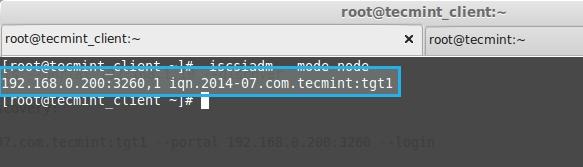
5. Here we got the iSCSI (iqn) qualified name from above command execution.
192.168.0.200:3260,1 iqn.2014-07.com.tecmint:tgt1
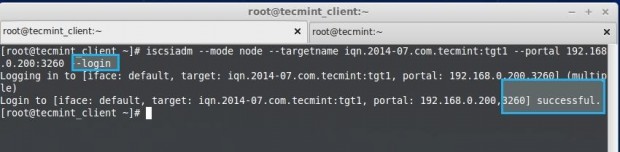
6. To log-in use the below command to attach the LUN to our local System, this will authenticate with target server and allow us to log-in into LUN.
# iscsiadm --mode node --targetname iqn.2014-07.com.tecmint:tgt1 --portal 192.168.0.200:3260 --login
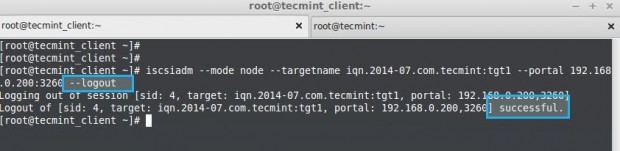
Note: Use the login command and replace login with logout at end of command.
# iscsiadm --mode node --targetname iqn.2014-07.com.tecmint:tgt1 --portal 192.168.0.200:3260 --logout
7. After login to the LUN, list the records of Node using.
# iscsiadm --mode node
8. Display all data of a particular node.
# iscsiadm --mode node --targetname iqn.2014-07.com.tecmint:tgt1 --portal 192.168.0.200:3260
Sample Output
# BEGIN RECORD 6.2.0-873.10.el6
node.name = iqn.2014-07.com.tecmint:tgt1
node.tpgt = 1
node.startup = automatic
node.leading_login = No
iface.hwaddress = <empty>
iface.ipaddress = <empty>
iface.iscsi_ifacename = default
iface.net_ifacename = <empty>
iface.transport_name = tcp
iface.initiatorname = <empty>
iface.bootproto = <empty>
iface.subnet_mask = <empty>
iface.gateway = <empty>
iface.ipv6_autocfg = <empty>
iface.linklocal_autocfg = <empty>
....
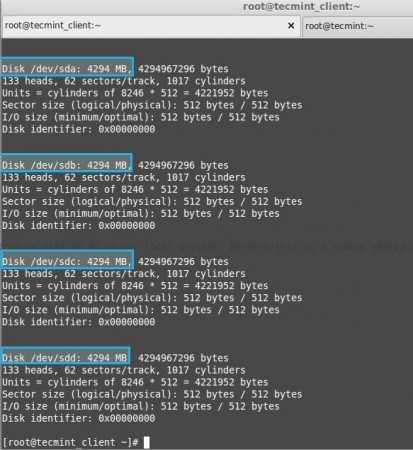
9. Then list the drive using, fdisk will list every authenticated disks.
# fdisk -l /dev/sda
10. Run fdisk to create a new partition.
# fdisk -cu /dev/sda
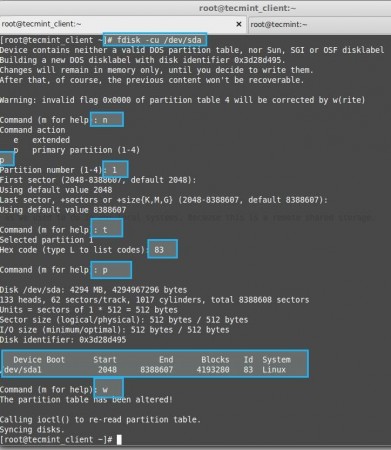
Note: After Creating a Partition using fdisk, we don’t need to reboot, as we used to do in our local systems, Because this is a remote shared storage mounted locally.
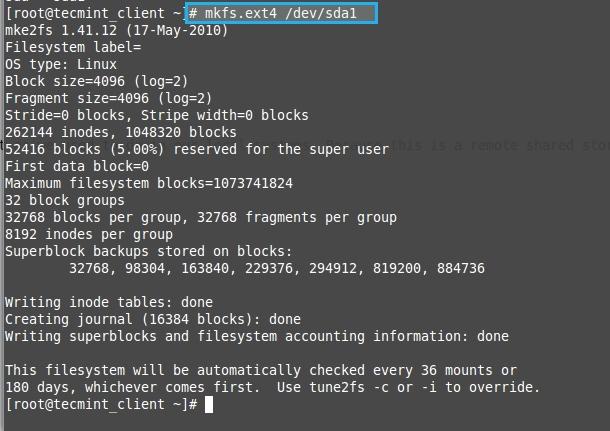
11. Format the newly created partition.
# mkfs.ext4 /dev/sda1
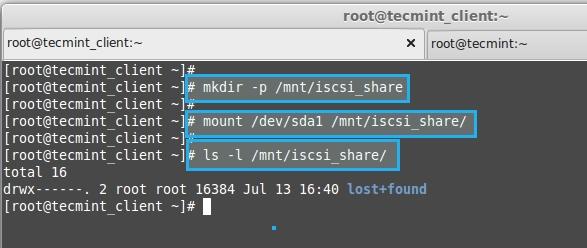
12. Create a Directory and mount the formatted partition.
# mkdir /mnt/iscsi_share
# mount /dev/sda1 /mnt/iscsi_share/
# ls -l /mnt/iscsi_share/
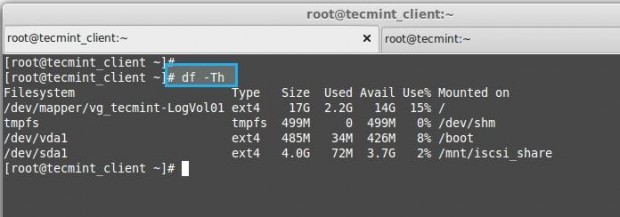
13. List the Mount Points.
# df -Th
- -T – Prints files system types.
- -h – Prints in human readable format eg : Megabyte or Gigabyte.
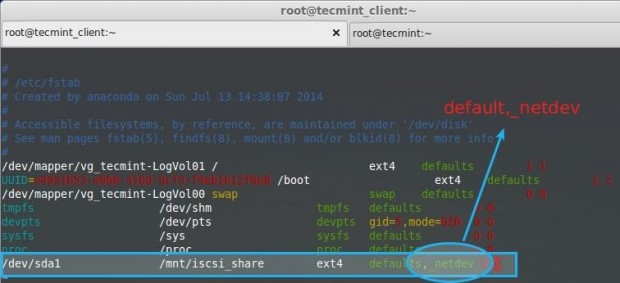
14. If we need to permanently mount the Drive use fstab entry.
# vim /etc/fstab
15.Append the following Entry in fstab.
/dev/sda1 /mnt/iscsi_share/ ext4 defaults,_netdev 0 0
Note: Use _netdev in fstab, as this is a network device.
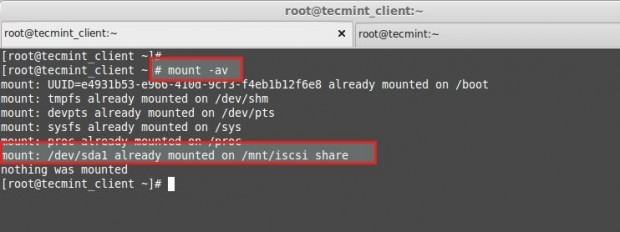
16. Finally check whether our fstab entry have any error.
# mount -av
- -a – all mount point
- -v – Verbose
We have Completed Our client side configuration Successfully. Start to use the drive as we use our local system disk.


When we are doing wrong entry in /etc/iscsi/initiator-nam….
And then. I use. This command
Iscsiadm -m discovery -t st -p (ip.addr)
Then iscsiadm -m discovery -t st -p (ip.addr) – l
Then show 24 type something error then what i do troubleshooting this error without reboot use
@Abhishek,
1. You need to check your logs first to find out what cause the exact issue.
2. You can’t discover any device till fix any issue in configurations.
If you are facing the issue provide us the logs, configuration entries.
Regards,
I remove /var/lib/iscsi/send_target/* and /var/lib/iscsi/nodes/* but i have error 24 somthing type. i did not know about this comand
“iscsiadm -m discovery -t st -p (ip.addr) – l ” cache entry path.
can u tell me where is the cache entry path ?
@Abhishek,
You can remove both
/var/lib/iscsi/send_target/* && /var/lib/iscsi/nodes/*
It will be populated once you do a new discovery and login session.
Regards,
Thank you for the wonderful tutorial, i have a question regarding mount point. I have a LV in target and i would like this to be mounted on the initiator however it tells me its not able to find special device
Is it possible to mount the lv in above setup?
I have a LV in target and i would like this to be mounted on the initiator however it tells me its not able to find special device
// Okay you have a Logical volume in iSCSI server but you can’t mount without giving that lv to in iSCSI configuration//
Is it possible to mount the lv in above setup?
// Have you provided that LV to target server configuration under /etc/tgt/targets.conf ? //
Then reload target and find the output using tgtadm –mode target –op show
If above steps done you can’t mount the LUN under initiator.
I have two host initiators that are connected to one target using one LUN. After the connection is established it gives me on every host (initiator) a disk that I mount to a directory using ext4 file system. When I write some data to the disk that I mounted on each initiator, data is replicated to the target. The problem is that: what I write on one initiator is not seen by the other initiator, but if I umount the disks on initiators and I mount them again data written on one is seen on the other initiator.
Please suggest.
@TDG,
Can you show the fstab entry? _netdev added ? Any logs ?
Sir I am trying to connect one LUN to more linux clients. I mounted the LUN to one client should i have to run commands from 10 to 16 on second client or is there any single command to connect same LUN to another client? or can i share this LUN with other clients?
@TDG,
Add the route in other client, create a mount point, then scan for LUN and mount
Thank you sir
Thanks much…It is very helpful… I have one question here… After mounting the iscsi share permanently by fstab entry… If we want to reboot the client machi, do we need to logout from the targer server??
@Dinesh,
No we don’t need to logout those iSCSI session in any case. Only we need to add the route for those target IP. If the route was not persistent upon reboot it will not connect to Storage.
This series has been a great help for me. Would it be possible to add multiple NICs to the target and configure multi-path/redundancy/fail-over? Thank you again.
Yes we can add multiple route for that we need to setup target server with more options.
@Tony
Yes add one more NIC in target machine and add the route in client machine it will work.
I m shy to say that.
I tried my best to configure mail server in 2008. But I am fail.
one for dns and second for mail server.
Could any one explain please step by step all configuration till clients side
Thanks a lot!
Thank you very much for your posts, I have learned so much from you and it is very kind of you to offer all this valuable knowledge for free. Many thanks again :-)
Hi,
Thanks for your article. I am facing a problem in following command ” iscsiadm –mode node –targetname iqn.2015-02.com.example:target01 –portal 10.129.154.77:3260 –login” It says login successful but fdisk -l not showing any disk(iscsi target disk). Kindly help me……
Check your LUN configuration…
thanks for this publication. But I am having a situation ehen i run the following command it says no record found, but in your presentation it produced result.
iscsiadm –mode node –targetname iqn.2015-01.com.tecmint:tgt1 –portal 172.110.0.200:3260
Also, when I run the fdisk -l /dev/sdb, it only show one partition, but in you presentation it showed 4 partition. Is there any reason for that or I am doing something wrong. Please help me out. Thanks
//Also, when I run the fdisk -l /dev/sdb, it only show one partition, but in you presentation it showed 4 partition. // They are define from iSCIS server, Those are LUN’s A single disk divided into 4, Please read this will understand https://www.tecmint.com/create-luns-using-lvm-in-iscsi-target/
@ gaurav # iscsiadm –mode node –targetname iqn.2014-07.com.tecmint:tgt1 –portal 192.168.0.200:3260 –login
192.168.0.0 this is my network range. may be your network range will be 192.168.1.0, replace with your range.
# iscsiadm –mode node –targetname iqn.2014-07.com.tecmint:tgt1 –portal 192.168.1.200:3260 –login
Please change the IP address as per your need before installing and configure.
sir thanku for the post. i am facing a problem int the following command:
# iscsiadm –mode node –targetname iqn.2014-07.com.tecmint:tgt1 –portal 192.168.0.200:3260 –login
the initiator is unable to locate the target server and is displaying the message
cannot route to host. are there any changes needed to be done in the network settings?
@ Omipenguin your server setup seems working fine. Never restart the iscsiadm, While discovery it will automatically start the service after that we don’t need to restart the service if so we will get disconnect from the shared LUN. Please have a look at Step 5. do chkconfig no need of adding in rc.local, LUN is a RAW disk shared from a iSCSI server so we can create standard or LVM too. seems your steps may have issue, could you please give us the steps what you following after the discovery ? fstab entry
Happy to help you…
Thanks Tut was great. But I faced issue. I shared 8GB LUN from ServerA and I can see the LUN on ServerB using both “fdisk -l” and “ls -l /dev/disk/by-path”
I created LVM on this Partition and added its entry in fstab and everything’s working till system in not restart. When i restart the system booya Volume group gone. Even though LUN is appearing in fdisk -l
I set the iscsi and iscid on autostart and added the “icsciadm –discover and –login ” in rc.local. But still not working everytime I create the Partition or LVM on this drive and restart the system its not there.
Must have deep knowledge in storage if you going towards Data Center related Jobs
Can you please make tutorial on SAN from Allocating LUNS to mounting on remote Servers. It will be great push for us Noobs
Thanks
@ Omipenguin Sure currently LVM going on let me complete it and will guide you.
Hi,
great article….. and waiting for some more useful information from your side. i have done this scenario in lab. Is there any big challenge when in live scenario?
No No there is no risk boss everything very interesting and easiest one…