SSH security is a top priority when setting up your server. The default SSH settings are usually not robust enough to safeguard your server from external attacks.
Therefore, additional tweaks are needed to provide a decent amount of security from brute-force attacks. One of these is implementing fail2ban to keep off unauthorized users after a certain number of incorrect log attempts. Similarly, you can leverage the pam_faillock module to implement an account lockout policy.
This guide will show how to lock a system user’s account after a specifiable number of failed SSH login attempts in RedHat-based distributions. On Debian-based distributions, you need to use the pam_tally2 module to lock failed SSH logins.
Here, the focus is to enforce simple server security by locking a user’s account after a consecutive number of unsuccessful SSH authentications.
Table of Contents
What Is pam_faillock module?
The pam_faillock module is a part of the Linux PAM (Pluggable Authentication Modules), a utility made up of shared libraries that separates applications from standard authentication methods.
It accepts authentication checks from programs such as sshd, gdm, login, and many more and authenticates the user to those services or applications in Linux systems. We briefly explained configuring PAM to audit user login shell activity.
The module records failed authentication attempts per user and temporarily locks the user account if the failed authentication attempts exceed a certain limit. Failed login attempts are stored in per-user files in the tally directory which is /var/run/faillock/ by default.
The pam_faillock module replaces the pam_tally and pam_tally2 modules which have been deprecated in RHEL 7 and RHEL 8. It offers more flexibility and options than the two modules.
How to Lock User After Failed SSH Logins
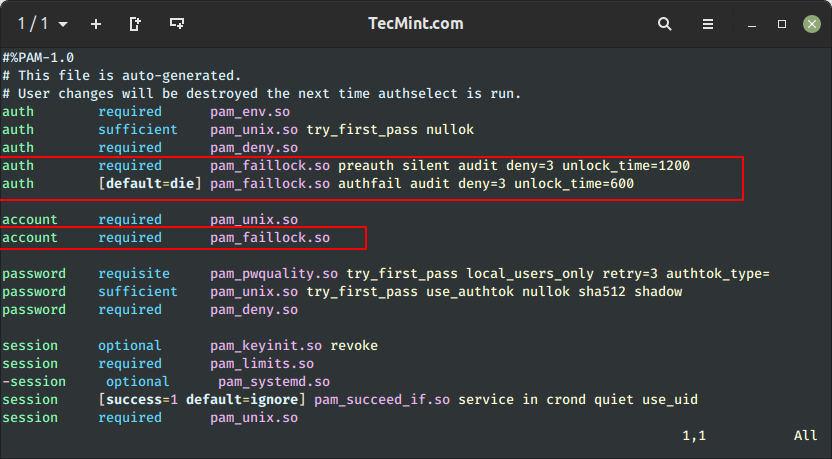
You can configure the above functionality in the /etc/pam.d/system-auth and /etc/pam.d/password-auth files, by adding the entries below to the auth section.
$ sudo vim /etc/pam.d/system-auth
$ sudo vim /etc/pam.d/password-auth
To lock out or deny users access to the system after 3 unsuccessful SSH attempts and unlock the user account after 1200 seconds, add the following lines in the auth section.
auth   required      pam_faillock.so preauth silent audit deny=3 unlock_time=1200
auth   [default=die] pam_faillock.so authfail audit deny=3 unlock_time=600
Where:
audit– enables user auditing.deny– used to define the number of attempts (3 in this case), after which the user account should be locked.unlock_time– sets the time (600 seconds = 10 minutes) for which the account should remain locked.
Note that the order of these lines is very important, wrong configurations can cause all user accounts to be locked.
The auth section in both files should have the content below arranged in this order:
#%PAM-1.0
# This file is auto-generated.
# User changes will be destroyed the next time authselect is run.
auth        required      pam_env.so
auth        sufficient    pam_unix.so try_first_pass nullok
auth        required      pam_deny.so
auth        required      pam_faillock.so preauth silent audit deny=3 unlock_time=1200
auth        [default=die] pam_faillock.so authfail audit deny=3 unlock_time=600
Next, navigate to the account section and add the following line in both of the above files.
account required pam_faillock.so
After adding the above settings, it should appear as follows.
How to Lock Root After Failed SSH Logins
You can add the even_deny_root parameter to auth section to lock out both the user as well as the normal user. In this example, the unlock time for regular users is 1200 seconds (20 minutes) and 3600 seconds (60 min or 1 hr) for the root user after 3 failed SSH login attempts.
auth    required       pam_faillock.so preauth silent audit deny=3 even_deny_root unlock_time=1200
auth    [default=die]  pam_faillock.so authfail  audit  deny=3 even_deny_root unlock_time=3600
Once you have configured everything. You can restart remote access services like sshd, for the above policy to take effect that is if users will employ ssh to connect to the server.
$ sudo systemctl restart sshd
Next, we will run a test and check if the configuration works.
How to Test SSH User Failed Login Attempts
From the above settings, we configured the system to lock a user’s account after 3 failed authentication attempts.
In this scenario, the user tecmint is trying to switch to the user aaronkilik, but after 3 incorrect logins because of a wrong password, indicated by the “Permission denied” message, the user aaronkilik’s account is locked as shown by the “authentication failure” message from the fourth attempt.
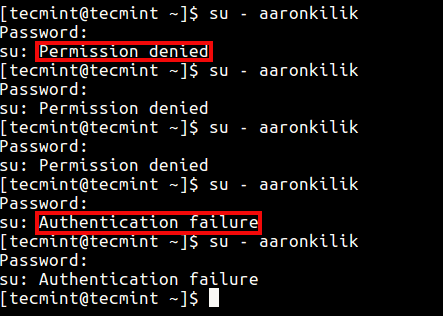
The root user is also notified of the failed login attempts on the system, as shown in the screenshot below.

How to View Failed SSH Logins
You can see all failed SSH authentication logs using the faillock utility, which is used to display and modify the authentication failure log.
You can view failed login attempts for a particular user like this.
# faillock --user aaronkilik

To view all unsuccessful login attempts, run faillock without any argument like so:
# faillock
How to Unlock User After Failed SSH Logins
To clear a user’s authentication failure logs, run this command.
# faillock --user aaronkilik --reset
OR
# fail --reset	#clears all authentication failure records
Disable User Lock After SSH Failed Logins
Lastly, to tell the system not to lock a user or user’s accounts after several unsuccessful login attempts, add the entry highlighted in bold, just above where pam_faillock is first called under the auth section in both files (/etc/pam.d/system-auth and /etc/pam.d/password-auth) as follows.
#%PAM-1.0
# This file is auto-generated.
# User changes will be destroyed the next time authselect is run.
auth        required      pam_env.so
auth        sufficient    pam_unix.so try_first_pass nullok
auth        required      pam_deny.so
auth   [success=1 default=ignore] pam_succeed_if.so user in tecmint:aaronkilik
auth        required      pam_faillock.so preauth silent audit deny=3 unlock_time=1200
auth        [default=die] pam_faillock.so authfail audit deny=3 unlock_time=600
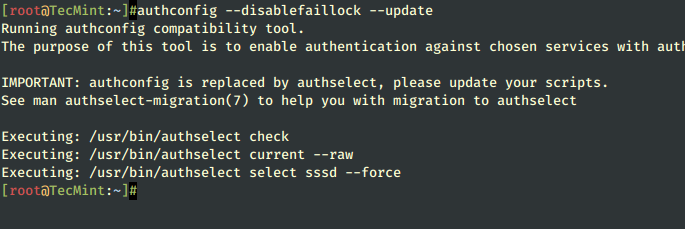
How To Disable Faillock Module
To disable the pam_failock module, execute the following command:
# authconfig --disablefaillock --update
For more information, see the pam_faillock and faillock man pages.
# man pam_faillock
# man faillock
That’s all! In this article, we showed how to enforce simple server security by locking a user’s account after x number of incorrect logins or failed authentication attempts.
It’s a handy way of fortifying your SSH security from brute-force attacks. Use the comment form below to share your queries or thoughts with us.


Thanks for the very helpful article…
I see lots of SSH failed login attempts on my Linux server logs daily, I hope with this solution I can completely block such login attempts and secure my SSH box from unwanted authentications…
what if i have a user who keeps entering the wrong password and keeps getting locked and every single day i have to unlock him .. is there any way by which i can keep that specific user out of pam policy so that he never gets locked but others can get locked?
Thanks for this info. I had to come up with something because when I logged in today, it said there were 43,945 failed login attempts to root. So clearly someone set up a server in china to try to brute force their way in. I set the unlock_time in mine to 24 hours after 2 failed attempts.
@josh and ravi can you please tell how to make this lock option permanent so that reboot should not clear the lock also please let me know how can i apply this policy on 100 servers easily.
The following will lock a user account forever. You can read the manual. I checked this and it on an account and the account is still locked. A reboot clears the lock.
@Josh
Many thanks for sharing this, will read more about this, and also find out how to make the setting persistent even after a reboot.
@ravi
My objective is user account should be locked for infinite duration after 3 unsuccessful attempts. How to meet this objective
Thanks in advance
@Shuja,
Then add the following configuration to lock a user for infinite time (specify higher time for the unlock_time=300).
will this configurable in RHEL 7?
@Shuja,
Yes, you can lock user accounts in RHEL distribution also using these instructions..
Thanks, Ravi I did it it’s working, but wen I run the
passwd -Sthe output doesn’t say user account is locked but I can see failock entry for the user, secondly I want to lock the user for infinite time and unlock it manually.How can i do that?
@Shuja,
To lock an account in Linux permanently, use the following command.
To unlock an account manually, use the following command.
Hi,
In the file it says:
Is there a way to make these changes persistent?