Understanding about Django models
Up to this point, you have the basic directory structure of a web application but we still need to create the models (each model will be a separate class that represents an object in our application).
Another thing that you need to know about Django models is that every attribute represents a database field where the corresponding value will be stored.
Now, return to the myblog directory and edit the file models.py, where we will define the objects for our application:
# cd /myfirstdjangoenv/myfirstdjangoproject/myblog

It is VERY important that you pay close attention to indentation in .py files. Since this is Python, the models will not work if the indentation is not set evenly and properly. Please refer to the comments below for further clarification on what we’re doing:
- Lines starting with the from keyword indicate that we are importing modules (or predefined objects) from an existing file or library (django.db and django.utils, in this case, are located inside /root/myfirstdjangoenv/myfirstdjangoenv/lib/python2.7/site-packages/django/db and utils, respectively.
- Each model is defined through a class that derives from django.db.models.Model, which tells Django that it should be saved in the database.
- Following the class declaration, you will find the properties of each Post object and then the def keyword that defines the methods for the object.
- The blank=False and null=False directives in a field declaration indicate that such fields are required.
- ForeignKey indicates that the author of a post must have been created previously using the auth.User module (we will show you how to do that in the next article of this series).
- Finally, the self keyword refers to the current object and represents a shortcut to accessing its properties and methods.
You can read more about model field declarations in the docs.
So here’s our models.py:
from django.db import models
from django.utils import timezone
# Create your models here.
class Post(models.Model):
        author = models.ForeignKey('auth.User')
        title = models.CharField(max_length=200, blank=False, null=False)
        text = models.TextField(blank=False, null=False)
        whenCreated = models.DateTimeField(default=timezone.now)
        whenPublished = models.DateTimeField(blank=True, null=True)

        def publish(self):
                self.whenPublished = timezone.now()
                self.save()

        def __str__(self):
                return self.title
Creating Django Database and Admin User
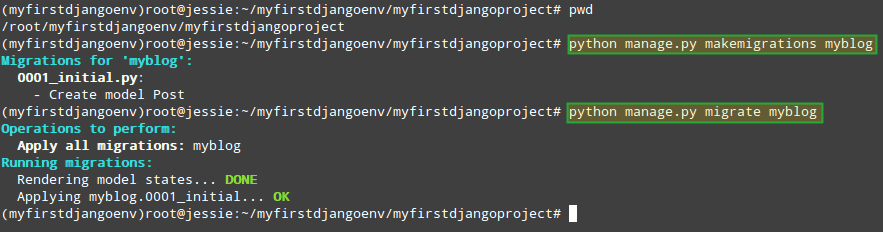
As we mentioned earlier, the Post model must be migrated to the database in order to store the data associated with each instance of it. If you make changes to your model later, you will need to repeat this step:
# cd ~/myfirstdjangoenv/myfirstdjangoproject
# python manage.py makemigrations myblog
# python manage.py migrate myblog
To create an administrative user for your application (this will allow us to manage our application using a web interface), do:
# python manage.py createsuperuser
and enter the required information when prompted to do so:

However, in order for our application to be managed through the admin interface, it needs to be registered in ~/myfirstdjangoenv/myfirstdjangoproject/myblog/admin.py:
from django.contrib import admin
from .models import Post
# Register your models here.
admin.site.register(Post)
Now go ahead and start the server:
# cd ~/myfirstdjangoenv/myfirstdjangoproject
# python manage.py runserver 0.0.0.0:8000
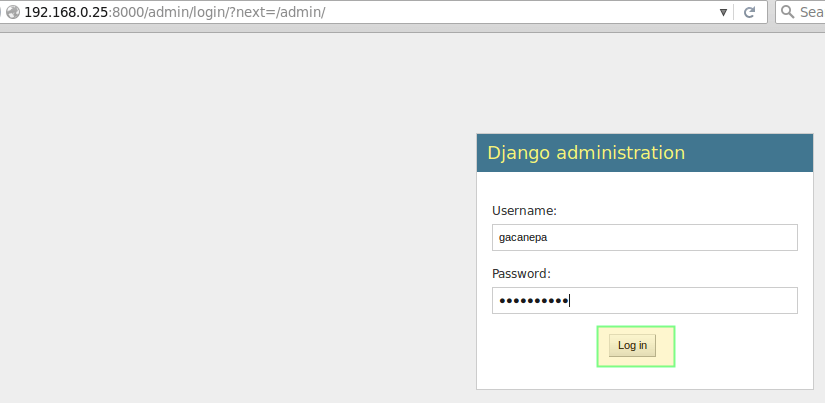
and point your web browser to 192.168.0.25:8000/admin. Enter the user credentials created earlier to log on:
If you followed the steps outlined above, you will be taken to the Django admin interface. Pay particular attention to the Users module, which we will use to create the objects required to define the post authors in our blog:
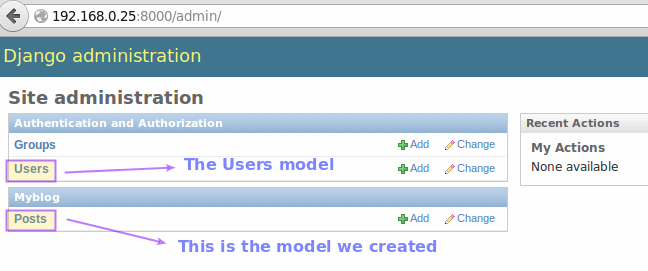
We will use this administration area to create objects of type User and Post in the next article. By now, you can stop the web server by pressing Ctrl + C in the same terminal window where you started it.
Important Points to remember
Through the use of models, we can create objects for our application and migrate them easily to the underlying database. Thanks to the fact that Django takes care of creating the directory structure and the files that require minimum editing we can focus in the programming side of things, which translates into time savings and equates to a happier developer.
Summary
In this tutorial we have discussed some basic concepts of object-oriented programming in Python and explained how to create the directory structure for our web application using Django.
In the next (and final) guide of this series, we will make use of the Post model to create objects and work on the frontend of our application to display the posts in our blog in a mobile-friendly format.
Until then, feel free to let us know if you have any questions or comments! Use the form below to reach us.

Your blog is simply awesome, you explain things in a clear and neat way.
Glad to hear that!
Great Tutorial, thanks a lot!
Works!!!
@Kevin,
Thank you for pointing this out. We will soon review these series as several readers have informed us that they have run into issues like yours. It is largely my fault – mainly for choosing same names for directories at different levels. I apologize for it. Please stay tuned!
I followed the instructions on this site, and everything worked perfectly until the very end of this part.
More specifically I couldn’t find the settings.py in my project folder, so I created it manually and added in the code snippet above.
FYI I am using an OS based on Ubuntu 14.04 LTS and the django 1.8.5 as specified by the first article and installed through pip.