Most Linux distributions provide ISO files that are designed and built to run in Live Mode directly from a bootable media such as CD /DVD, Flash/USB cards, or even directly from a Hard Drive using the Linux Grub menu without the need to burn it to a CD/DVD or create a bootable USB using USB creator tools.
This tutorial will concentrate on presenting a way you can run some Linux ISO distributions directly from your hard disk by editing Ubuntu 22.04 GRUB2 (works on Ubuntu 20.04 or earlier) menu which is the default boot loader in most modern Linux distributions.
Running an operating system from a hard disk provides a faster way of using Linux, and also has a great impact on privacy because all your settings and live sessions are not preserved by default.
The distributions presented in this topic are Rocky Linux, Fedora, Kali Linux, Arch Linux and Gentoo Live DVD.
Requirements
A newly installed Ubuntu 22.04 (or any other Linux distribution with the GRUB2 bootloader) is on your system’s hard drive.
Step 1: Download Linux Live ISO Files
1. To able boot and run any Linux distribution without installing them to your hard drive, make sure to download the “Live CD/DVD” release of each Linux ISO image.
- Download Rocky Linux Live ISO Image
- Download Fedora Live ISO Image
- Download Kali Linux Live ISO Image
- Download Arch Linux Live ISO Image
- Download Gentoo Linux Live ISO Image
Step 2: Add ISO Images to the Directory
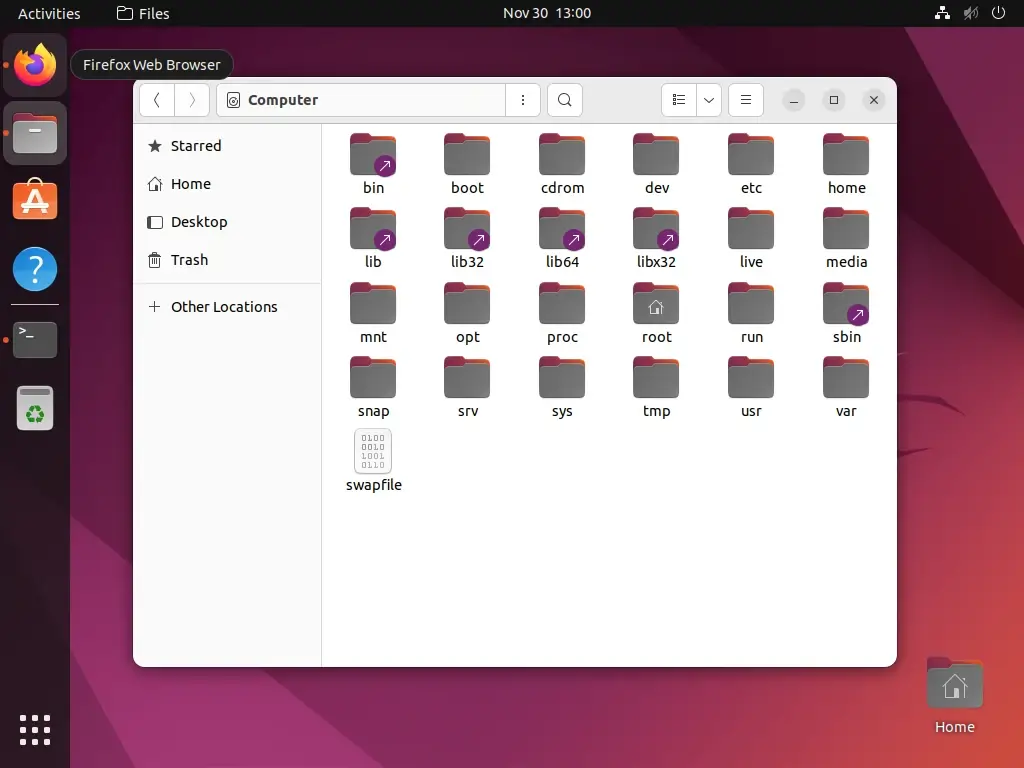
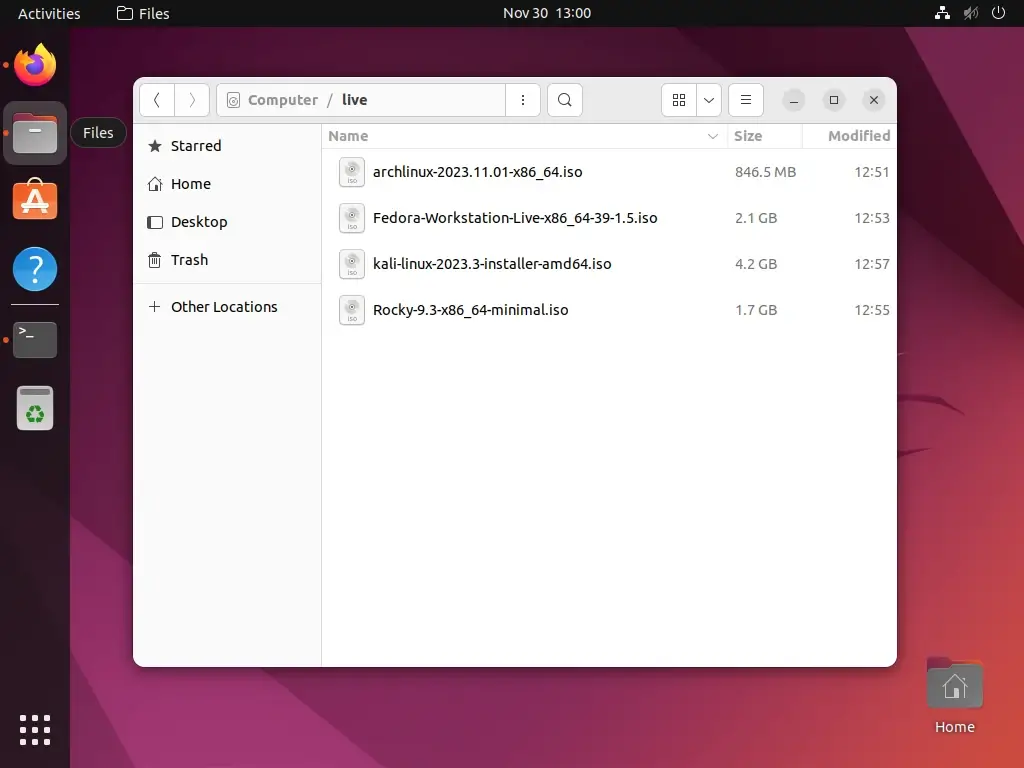
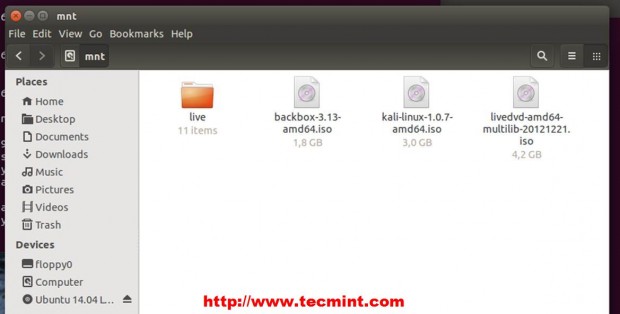
2. After you have downloaded your favorite Linux ISO Live DVD Images, open Ubuntu Nautilus with root privileges using the ‘sudo nautilus‘ command from the terminal and create a directory called live in your system root path and move the ISO file to this folder.
$ sudo nautilus
Step 3: Find Disk Partition UUID
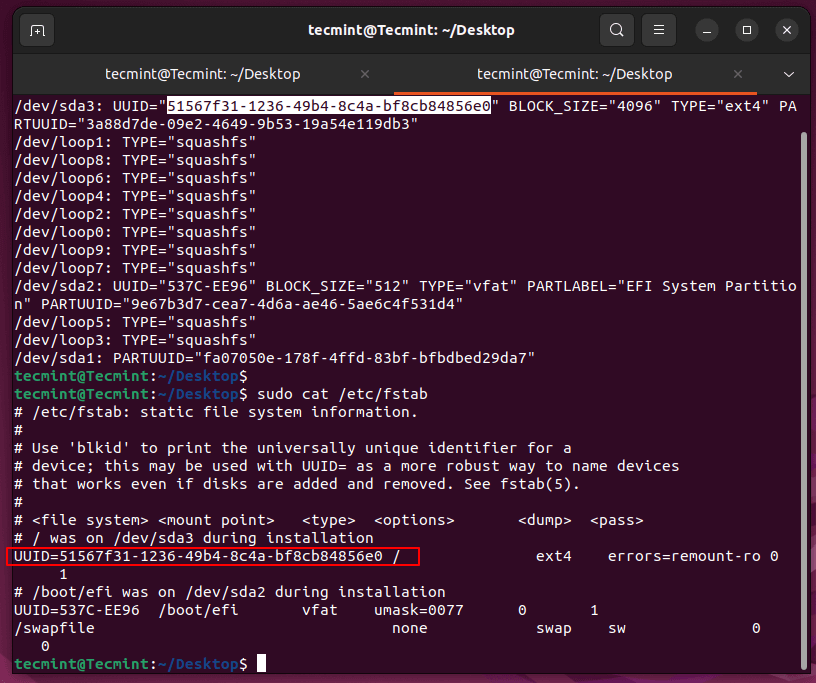
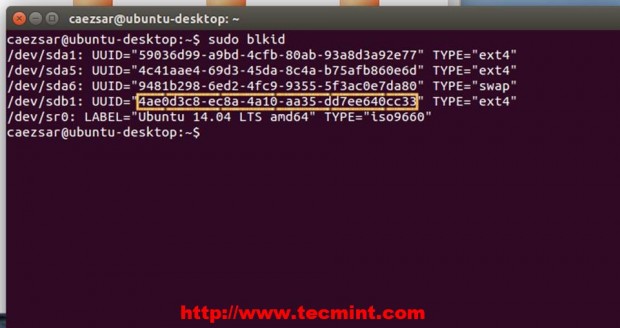
3. To continue further will need to provide Grub2 with our disk partition UUID – Universally Unique Identifier (the partition where ISO files are located).
To get partition UUID run the following blkid command.
$ sudo blkid
For automatically mounted partitions or hard disks on the system boot run the following cat command.
$ sudo cat /etc/fstab
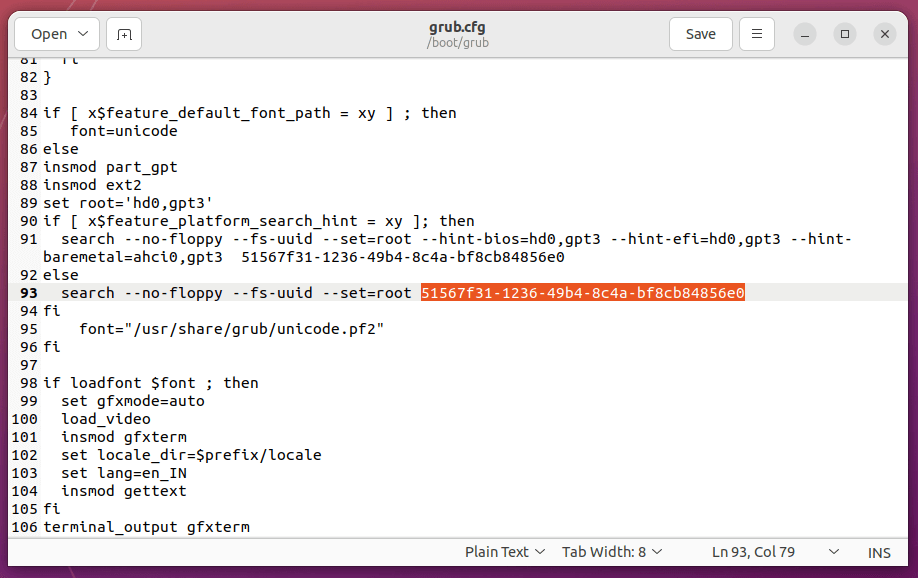
4. Another method to get your partition UUID is, to open and visualize grub.cfg file content located in /boot/grub/ path and search for --fs-uuid a string (in case you don’t have a separated partition for /boot).
Step 4: Add ISO Images to the GRUB2 Menu
5. After you obtain your root partition UUID code move to /etc/grub.d/ directory, open the 40_custom file for editing and add the following lines at the bottom of this file.
menuentry 'Rocky Linux Live' --class os --class gnu-linux --class gnu --class os --group group_main {
                set isofile="/live/Rocky-9.3-x86_64-minimal.iso"

         insmod ext2
         insmod loopback
         insmod iso9660
                set root=(hd0,3)
                search --no-floppy --fs-uuid --set=root 51567f31-1236-49b4-8c4a-bf8cb84856e0
                linux /live/Rocky-9.3-x86_64-minimal/isolinux/vmlinuz noconfig=sudo username=root hostname=tecmint
                initrd /live/Rocky-9.3-x86_64-minimal/isolinux/initrd.img
}
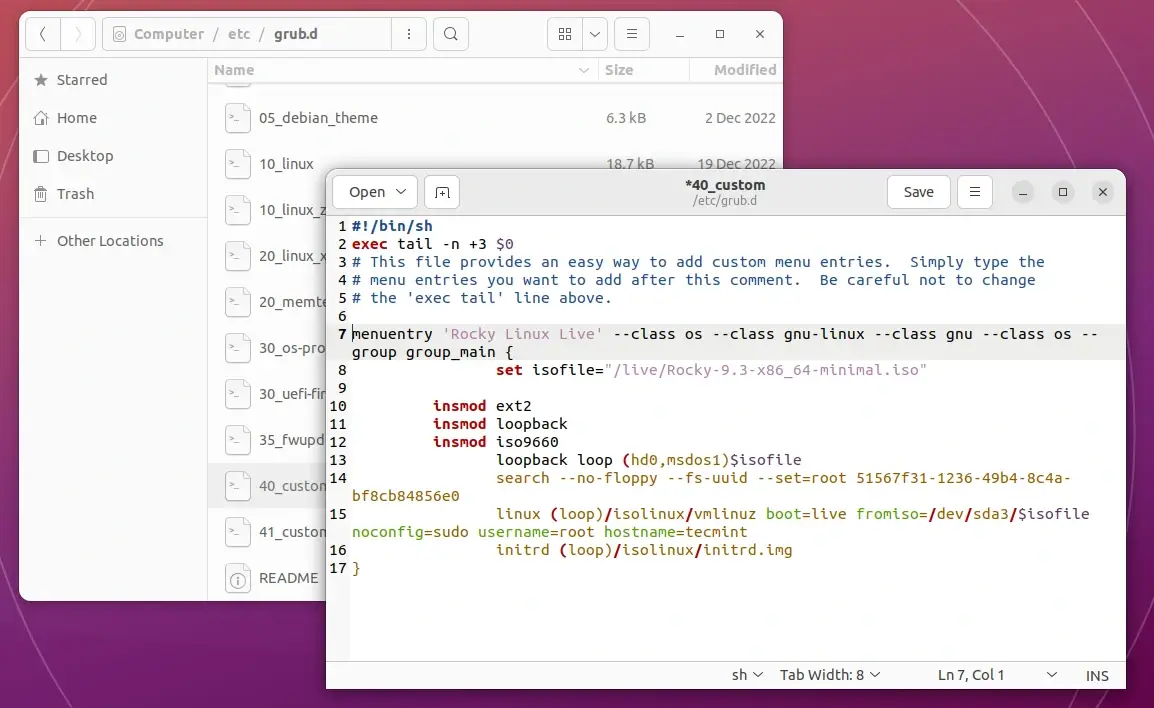
Here the following directives represent:
- set isofile = A variable that holds ISO system path location.
- (hd0,msdos1) = First partition from first hard disk (In Linux disks are numbered starting with 0) – the same as /dev/sda3.
- –fs-uuid –set=root 51567f31-1236-49b4-8c4a-bf8cb84856e0 = First partition from first hard disk UUID code.
- linux and initrd = Custom kernel booting parameters – they are different depending on every Linux distribution.
6. After you finish editing the file, update-grub to add the new ISO (in this case Rocky Linux) to your Grub2 menu.
$ sudo update-grub
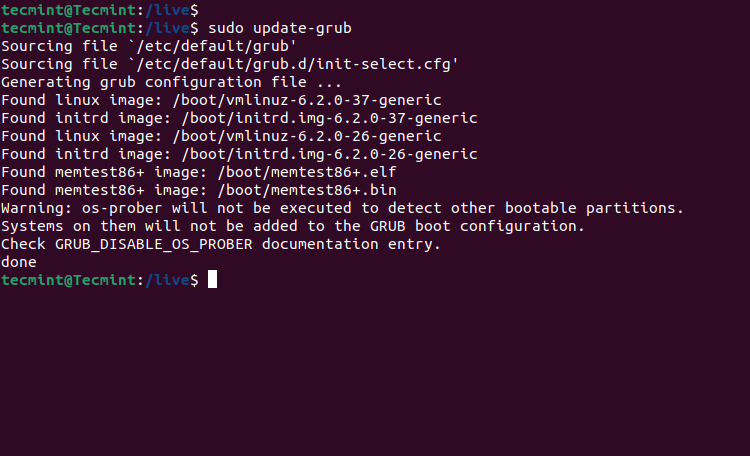
To verify it open /boot/grub/grub.cfg and search at the bottom for your ISO entry.

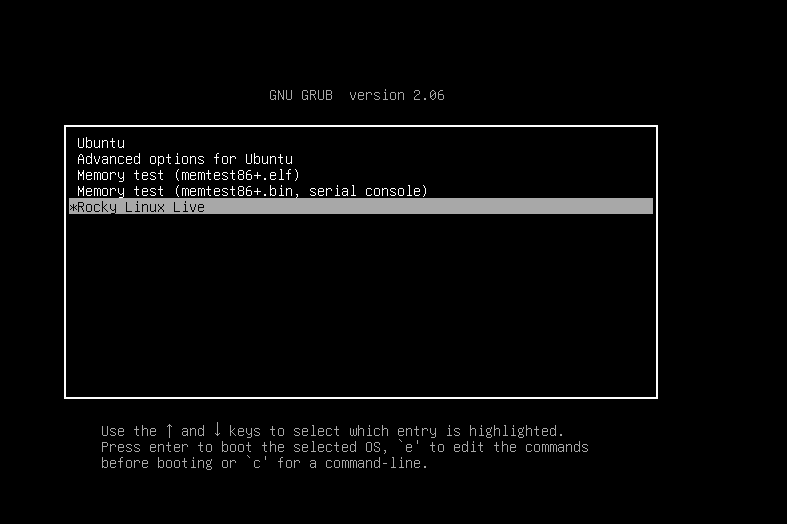
Step 5: Run Rocky Linux ISO from Hard Disk
7. To run Rocky Linux Live ISO, reboot your computer, select Rocky Linux entry from the GRUB menu then press the Enter key.
In the same way, you can add the other Linux Live ISO distribution images to the GRUB2 menu as shown. Again open and edit /etc/grub.d/40_custom grub file and add the following entries.
For Fedora Live DVD
menuentry 'Fedora Live' --class os --class gnu-linux --class gnu --class os --group group_main {
                set isofile="/live/Fedora-Workstation-Live-x86_64-39-1.5.iso"

         insmod ext2
         insmod loopback
         insmod iso9660
                loopback loop (hd0,msdos1)$isofile
                search --no-floppy --fs-uuid --set=root 3b87d941-8ee7-4312-98fc-1f26828d62ab
                linux (loop)/isolinux/vmlinuz boot=live fromiso=/dev/sda1/$isofile noconfig=sudo username=root hostname=fedora
                initrd (loop)/isolinux/initrd.img
}
For Kali Linux Live DVD
menuentry 'Kali Linux Live' --class os --class gnu-linux --class gnu --class os --group group_main {
                set isofile="/live/kali-linux-2023.3-installer-amd64.iso"

         insmod ext2
         insmod loopback
         insmod iso9660
                loopback loop (hd0,msdos1)$isofile
                search --no-floppy --fs-uuid --set=root 3b87d941-8ee7-4312-98fc-1f26828d62ab
                linux (loop)/live/vmlinuz boot=live fromiso=/dev/sda1/$isofile noconfig=sudo username=root hostname=kalilinux
                initrd (loop)/live/initrd.img
}
For Gentoo Live DVD
menuentry 'Gentoo Linux Live' --class os --class gnu-linux --class gnu --class os --group group_main {
                set isofile="/live/archlinux-2023.11.01-x86_64.iso"

         insmod ext2
         insmod loopback
         insmod iso9660
                loopback loop (hd0,msdos1)$isofile
                search --no-floppy --fs-uuid --set=root 3b87d941-8ee7-4312-98fc-1f26828d62ab
                linux (loop)/live/vmlinuz boot=live fromiso=/dev/sda1/$isofile noconfig=sudo username=root hostname=gentoo
                initrd (loop)/live/initrd.img
}
8. Then update your GRUB menu again, reboot your computer, and choose your preferred Linux distribution ISO from the GRUB menu.
$ sudo update-grub
9. If you don’t have enough free space on your root partition, to host other Linux ISO files you can add another hard disk and move all your Linux distribution ISO files there. After you create a partition and add a file system mount it on the /mnt path to make it available.
$ sudo mount /dev/sdb1 /mnt
10. Then move all ISO on the new hard disk and grab its UUID using the blkid command.
$ sudo blkid
11. Again open and edit /etc/grub.d/40_custom grub file and add other Linux Live ISO distribution images to the GRUB2 menu using the same procedure but pay attention to every distribution Live Kernel booting parameters which can be inspected by mounting the ISO image using mount -o loop option or consult distribution Wiki pages.