Domain Name Server (DNS) used for name resolving to any hosts. Master DNS servers (Primary Server) are the original zone data handlers and Slave DNS server (Secondary Server) are just a backup servers which is used to copy the same zone information’s from the master servers. Master Server will resolve the names for every hosts which we defined in the zone database and use UDP protocol, because UDP protocols never use the acknowledgement process while tcp uses acknowledgement. DNS servers also use UDP protocols to resolve the query request at the earliest.
How DNS Works?
Understanding DNS might be little confusing for newbies. Here is a brief explanation on how the DNS work’s.
Let’s say, if we need to access any website what we will do? Just type www.google.com in browser and hit enter. Hmm that’s all we know, but the fact is, how pain DNS go through it, while querying for us. While we type www.google.com the system will look for www.google.com. Whenever we type some domain name, there is a . (dot) at the end of the www.google.com that say to search the root server of namespace.
Globally there are 13 root servers available to resolve the query. At first, while we hit enter as www.google.com our browser will pass a request to our local resolver, which has entry about our master and slave DNS server info. If they don’t have info about such requested query they will pass the request to the Top Level domain (TLD), if TLD say I don’t know the request, may be the authoritative server know your request, it will forward to authoritative servers, here only www.google.com was defined as address 72.36.15.56.
In mean time authoritative server will give the answer to TLD and TLD will pass to root server and root will provide the info to browser, hence the browser will cache the DNS request for future use. Thus these long process will just resolve with in milliseconds. If they don’t know the request they will reply as NXDOMAIN. That means, there is no record any-were found in the Zone database. Hope this makes you to understand how the DNS works.
Read Also: Setup DNS Cache Server in Ubuntu
My Testing Environment
For this article, I’m using 3 machines, 2 for server setup (master and slave) and 1 for client.
---------------------------------------------------
Master DNS Server
---------------------------------------------------

IP Address	:	192.168.0.200
Host-name	:	masterdns.tecmintlocal.com
OS		:	Centos 6.5 Final
---------------------------------------------------
Slave DNS Server
---------------------------------------------------

IP Address	:	192.168.0.201
Host-name	:	slavedns.tecmintlocal.com
OS		:	Centos 6.5 Final
---------------------------------------------------
Client Machine to use DNS
---------------------------------------------------

IP Address	:	192.168.0.210
Host-name	:	node1.tecmintlocal.com
OS		:	Centos 6.5 Final
Requirement Packages
bind, bind-utils, bind-chroot
Configuration Files Used
config file	:	/etc/named.conf
script file	:	/etc/init.d/named
Port & Protocols Used
53, UDP
Setup Master DNS Server
First, verify the IP address, Hostname and Distribution version of Master DNS Server, before moving forward for setup.
$ sudo ifconfig | grep inet
$ hostname
$ cat /etc/redhat-release

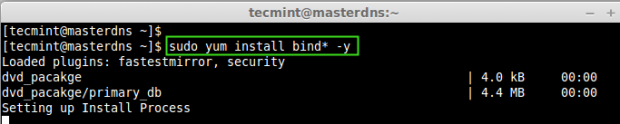
Once, you confirm that the above settings are correct, its time to move forward to install required packages.
$ sudo yum install bind* -y
Installing and Configuring Bind
After installing required packages, now define zone files in master configuration ‘named.conf‘ file.
$ sudo vim /etc/named.conf
Given below is my named.conf file entry, change the configuration file as per your need.
//
// named.conf
//
// Provided by Red Hat bind package to configure the ISC BIND named(8) DNS
// server as a caching only nameserver (as a localhost DNS resolver only).
//
// See /usr/share/doc/bind*/sample/ for example named configuration files.
//

options {
        listen-on port 53 { 127.0.0.1; 192.168.0.200; }; # Here we need to add our Master DNS Server IP.
        listen-on-v6 port 53 { ::1; };
        directory       "/var/named";
        dump-file       "/var/named/data/cache_dump.db";
        statistics-file "/var/named/data/named_stats.txt";
        memstatistics-file "/var/named/data/named_mem_stats.txt";
        allow-query     { localhost; 192.168.0.0/24; }; # subnet range where my hosts are allowed to query our DNS.
        allow-transfer     { localhost; 192.168.0.201; };  # Here we need to our Slave DNS server IP.
        recursion no;

        dnssec-enable yes;
        dnssec-validation yes;
        dnssec-lookaside auto;

        /* Path to ISC DLV key */
        bindkeys-file "/etc/named.iscdlv.key";

        managed-keys-directory "/var/named/dynamic";
};

logging {
        channel default_debug {
                file "data/named.run";
                severity dynamic;
        };
};

zone "." IN {
        type hint;
        file "named.ca";
};

## Define our forward & reverse Zone file here for tecmintlocal.com.


zone"tecmintlocal.com" IN {
type master;
file "tecmintlocal.fwd.zone";
allow-update { none; };
};

zone"0.168.192.in-addr.arpa" IN {
type master;
file "tecmintlocal.rev.zone";
allow-update { none; };
};

#####
include "/etc/named.rfc1912.zones";
include "/etc/named.root.key";

Following are the explanation of each configuration we used in above file.
- listen-on port 53 – This is used for the DNS to listen in available interfaces.
- Master DNS – Define, your Master DNS IP address to listen the query.
- Slave DNS – Define your Slave DNS, which is used to sync our zone information to resolve the hosts from Master.
- recursion no – If its set to yes, recursive queries will make the server into DDOS attack.
- Zone Name – Define your Zone name here defined as tecminlocal.com.
- type master – As this system was configured for a master server, for upcoming slave server this will be slave.
- tecmintlocal.fwd.zone – This file have the host information for this zone.
- allow-update none – If none will set. it won’t use Dynamic DNS (DDNS).
Creating Master Zone Files
At first let us define forward look-up zone entry. Here we need to create the zone files in the name of what we have define in the named.conf file as below.
tecmintlocal.fwd.zone
tecmintlocal.rev.zone
We use sample configuration files for creating forward zone files, for this we’ve to copy the sample configuration files.
$ sudo cp /var/named/named.localhost /var/named/tecmintlocal.fwd.zone
$ sudo cp /var/named/named.loopback /var/named/tecmintlocal.rev.zone

Once, you’ve copied configuration files, now edit these zones files using vim editor.
$ sudo vim /var/named/tecmintlocal.fwd.zone
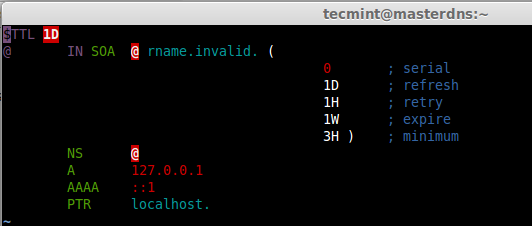
Before defining our host information in forward zone file, first have a quick look at the sample zone file.
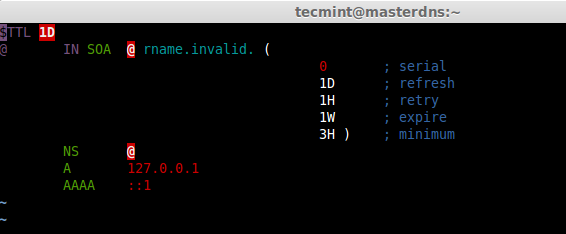
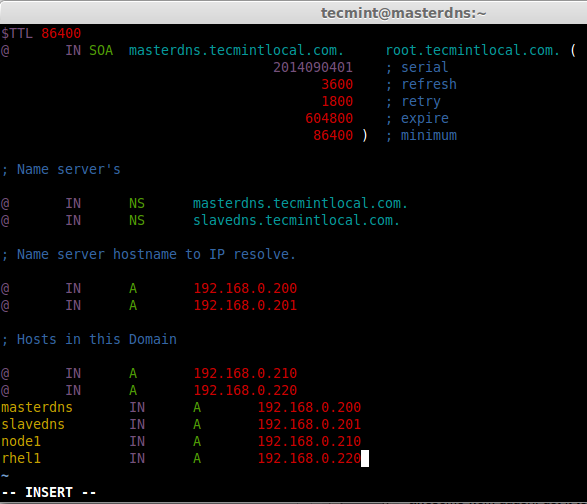
This is my forward zone configuration, append the below entry and make changes as per your need.
$TTL 86400
@       IN SOA  masterdns.tecmintlocal.com.     root.tecmintlocal.com. (
                                  2014090401    ; serial
                                        3600    ; refresh
                                        1800    ; retry
                                      604800    ; expire
                                       86400 )  ; minimum

; Name server's

@       IN      NS      masterdns.tecmintlocal.com.
@       IN      NS      slavedns.tecmintlocal.com.

; Name server hostname to IP resolve.

@       IN      A       192.168.0.200
@       IN      A       192.168.0.201

; Hosts in this Domain

@       IN      A       192.168.0.210
@       IN      A       192.168.0.220
masterdns       IN      A       192.168.0.200
slavedns        IN      A       192.168.0.201
node1           IN      A       192.168.0.210
rhel1           IN      A       192.168.0.220
Save and quit the file using wq!. After editing the forward look-up, it looks like below, Use TAB to get a decent format in zone file.
Now, create reverse lookup file, we have already made a copy of loop-back file in the name of tecmintlocal.rev.zone. So, we use this file to configure our reverse look-up.
$ sudo vim /var/named/tecmintlocal.rev.zone
Before defining our host information in reverse zone file, have a quick look of sample reverse lookup file as shown below.
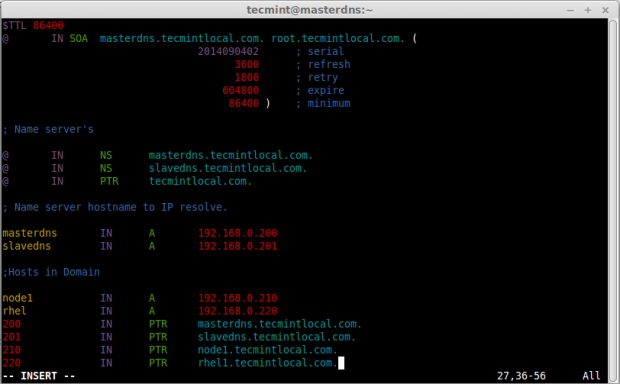
This is my reverse zone configuration, append the below entry and make changes as your need.
$TTL 86400
@       IN SOA  masterdns.tecmintlocal.com. root.tecmintlocal.com. (
                                2014090402      ; serial
                                      3600      ; refresh
                                      1800      ; retry
                                    604800      ; expire
                                     86400 )    ; minimum

; Name server's

@       IN      NS      masterdns.tecmintlocal.com.
@       IN      NS      slavedns.tecmintlocal.com.
@       IN      PTR     tecmintlocal.com.

; Name server hostname to IP resolve.

masterdns       IN      A       192.168.0.200
slavedns        IN      A       192.168.0.201

;Hosts in Domain

node1           IN      A       192.168.0.210
rhel            IN      A       192.168.0.220
200             IN      PTR     masterdns.tecmintlocal.com.
201             IN      PTR     slavedns.tecmintlocal.com.
210             IN      PTR     node1.tecmintlocal.com.
220             IN      PTR     rhel1.tecmintlocal.com.
Save and quit the file using wq!. After editing the reverse look-up, it looks like below, Use TAB to get a decent format in zone file.
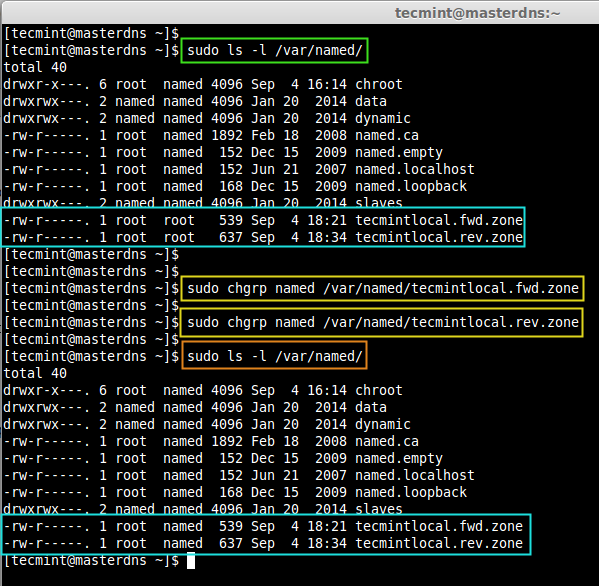
Check the group ownership of forward look-up & reverse look-up files, before checking for any errors in configuration.
$ sudo ls -l /var/named/
Here we can see both the files are in root users ownership, because files which we makes a copy from sample files are available under /var/named/. Change the group to named on both files using following commands.
$ sudo chgrp named /var/named/tecmintlocal.fwd.zone
$ sudo chgrp named /var/named/tecmintlocal.rev.zone
After setting correct ownership on the files, verify them again.
$ sudo ls -l /var/named/
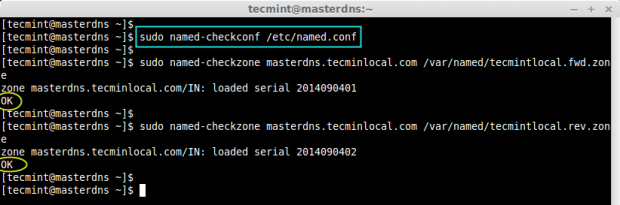
Now, check for the errors in zone files, before starting the DNS service. First check the named.conf file, then check other zone files.
$ sudo named-checkconf /etc/named.conf
$ sudo named-checkzone masterdns.tecminlocal.com /var/named/tecmintlocal.fwd.zone
$ sudo named-checkzone masterdns.tecminlocal.com /var/named/tecmintlocal.rev.zone
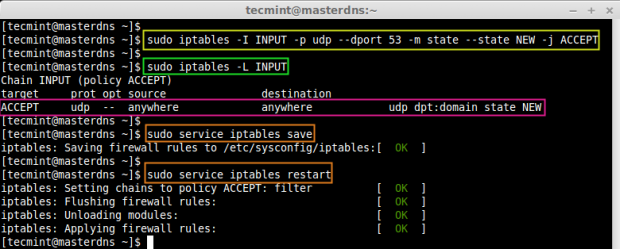
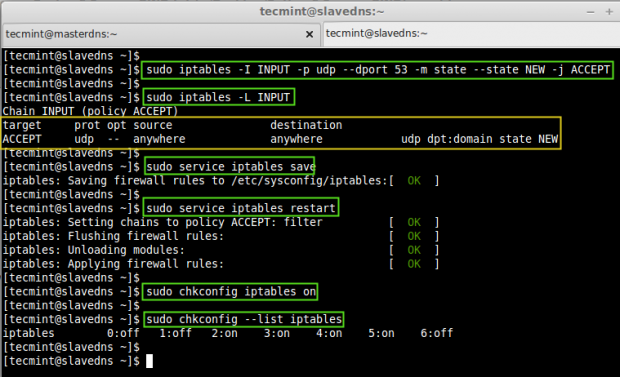
By default iptables was running and our DNS server is restricted to localhost, if client wants to resolve name from our DNS Server, then we have to allow the inbound request, for that we need to add iptables inbound rule for the port 53.
$ sudo iptables -I INPUT -p udp --dport 53 -m state --state NEW -j ACCEPT
Now, verify that the rules has been added correctly in INPUT chain.
$ sudo iptables -L INPUT
Next, save the rules and restart firewall.
$ sudo service iptables save
$ sudo service iptables restart
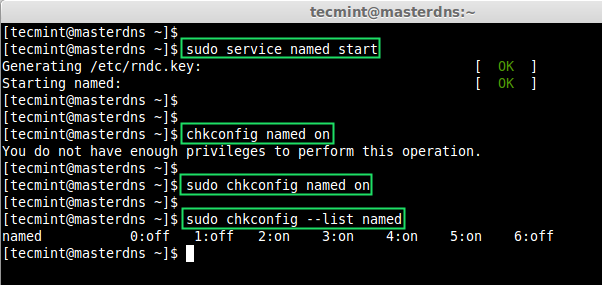
Start the named service and make it persistent.
$ sudo service named start
$ sudo chkconfig named on
$ sudo chkconfig --list named
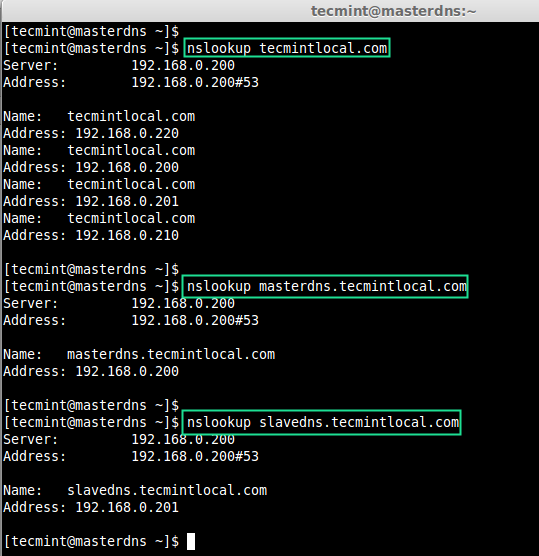
Finally, test the configured Master DNS zone files (forward and reverse), using dig & nslookup tools.
$ dig masterdns.tecmintlocal.com [Forward Zone]
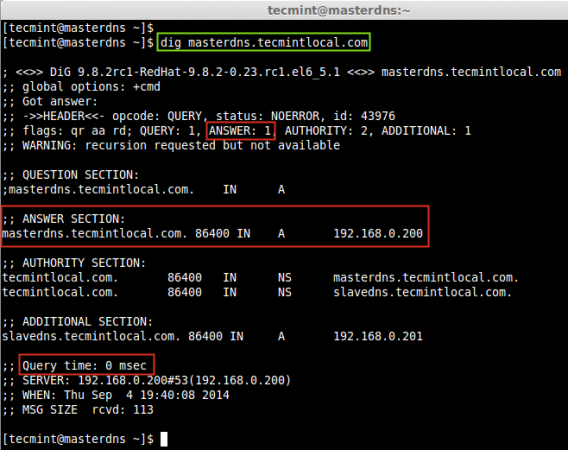
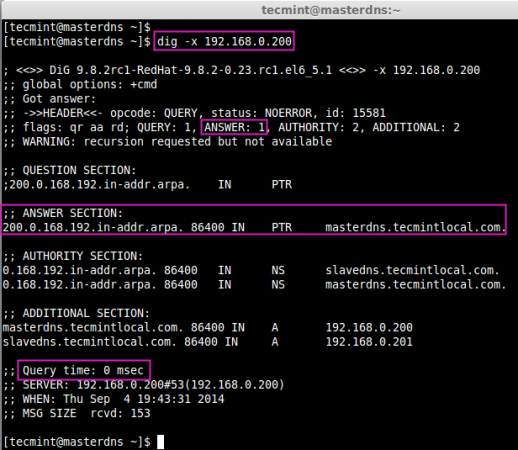
$ dig -x 192.168.0.200
$ nslookup tecmintlocal.com
$ nslookup masterdns.tecmintlocal.com
$ nslookup slavedns.tecmintlocal.com
Cool! we have configured a Master DNS, now we need to setup a Slave DNS Server. Let’s move forward to setup a slave server, This won’t take much time as master setup.
Setup Slave DNS Server
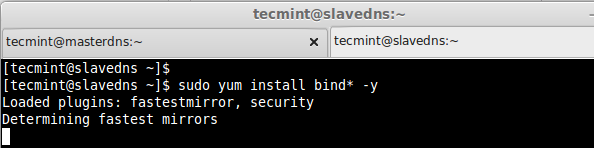
In Slave machine, also we need to install same bind packages as shown in Master, so let’s install them using following command.
$ sudo yum install bind* -y
Open and edit ‘named.conf’ file for our zone database and port listen.
$ sudo vim /etc/named.conf
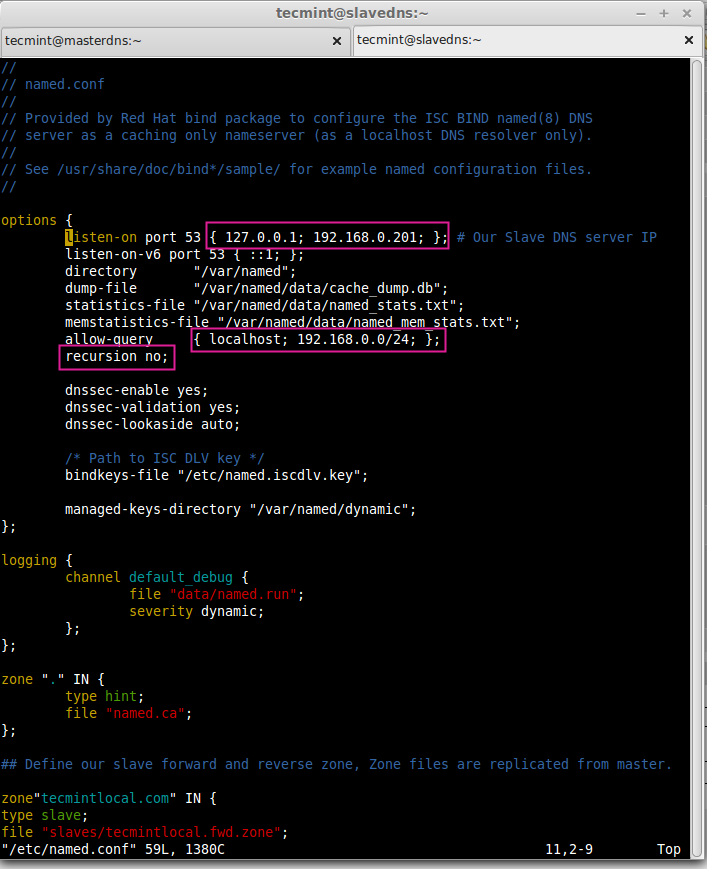
Make changes as shown, as per your requirements.
//
// named.conf
//
// Provided by Red Hat bind package to configure the ISC BIND named(8) DNS
// server as a caching only nameserver (as a localhost DNS resolver only).
//
// See /usr/share/doc/bind*/sample/ for example named configuration files.
//

options {
        listen-on port 53 { 127.0.0.1; 192.168.0.201}; # Our Slave DNS server IP
        listen-on-v6 port 53 { ::1; };
        directory       "/var/named";
        dump-file       "/var/named/data/cache_dump.db";
        statistics-file "/var/named/data/named_stats.txt";
        memstatistics-file "/var/named/data/named_mem_stats.txt";
        allow-query     { localhost; 192.168.0.0/24; };
        recursion no;

        dnssec-enable yes;
        dnssec-validation yes;
        dnssec-lookaside auto;

        /* Path to ISC DLV key */
        bindkeys-file "/etc/named.iscdlv.key";

        managed-keys-directory "/var/named/dynamic";
};

logging {
        channel default_debug {
                file "data/named.run";
                severity dynamic;
        };
};

zone "." IN {
        type hint;
        file "named.ca";
};

## Define our slave forward and reverse zone, Zone files are replicated from master.

zone"tecmintlocal.com" IN {
type slave;
file "slaves/tecmintlocal.fwd.zone";
masters { 192.168.0.200; };
};

zone"0.168.192.in-addr.arpa" IN {
type slave;
file "slaves/tecmintlocal.rev.zone";
masters { 192.168.0.200; };
};

#####
include "/etc/named.rfc1912.zones";
include "/etc/named.root.key";
Start the DNS service using.
$ sudo service named start
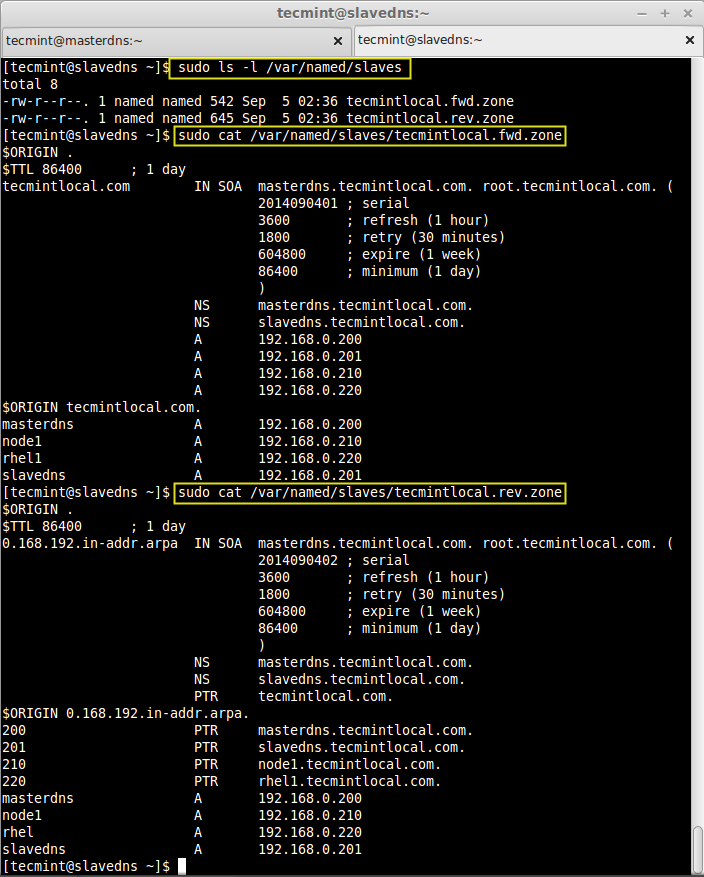
After restarting the bind service, we don’t have to define the zone information individually, as our allow-transfer will replicate the zone information from master server as shown in the image below.
$ sudo ls -l /var/named/slaves
Verify, the zone information using cat command.
$ sudo cat /var/named/slaves/tecmintlocal.fwd.zone
$ sudo cat /var/named/slaves/tecmintlocal.rev.zone
Next, open DNS port 53 on iptables to allow inbound connection.
$ sudo iptables -I INPUT -p udp --dport 53 -m state --state NEW -j ACCEPT
Save the iptables rules and restart the iptables service.
$ sudo service iptables save
$ sudo service iptables restart
Make the service persistent on system boot.
$ sudo chkconfig iptables on
Check whether persistent set for run-levels .
$ sudo chkconfig --list iptables
That’s it!. Now time to configure our client machines and check for the hostname.
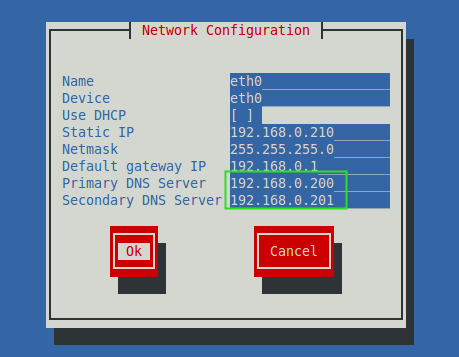
Configure Client Machine
In client side we need to assign the Primary (192.168.0.200) and Secondary DNS (192.168.0.201) entry in network settings to get assign a hostname. To do, run the setup command to define all these entries as shown in the picture.
$ setup
Else, edit the ‘/etc/reslov.conf‘ file and add the following entries.
$ vim /etc/resolv.conf
search tecmintlocal.com
nameserver 192.168.0.200
nameserver 192.168.0.201
Now, verify the ip, hostname and name server look-up.
$ ifconfig | grep inet
$ hostname
$ nslookup tecmintlocal.com

Now, check the forward & Reverse DNS look-up using.
$ dig masterdns.tecmintlocal.com
$ dig -x 192.168.0.200
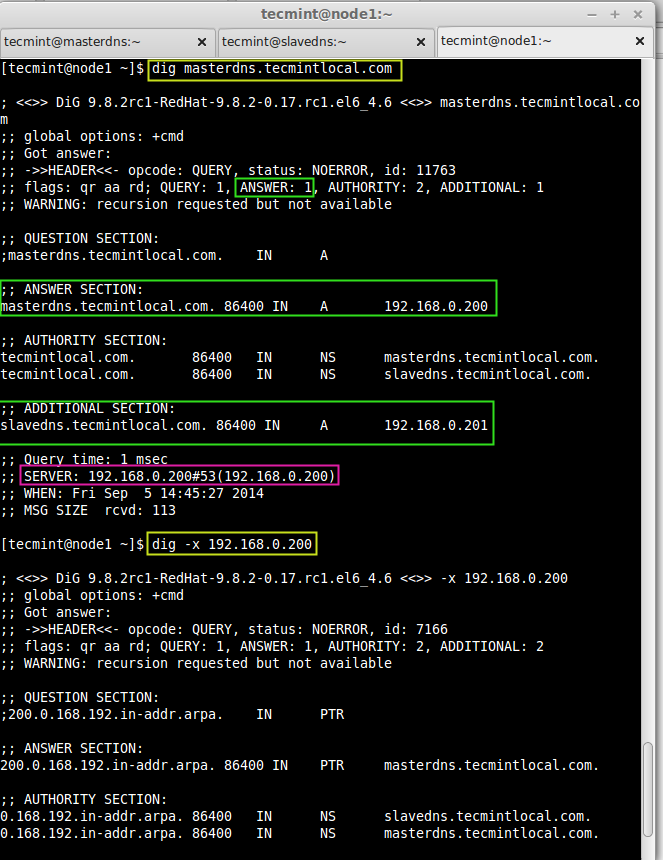
Understaing the dig Output:
- Header – This says everything what we have asked and how the result was.
- Status – Status was NO ERROR, that means which query request sent by us was successful without any ERROR.
- Question – The Query which was made by us, here my query was masterdns.tecmintlocal.com.
- Answer – The Query request resolved if there is available information.
- Authority – The name servers response for the domain and zone.
- Additional – Additional info’s regarding name-servers such as host-name and IP address.
- Query time – How long it took for resolving the names from the above servers.
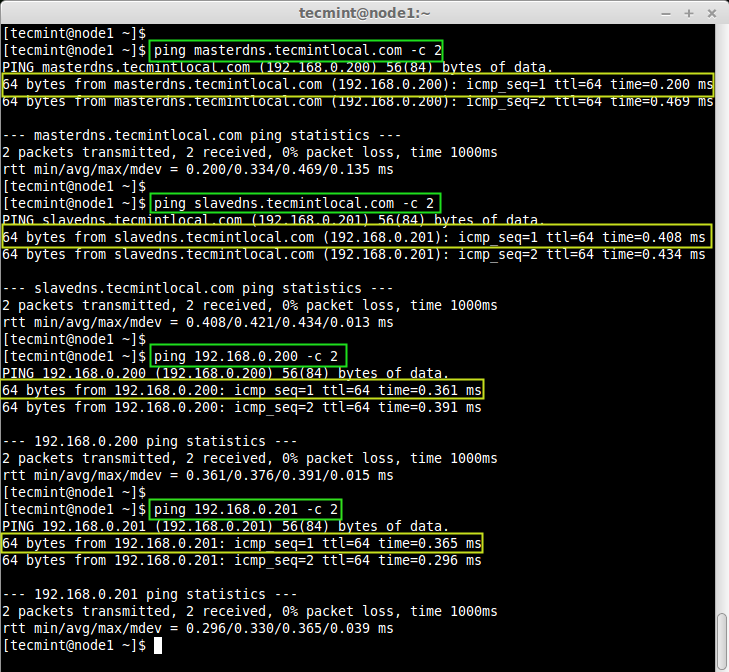
Finally check for our node and make a ping.
$ dig node1.tecmintlocal.com
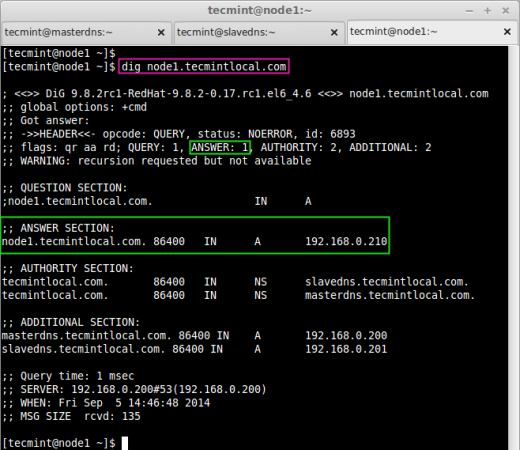
$ ping masterdns.tecmintlocal.com -c 2
$ ping slavedns.tecmintlocal.com -c 2
$ ping 192.168.0.200 -c 2
$ ping 192.168.0.201 -c 2
Finally, setup completed, here we have configured both Primary (Master) and Slave (Seconday) DNS server successfully, hope everyone have setup-ed without any issue, feel free to drop a comment if you face any issue while setup.