Configuring DNS Zones
In the files /var/named/sales.me.com.zone and /var/named/0.168.192.in-addr.arpa.zone we will configure the forward (domain → IP address) and reverse (IP address → domain) zones.
Let’s tackle the forward configuration first:
1. At the top of the file you will find a line beginning with TTL (short for Time To Live), which specifies how long the cached response should “live” before being replaced by the results of a new query.
In the line immediately below, we will reference our domain and set the email address where notifications should be sent (note that the root.sales.me.com means [email protected]).
2. A SOA (Start Of Authority) record indicates that this system is the authoritative nameserver for machines inside the sales.me.com domain.
The following settings are required when there are two nameservers (one master and one slave) per domain (although such is not our case since it is not required in the exam, they are presented here for your reference):
The Serial is used to distinguish one version of the zone definition file from a previous one (where settings could have changed). If the cached response points to a definition with a different serial, the query is performed again instead of feeding it back to the client.
In a setup with a slave (secondary) nameserver, Refresh indicates the amount of time until the secondary should check for a new serial from the master server.
In addition, Retry tells the server how often the secondary should attempt to contact the primary if no response from the primary has been received, whereas Expire indicates when the zone definition in the secondary is no longer valid after the master server could not be reached, and Negative TTL is the time that a Non-existent domain (NXdomain) should be cached.
3. A NS record indicates what is the authoritative DNS server for our domain (referenced by the @ sign at the beginning of the line).
4. An A record (for IPv4 addresses) or an AAAA (for IPv6 addresses) translates names into IP addresses.
In the example below:
dns: 192.168.0.18 (the DNS server itself)
web1: 192.168.0.29 (a web server inside the sales.me.com zone)
mail1: 192.168.0.28 (a mail server inside the sales.me.com zone)
mail2: 192.168.0.30 (another mail server)
5. A MX record indicates the names of the authorized mail transfer agents (MTAs) for this domain. The hostname should be prefaced by a number indicating the priority that the current mail server should have when there are two or more MTAs for the domain (the lower the value, the higher the priority – in the following example, mail1 is the primary whereas mail2 is the secondary MTA).
6. A CNAME record sets an alias (www.web1) for a host (web1).
IMPORTANT: The dot (.) at the end of the names is required.
$TTL	604800
@   	IN  	SOA 	sales.me.com. root.sales.me.com. (
                    	2016051101 ; Serial
                    	10800 ; Refresh
                    	3600  ; Retry
                    	604800 ; Expire
                    	604800) ; Negative TTL
;
@   	IN  	NS  	dns.sales.me.com.
dns 	IN  	A   	192.168.0.18
web1	IN  	A   	192.168.0.29
mail1   IN  	A   	192.168.0.28
mail2   IN  	A   	192.168.0.30
@   	IN  	MX  	10 mail1.sales.me.com.
@   	IN  	MX  	20 mail2.sales.me.com.
www.web1    	IN  	CNAME   web1
Let’s now take a look at the reverse zone configuration (/var/named/0.168.192.in-addr.arpa.zone). The SOA record is the same as in the previous file, whereas the last three lines with a PTR (pointer) record indicates the last octet in the IPv4 address of the mail1, web1, and mail2 hosts (192.168.0.28, 192.168.0.29, and 192.168.0.30, respectively).
$TTL	604800
@   	IN  	SOA 	sales.me.com. root.sales.me.com. (
                    	2016051101 ; Serial
                    	10800 ; Refresh
                    	3600  ; Retry
                    	604800 ; Expire
                    	604800) ; Minimum TTL
@   	IN  	NS  	dns.sales.me.com.
28  	IN  	PTR 	mail1.sales.me.com.
29  	IN  	PTR 	web1.sales.me.com.
30  	IN  	PTR 	mail2.sales.me.com.
You can check the zone files for errors with:
# named-checkzone sales.me.com /var/named/sales.me.com.zone
# named-checkzone 0.168.192.in-addr.arpa /var/named/0.168.192.in-addr.arpa.zone
The following image illustrates what is the expected output on success:

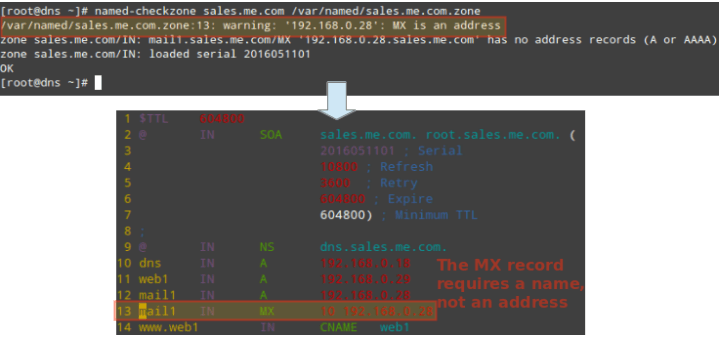
Otherwise, you will get an error message stating the cause and how to fix it:
Once you have verified the main configuration file and the zone files, restart the named service to apply changes.
In CentOS and OpenSUSE, do:
# systemctl restart named
And don’t forget to enable it as well:
# systemctl enable named
In Ubuntu:
$ sudo service bind9 restart
Finally, you will have to edit the configuration of your main network interfaces:
---- In /etc/sysconfig/network-scripts/ifcfg-enp0s3 for CentOS and openSUSE ----
DNS1=192.168.0.18

---- In /etc/network/interfaces for Ubuntu ----
dns-nameservers 192.168.0.18
and restart the network service to apply changes.


There are 2 typos (well two digits transposed) in the sample reverse DNS zone example given above.
Here’s the text provided:
zone "0.168.192.in-addr.arpa" IN {
    type master;
    file "/var/named/0.162.198.in-addr.arpa.zone";
};
The file directive has the 2 and the 8 transposed. The file name should be “/var/named/0.168.192.in-addr.arpa.zone“
@BJ,
Thanks, I have corrected the file in the article…
Hi Gabriel Cánepa,
could you help me here..?
https://serverfault.com/questions/930206/centos6-9-not-possible-to-resolv-two-windows-domain-controllers-at-a-time-using
Hello Mr Canepa,
First of all I would like to thank you for a very good articles in order to help me to prepare for LFCS. I studied all of them very carefully, but unfortunately I was stuck at the DNS.
It is about 3th part of this chapter. I don’t know if files /var/named/sales.me.com.zone and /var/named/0.168.192.in-addr.arpa.zone should be appeared automatically or should I append them on my own?
There are differences between CentOS and Ubuntu because of location of these files – in Ubuntu these files supposed to be in /var/cache/bind…
I will be thankful for your support.
Hello again,
I would like to inform that all questions mentioned above I solved. I just created require zone-files in /etc/bind/.
Unfortunately I met another issue and I tried to handled with that all the day – without result. When I try to check the answer with host command I received always the same error: “Host ….. not found: 3(NXDOMAIN)“.
The zone files and option files are done correctly without any errors.
Could someone help me with that and point me where I should looking for a mistake..? Many thanks in advance.
Radek.