Most of the time we need to take screenshots of the whole screen or some part of the window on the screen. While on Android or iOS, you can do this even with the click of a button, here on Linux we have special tools that ease taking screenshots, providing flexibility whether of the whole screen or some part of the screen.
Some of these tools are not only meant to take screenshots but also to modify the picture, adjusting the borders, depth, color, and a lot more while capturing the screen of a particular application or a whole window.
There are a lot of open-source tools in the market for this purpose and are easily available on the Linux system, we will be focusing on a few of them which are both popular and flexible when it comes to features they provide.
1. Shutter – Screenshot Tool
Shutter is one of the powerful screenshot tools that not only allows you to take a screenshot of any part of the screen but also lets you edit the captured image, add text, hide private content by pixelating, upload the image to a hosting site, and much more.
You can easily install Shutter on Linux with the help of the apt, yum or dnf as shown:
$ sudo apt install shutter         [On Debian, Ubuntu and Mint]
$ sudo yum install shutter         [On RHEL/CentOS/Fedora and Rocky/AlmaLinux]
$ sudo emerge -a sys-apps/shutter  [On Gentoo Linux]
$ sudo apk add shutter             [On Alpine Linux]
$ sudo pacman -S shutter           [On Arch Linux]
$ sudo zypper install shutter      [On OpenSUSE]
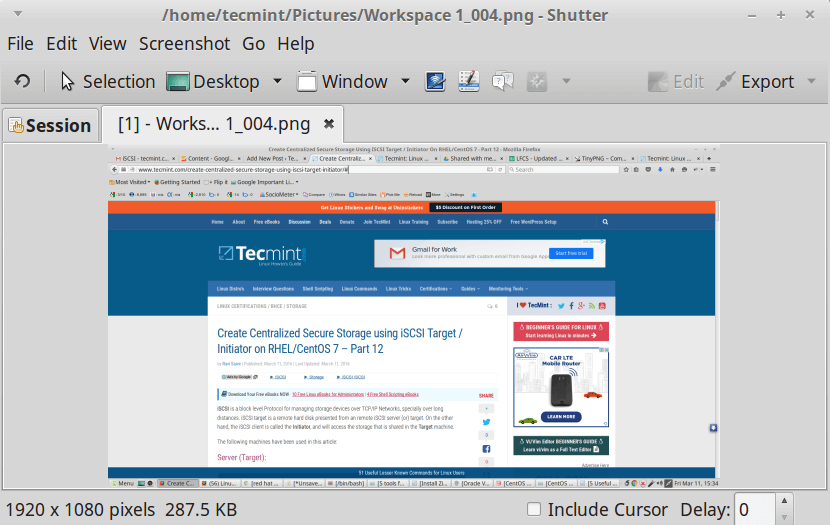
To create a screenshot through the shutter, either open a new session by launching the shutter app or just select the window to capture from the shutter icon in the notification bar.
2. ImageMagick
ImageMagick is a powerful, open-source tool for editing, converting, and displaying image files in more than 200 image formats. It includes, along with taking screenshots of selected portions of the screen, a rich set of commands for editing and transformation of images.
Apart from the command line, ImageMagick also includes a native X-window GUI for Unix-like systems which helps make rendering of images easy. Licensed under the Apache 2.0 License, ImageMagick provides a number of bindings for various languages like PerlMagick (Perl), Magickcore (C ), and Magick++ (C++) to name a few.
To install ImageMagick on a Linux system, you can typically use the package manager that comes with your distribution.
$ sudo apt install imagemagick         [On Debian, Ubuntu and Mint]
$ sudo yum install ImageMagick         [On RHEL/CentOS/Fedora and Rocky/AlmaLinux]
$ sudo emerge -a sys-apps/imagemagick  [On Gentoo Linux]
$ sudo apk add imagemagick             [On Alpine Linux]
$ sudo pacman -S imagemagick           [On Arch Linux]
$ sudo zypper install ImageMagick      [On OpenSUSE]
Using ImageMagick, you can take screenshots in the following ways:
Capture an Entire Desktop Screen
The import command is used to capture a portion of the entire desktop screen, including all currently active windows, and save the image to a file.
$ import screen.png
Capture a Specific Region
Running the following command changes the mouse pointer into a crosshair cursor, which can be used to select any area of the screen and take a screenshot of that part.
$ import image.png
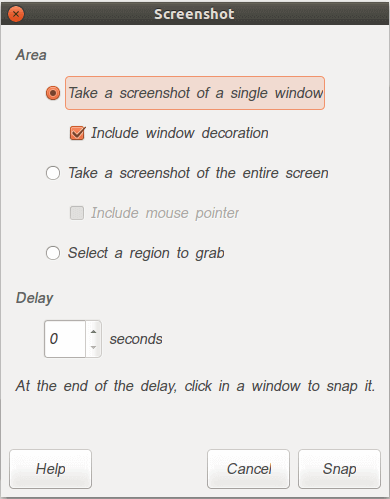
3. Gnome Screenshot
Another tool for taking screenshots is GNOME Screenshot, which is the default tool that comes along with Ubuntu on the gnome desktop environment. Initially, it was the part of gnome-utils package, but later on, it was separated into its own independent package from version 3.3.1.
Like the tools mentioned above, it is also powerful enough to take a screenshot of either the whole screen or a part of it as needed.
To install Gnome Screenshot on a Linux system, you can typically use the package manager that comes with your distribution.
$ sudo apt install gnome-screenshot         [On Debian, Ubuntu and Mint]
$ sudo yum install gnome-screenshot         [On RHEL/CentOS/Fedora and Rocky/AlmaLinux]
$ sudo emerge -a sys-apps/gnome-screenshot  [On Gentoo Linux]
$ sudo apk add gnome-screenshot             [On Alpine Linux]
$ sudo pacman -S gnome-screenshot           [On Arch Linux]
$ sudo zypper install gnome-screenshot      [On OpenSUSE]
One method to take a screenshot is to use the shortcut Shift+PrtScr. This changes the mouse pointer into a crosshair cursor, allowing you to select the part of the screen you wish to capture.
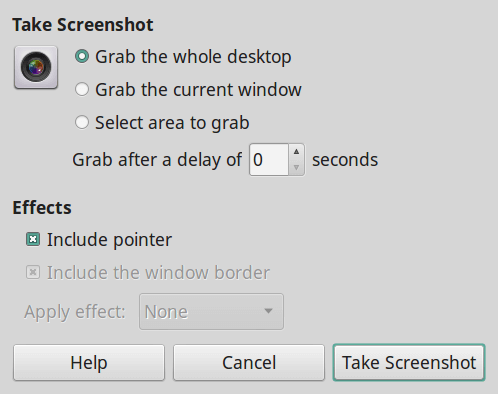
You can also take screenshots using the GUI. To do this, simply open the GUI and choose one of the following options: ‘Select an area to grab‘, ‘Grab the whole screen‘, or ‘Grab the current window‘. This allows you to fulfill any of the desired requirements.
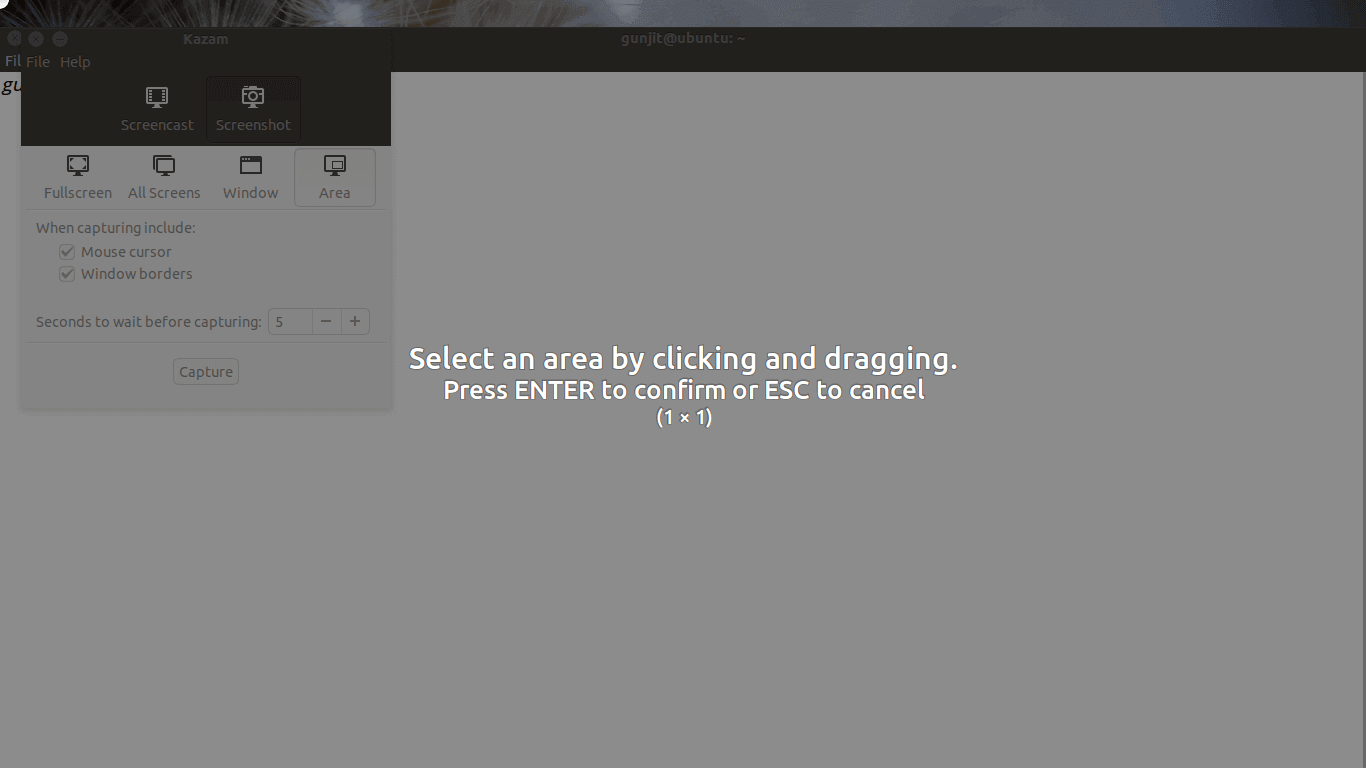
4. Kazam – Linux Desktop Screen Recorder
Kazam is a multi-functional tool that can be used for both video recording and taking screenshots. Like Gnome Screenshot, it also has a GUI that provides a list of options, whether to do screencasting or take screenshots and even, whether for a whole area or a part of it.
To install Kazam on a Linux system, you can typically use the package manager that comes with your distribution.
$ sudo apt install kazam         [On Debian, Ubuntu and Mint]
$ sudo yum install kazam         [On RHEL/CentOS/Fedora and Rocky/AlmaLinux]
$ sudo emerge -a sys-apps/kazam  [On Gentoo Linux]
$ sudo apk add kazam             [On Alpine Linux]
$ sudo pacman -S kazam           [On Arch Linux]
$ sudo zypper install kazam      [On OpenSUSE]
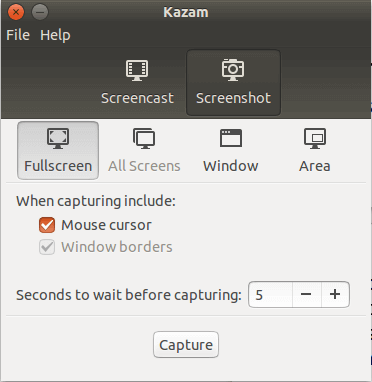
In GUI mode, you can take a screenshot with the click of a button. Simply choose one of the four options available: Fullscreen, All Screens, Window, or Area, and then click ‘capture‘. For the ‘Area‘ selection, you’ll be able to specify the desired region and press Enter to capture.
5. GIMP – GNU Image Manipulation Program
Gimp is a free and open-source image editor which can be used for image manipulation, editing, resizing, retouching, etc. It is written in C, GTK+, and distributed under GPLv3 license. It is highly extensible and expandable and implemented with the use of a scripting interface.
Apart from being an image editing program, Gimp has the ability to take screenshots of the complete or half area and then edit the image accordingly adding effects to it.
To install GIMP on a Linux system, you can typically use the package manager that comes with your distribution.
$ sudo apt install gimp         [On Debian, Ubuntu and Mint]
$ sudo yum install gimp         [On RHEL/CentOS/Fedora and Rocky/AlmaLinux]
$ sudo emerge -a sys-apps/gimp  [On Gentoo Linux]
$ sudo apk add gimp             [On Alpine Linux]
$ sudo pacman -S gimp           [On Arch Linux]
$ sudo zypper install gimp      [On OpenSUSE]
When you’ll open the Gimp GUI, go to File -> Create Screenshot and this menu will appear you can select the option you want, whether to take a screenshot of the whole or part of the screen.
After this, the snap of the image created will be available on the GUI for editing, where you can edit the image, apply effects, and so on.
6. Deepin Screenshot
Deepin Screenshot is a lightweight screen capture application used in Linux Deepin OS, that allows you to add text, arrows, lines and drawing to the screenshot. It is much more powerful than the default Gnome tool and much lighter than Shutter.
Deepin Scrot Features
- Full screen capture (PrintScreen)
- Capture a screenshot of the window under the cursor (Alt+PrintScreen)
- Rectangular Region and Freehand Region (Ctrl+Alt+A)
- Delay capture of Full Screen (Ctrl+PrintScreen)
- Take a screenshot of a selected area
- Draw a rectangle, ellipse, arrow, line, or text to screenshot
- Save screenshot to file or clipboard
To install Deepin Screenshot on a Linux system, you can typically use the package manager that comes with your distribution.
$ sudo apt install deepin-screenshot         [On Debian, Ubuntu and Mint]
$ sudo yum install deepin-screenshot         [On RHEL/CentOS/Fedora and Rocky/AlmaLinux]
$ sudo emerge -a sys-apps/deepin-screenshot  [On Gentoo Linux]
$ sudo apk add deepin-screenshot             [On Alpine Linux]
$ sudo pacman -S deepin-screenshot           [On Arch Linux]
$ sudo zypper install deepin-screenshot      [On OpenSUSE]
7. ScreenCloud
ScreenCloud is a free, open-source, simple, easy-to-use, and cross-platform tool for taking and sharing screenshots. It works on Linux, Windows, and Mac OS X.
ScreenCloud Features:
- Supports easy sharing.
- Allows you to save or upload screenshots.
- Supports the addition of an FTP server.
- Comes with a system tray for quick access and more.
To install ScreenCloud, you need to download the ScreenCloud AppImage from its official website and run it.
8. Flameshot – Open Source Screenshot Software
Flameshot is a free, open-source, simple yet powerful application for taking screenshots. It supports keyboard shortcuts and it’s fully configurable via GUI or the command-line.
Flameshot Features:
- It’s easy to use and comes with fully customizable user interface.
- Comes with a DBus interface.
- Supports in-app screenshot edition.
- Allows you to upload screenshots to Imgur.
- Supports a system tray and more.
To install Flameshot on a Linux system, you can typically use the package manager that comes with your distribution.
$ sudo apt install flameshot         [On Debian, Ubuntu and Mint]
$ sudo yum install flameshot         [On RHEL/CentOS/Fedora and Rocky/AlmaLinux]
$ sudo emerge -a sys-apps/flameshot  [On Gentoo Linux]
$ sudo apk add flameshot             [On Alpine Linux]
$ sudo pacman -S flameshot           [On Arch Linux]
$ sudo zypper install flameshot      [On OpenSUSE]
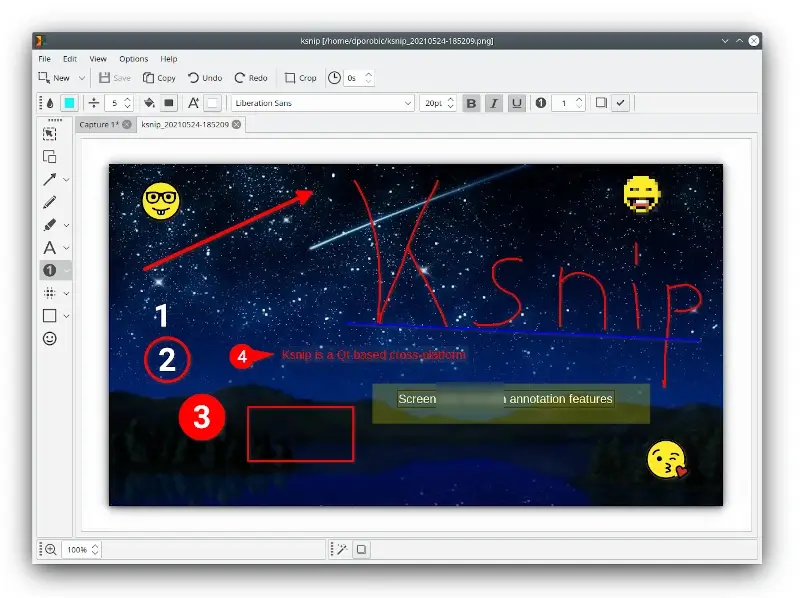
9. Ksnip – Screenshot and Annotation Tool
Ksnip is a versatile, cross-platform screenshot tool that caters to users across various operating systems, including Linux, Windows, and macOS.
Its intuitive interface offers a range of features beyond basic screenshot capabilities such as taking screenshots of specific regions, entire screens, or even individual application windows.
One of its standout features is the built-in annotator, which allows users to highlight, draw, or add text directly to their screenshots, enhancing clarity and communication.
To install Ksnip on a Linux system, you can typically use the package manager that comes with your distribution.
$ sudo apt install ksnip         [On Debian, Ubuntu and Mint]
$ sudo yum install ksnip         [On RHEL/CentOS/Fedora and Rocky/AlmaLinux]
$ sudo emerge -a sys-apps/ksnip  [On Gentoo Linux]
$ sudo apk add ksnip             [On Alpine Linux]
$ sudo pacman -S ksnip           [On Arch Linux]
$ sudo zypper install ksnip      [On OpenSUSE]
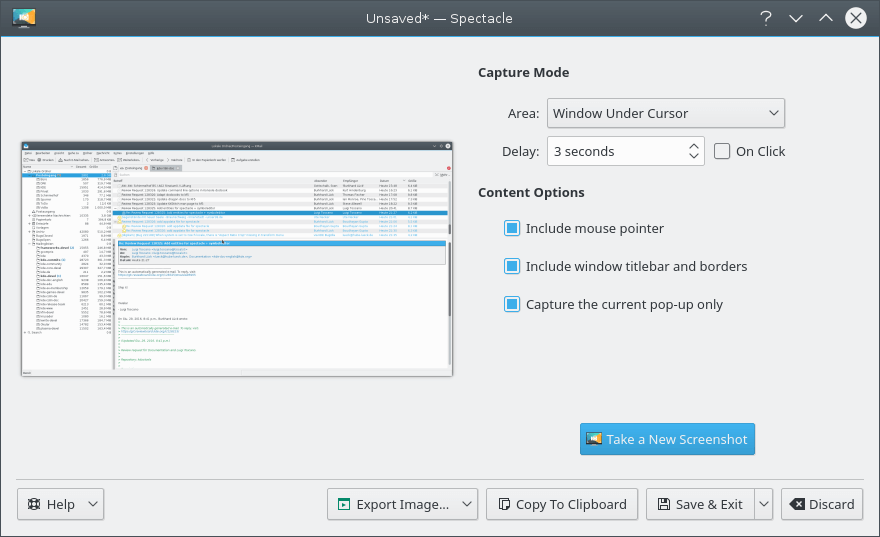
10. Spectacle – Screenshot Capture Utility
Spectacle is another easy-to-use tool for taking desktop screenshots. It can capture a whole desktop, a single monitor, the currently active window, the window currently under the mouse, or a rectangular portion of the screen.
Spectacle Features:
- Launch in GUI mode (default)
- Capture a screenshot and exit without showing the GUI
- Start in DBus-Activation mode
- Save the image to the given file format in background mode
- Wait for a click before taking a screenshot
To install Spectacle on a Linux system, you can typically use the package manager that comes with your distribution.
$ sudo apt install spectacle         [On Debian, Ubuntu and Mint]
$ sudo yum install spectacle         [On RHEL/CentOS/Fedora and Rocky/AlmaLinux]
$ sudo emerge -a sys-apps/spectacle  [On Gentoo Linux]
$ sudo apk add spectacle             [On Alpine Linux]
$ sudo pacman -S spectacle           [On Arch Linux]
$ sudo zypper install spectacle      [On OpenSUSE]
Conclusion
Here, we’ve listed a few readily available and feature-rich tools for taking screenshots on the Linux system. There are likely many others that some of you might prefer. If you have any other tools on your list, please share them with us in the comments.


Excellent article on-screen image capture software for Linux operating system software. I am very grateful that you also stated and wrote the correct command lines for installing the software into the multiple versions/flavors of Linux.
Linux was originally supposed to be uniform and standardized so that amateurs like me could operate and manage the software, but now that there are so many deviations/flavors because of various selfish-self-centered reasons of their authors – it’s far from standardized anymore.
Thank You! again though – for including the various versions of command lines – it was a great help and also a great comparison education!
@David,
Thank you for your kind words and feedback! I’m glad you found the article and the provided command lines helpful.
Most distributions also come with maim.
Just looking for a screenshot that actually works. Don’t need full image editing software. None of that here.
I use screenrec.com and it works great for taking screenshots or screen recording and sharing it via URL with colleagues
I find a better solution that flame shot – ksnip, it has much better UI and features!
Plus one for Ksnip, especially now you can see more than one screenshot at a time, great for writing documentation.
I used Shutter for years but it is bitrotting and gets harder to install with each new release of Ubuntu.
I agree ksnip is good and lightweight. I use an app image. One may also edit the image with text and markup.
+1, for me ksnip is the best screenshot app for linux, but if you use wayland, you cannot take rectangular area screenshots.
lookit is no longer maintained.
Very few of these run properly under Wayland. At least not without additional hacking which is beyond my skills.
Ksnip works with Wayland.
Flameshot, amazing application, light and complete.
Thanks for the article
+1 Flameshot is the best
For me all these applications are shit, I don’t need the capture to be immediately processed or what, just saved in a png file or jpg file while I am immediately capturing the next image pressing the key.
I don’t want a shit as Shutter which open a window and then must click on the right symbol to hope to get a screen capture, but which oftenly fails before 10 captures are done and which gives artifacts with videos
Make us a real Gadwin Prinscreen Linux tool or I shall buy a MS Win 10 license – last warning
I capture videos as well as webcams online shows
Spectacle is still one of the best screenshot tools. :)
I like deepin.
My usage is mainly annotating (drawing rectangles, circles, arrows). It is a step up from the gnome screenshot.
The best is the Deepin Scrot = )
https://github.com/lupoDharkael/flameshot is new app that very light and quick, allow to make screenshots, edit it and upload to imgur via single click.
In my opinion Deepin Scrot is the better screenshot tool.
You also have “Take a shot!” (tas) and Screeny, both of them quite useful and simple.
It should be apt-get install shutter and not as stated above. The above command will result in an Invalid operation error via the terminal.
sudo apt-get INSTALL shutter
There is also an application called screencloud from here https://screencloud.net/ when you click on the application it sits in the panel and is available whenever you wish to use a screenshot tool, also it has another feature you can annotate from the window that pops up after the shot is taken.
Hi,
This also looks very nice and useful application for instant capture and sharing screenshots.
Thanks for suggestion and being a regular follower of tecmint. Stay connected. :-)
I also forgot to mention this application as well it is called lookit here is the github page it has the install ppa instructions and other info https://github.com/zachtib/lookit