Linux Mint 19.3 receives support until April 2023, but you may want to upgrade to the latest version of Mint – Linux Mint 20 – to enjoy the numerous enhancements and cool features.
In this guide, you will learn how to Upgrade Linux Mint 19.3, codenamed Tricia, to Linux Mint 20 which is based on Ubuntu 20.04.
NOTE: This guide applies ONLY to 64-bit systems.
On this page
Check Linux Mint Architecture
If you are running a 32-bit instance of Linux Mint 19.3, then a fresh installation of Linux Mint 20 is recommended, otherwise, this procedure won’t work.
To verify your system’s architecture, run the command:
$ dpkg --print-architecture
If you are running a 64-bit system your output should give you 'amd64' as shown.

However, if you get 'i386' as the output, then you are running a 32-bit version on Linux Mint 19.3 and you cannot upgrade to Linux Mint 20. You should either stick to Linux 19.3 or perform a fresh installation of Linux Mint 20.
Upgrade all the Packages on Linux Mint
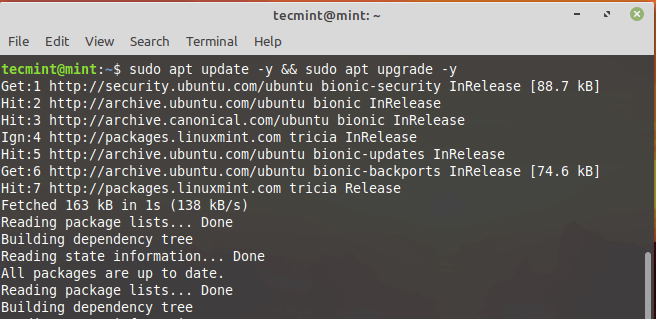
To start off, apply all the package updates by running the command:
$ sudo apt update -y && sudo apt upgrade -y
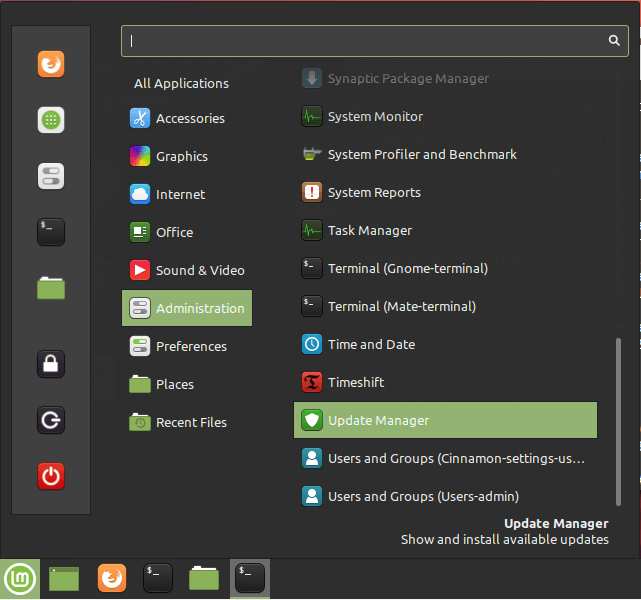
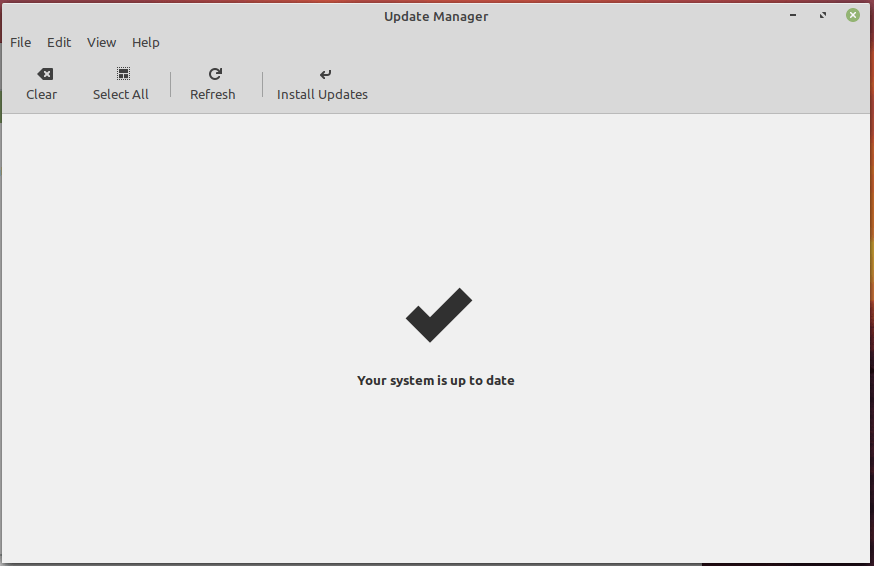
Alternatively, you can use the Update Manager to apply all the system & package updates. Simply navigate to Menu > Administration then select ‘Update Manager’.
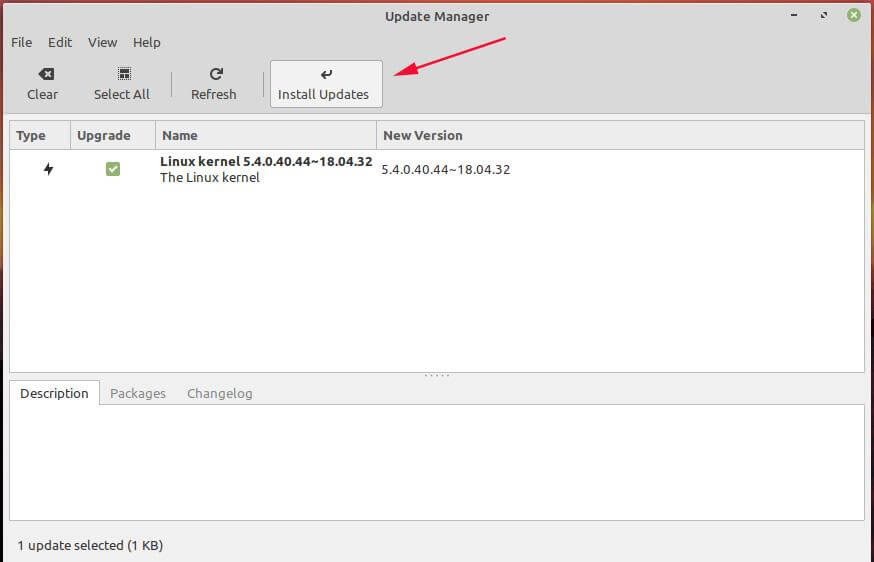
On the Update Manager Window, click on the ‘Install Updates’ button to upgrade the packages to their latest versions.
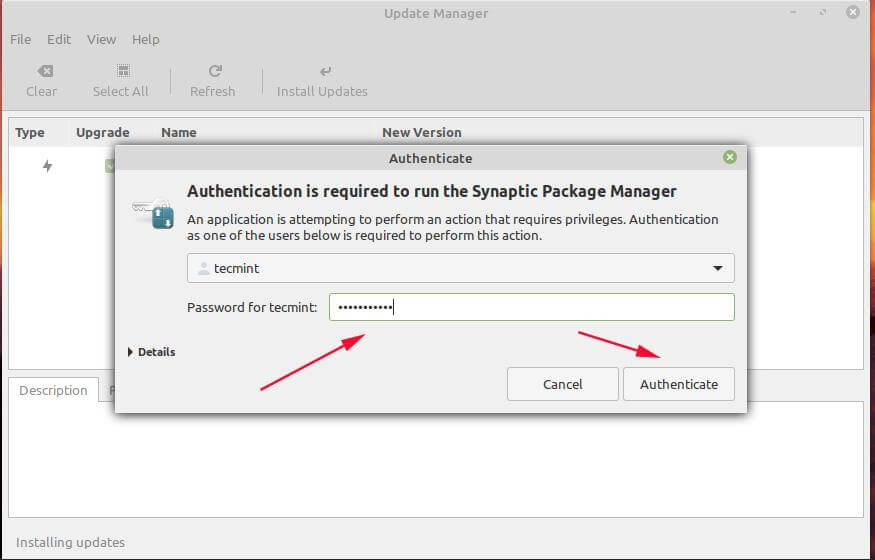
Provide your password and hit ENTER or click on the ‘Authenticate’ button to authenticate and proceed with the upgrade.
If it’s been a while since you last upgraded your packages, this might take quite a while to complete and some patience will do.
Backup Linux Mint Files
We cannot stress enough the importance of taking a backup copy of all your files. A backup will save you the agony of losing your crucial files in the event that something goes wrong during the system upgrade.
Additionally, you can create a snapshot of your system files and settings using the Timeshift tool. This will make a backup copy of all your system files and help you to restore your system using the latest snapshot in case anything goes wrong.
Be advised that this does not back up your user data such as movies, images, audio files, etc. This, therefore, informs the need to have a backup of your personal files.
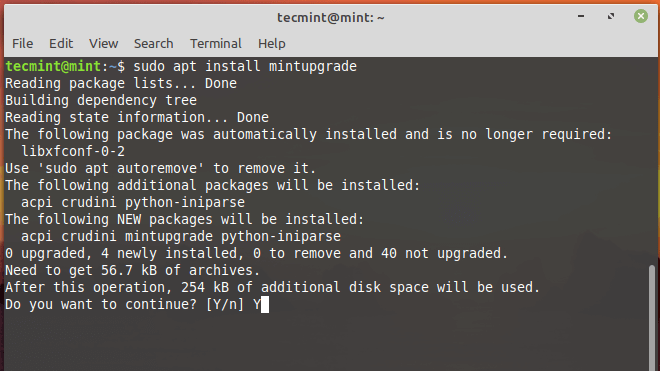
Install the Mintupgrade Utility in Linux Mint
The next step will require you to install the mintupgrade utility. This is a command-line tool provided by Linux Mint solely for upgrading from one Mint release to another.
Therefore, run the following command:
$ sudo apt install mintupgrade
Check Linux Mint Upgrade
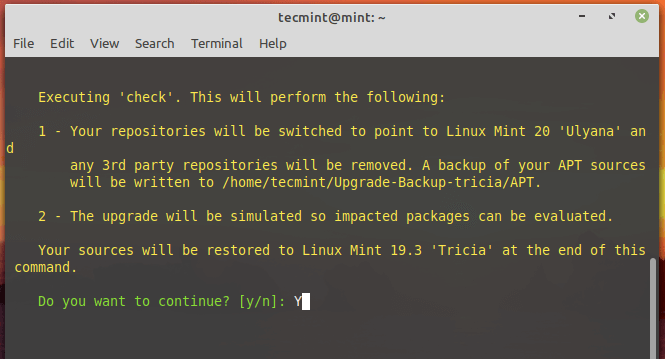
With mintupgrade installed, you can simulate the upgrade to Linux Mint 20 Ulyana by running the command:
$ sudo mintupgrade check
Since it’s a simulation, the command won’t upgrade your system, but will temporarily point your current system to Linux Mint 20 repositories and thereafter restore your repositories back to Linux Mint 19.3. It’s basically a dry run that gives you a peek on what will happen during the upgrade including the packages to be upgraded and installed or removed.
Download Linux Mint Upgrades
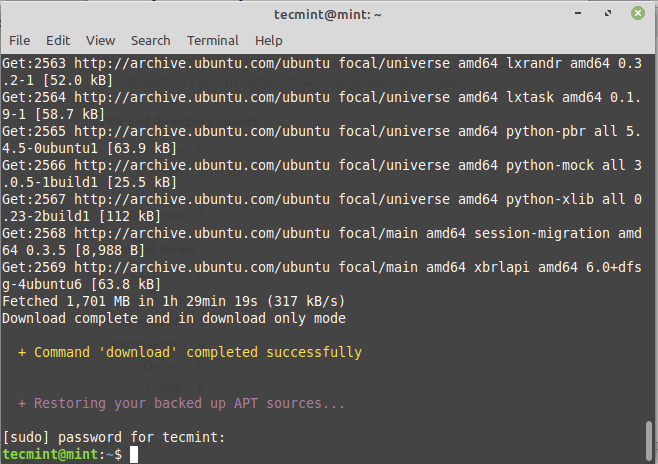
After the simulation is complete, initiate the download of packages required for the upgrade using the mintupgrade command shown:
$ sudo mintupgrade download
Bear in mind that this command only downloads the packages meant for upgrading your system and doesn’t perform the upgrade itself. Once done, you should get the notification that ‘Command ‘download’ has completed successfully’.
Upgrade to Linux Mint 20
Finally to upgrade to Linux Mint 20, execute:
$ sudo mintupgrade upgrade
Before you proceed, kindly note that this process is irreversible and should not be interrupted. The only way to go back is to restore your system using the snapshot you created earlier on.
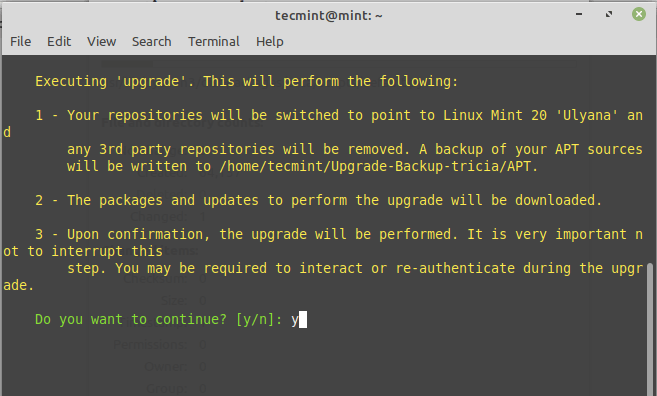
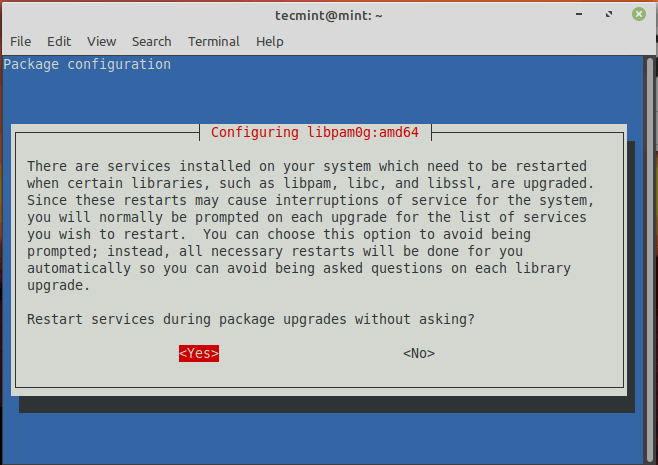
The upgrade is quite massive and intensive and will take roughly 2-3 hours. Also, during the upgrade process, you will be required to re-authenticate a couple of times and interact with any prompts on the terminal. For example, you will be required to choose between restarting services during the upgrade or not as shown.
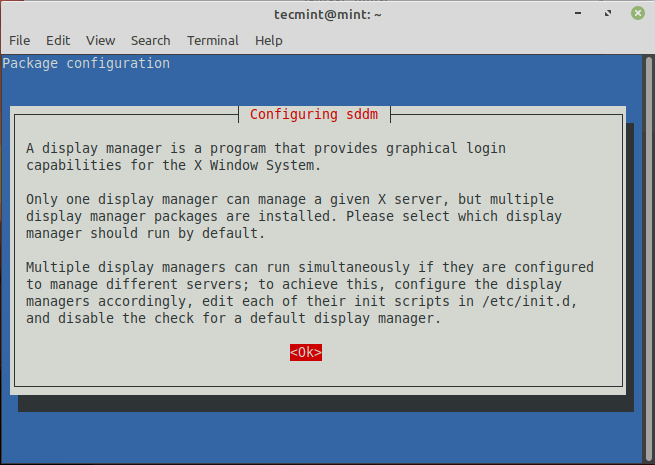
If you have multiply display managers, you will come across this prompt. Simply hit ENTER to proceed.
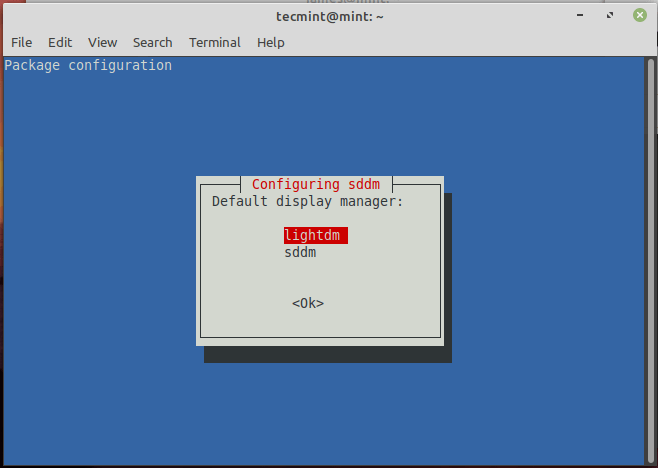
Then select your preferred display manager. In my case, I chose ‘Lightdm’.
The entire upgrade took about 3 hours for my case. It may take longer or shorter for your case, but one thing’s for sure – it’s quite time-consuming.
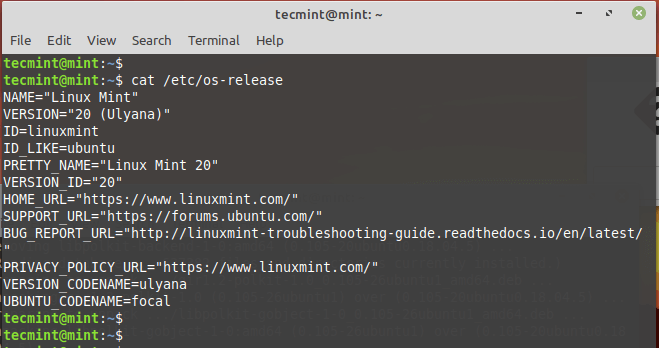
After the upgrade, you can verify your system’s version by running the command:
$ cat /etc/os-release
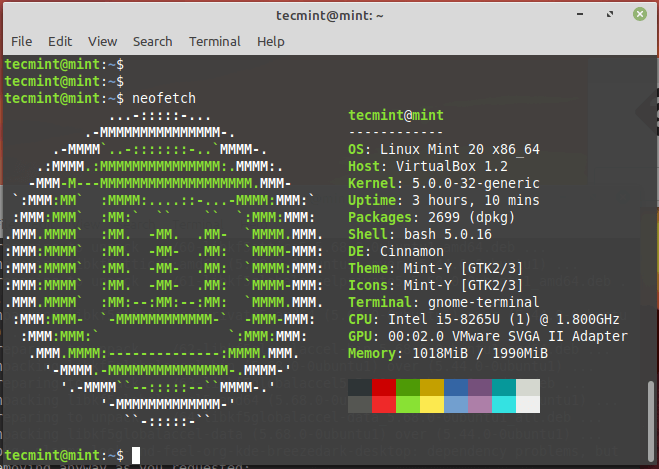
Additionally, you can use the Neofetch command-line utility to display system information as shown.
$ neofetch
NOTE: The upgrade will overwrite the default configuration files in the /etc directory. To restore the files, use the snapshot you created earlier before upgrading.
If you wish not to use the Timeshift tool, you can instruct the upgrader to ignore it by running the command.
$ sudo touch /etc/timeshift.json
Again, the upgrade takes a while. If you are busy elsewhere, It’s advisable to keep checking your terminal every now and then for any prompts that might require your intervention.


Hi, I get this error list.
Can I no longer use all these apps with V 20? I work with Brave and do not want to have to do without them.
!! ERROR: The following 3rd party repositories were detected. Disable them and refresh your APT cache.
– . stable (. stable) – repo.skype.com
– . xenial (. xenial) – updates.signal.org
– Brave Browser (Brave Software) – brave-browser-apt-release.s3.brave.com
– DEB (obs://private/DEB/xUbuntu_18.04) – mega.nz
– Google (Google LLC) – dl.google.com
– Official Vivaldi package repository (Vivaldi Technologies) – repo.vivaldi.com
– TeamViewer (TeamViewer GmbH) – linux.teamviewer.com
– f.lux GUI (LP-PPA-nathan-renniewaldock-flux) – ppa.launchpad.net
– slack (packagecloud.io/slacktechnologies/slack) – packagecloud.io
– winehq (dl.winehq.org) – dl.winehq.org
linux mint spying bug better debian or ubuntu
cat /etc/os-release shows “version 19.3 tricia“, however
sudo apt install mintupgradeshows “mintupgrade is already the newest version (2020.07.18.1)” – why?sudo mintupgradecheck gives “please don`t run this command as root or with elevated privileges”.19.3 is up to date.
Since my earlier comment, I was able to continue with the upgrade after opening software sources, maintenance, and downgrade foreign packages.
Hey Michael, the output “mintupgrade is already the newest version (2020.07.18.1)” shows that you previously installed mintugrade or upgraded it from an earlier version assuming it was already existing on your system. The error you are getting when performing a dry run is quite baffling. Usually, the command should allow a simulation of the upgrade. Can you give your system a reboot and try it later?
Guys, I am new to the scene but I’m the one friends and family look to fix their Windows machines over the years and I would like to say how painless this was thanks to the easy of copy& paste and your clear guidance. Tip of the hat and a wink in thanks, I will be sticking around no going back for me
Thanks for the feedback, John Anderson! I’m glad that this tutorial worked for you.
Thank you for this gold peace of HowTo!
So easy and not so much to know about Linux. Now my old mashine will run for a wile.
Thank you for your feedback. I’m glad you succeeded in your endeavors.
I was able to successfully upgrade to Linux Mint 17 from 16 through aptitude safe-upgrade command. Is this right?
Just saw this on another TUTORIAL SOMEWHERE? to List your system info type “root >sudo lsb_release -a “
Hey Lee, there are quite a number of ways of checking system info. That is one of them, so you are good to go :-)
This is the most detailed article Ive seen about migrating to a new OS. I started building mint17.1-KDE and got it to point I was having fun with it. I was considering mingrating it over to my Petra machine when suddenly the unthinkable happened and my HD-died. It started with a simple chkdsk error and progressed from there. I had made an image of my Petra disk so I wasn’t worried. Later I tried to restore it using my archive image and my disk-flash-image. Neither of whiched worked out because as soon as I run update the system tells me that the Ubuntu-saucy archives are NOT reachable. Can anyone tell me whom is the keeper of the Petra-archives? I’ve been forced over to run solely on mint17.1-kde and it is just too buggy to use as a primary machine. Werid things happen on Mint17.1 like browsers falling over, connection to remote disk failing, network popping in and out. I just want my Petra-back. wheres the Archives cos I didn’t know about backing up sources before reading this.
hai lee, i got same problem like you do, my solution is changing petra sources list to old release. here the reference http://forums.linuxmint.com/viewtopic.php?f=198&t=142447
Just for your information, I was using mint mate petra/saucy KDE and used this guide to update to Quiana, all went well until reboot.
Just prior to reboot; issue, issue.net, etc showed the new Ubuntu / Mint versions. After reboot, startkde could not be found.
After installing and using apt-file from the root terminal (in safe mode with networking) I installed the missing startkde file but too much was missing and cluttered in KDE so I decided to just install the latest mint using the USB (mintstick).
I just want my old Petra-mint16 OS back. My HD was recently replaced and I’ve been unable to reboot the backup.img I made. I was able to restore all the old packages in /var/cache/apt/archive using apt-on-cd but now am getting errors that the old Petra – Ubuntu-Saucy libs no longer exisit. I tried changing Software-Sources to different mirros but nothing seems to work. I pointed my local repositry to “deb file:/var/cache/apt/archive and ran Apt-update then it forked. Is there and easy way to restore old packages with outhitting the lib-dependancy issue?
Try to upgrade the system to e newer version of Linux Mint! Looks like the support period for Ubuntu Saucy has expired and the official repositories had been removed!
I’m getting this error:
Preparing to unpack …/usb-modeswitch-data_20140327-1_all.deb …
Unpacking usb-modeswitch-data (20140327-1) over (20120815-2) …
Preparing to unpack …/wine-compholio_1.7.41~ubuntu14.04.1_i386.deb …
Unpacking wine-compholio (1.7.41~ubuntu14.04.1) over (1.7.22~ubuntu13.10.1) …
dpkg: error processing archive /var/cache/apt/archives/wine-compholio_1.7.41~ubuntu14.04.1_i386.deb (–unpack):
trying to overwrite ‘/opt/wine-compholio/bin/wine’, which is also in package wine-compholio-i386 1.7.22~ubuntu13.10.1
Preparing to unpack …/wine-compholio-i386_1.7.41~ubuntu14.04.1_i386.deb …
Unpacking wine-compholio-i386 (1.7.41~ubuntu14.04.1) over (1.7.22~ubuntu13.10.1) …
Processing triggers for ureadahead (0.100.0-16) …
Processing triggers for doc-base (0.10.5) …
Processing 9 changed doc-base files…
Registering documents with scrollkeeper…
Processing triggers for install-info (5.2.0.dfsg.1-2) …
Processing triggers for ccache (3.1.9-1) …
Updating symlinks in /usr/lib/ccache …
Processing triggers for initramfs-tools (0.103ubuntu4.2) …
update-initramfs: Generating /boot/initrd.img-3.11.0-12-generic
Warning: No support for locale: en_US.utf8
Errors were encountered while processing:
/var/cache/apt/archives/wine-compholio_1.7.41~ubuntu14.04.1_i386.deb
E: Sub-process /usr/bin/dpkg returned an error code (1)
I’m new with Linux so I don’t know what to do. It’s gone so well up to this point.
First try:
sudo apt-get install -f
sudo dpkg –configure -a
If no success then run:
sudo dpkg -i –force-overwrite /var/cache/apt/archives/wine-compholio_1.7.41~ubuntu14.04.1_i386.deb
sudo apt-get autoremove
sudo apt-get install -f
Very nicely done article. New to Linux, but have tried Zorin OS 9, and I like the feature that it automatically points the way to upgrade from older versions, by downloading sources, etc. I hope Linux Mint might consider this for the not so software inclined people such as myself. :-p Thank you!
Thank you. Worked perfectly. I hope that http://blog.linuxmint.com/?p=2725 (17 qiana to 17.1 rebecca) works as well.
sed: can’t read /ect/apt/sources.list.d/official-package-repositories.list: No such file or directory
What went wrong?
During upgrade – the last step…. When GRUB came up to chane or install, or to see differences, I chose “D”,
but when I exited the editor that it started, I am unable to continue the upgrade,
and if I run sudo apt-get upgrade -f again, it get the following:
E: Could not get lock /var/lib/dpkg/lock – open (11: Resource temporarily unavailable)
E: Unable to lock the administration directory (/var/lib/dpkg/), is another process using it?
How do I continue the process ?
@Mlkem24,
To fix such error, you need to delete the lock file with the below commands.
Restart the machine and try again…
I was using mint mate petra/saucy. I thought I would upgrade to trusty because it is lts. A lot of things (mate-settings-daemon, cairo-dock,nm-applet, etc) won’t start now with the following error:
symbol lookup error: /usr/lib/x86_64-linux-gnu/libgdk-3.so.0: undefined symbol: cairo_surface_set_device_scale
Any help out there would be appreciated! Thanks
Processing triggers for hicolor-icon-theme (0.12-1ubuntu2) …
(gtk-update-icon-cache:30354): GdkPixbuf-WARNING **: Cannot open pixbuf loader module file ‘/usr/lib/x86_64-linux-gnu/gdk-pixbuf-2.0/2.10.0/loaders.cache’: No such file or directory
This likely means that your installation is broken.
Try running the command:
to make things work again for the time being.
(gtk-update-icon-cache-3.0:30355): GdkPixbuf-WARNING **: Cannot open pixbuf loader module file ‘/usr/lib/x86_64-linux-gnu/gdk-pixbuf-2.0/2.10.0/loaders.cache’: No such file or directory
This likely means that your installation is broken.
Try running the command
to make things work again for the time being.
dpkg: libmatemenu: dependency problems, but removing anyway as you requested:
mate-panel depends on libmatemenu; however:
Package libmatemenu is to be removed.
mate-menus depends on libmatemenu (= 1.6.0-1+petra).
mate-control-center depends on libmatemenu; however:
Package libmatemenu is to be removed.
python-mate-menu depends on libmatemenu; however:
Package libmatemenu is to be removed.
Why? What’s wrong? :(
to block this line in the file sources.list, getdeb.list, official-package-repositories.list (###) with : ###deb cdrom:[Linux Mint 17 _Qiana_ – Release i386 20140530]/ trusty contrib main non-free
for bloquear -file- with “deb” -sources.list, official-package-repositories.list-
File “sources.list” :
Only U Push It: ###
###deb cdrom:[Linux Mint 17 _Qiana_ – Release i386 20140530]/ trusty contrib main non-free
Thanks. The update more or less worked with some minor issues needing manual changes like deleting recreating etc.
( /usr/lib/i386-linux-gnu/gdk-pixbuf-2.0/2.10.0/loaders.cache, /etc/lightdm/lightdm.conf.d/10-ubuntu.conf.dpkg-remove, /etc/mate-system-tools/user-profiles.conf …)
Hy,
thank you for this nice tutorial. I did this upgrade on my Desktop because I thought it would help with the boot-up problems I have. Sometimes When I like to shutdown the computer it is not doing it. So I have to kill it with holding the power button and the result with the next boot up is, it is not doing it many times untill I am lucky… all USB ports are unused and I dont need thow to move on with that issue.
A result I experience of the new installation is when I am checking with my network connections, Lan and Wireless that it gots stucked there after I am trying just to connect to a Wireless lan, or to a new Lan connection. When I remove the UBS-Wifi adapter or the AP via Lan cable I have to reboot the whole system because my new Mint 17 does not recognice the change and is stucked.
Everything else is working fine, thanks!
continued from previous (dang thumb hitting touch panel caused submit…)
Again a BIG thank you for an excellent job…
Big Thank You!!!
for this tutorial…
It made upgrading a dream and it saved a lot of work restoring applications.
A person I support has (had) Rosetta Stone 3 installed in LM16 using Wine 1.7 (development release) because neither 1.4 or 1.6 at the time of RS3 installation would run RS3. Because getting RS3 installed/running on LM16 was a hassle we were hesitant to upgrade for fear that we might not get RS running on LM17.
The good news is that after following this procedure RS3/Wine runs perfectly and in fact the user reports that it seems to run better.
What a time saver
I don’t think it worked entirely….
was…
LinuxMint
DISTRIB_RELEASE=16
DISTRIB_CODENAME=petra
DISTRIB_DESCRIPTION=”Linux Mint 16 Petra”
NAME=”Ubuntu”
VERSION=”13.10, Saucy Salamander”
Linux Mint 16 Petra 13.10 Saucy Salamander
now…..
nino@nino-eM250 ~/Desktop $ uname -a
Linux nino-eM250 3.13.0-24-generic #47-Ubuntu SMP Fri May 2 23:31:42 UTC 2014 i686 i686 i686 GNU/Linux
any ideas?
Thanks for the tutorial!
I had to go through all the files in /etc/apt and change both the file names and file content from saucy -> trusty and petra -> qiana on all the files in /etc/apt and its sub folders, but it worked like a charm.
I messed up the first time by not doing it as I described above and Cinnamon wouldnt start up. Luckily I had KDE as well, but i could just have done it in another terminal (open by pressing CTRL + ALT + F1)
If you plan on doing an operation like this purely in terminal I would recommend using Midnight Commander (mc) for easy and fast navigation in the directories, although I admit sudo nemo is my jam.
This is a joke, right? I have managed to get over the years from Windows 3.1 to Windows 8.1 without ever typing (or copying and pasting) a single line of code. I have gone from version to version of Ubuntu seamlessly.
Now you tell me that to go from version 16 to 17 of Mint I have to wipe my disk and start again.
It might be the most downloaded Linux distro on the planet but I won’t be downloading it again.
:(
The change from “saucy” to “trusty” and from “petra” to “qiana” can be easily done and/or verified from the package manager. In the repo settings, when you highlight a given repo, including the ppas that you might have added, you can see the distro name in a separate input box. Just highlight every line, do the required change and click OK.
This is useful especially for ppas, because other sources are easier and quicker with sed, as described above.
One more remark: To do the upgrade in the way described here, you must have enough space on the root (system) partition. I usually have only 9 GB there because my experience is that it is difficult to fill it up with just system and software, so I always gave as much as possible space to my home partition. Therefore I ran out of space while doing the dist-upgrade. The solution was to stop the process, move the /var/apt folder to my home and symlinking it to the original location.
Amazing job, worked perfectly! And I have a hell of a lot running on this machine, to lazy to do a fresh install, this worked nicely.
Worked well, many thanks
@cochese: All distro upgrade procedures have drawbacks and could lead to making the system unusable or data coruption. I haven’t test it Linux Mint KDE edition but the same procedure is valid for KDE also and should work
Make sure you backup all your important data before upgrade, and if your system becomes unbootable or unusual after upgrade, then perform a clean installation and import your backed-up data.
Will this work with Mint KDM?
Hi,
Update went smooth, except for one issue: after reboot, my grub was smashed, and only showed an error message (some file not found), and I needed a linux live usb stick to repair grub following this guide: http://ubuntuforums.org/showthread.php?t=1692144
BTW: Thanks for your guide :-)
thanks, now I have Linux Mint 17 in my pc
@Ugly Duck: usualy loop devices are cd/dvd (iso images) mounted on a system mount point.
Did you had any of this kind of device mounted on your system when you started upgrade process?
Please verify the content of /etc/fstab and /etc/mtab file and remove any entry that point to a dvd/dvd/iso filesystem.
@Matel Cezar,
Sorry I almost forgot about this post. here are the contents of both the fstab and mtab files.
I think in my case loop0 is the disk (its like a big iso) where mint4win installed the linux mint 16. How can I start the upgrade process if remove it from there! (Like formating C drive inside windows).
Hi, I have installed Linux mint 15 with Mint4Win as Dual boot with Windows 7.
Then upgraded it to Mint 16 and it was running fine.
But when I upgrade to Mint 17 (Qiana), after restarting the partition loop0 (or loopback0 or something like that) fails to load.
It shows an error like, Press I to ignore, S to skip or M for manual recovery.
Please tell me a way to fix this.
Or let me know if it is not possible. TIA.
I’m a Linux newbie running Mint Mate on Aspire One (ZA3) and I’ve tried upgrading using these steps twice now. Each time this machine loses ability to resume after suspend.
What am I missing? Default install of Petra works fine, so I guess something must have changed in the new release…
It worked for me thanks !
I had Linux Mint in dual-boot with an old windows XP and I was worried about the dual-boot but it worked fine without any serious glitch.
I’m currently dual-booting Windows 8.1 x64 with Linux Mint 16 Petra x64. Can I follow this guide to upgrade from Petra to Qiana without adversely affecting anything (i.e dual-boot settings and whatnot)?
I used this method on s system that dual boots Windows 7 and Mint with no problem on the dual boot.
I went directly from Olivia (15) to Qiana (17). Only problem was with the window manager, I ended up removing MDM and installed lightdm to fix it, turned out the problem was to do with an obscure xsession lying around on the system mdm’s errors were not helpful but lightdm’s were. I suspect that if you just have out of the box xsessions you would not encounter this problem.
Make sure you back up first on both sides of the dual boot though as worst case is needing to restore everything from scratch.
I tried to do an upgrade from 16 to 17 via apt-get, but it just failed (it didn’t upgrade to 17, when I tried to use “sudo apt-get dist-upgrade”).
Thanks for the tutorial – it was really useful and worked well for me.
FYI, there is a typo mistake in step 7 : ‘$ sudo cat /etc/lsb_release’ should be ‘$ sudo cat /etc/lsb-release’ with – instead of _
thnx dude
i did it successfully
keep it up ^_^
Nevertheless: Thank you for the tutorial! My system works just fine.
Under point 7, the third line is still
sudo cat /etc/lsb_release
but needs to be
sudo cat /etc/lsb-release
Run bleachbit and sudo bleachbit first, in order to keep the backupfile small as possible.
Hi guys…I have a problem…I don’t have any “official-package-repositories.list” in /etc/apt/sources.list.d…is that normal?
What should I do?
Thank you for this page. I did use it to upgrade from Petra to Qiana.
I was particularly impressed when I C&P’d
sudo apt-get dist-upgrade
onto my Terminal and it took more than an hour to run,
including a self-timed 42 minutes doing the downloads.
Generated an awful lot of lines on screen, so was, in its way, an ‘action movie’.
Then also did :
sudo apt-get upgrade
and logged out. So far so good.
Problems started when I logged in again.
First, my desktop was a conky screen, essentially this one :
http://www.noobslab.com/2012/06/install-infinity-conky-in-ubuntulinux.html
I can understand that, since I DID previously TRY to install conky.
The problem is though that I cannot get from that screen to anywhere else.
The cursor is stuck right in the middle of the screen with the laptop’s mouse
ineffective. Plugging in an external mouse to the USB slot allows me
to move to the cursor but I cannot find anywhere ‘clickable’ to get to another screen.
What can I do ? Thanks.
I’m about to do the upgrade, and thanks for the Mint_Backup_Restore – exactly what I needed.
Here’s the deal – I want the Linux community to become bigger. There are a lot of people who NEED Linux, not because it’s got a great command line and great, but very technical documentation, but because it is essentially free, and because it’s light.
A classroom in a lower income neighborhood gets third hand computers, and can run this stuff without buying a MS license for office software, and should be able to upgrade twice a year easily through a prepackaged script that runs automatically, or gets invoked. No tricky settings, no CLI, it should just work, and self check, and try again, until its done.
WordPress figured it out; a lot of the Ubuntu software packages already upgrade automatically, why not the OS? Linuxers should make this happen.
thanks for tutorial, nice post bro (y)
Worked very well for an upgrade of LM16 to LM17 xfce version (32 bit). The only problem I have encountered was that after the upgrade all xfce symbols very lost. This was solved by the command “gdk-pixbuf-query-loaders > /usr/lib/i386-linux-gnu/gdk-pixbuf-2.0/2.10.0/loaders.cache” after installing gdk-pixbuf-query-loaders.
Got t the apt-get update stage and get the following:
$ sudo apt-get update
N: Ignoring file ‘official-package-repositories.list.bkp’ in directory ‘/etc/apt/sources.list.d/’ as it has an invalid filename extension
E: Could not get lock /var/lib/apt/lists/lock – open (11: Resource temporarily unavailable)
E: Unable to lock directory /var/lib/apt/lists/
??? And I can copy and paste. Even to and from a terminal! That said, Mint 16 is my first Linux since Ubuntu 8.04. Needless to say I am out of the loop.
Looks like you got two different problems here.
First: “official-package-repositories.list.bkp” is a file in your directory /etc/apt/source.list.d. Apt doesn’t know what to do with it. If you don’t need it, (re)move it. And chances are you don’t need it, since it is a backup to the file official-package-repositories.list
Secondly: sometimes the apt-process is run automatically in the background, if you manually run apt at the same time you will get the message “E: Could not get lock /var/lib/apt/lists/lock – open (11: Resource temporarily unavailable)”
Rerunning the command (sudo apt-get update) after a minute or so usually works.
Thank you for letting me know how to fix my update problem. I guess the answers are out there, you just have to look for them. I despise Microsoft and refuse to0 pay for ANOTHER Win7 license. Linux seems to be the answer. Thanks again.
I used the same method to upgrade from Mint 13 to Mint 17 and it worked fine. Some package changes needed tweaking, but so far so good. Thanks for the tips!
“Because if copy-pasting is too hard for you, you are not an asset to the community. You are a liability.”
:D Brilliant response!, prodigydancer.
Excellent instruction and went (virtually) flawlessly for me in ~ 45 mins – the only slight curves were the lsb-release and having to add ‘-f’ to the upgrade command line (both immediately obvious I should add)
Thanks for a valuable tutorial!
And this is why linux Mint (or any other distro) will never make it big…
What user in his right mind, not being an IT professional or enthusiast is going to use the command prompt to enter ‘secret code’ so he or she can upgrade to a new version??
I personally think it is very sad that we techies always end up drowing in possibilities and improvements.
Make one thing and make it perfect. Take the focus a little longer on improving the OS and usability. Then worry later about that one package that doesn’t quite perform to expectations or that security risk you might have discovered.
Usability people, don’t expose the tech-stuff to the user! :)
Because we only accept people who are at least smart enough to copy and paste (no, you don’t need to type anything) a couple of lines from a step-by-step HOWTO in our club.
Because if copy-pasting is too hard for you, you are not an asset to the community. You are a liability.
This seems to be the way how Mint can be upgraded, but distros are not all the same. Ubuntu for example can be upgraded from gui: http://www.ubuntu.com/download/desktop/upgrade
Mint has a backup GUI for upgrades, but it has had a fatal bug for more than three years now. The official instructions for upgrade continue to require use of the backup utility and it and the Mint help forums ignore requests for help (or say, “just use some other tool” without changing anything). Like many OSS projects, Mint is mostly inward-looking. It’s intended as a newbie distro but the reality is that in practice it’s targeted at programmers and sysadmins who don’t want to spend too much time on care and feeding of their desktop environments.
Rolling updates is much smarter, and while there are arguments against it, the bottom line is developer laziness.
I do agree with you Willem.
Then again: how many regular users have updated from Windows 98 to Windows XP or from XP to 7 (or 8) by themselves without the help of “us, techies”?
But upgrading is needlessly complicated and can (and should) be simplified.
@Prodigydancer
this is EXACTLY the attitude due to which many people stay away from Linux: the horror-stories of people needing help that are simply shot down with simple statements like “you can look it up yourself” or “do we really need to help n00bs” or other arrogant remarks like that.
I agree with Willem and Pieter, this is one reason why Linux will never replace Windows! Most users want to be able to use there machines and install software by just a click, not learn how to be a programmer, as a retired IT Tech the reason I got on with most users in the organisation was because I could communicate on their level, not 10 levels above and talking down.
Overview Step 1 Step 2 Step 3 Step 4 Step 5
We highly recommend that you print this tutorial. Your PC will restart during the Windows 7 installation process, so having a printed copy will help you follow the steps if you’re unable to return to this webpage.
Get Microsoft Silverlight
Watch this video to learn more about upgrading from Windows XP to Windows 7. (3:07)
Introduction
To upgrade your PC from Windows XP to Windows 7, you’ll need to select the Custom option during Windows 7 installation. A custom installation doesn’t preserve your programs, files, or settings. It’s sometimes called a “clean” installation for that reason.
A custom installation is more complex, and it can sometimes take a couple of hours to complete. We created this five-step tutorial to help guide you through the entire process each step of the way.
didnt work smoothly the first time.
Used the -f paramater with install and dist-upgrade and repeated everything until everything was done
only problem is that I have two network symbols in the taskbar :D
any suggestions?
Yes, you can delete the extra Network icon in the taskbar Going to Menu->Control Center->Startup Applications and deleting the extra Network item.
Good luck!
@Frank Starr: Bump!…Fresh reinstall….I have explained that this method is not recommended, especially for a system with ppa enabled…Try save you data using a live DVD if you cant use it anymore and perform a fresh reinstall.
I followed the above instructions, and in all instances of the question to install the new or package maintainer’s update, I answered “y” for yes. Then I got to this notice in terminal:
Kernel panic – not syncing: attempted to kill init! Exitcode=0X0000000b
Drm-kms-helper: panic occured, switching back to text console
Things are locked there, and I must power off and back on to continue. I seem to have Linux Mint 16 still loaded, far as I can tell. The three lines at the beginning of this tutorial show Mint 16, but the last sudo cat /etc/os-release shows: NAME=”Ubuntu”
VERSION=”14.04, Trusty Tahr”
If I restart the update process, I get this error:
dpkg was interrupted, you must manually run ‘dpkg –configure -a’ to correct the problem
When I do this, I get both kernal panic messages.
Appreciate your help to resolve this.
Thank you for continuing to post this solution for each new Mint version. I’ve followed your instructions for 3 version upgrades now, and again this went without a hitch. I wish MInt would support this upgrade path officially. I have too much 3rd party software installed to start from scratch with each new version. The directions Mint provides for “fresh” installs fails to address this issue.
/etc/mdm/Xsession: Beginning session setup…
localuser:mediacenterpc being added to access control list
Script for cjkv started at run_im.
Script for default started at run_im.
Failed to connect to the VirtualBox kernel service
Failed to connect to the VirtualBox kernel service
Failed to connect to the VirtualBox kernel service
Failed to connect to the VirtualBox kernel service
Failed to connect to the VirtualBox kernel service
Script for cjkv started at run_im.
Script for default started at run_im.
cinnamon-session[2297]: WARNING: Unable to find required component ‘cinnamon-fallback-mount-helper’
Hello,
I’m having problems after the update.
Follow the above procedure to upgrade from Linux Mint 16 to 17.
When booting now the error message appears: Failed to load session “cinnamon”
My Linux mint is 64 bit.
Can someone help me.
My upgrade from mint 16 to 17 also failed, with similar errors. Guess I will try the clean install from ISO. Lost all settings and software, though. I admit I am struggling with LInux.
I had the same problem, but in my case, I spelled qiana as quiana, so only the Ubuntu packages were upgraded.
Start over with the procedure above and ensure everything is exactly as shown.
Once you get the error message, log on to a console with ctrl-alt-f1 and redo the procedure. It worked for me once I got the spelling right.
I had the same issue, but I just hit Ctrl-Alt-1 then logged in, and typed:
sudo apt-get install cinnamon
then all worked fine for me
W: Failed to fetch gzip:/var/lib/apt/lists/partial/archive.ubuntu.com_ubuntu_dists_trusty_universe_binary-i386_Packages Hash Sum mismatch
E: Some index files failed to download. They have been ignored, or old ones used instead.
please help me
Hi,
Thanks for this, that was very useful for me and the upgrade from 16 to 17 went really smooth, without a problem.
I even did not make any backup when I read the steps ;) (I did not have lots of custom ppa).
I think the upgrade took something like 45 minutes on an old laptop Core2Duo 2.26 Ghz (old MSI Gx620) with a 256 GB SSD.
Thanks for that, really appreciated, keep up the good work ;)
There’s NO REASON whatsoever to use sudo to cat anything in etc. You don’t need root to READ files in /etc.
Software Sources no longer opens.
$ software-properties-gtk
Traceback (most recent call last):
File “/usr/bin/software-properties-gtk”, line 101, in
app = SoftwarePropertiesGtk(datadir=options.data_dir, options=options, file=file)
File “/usr/lib/python3/dist-packages/softwareproperties/gtk/SoftwarePropertiesGtk.py”, line 98, in __init__
SoftwareProperties.__init__(self, options=options, datadir=datadir)
File “/usr/lib/python3/dist-packages/softwareproperties/SoftwareProperties.py”, line 109, in __init__
self.reload_sourceslist()
File “/usr/lib/python3/dist-packages/softwareproperties/SoftwareProperties.py”, line 599, in reload_sourceslist
self.distro.get_sources(self.sourceslist)
File “/usr/lib/python3/dist-packages/aptsources/distro.py”, line 89, in get_sources
(self.id, self.codename))
aptsources.distro.NoDistroTemplateException: Error: could not find a distribution template for LinuxMint/qiana
Error: could not find a distribution template is addressed here: http://askubuntu.com/questions/49040/apt-could-not-find-a-distribution-template-error
Make /etc/lsb-release look like this:
DISTRIB_ID=LinuxMint
DISTRIB_RELEASE=17
DISTRIB_CODENAME=qiana
DISTRIB_DESCRIPTION=”Linux Mint 17 Qiana”
It should open fine after that.
Thanks I managed to fix that,
My Software sources had to be loaded from the gnome version :/
I’m still getting visual bugs though, possibly related to Mate with Compiz Fusion.
The start menu hovering at start up when opened, and mouse left click not functioning until I open a browser with hotkeys.
Also mint-meta-mate_2014.05.20_all.deb won’t install, it’s looking for libX11-dev, which is already there.
I’ll likely end up doing a clean install.
Ok great. I would suspect having Mate on there as well. I only run Cinnamon and things are looking good after performing the in-place upgrade.
http://community.linuxmint.com/tutorial/view/1621
I’m using Mint Mate, but it seems there are some conflicts between Mate and compiz at the moment.
Thank you for this tutorial! In my case there was a version conflict with the gnome-settings-daemon. Seems to be a bug. What helped me resolving the dependencies was the second solution (denied the first suggestion) from
$ sudo aptitude install gnome-settings-daemon
Just in case, someone experiences the same.
@Angelo: Olivia to Qiana is Saucy to Trusty. Raring was 12.04 … Just want to point out you’re not clear. Don’t know if you can jump from Raring to Trusty directly the same way.
Yes you can use this procedure to upgrade your system but I strongly recommend that you backup you data and do a fresh installation release of Linux Mint Qiana.
Can I use this same procedure to upgrade from Olivia to Qiana simply replacing Soucy with Raring?
you may upgrade fro Olivia to Qiana following the procedure … I just tested! ;)
I had some with indicator-bluetooth, engrampa and engrampa-common… I had to remove them during the procedure…
Very nice step by step tutorial.
Linux Mint is a great operating system, but since updates are frequent, maintaining the system can cause a lot of work. In
contrast to Ubuntu, Linux Mint is more in favor of reinstalling the entire system with every new release, rather then upgrading.
But I slightly prefer Linux Mint, because I can use flash, Java and playback DVD right out of the box. Installing a new release
is quite quick, but getting the settings (such as fstab, cronjobs, etc.) back to how I like them takes me usually 1-2 days.
So I decided to write two scripts:
a.) Backup_Linux_Settings:
Saves all the current settings, installed packages, data stored in home folder and tweaks you have done to the system.
b.) Restore_Linux_Settings
Script which restores these “settings” into your new freshly installed Linux Mint.
Please visit the open source Webpage for more details:
https://github.com/MintBackupRestore/MintBackupRestore
With best regards,
Mint_BackupRestore
Whatever it may be, thk U very much, as saving customs/settings while migrating takes time, and such attempts to make free SW easier are great! Now I’m trying to go 16 to 17 Mint, and in case using Ur scripts successful, I’ll write it down.
I tried to type the four lines but with the third line — no such file.
$ sudo cat /etc/issue
$ sudo cat /etc/issue.net
$ sudo cat /etc/lsb_release
$ sudo cat /etc/os-release
Here is the error file with the third line below:
cat: /etc/lsb_release: No such file or directory
Hope to get the right line in third line soon.
Thank you,
John
The third line has a typo and should be:
$ sudo cat /etc/lsb-release
Hope that helps.
Yeah John, thanks for pointing that error. We’ve corrected in write up..
Since all of the files are (or should be) world readable, there is no reason whatsoever to use the sudo command to read their contents.
Simply use
$ cat /etc/issue
$ cat /etc/issue.net
$ cat /etc/lsb_release
$ cat /etc/os-release