Linux servers are rarely standalone boxes. Whether it is in a datacenter or in a lab environment, chances are that you have had to install several machines that will interact one with another in some way. If you multiply the time that it takes to install Red Hat Enterprise Linux 7 manually on a single server by the number of boxes that you need to set up, this can lead to a rather lengthy effort that can be avoided through the use of an unattended installation tool known as kickstart.
In this article we will show what you need to use kickstart utility so that you can forget about babysitting servers during the installation process.
Introducing Kickstart and Automated Installations
Kickstart is an automated installation method used primarily by Red Hat Enterprise Linux (and other Fedora spin-offs, such as CentOS, Oracle Linux, etc.) to execute unattended operating system installation and configuration. Thus, kickstart installations allow system administrators to have identical systems, as far as installed package groups and system configuration are concerned, while sparing them the hassle of having to manually install each of them.
Preparing for a Kickstart Installation
To perform a kickstart installation, we need to follow these steps:
1. Create a Kickstart file, a plain text file with several predefined configuration options.
2. Make the Kickstart file available on removable media, a hard drive or a network location. The client will use the rhel-server-7.0-x86_64-boot.iso file, whereas you will need to make the full ISO image (rhel-server-7.0-x86_64-dvd.iso) available from a network resource, such as a HTTP of FTP server (in our present case, we will use another RHEL 7 box with IP 192.168.0.18).
3. Start the Kickstart installation
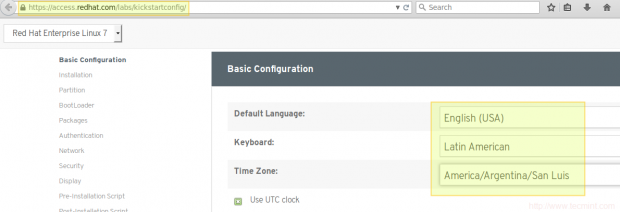
To create a kickstart file, login to your Red Hat Customer Portal account, and use the Kickstart configuration tool to choose the desired installation options. Read each one of them carefully before scrolling down, and choose what best fits your needs:
If you specify that the installation should be performed either through HTTP, FTP, or NFS, make sure the firewall on the server allows those services.
Although you can use the Red Hat online tool to create a kickstart file, you can also create it manually using the following lines as reference. You will notice, for example, that the installation process will be in English, using the latin american keyboard layout and the America/Argentina/San_Luis time zone:
lang en_US
keyboard la-latin1
timezone America/Argentina/San_Luis --isUtc
rootpw $1$5sOtDvRo$In4KTmX7OmcOW9HUvWtfn0 --iscrypted
#platform x86, AMD64, or Intel EM64T
text
url --url=http://192.168.0.18//kickstart/media
bootloader --location=mbr --append="rhgb quiet crashkernel=auto"
zerombr
clearpart --all --initlabel
autopart
auth --passalgo=sha512 --useshadow
selinux --enforcing
firewall --enabled
firstboot --disable
%packages
@base
@backup-server
@print-server
%end
In the online configuration tool, use 192.168.0.18 for HTTP Server and /kickstart/tecmint.bin for HTTP Directory in the Installation section after selecting HTTP as installation source. Finally, click the Download button at the right top corner to download the kickstart file.
In the kickstart sample file above, you need to pay careful attention to.
url --url=http://192.168.0.18//kickstart/media
That directory is where you need to extract the contents of the DVD or ISO installation media. Before doing that, we will mount the ISO installation file in /media/rhel as a loop device:
# mount -o loop /var/www/html/kickstart/rhel-server-7.0-x86_64-dvd.iso /media/rhel

Next, copy all the contents of /media/rhel to /var/www/html/kickstart/media:
# cp -R /media/rhel /var/www/html/kickstart/media
When you’re done, the directory listing and disk usage of /var/www/html/kickstart/media should look as follows:

Now we’re ready to kick off the kickstart installation.
Regardless of how you choose to create the kickstart file, it’s always a good idea to check its syntax before proceeding with the installation. To do that, install the pykickstart package.
# yum update && yum install pykickstart
And then use the ksvalidator utility to check the file:
# ksvalidator /var/www/html/kickstart/tecmint.bin
If the syntax is correct, you will not get any output, whereas if there’s an error in the file, you will get a warning notice indicating the line where the syntax is not correct or unknown.
Performing a Kickstart Installation
To start, boot your client using the rhel-server-7.0-x86_64-boot.iso file. When the initial screen appears, select Install Red Hat Enterprise Linux 7.0 and press the Tab key to append the following stanza and press Enter:
# inst.ks=http://192.168.0.18/kickstart/tecmint.bin
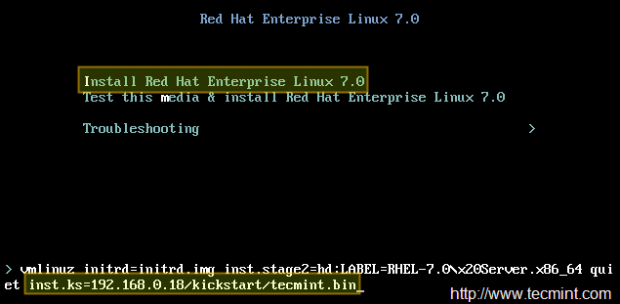
Where tecmint.bin is the kickstart file created earlier.
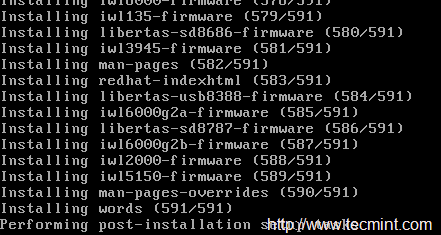
When you press Enter, the automated installation will begin, and you will see the list of packages that are being installed (the number and the names will differ depending on your choice of programs and package groups):
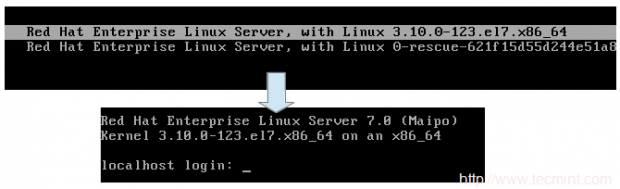
When the automated process ends, you will be prompted to remove the installation media and then you will be able to boot into your newly installed system:
Although you can create your kickstart files manually as we mentioned earlier, you should consider using the recommended approach whenever possible. You can either use the online configuration tool, or the anaconda-ks.cfg file that is created by the installation process in root’s home directory.
This file actually is a kickstart file, so you may want to install the first box manually with all the desired options (maybe modify the logical volumes layout or the file system on top of each one) and then use the resulting anaconda-ks.cfg file to automate the installation of the rest.
In addition, using the online configuration tool or the anaconda-ks.cfg file to guide future installations will allow you to perform them using an encrypted root password out-of-the-box.
Conclusion
Now that you know how to create kickstart files and how to use them to automate the installation of Red Hat Enterprise Linux 7 servers, you can forget about babysitting the installation process. This will give you time to do other things, or perhaps some leisure time if you’re lucky.
Either way, let us know what you think about this article using the form below. Questions are also welcome!
Read Also: Automated Installations of Multiple RHEL/CentOS 7 Distributions using PXE and Kickstart


Kindly share the Kickstart installation of the RHEL server with UEFI Boot mode.