Cryptmount is a powerful utility that allows any user to access encrypted filesystems on-demand under GNU/Linux systems without requiring root privileges. It requires Linux 2.6 or higher. It handles both encrypted partitions as well as encrypted files.
It makes it as easy (compared to older approaches such as cryptoloop device driver and dm-crypt device-mapper target) for ordinary users to access encrypted filesystems on-demand using the newer devmapper mechanism. Cryptmount helps a system administrator in creating and managing encrypted filesystems based on the kernel’s dm-crypt device-mapper target.
Cryptmount offers the following advantages:
- access to enhanced functionality in the kernel.
- support for filesystems stored on either raw disk partitions or loopback files.
- different encryption of filesystem access keys, enabling access passwords to be modified without re-encrypting the whole filesystem.
- keeping various encrypted filesystems on a single disk partition, using a designated subset of blocks for each.
- hardly used filesystems don’t need to be mounted during system startup.
- un-mounting of every filesystem is locked so that this can only be conducted by the user that mounted it, or the root user.
- encrypted filesystems compatible with cryptsetup.
- support for encrypted swap partitions (superuser only).
- support for creating encrypted filesystems or crypto-swap at system boot-up.
How to Install and Configure Cryptmount in Linux
On Debian/Ubuntu distributions, you can install Cryptmount using the apt command as shown.
$ sudo apt install cryptmount
On RHEL/CentOS/Fedora distributions, you can install it from source. First start installing the required package(s) to successfully build and use cryptmount.
# yum install device-mapper-devel   [On CentOS/RHEL 7]
# dnf --enablerepo=PowerTools install device-mapper-devel [On CentOS/RHEL 8 and Fedora 30+]
Then download the latest Cryptmount source files using the wget command and install it as shown.
# wget -c https://sourceforge.net/projects/cryptmount/files/latest/download -O cryptmount.tar.gz
# tar -xzf cryptmount.tar.gz
# cd cryptmount-*
# ./configure
# make
# make install
After installation successful, it’s time to configure cyptmount and create an encrypted filesystem using the cyptmount-setup utility as superuser, otherwise use the sudo command as shown.
# cyptmount-setup
OR
$ sudo cyptmount-setup
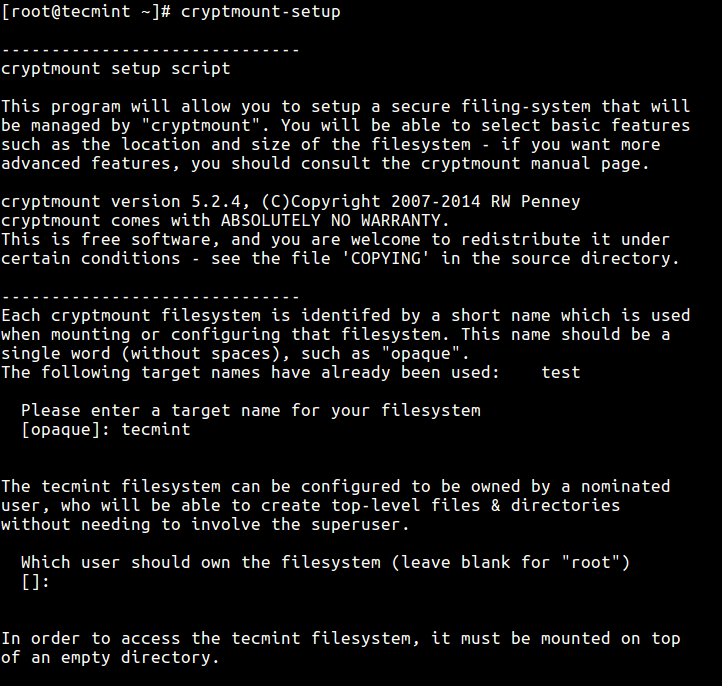
Running the above command will ask you a series of questions to setup a secure filing-system that will be managed by cryptmount. It will ask for target name for your filesystem, user who should own the encrypted filesystem, location and size of the filesystem, filename (absolute name) for your encrypted container, location of the key as well as password for the target.
In this example, we are using the name 'tecmint' for the target filesystem. The following is a sample output of the crytmount-setup command output.
Once the new encrypted filesystem is created, you can access it as follows (enter the name you specified for your target – tecmint), you will be prompted to enter the password for the target.
# cryptmount tecmint
# cd /home/crypt
To unmount the target run cd command to get out of the encrypted filesystem, then use the -u switch to unmount as shown.
# cd
# cryptmount -u tecmint

In case you have created more than one encrypted filesystem, use the -l switch to list them.
# cryptsetup -l

To change the old password for a specific target (encrypted filesystem), use the -c flag as shown.
# cryptsetup -c tecmint

Take a note of the following important points while using this critical tool.
- Do not forget your password, once you forget it, it’s not recoverable.
- It is strongly recommended to save a backup copy of the key-file. Deleting or corrupting the key-file implies that the encrypted filesystem will in effect be impossible to access.
- In case you forget the password or delete the key, you can fully remove the encrypted filesystem and start over, however you will lose your data (which is not recoverable).
If you wish to use more advanced setup options, the setup process will depend on your host system, you can refer to cryptmount and cmtab man pages or visit cyptmount homepage under the “files” sections for a comprehensive guide.
# man cryptmount
# man cmtab
Conclusion
cryptmount enables for management and user-mode mounting of encrypted filesystems on GNU/Linux systems. In this article, we have explained you how to install it on various Linux distributions. You can ask questions or share your thoughts about it, with us via the comment section below.


If I use this to encrypt a thumb drive, can I still read it from a windows machine?
“cd cryptmount-5.2.4” should be “cd cryptmount-5.2.4“. “./install” requires a C compiler installed (which I hadn’t), and libdevmapper-devel.
which I failed to install, in spite of having downloaded the deb package. So it seems that your instructions are far from complete, at least to run on a standard Ubuntu installation.
@Agostinho
True, installing from source on RHEL/CentOS/Fedora distributions requires a C compiler installed and libdevmapper-devel. Allow us to review this and update the article accordingly. Thanks for the useful feedback.
You have some typos, cyptomount and cyptomount-setup should be cryptmount and cryptmount-setup. Thanks for the article.
@Nathan
Thanks for the heads up, we will correct this as soon as possible. And you are most welcome.