Drupal is an open source, flexible, highly scalable and secure Content Management System (CMS) which allows users to easily build and create web sites. It can be extended using modules and enables users to transform content management into powerful digital solutions.
Drupal runs on a web server like Apache, IIS, Lighttpd, Cherokee, Nginx and a backend databases MySQL, MongoDB, MariaDB, PostgreSQL, SQLite, MS SQL Server.
In this article, we will show how to perform a manual installation and configuration of Drupal 8 on RHEL 7/6, CentOS 7/6 and Fedora 20-25 distributions using LAMP setup.
Drupal Requirement:
- Apache 2.x (Recommended)
- PHP 5.5.9 or higher (5.5 recommended)
- MySQL 5.5.3 or MariaDB 5.5.20 with PHP Data Objects (PDO)
For this setup, I am using website hostname as “drupal.tecmint.com” and IP address is “192.168.0.104“. These settings may differ at your environment, so please make changes as appropriate.
Step 1: Installing Apache Web Server
1. First we will start with installing Apache web server from the official repositories:
# yum install httpd
2. After the installation completes, the service will be disabled at first, so we need to start it manually for the mean time and enable it to start automatically from the next system boot as well:
------------- On SystemD - CentOS/RHEL 7 and Fedora 22+ -------------
# systemctl start httpd
# systemctl enable httpd

------------- On SysVInit - CentOS/RHEL 6 and Fedora -------------
# service httpd start
# chkconfig --level 35 httpd on
3. Next, in order to allow access to Apache services from HTTP and HTTPS, we have to open 80 and 443 port where the HTTPD daemon is listening as follows:
------------- On FirewallD - CentOS/RHEL 7 and Fedora 22+ -------------
# firewall-cmd --permanent --zone=public --add-service=http
# firewall-cmd --permanent --zone=public --add-service=https
# firewall-cmd --reload

------------- On IPtables - CentOS/RHEL 6 and Fedora 22+ -------------
# iptables -A INPUT -p tcp -m tcp --dport 80 -j ACCEPT
# iptables -A INPUT -p tcp -m tcp --dport 443 -j ACCEPT
# service iptables save
# service iptables restart
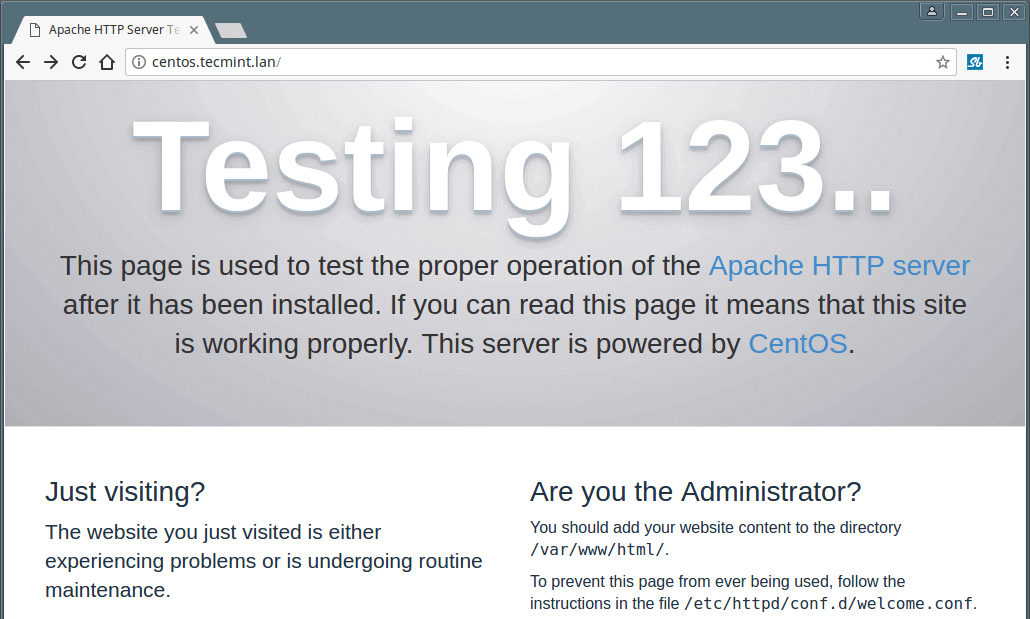
4. Now verify that Apache is working fine, open a remote browser and type your server IP Address using HTTP protocol in the URL:http://server_IP, and the default Apache2 page should appear as in the screenshot below.
Step 2: Install PHP Support for Apache
5. Next, install PHP and the required PHP modules.
# yum install php php-mbstring php-gd php-xml php-pear php-fpm php-mysql php-pdo php-opcache
Important: If you want to install PHP 7.0, you need to add the following repositories: EPEL and Webtactic in order to install PHP 7.0 using yum:
------------- Install PHP 7 in CentOS/RHEL and Fedora -------------
# rpm -Uvh https://dl.fedoraproject.org/pub/epel/epel-release-latest-7.noarch.rpm
# rpm -Uvh https://mirror.webtatic.com/yum/el7/webtatic-release.rpm
# yum install php70w php70w-opcache php70w-mbstring php70w-gd php70w-xml php70w-pear php70w-fpm php70w-mysql php70w-pdo
6. Next, to get a full information about the PHP installation and all its current configurations from a web browser, let’s create a info.php file in the Apache DocumentRoot (/var/www/html) using the following command.
# echo "<?php phpinfo(); ?>" > /var/www/html/info.php
then restart HTTPD service and enter the URL http://server_IP/info.php in the web browser.
# systemctl restart httpd
OR
# service httpd restart

Step 3: Install and Configure MariaDB Database
7. For your information, Red Hat Enterprise Linux/CentOS 7.0 moved from supporting MySQL to MariaDB as the default database management system.
To install MariaDB database, you need to add the following official MariaDB repository to file /etc/yum.repos.d/MariaDB.repo as shown.
[mariadb]
name = MariaDB
baseurl = http://yum.mariadb.org/10.1/centos7-amd64
gpgkey=https://yum.mariadb.org/RPM-GPG-KEY-MariaDB
gpgcheck=1
Once the repo file in place you can able to install MariaDB like so:
# yum install mariadb-server mariadb
8. When the installation of MariaDB packages completes, start the database daemon for the mean time and enable it to start automatically at the next boot.
------------- On SystemD - CentOS/RHEL 7 and Fedora 22+ -------------
# systemctl start mariadb
# systemctl enable mariadb

------------- On SysVInit - CentOS/RHEL 6 and Fedora -------------
# service mysqld start
# chkconfig --level 35 mysqld on
9. Then run the mysql_secure_installation script to secure the database (set root password, disable remote root login, remove test database and remove anonymous users) as follows:
# mysql_secure_installation

Step 4: Install and Configure Drupal 8 in CentOS
10. Here, we will start by downloading the latest Drupal version (i.e 8.2.6) using the wget command. If you don’t have wget and gzip packages installed, then use the following command to install them:
# yum install wget gzip
# wget -c https://ftp.drupal.org/files/projects/drupal-8.2.6.tar.gz
11. Afterwards, let’s extract the tar file and move the Drupal folder into the Apache Document Root (/var/www/html).
# tar -zxvf drupal-8.2.6.tar.gz
# mv drupal-8.2.6 /var/www/html/drupal
12. Then, create the settings file settings.php, from the sample settings file default.settings.php) in the folder (/var/www/html/drupal/sites/default) and then set the appropriate permissions on the Drupal site directory, including sub-directories and files as follows:
# cd /var/www/html/drupal/sites/default/
# cp default.settings.php settings.php
# chown -R apache:apache /var/www/html/drupal/
13. Importantly, set the SELinux rule on the folder “/var/www/html/drupal/sites/” as below:
# chcon -R -t httpd_sys_content_rw_t /var/www/html/drupal/sites/
14. Now we have to create a database and a user for the Drupal site to manage.
# mysql -u root -p
Enter password:
Welcome to the MariaDB monitor.  Commands end with ; or \g.
Your MySQL connection id is 12
Server version: 5.1.73 Source distribution

Copyright (c) 2000, 2016, Oracle, MariaDB Corporation Ab and others.

Type 'help;' or '\h' for help. Type '\c' to clear the current input statement.

MySQL [(none)]> create database drupal;
Query OK, 1 row affected (0.00 sec)

MySQL [(none)]> create user ravi@localhost identified by 'tecmint123';
Query OK, 0 rows affected (0.00 sec)

MySQL [(none)]> grant all on drupal.* to ravi@localhost;
Query OK, 0 rows affected (0.00 sec)

MySQL [(none)]> flush privileges;
Query OK, 0 rows affected (0.00 sec)

MySQL [(none)]> exit
Bye
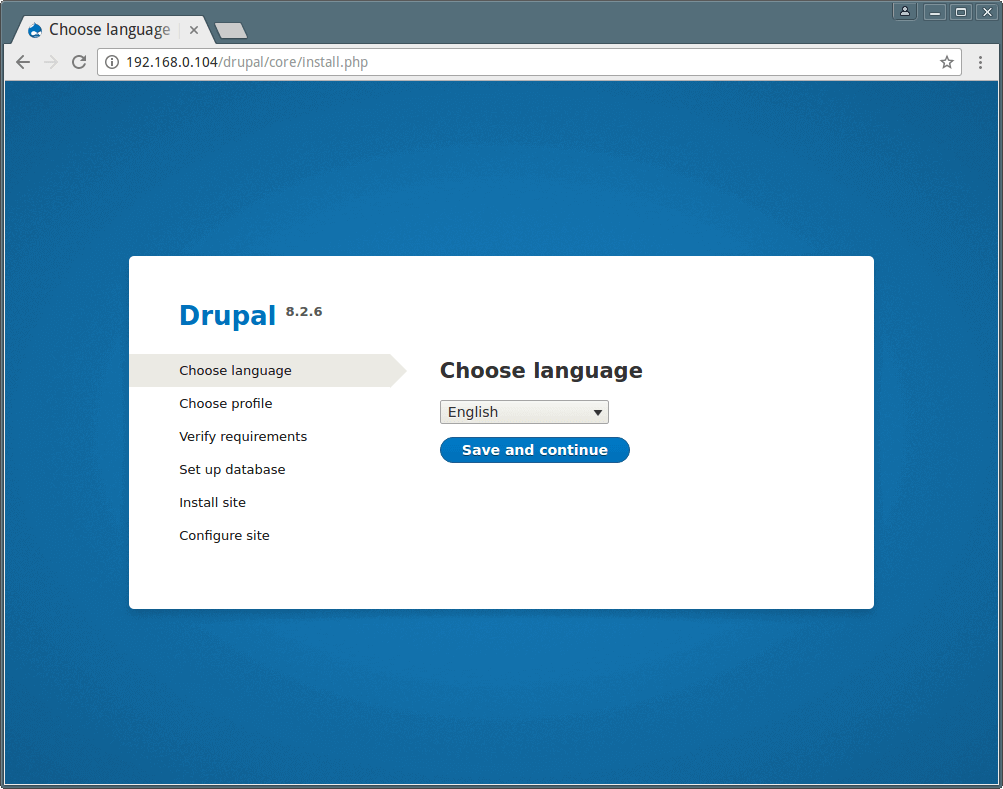
15. Now finally, at this point, open the URL: http://server_IP/drupal/ to start the web installer, and choose your preferred installation language and Click Save to Continue.
16. Next, select an installation profile, choose Standard and click Save to Continue.

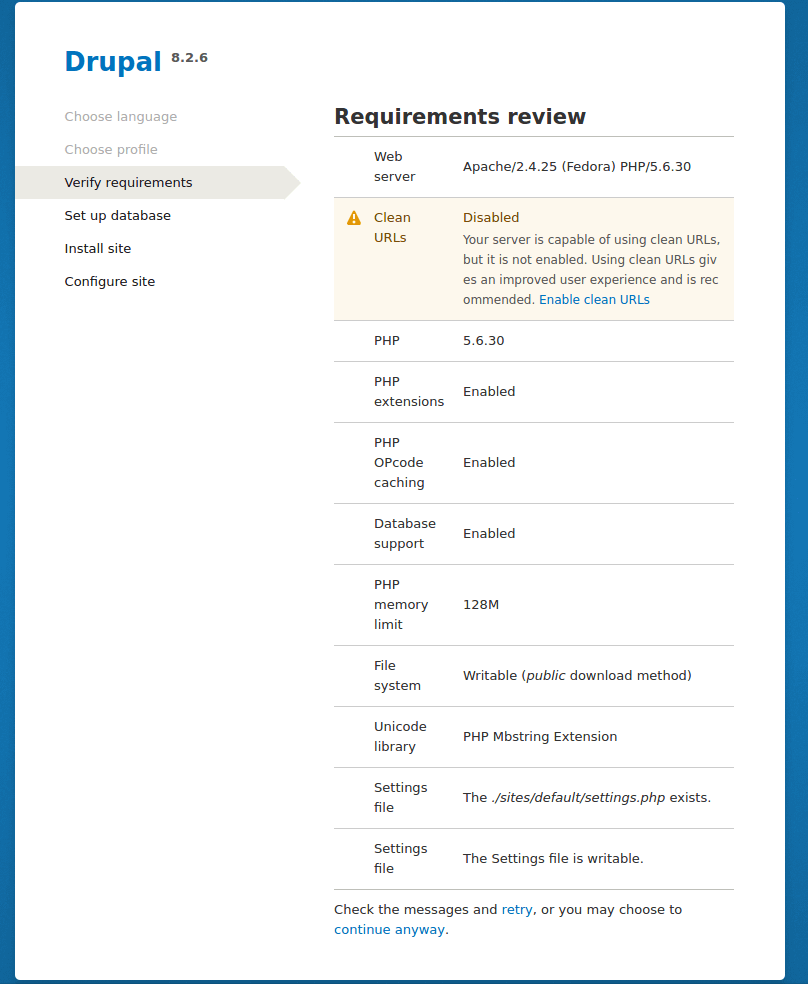
17. Look through the requirements review and enable clean URL before moving forward.
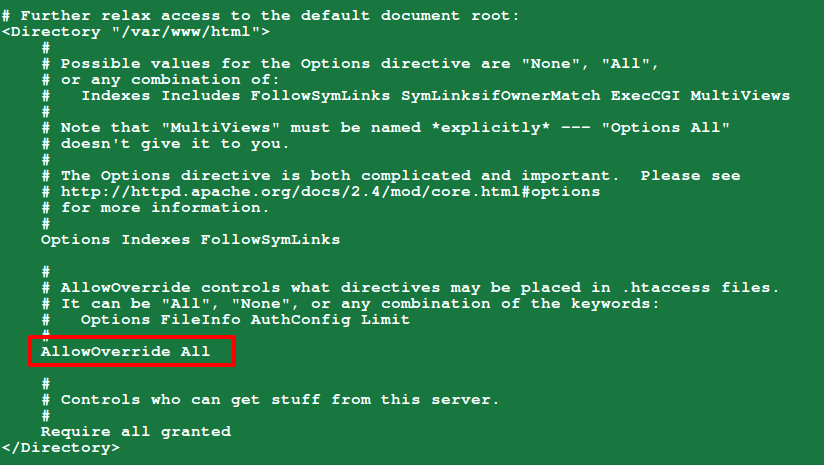
Now enable clean URL drupal under your Apache configuration.
# vi /etc/httpd/conf/httpd.conf
Make sure to set AllowOverride All to the default DocumentRoot /var/www/html directory as shown in the screenshot below.
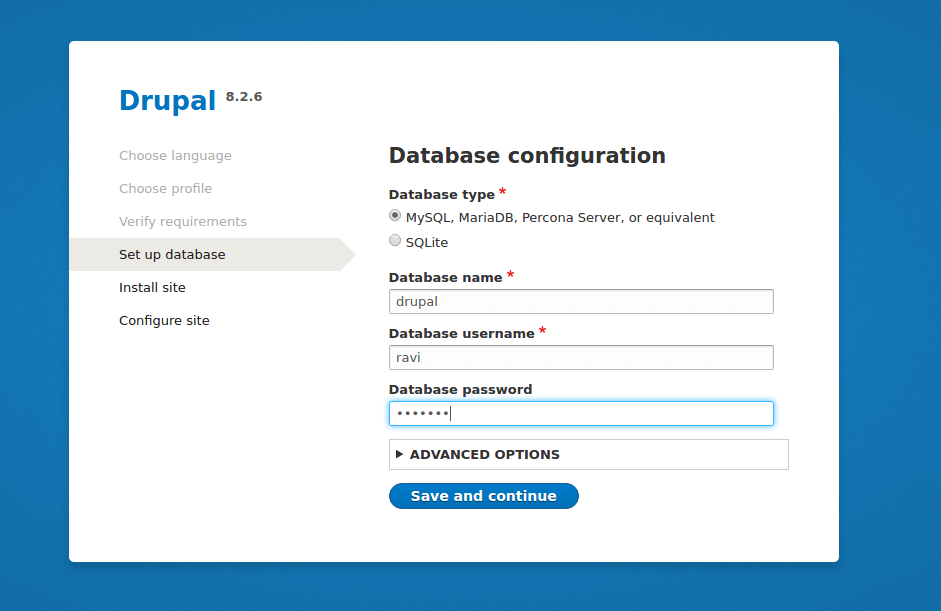
18. Once you enabled clean URL for Drupal, refresh the page to perform database configurations from the interface below; enter the Drupal site database name, database user and the user’s password.
Once filled all database details, click on Save and Continue.
If the above settings were correct, the drupal site installation should start successfully as in the interface below.

19. Next configure the site by setting the values for (use values that apply to your scenario):
- Site Name – TecMint Drupal Site
- Site email address – [email protected]
- Username – admin
- Password – ##########
- User’s Email address – [email protected]
- Default country – India
- Default time zone – UTC
After setting the appropriate values, click Save and Continue to finish the site installation process.

20. The interface that follows shows successful installation of Drupal 8 site with LAMP stack.
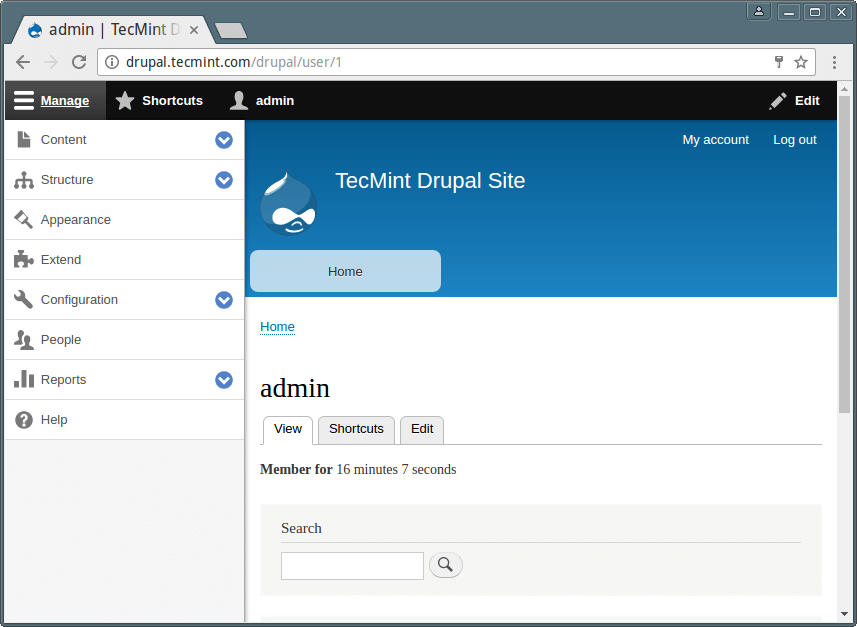
Now you can click on Add content to create a sample web content such as a page.
Optional: For those who are uncomfortable using MySQL command line to manage databases, install PhpMyAdmin to manage databases from a web browser interface.
Visit the Drupal Documentation: https://www.drupal.org/docs/8
That’s all! In this article, we showed how to download, install and setup LAMP stack and Drupal 8 with basic configurations on CentOS 7. Use the feedback form below to write back to us concerning this tutorial or perhaps to provide us any related information.

The instructions for CentOS7 suggest a simple command like ‘yum install php’ will install php-5.6.30. This is simply not possible under regular CentOS7 without deviating from the instructions and also breaking the chain of enterprise updates . And that’s how tomorrow’s meeting will go, I guess.
@bish
You can use PHP 5.5.9 or higher, meaning version 5.6.30 will work. Alternatively, go to the REMI repository configuration wizard to enable it and install different versions of PHP on CentOS 7:https://rpms.remirepo.net/wizard/
Thanks for the feed back.
You may have missed what I said.
The instructions for CentOS7 suggest a simple command like ‘yum install php’ will install php-5.6.30. This is simply not possible under regular CentOS7 without deviating from the instructions and also breaking the chain of enterprise updates .
I know of Remi’s fine work. I’m not asking about that. I’m mentioning that, in case it’s not clear, the instructions give a different result than anticipated. I don’t mean to belabour so much as to firmly state as clearly as I can that the instructions have a flaw in that following them exactly gives a result not predicted by the instructions.
In short, the instructions are broken.
We can talk about the added risks of breaking enterprise updates on a very vulnerable package, but that’s a little more ‘next level’ than the bits I worry you may have already overlooked; so we’ll save that.
Hi, I just started using Linux few months ago, now I’m trying to use scientific Linux 7.3 (which is based on red hat enterprise Linux )to install drupal, i followed your instruction, but when I try to access in the web browser, it says Forbidden . I could not figure it out why ? sorry if this is a stupid question.
@melonie,
Have you followed installation instructions carefully? I suggest you to follow again carefully without missing any steps, if you still face same issue, try to view logs of httpd.
Thanks for the reply, I redo the whole thing again and I still get the same problem. Then I found out that it is because my SElinux is enabled. I need to disabled it in order to work. Now I can access the server perfectly !
@melonie
Try to check the permissions on your drupal installation directory, make sure other users can access it to use the site.
Thanks for the reply, I already use chmod to allow other user to access the sites, I found out it is because my SElinux enabled by default that doesn’t allow me to access the site.
@melonie
OKay, well, step 13 actually shades light on SELinux command for enabling access to site. I guess, you system needs additional configurations, try to cross-check.
Thanks for the feedback.
Thanks to all! I was able to get my first Drupal installation completed with this guide! There were several hiccups with version 5.5 solr and 7.1 php. I resolved by replacing each with version 6.6 solr (http://www-us.apache.org/dist/lucene/solr/6.6.0) and 5.6 php (from repo https://centos7.iuscommunity.org/ius-release.rpm).
Your guide was instrumental to my success! Thanks for your time putting this together.
@EagleRock
Hope your enjoyed it all, many thanks for the useful feedback.
Please use,
in place of, if your web install is not opening.
@Amrendra
Okay, thanks a lot for sharing this.
For more recent installations of Drupal, the installer will report PHP to be at a deprecated version (below 5.5.9). I followed this guide and it worked well:
https://doc.owncloud.org/server/8.2/admin_manual/installation/php_55_installation.html
@starbuck
Thanks a lot for sharing this, really useful.
While installing IPTables,
above commands did not work for me, but below command did the trick.
@Subash
Cool, we’ll test this out. Thanks for the useful feedback.
Excellent walkthrough, thank you! I did have to do a chmod 644 phpinfo.php before it would be accessible from the browser.
@Eric
Many thanks for the kind words of appreciation, and for always following us.
disable selinux in fedora before you proceed with the installation steps
@saurabh
Thanks for the heads up, useful info here.
Requirements problem
Web server Apache/2.2.15 (CentOS)
OK PHP 5.3.3
OK PHP register globals Disabled
Error PHP extensions Disabled
Drupal requires you to enable the PHP extensions in the following list (see the system requirements page for more information):
dom
gd
pdo
Error Database support Disabled
Your web server does not appear to support PDO (PHP Data Objects). Ask your hosting provider if they support the native PDO extension. See the system requirements page for more information.
OK PHP memory limit 128M
Error File system
The directory sites/default/files is not writable. An automated attempt to create this directory failed, possibly due to a permissions problem. To proceed with the installation, either create the directory and modify its permissions manually or ensure that the installer has the permissions to create it automatically. For more information, see INSTALL.txt or the online handbook.
Warning Unicode library Standard PHP
Operations on Unicode strings are emulated on a best-effort basis. Install the PHP mbstring extension for improved Unicode support.
OK Settings file The ./sites/default/settings.php file exists.
Error Settings file The settings file is not writable.
The Drupal installer requires write permissions to ./sites/default/settings.php during the installation process. If you are unsure how to grant file permissions, consult the online handbook.
Check the error messages and proceed with the installation.
@Mohammed
Try to update your Apache2 web server and install the required PHP modules as explained in the article. Simply follow the steps described above to do away with the errors.