YUM is an interactive, rpm based, high level package manager for RHEL/CentOS systems, it enables users to install new packages, remove/erase old/unwanted packages. It can automatically run system updates and does dependency analysis, and also perform queries on the installed packages and/or available packages plus so much more.
In this article, we will explain how to view history of YUM transactions in order to find out information about installed packages and those that where removed/erased from a system.
Suggested Read: 20 Linux YUM Commands for Package Management
Below are some examples of how to use the YUM history command.
View Complete YUM History
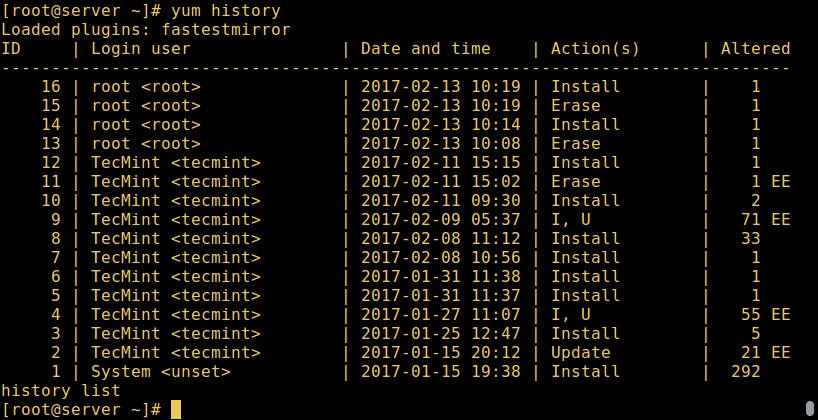
To view a full history of YUM transactions, we can run the command below which will show us the: transaction id, login user who executed the particular action, date and time when the operation happened, the actual action and additional information about any thing wrong with the operation:
# yum history
Use Yum to Find Package Info
The history sub-commands: info/list/summary can take a transaction ID or package name as an argument. Additionally, the list sub-command can take a special argument, all meaning – all transactions.
The previous history command is equivalent to running:
# yum history list all
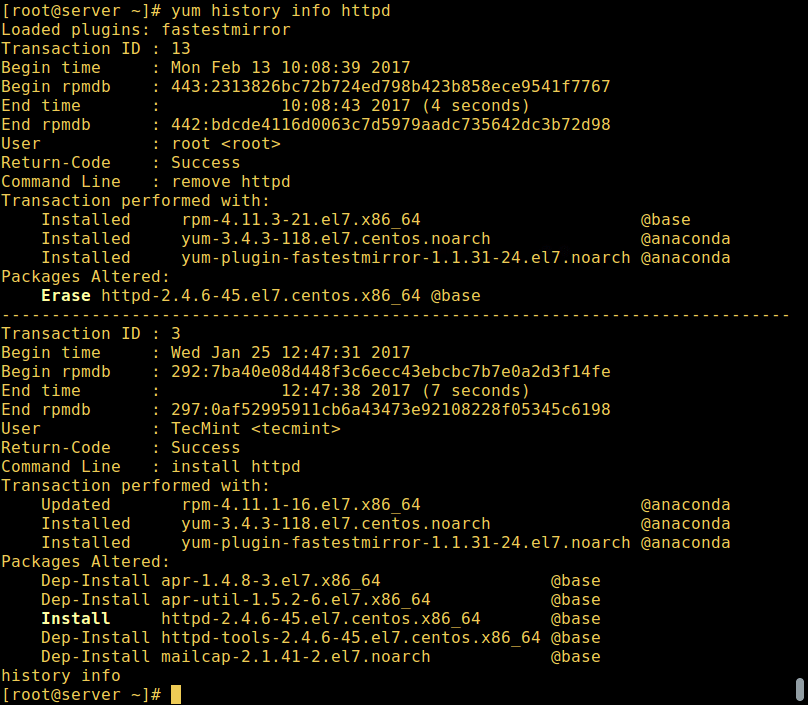
And, you can view details of transactions concerning a given package such as httpd web server with the info command as follows:
# yum history info httpd
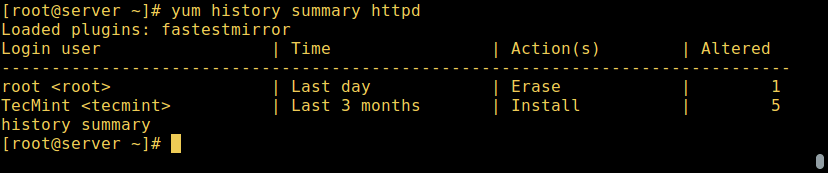
To get a summary of the transactions concerning httpd package, we can issue the following command:
# yum history summary httpd
It is also possible to use a transaction ID, the command below will display details of the transaction ID 15.
# yum history info 15

Use Yum History to Find Package Transaction Info
There are sub-commands that print out transaction details of a specific package or group of packages. We can use package-list or package_info to view more info about httpd package like so:
# yum history package-list httpd
OR
# yum history package-info httpd

To get history about multiple packages, we can run:
# yum history package-list httpd epel-release
OR
# yum history packages-list httpd epel-release

Use Yum to Rollback Packages
Furthermore, there are certain history sub-commands that enable us to: undo/redo/rollback transactions.
- Undo – will undo a specified transaction.
- redo – repeat the work of a specified transaction
- rollback – will undo all transactions up to the point of the specified transaction.
They take either a single transaction id or the keyword last and an offset from the last transaction.
For example, assuming we’ve done 60 transactions, “last” refers to transaction 60, and “last-4” points to transaction 56.
Suggested Read: How to Use ‘yum-utils’ to Maintain Yum and Boost its Performance
This is how the sub-commands above work: If we have 5 transactions: V, W, X, Y and Z, where packages where installed respectively.
# yum history undo 2    #will remove package W
# yum history redo 2    #will  reinstall package W
# yum history rollback 2    #will remove packages from X, Y, and Z.
In the following example, transaction 2 was a update operation, as seen below, the redo command that follows will repeat transaction 2 upgrading all the packages updated by that time:
# yum history | grep -w "2"

# yum history redo 2

The redo sub-command can also take some optional arguments before we specify a transaction:
- force-reinstall – reinstalls any packages that were installed in that transaction (via yum install, upgrade or downgrade).
- force-remove – removes any packages that were updated or downgraded.
# yum history redo force-reinstall 16

Find Yum History Database and Sources Info
These sub-commands provide us information about the history DB and additional info sources:
- addon-info – will provide sources of additional information.
- stats – displays statistics about the current history DB.
- sync – enables us to alter the the rpmdb/yumdb data stored for any installed packages.
Consider the commands below to understand how these sub-commands practically work:
# yum history addon-info
# yum history stats
# yum history sync
To set a new history file, use the new sub-command:
# yum history new
We can find a complete information about YUM history command and several other commands in the yum man page:
# man yum
Suggested Read: 4 Ways to Disable/Lock Certain Package Updates Using Yum
That’s it for now. In this guide, we explained various YUM history commands to view details of YUM transactions. Remember to offer us your thoughts concerning this guide via the comment section below.


‘yum history‘ is not equivalent to ‘yum history list all‘.
The former will only list one page (default 20 entries on my system.)
Thanks, Aaron for such informative articles! Following your Site!
Awesome article, thank you Aaron.
@Noble
Many thanks for the feedback.
Superb Article
@Raja
Welcome, thanks for the feedback and following us as well.