“This article is revised and updated with latest version of Django – May 2016”
Some 20 years ago when the World Wide Web was still in its infancy, having a personal or business web site was almost a rare luxury. With the subsequent development of several web technologies and the introduction of dynamic content provided by the combination of server-side programs and databases, companies could no longer be satisfied with having a static web site.

Thus, web applications became a reality – programs in the full sense of the word running on top of a web server and accessible through a web browser.
To make development easier and more effective, web frameworks were designed to aid programmers in their efforts to create applications. In short, a web framework takes care of common core functionalities in the development process such as dealing with user session management, interaction with databases, and the good practice of keeping business logic separate from display logic, to name a few examples.
In this 3-article Django series, we will introduce you to Django, a popular web framework based on Python. For that reason, at least a little familiarity with this programming language is suggested but if you have little to no experience with it, we’ll also walk you through the basics.
Installing Django in CentOS and Debian Servers
Although you can install Django from both the Debian (v1.7.7: extended support will be discontinued on December 2015) and Fedora EPEL (v1.6.11: extended support was discontinued on April 2015) repositories, the available version is not the latest stable LTS (Long Term Support) release (v1.8.13, as of May 2016).
In this tutorial we will show you how to install Django v1.8.13 since its extended support is guaranteed until at least April of 2018.
The recommended method to install Django is through pip, a popular tool for managing Python packages. Also, in order to create isolated Python environments and avoid conflicts between projects that may require different versions of software dependencies, the use of virtual environments is highly encouraged.
The tools that are used to create and manage virtual Python environments is called virtualenv.
Follow these steps to perform the installation:
1. For Fedora-based distributions (except in Fedora itself), enable the EPEL repository first:
# yum update && yum install epel-release
2. Install pip and virtualenv:
Fedora-based distros:
# yum install python-pip python-virtualenv
OR
# dnf install python-pip python-virtualenv
Debian and derivatives:
# aptitude update && aptitude install python-pip virtualenv
3. Create a directory to store your initial project.
# mkdir ~/myfirstdjangoenv
# cd ~/myfirstdjangoenv
4. Create and activate a virtual environment:
# virtualenv myfirstdjangoenv
The above command creates a bunch of files and subdirectories into ~/myfirstdjangoenv and basically installs a local copy of Python and pip within the current working directory. Next, we need to activate the virtual environment we just created:
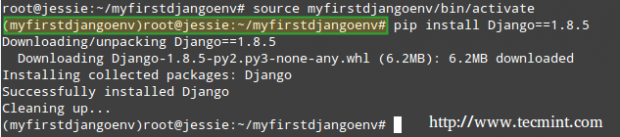
# source myfirstdjangoenv/bin/activate
5. Notice how the command prompt changes after the last command. It’s now time to install Django:
Note that the below screenshot was taken during a previous version of this tutorial, but the expected output is the same when installing Django 1.8.13):
# pip install Django==1.8.13
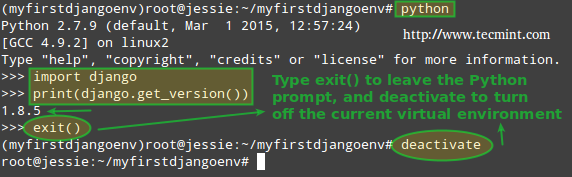
You can check the Django version by launching a Python shell from your current working directory:
# python
>>> import django
>>> print(django.get_version())
(Again, the above command should return 1.8.13 when checking the current Django version).
To exit the Python prompt, type:
>>> exit()
and press Enter. Next, turn off the virtual environment:
# deactivate
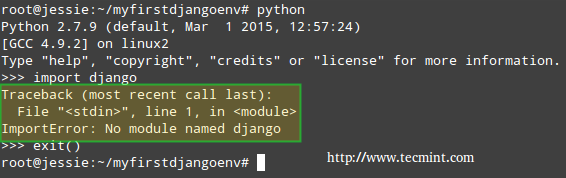
Please note that while the virtual environment remains deactivated, Django is not available:
How to Create a First Project in Django
To create a project within the virtual environment we created earlier, it needs to be activated:
# source myfirstdjangoenv/bin/activate
Next, the framework will create the entire directory structure to store your project. To do this, you will need to run.
# django-admin startproject myfirstdjangoproject
The above command will create a directory named myfirstdjangoproject inside your current working directory.
where you will find a file named manage.py (an utility that will help you manage your project later on) and another subdirectory (~/myfirstdjangoenv/myfirstdjangoproject/myfirstdjangoproject). This last subdirectory will serve as the container for the project files.
While the rest of the files will make real sense after we have reviewed some Python to start writing a real web application, it is worth and well to take note of the key files that will be found inside a project container directory:
- myfirstdjangoproject/__init__.py: This empty file tells Python that this directory should be considered a Python package.
- myfirstdjangoproject/settings.py: Specific settings for this Django project.
- myfirstdjangoproject/urls.py: a TOC (Table Of Contents) of your Django-powered site.
- myfirstdjangoproject/wsgi.py: An entry-point for WSGI-compatible web servers to serve your project.
# ls
# ls -l myfirstdjangoproject
# ls -l myfirstdjangoproject/myfirstdjangoproject

In addition, Django has a lightweight built-in web server (written in Python similar to Python SimpleHTTP, what else?) that can be used to test your applications during the development process without having to deal with the task of setting a web server at this particular stage.
However, you need to know that this is not suitable for a production environment – just for development. To launch your newly created project, change your current working directory to the container directory for your project (~/myfirstdjangoenv/myfirstdjangoproject) and run:
# python manage.py runserver 0.0.0.0:8000
If you run into the following error:
You have unapplied migrations; your app may not work properly until they are applied.
Run 'python manage.py migrate' to apply them.
Do what it says:
# python manage.py migrate
and then start the server again:
# python manage.py runserver 0.0.0.0:8000
We will cover the concept of migrations in the next articles of this series, so you can disregard the error message for the time being.
In any event, you can change the default port where the built-in web server will be listening. By using 0.0.0.0 as the network interface to listen on, we allow other computers in the same network to access the project user interface (if you use 127.0.0.1 instead, you will only be able to access the UI from localhost).
You can also change the port to another one of your choosing, but you’ll also need to make sure that traffic through such port is allowed through your firewall:
# firewall-cmd --add-port=8000/tcp
# firewall-cmd --permanent --add-port=8000/tcp
Of course, it goes without saying that you will need to update the allowed port if you choose to use a different one while launching the lightweight web server.
You should see the following output in your terminal:
# python manage.py runserver 0.0.0.0:8000
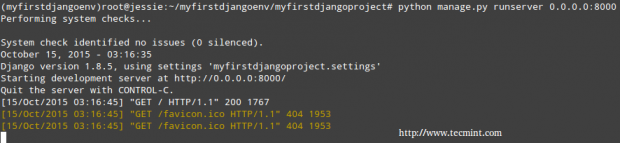
At this point, you can open your favorite web browser and navigate to the IP address of the machine where you installed Django followed by the port number. In my case, it is a Debian Jessie box with IP 192.168.0.25 and listening on port 8000:
http://192.168.0.25:8000

While it’s a great thing that we were able to complete the initial setup of a project, there is still much work left to do, as indicated in the message above.
Summary
In this guide we have explained how to install and configure a virtual environment for Django, a versatile open source web framework based on Python.
Regardless of whether you are an application developer or a system administrator, you will want to bookmark this article and the rest of this series because chances are that at some point or another you will need to consider the need of such tool for your daily tasks.
In the following articles of this series we will discuss how to build on what we have already accomplished to create a simple, yet functional, web application using Django and Python.
As always, don’t hesitate to drop us a note if you have questions about this article or suggestions to improve. We look forward to hearing from you!
Here is a video How to install pip, virtualenv, django on Centos 7– Django tutorial series lecture 1 that will help you much more than others because it’s so clear to understand.
What’s the point in running the development server on 0.0.0.0? A) there is no need for that and B) it’s an unnecessary safety concern.
Please see my response to Gavin below.
This article does not cover the topic well and includes unnecessary information and steps that open security vulnerabilities. Do not open ports on your firewall for “others on the same network” to see your django project unless you know what you’re doing. For most development setups of django localhost is the right way to go. The article says you need virtualenvwrapper then doesn’t make use of it.
On an admin note the whole first part of the article is mistakenly (or just irritatingly) a link.
@Gavin,
Thanks for your comment. Let me explain.
1) This series is meant as an introduction to Django (as I explain at the top), and not as a full guide covering security. However, since security is also a concern, we may consider adding an extra article to this series covering that topic for a development environment such as the one described here.
2) When I say “In any event, you can change the default port where the built-in web server will be listening. By using 0.0.0.0 as the network interface to listen on, we allow other computers in the same network to access the project user interface (if you use 127.0.0.1 instead, you will only be able to access the UI from localhost).”, I mean that if you are installing Django in a CLI-only server, how are you supposed to check whether the applications are working (and looking properly) except you can connect to the server from a desktop PC somewhere in the network?
3) You’re absolutely right about the link in the first part of the article. I am asking Ravi, the owner of the site, to take a look and fix it.
Best regards.
how about listening on port 80 ?
i want to install django 1.8.5 on my vps, with default port (:80) .. Please help
That is not a problem. Just make sure there’s nothing else listening on that port, and use 80 instead of 8000. You should then be good to go.
Just a quick question. Can this be used with Mint? If so, are there any differences?
@Chris,
You can use Django with your distribution of choice. There should not be any differences. If you run into any issues, don’t hesitate to contact me and I’ll be more than glad to jump in and help.
Once again a great article by Gabriel. I hope that you write articles for more advanced users! There is certainly lots of things people can learn from you.
Thank you for you comment! Do you have any topic in mind you would like me to cover?