Creating graphical user interface (GUI) applications is a fantastic way to bring your ideas to life and make your programs more user-friendly.
PyGObject is a Python library that allows developers to create GUI applications on Linux desktops using the GTK (GIMP Toolkit) framework. GTK is widely used in Linux environments, powering many popular desktop applications like Gedit, GNOME terminal, and more.
In this article, we will explore how to create GUI applications under a Linux desktop environment using PyGObject. We’ll start by understanding what PyGObject is, how to install it, and then proceed to building a simple GUI application.
Step 1: Installing Python and GTK in Linux
To work with PyGObject, you need to have Python installed and most of today’s Linux distributions come with Python pre-installed, but you can confirm by running:
python3 --version

Python 3.12.3
If Python is not installed, you can install it using using the following appropriate command for your specific Linux distribution.
sudo apt install python3       [On Debian, Ubuntu and Mint]
sudo dnf install python3       [On RHEL/CentOS/Fedora and Rocky/AlmaLinux]
sudo apk add python3           [On Alpine Linux]
sudo pacman -S python          [On Arch Linux]
sudo zypper install python3    [On OpenSUSE]
Now, you need to install the PyGObject bindings for Python, as well as GTK development libraries.
sudo apt install python3-gi gir1.2-gtk-3.0    [On Debian, Ubuntu and Mint]
sudo dnf install python3-gobject gtk3         [On RHEL/CentOS/Fedora and Rocky/AlmaLinux]
sudo apk add py3-gobject gtk+3                [On Alpine Linux]
sudo pacman -S python-gobject gtk3            [On Arch Linux]
sudo zypper install python3-gobject gtk3      [On OpenSUSE]
Step 2: Installing PyGObject in Linux
Once Python and GTK development libraries are installed, you can now install PyGObject using the following appropriate command for your specific Linux distribution.
sudo apt install python3-gi           [On Debian, Ubuntu and Mint]
sudo dnf install pygobject3           [On RHEL/CentOS/Fedora and Rocky/AlmaLinux]
sudo apk add py3-gobject              [On Alpine Linux]
sudo pacman -S python-gobject         [On Arch Linux]
sudo zypper install python3-gobject   [On OpenSUSE]
After installation, you’re ready to start developing GUI applications using PyGObject and GTK.
Creating First PyGObject GUI Application in Linux
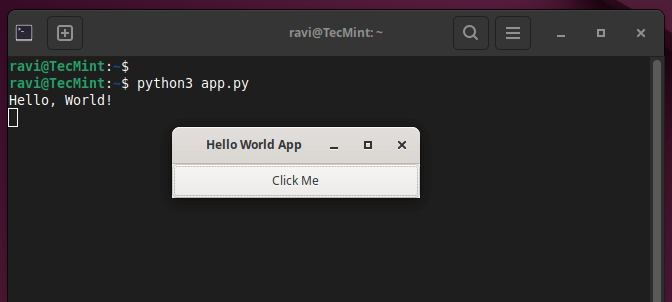
Now, let’s build a simple PyGObject application that displays a window with a button. When the button is clicked, it will display a message saying, “Hello, World!“.
Create a Python file called app.py, and let’s start writing the basic structure of our PyGObject application.
import gi
gi.require_version("Gtk", "3.0")
from gi.repository import Gtk

class MyApp(Gtk.Window):
    def __init__(self):
        Gtk.Window.__init__(self, title="Hello World App")
        self.set_size_request(300, 100)

        # Creating a button and adding it to the window
        button = Gtk.Button(label="Click Me")
        button.connect("clicked", self.on_button_clicked)
        self.add(button)

    def on_button_clicked(self, widget):
        print("Hello, World!")

# Initialize the application
app = MyApp()
app.connect("destroy", Gtk.main_quit)  # Close the app when window is closed
app.show_all()
Gtk.main()
Explanation of the Code:
- The first two lines import the necessary PyGObject modules. We specify the GTK version we want to use (
3.0in this case). - The
MyAppclass inherits fromGtk.Window, which represents the main window of the application. - We create a button using
Gtk.Button, and the button’s label is set to “Click Me“. We also connect the button’s “clicked” signal to theon_button_clickedmethod, which prints “Hello, World!” when clicked. - The application’s main loop is started by calling
Gtk.main(). This loop waits for events (like clicks) and updates the application accordingly.
To run the application, navigate to the directory where you saved the app.py file and run the following command:
python3 app.py
A window will appear with a button labeled “Click Me“. When you click the button, “Hello, World!” will be printed in the terminal.
Adding More Features to Your PyGObject Application
Let’s now expand our application by adding more widgets and interactivity.
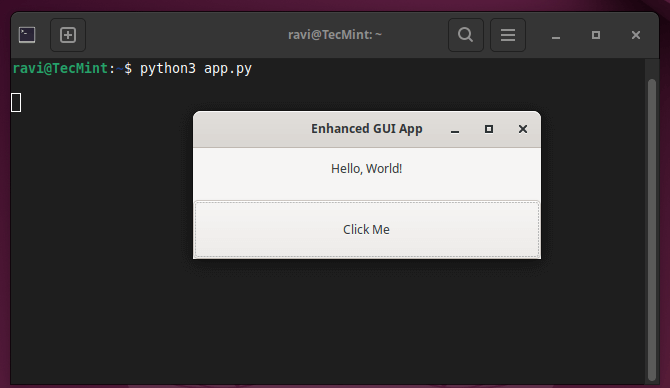
1. Adding a Label
We can enhance our application by adding a Gtk.Label to display messages in the window rather than printing them in the terminal.
import gi
gi.require_version("Gtk", "3.0")
from gi.repository import Gtk

class MyApp(Gtk.Window):
    def __init__(self):
        Gtk.Window.__init__(self, title="Enhanced GUI App")
        self.set_size_request(400, 200)

        # Create a vertical box layout
        vbox = Gtk.Box(orientation=Gtk.Orientation.VERTICAL, spacing=10)
        self.add(vbox)

        # Create a label
        self.label = Gtk.Label(label="Press the button to see a message")
        vbox.pack_start(self.label, True, True, 0)

        # Create a button
        button = Gtk.Button(label="Click Me")
        button.connect("clicked", self.on_button_clicked)
        vbox.pack_start(button, True, True, 0)

    def on_button_clicked(self, widget):
        self.label.set_text("Hello, World!")

# Initialize the application
app = MyApp()
app.connect("destroy", Gtk.main_quit)
app.show_all()
Gtk.main()
Explanation of the Changes:
- We used
Gtk.Boxto organize widgets vertically, which helps us arrange the label and button one after another. - The
Gtk.Labelwidget is added to display a message inside the window. - Instead of printing to the terminal, the
on_button_clickedfunction now updates the text of the label.
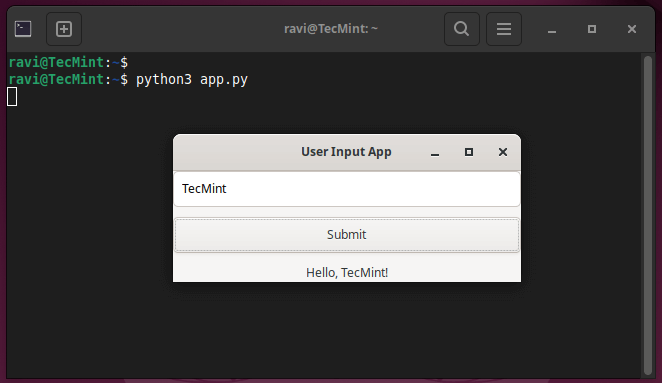
2. Adding Entry Fields for User Input
Next, let’s add Gtk.Entry widgets to allow user input, which will allow us to create a simple application where users can input their name and click a button to display a personalized greeting.
import gi
gi.require_version("Gtk", "3.0")
from gi.repository import Gtk

class MyApp(Gtk.Window):
    def __init__(self):
        Gtk.Window.__init__(self, title="User Input App")
        self.set_size_request(400, 200)

        # Create a vertical box layout
        vbox = Gtk.Box(orientation=Gtk.Orientation.VERTICAL, spacing=10)
        self.add(vbox)

        # Create an Entry widget for user input
        self.entry = Gtk.Entry()
        self.entry.set_placeholder_text("Enter your name")
        vbox.pack_start(self.entry, True, True, 0)

        # Create a button
        button = Gtk.Button(label="Submit")
        button.connect("clicked", self.on_button_clicked)
        vbox.pack_start(button, True, True, 0)

        # Create a label to display the greeting
        self.label = Gtk.Label(label="")
        vbox.pack_start(self.label, True, True, 0)

    def on_button_clicked(self, widget):
        name = self.entry.get_text()
        if name:
            self.label.set_text(f"Hello, {name}!")
        else:
            self.label.set_text("Please enter your name.")

# Initialize the application
app = MyApp()
app.connect("destroy", Gtk.main_quit)
app.show_all()
Gtk.main()
Explanation of the Code:
- The
Gtk.Entryis an input field where users can type their name. - The
set_placeholder_textmethod shows a hint inside the entry box until the user types something. - After clicking the button, the entered name is retrieved using
get_text()and displayed in the label as a personalized greeting.
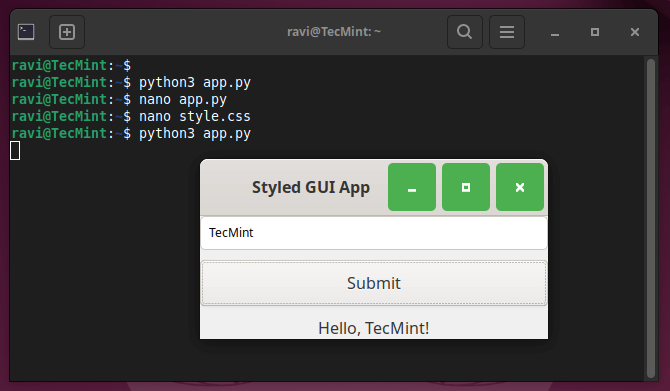
3. Styling Your Application with CSS
PyGObject allows you to apply custom styles to your application widgets using CSS file called style.css.
window {
    background-color: #f0f0f0;
}

button {
    background-color: #4CAF50;
    color: white;
    border-radius: 5px;
    padding: 10px;
}

label {
    font-size: 16px;
    color: #333;
}
Now, modify the Python code to load and apply this CSS file:
import gi
gi.require_version("Gtk", "3.0")
from gi.repository import Gtk, Gdk

class MyApp(Gtk.Window):
    def __init__(self):
        Gtk.Window.__init__(self, title="Styled GUI App")
        self.set_size_request(400, 200)

        # Load CSS
        css_provider = Gtk.CssProvider()
        css_provider.load_from_path("style.css")
        screen = Gdk.Screen.get_default()
        style_context = Gtk.StyleContext()
        style_context.add_provider_for_screen(screen, css_provider, Gtk.STYLE_PROVIDER_PRIORITY_USER)

        # Create a vertical box layout
        vbox = Gtk.Box(orientation=Gtk.Orientation.VERTICAL, spacing=10)
        self.add(vbox)

        # Create an Entry widget for user input
        self.entry = Gtk.Entry()
        self.entry.set_placeholder_text("Enter your name")
        vbox.pack_start(self.entry, True, True, 0)

        # Create a button
        button = Gtk.Button(label="Submit")
        button.connect("clicked", self.on_button_clicked)
        vbox.pack_start(button, True, True, 0)

        # Create a label to display the greeting
        self.label = Gtk.Label(label="")
        vbox.pack_start(self.label, True, True, 0)

    def on_button_clicked(self, widget):
        name = self.entry.get_text()
        if name:
            self.label.set_text(f"Hello, {name}!")
        else:
            self.label.set_text("Please enter your name.")

# Initialize the application
app = MyApp()
app.connect("destroy", Gtk.main_quit)
app.show_all()
Gtk.main()
Explanation of the CSS Changes:
- The button has a green background, and labels have a custom font size and color.
- The button’s borders are rounded for a modern look.
Conclusion
PyGObject is a powerful tool for creating GUI applications on the Linux desktop using Python. By leveraging the flexibility and simplicity of Python along with the rich features of GTK, developers can create feature-rich and visually appealing applications.
In this guide, we covered the basics of setting up PyGObject, creating a simple window, handling button clicks, adding user input, and even applying custom CSS styles.
You can extend these examples to build more complex applications, such as file managers, media players, or even professional-grade software. With PyGObject and GTK, the possibilities for creating desktop applications are nearly limitless!

I appreciate the start of using glade. I found that there were few syntax errors in the “Glade the Designer Way” causing the program to crash.
I found that:
Handler “button_1click” should be “button1_click”
The file “test.py” should read the following:
#!/usr/bin/python # -*- coding: utf-8 -*- import gi gi.require_version('Gtk', '3.0') from gi.repository import Gtk class Handler: def button1_clicked(self, button): print "Hello World!" builder = Gtk.Builder() builder.add_from_file("myprogram.glade") builder.connect_signals(Handler()) ournewbutton = builder.get_object("button1") ournewbutton.set_label("Hello, World!") window = builder.get_object("window1") window.connect("delete-event", Gtk.main_quit) window.show_all() Gtk.main()Need some help with that snake thing, I don’t I like C++.
I’m finding this very interesting. I used to program years ago – mainly in BASIC, and small dalliances with C & COBOL (a very elegant language, essentially like writing English sentences).
I become fed up with Windows 10, which has basically ruined my HP Pavilion dv7 (the Windows 7 it originally came with ran far better), so I bought a second hand MacBook Pro, which I love and is perfect for all my everyday uses, especially media – I’m a keen photographer and also getting into film-making. I would have bought a new MacBook, but if I’m honest I couldn’t afford it, and they’ve stopped doing the 17″ screens anyway – big mistake, Apple – but I digress.
Being loathed to get rid of the HP, whose hardware is of a similarly high spec to the MacBook, I’ve decided to use it for a very different purpose, effectively restoring my HP with Linux Mint Tara, which looks like a really elegant system, and and using it to get back into programming with this impressive Python language, so I basically wanted to say thank you to the author for writing these tutorials, and to ask the community for any tips you may have for someone who, while reasonably well-versed with computers generally, is very much out of date on the nuts & bolts side, and basically a beginner where Linux & Python are concerned.
Thank you in advance for any helpful replies.
Nice indentation there. Must be some real code experts on this site
BaCon (Basic to C Convertor) is an easy programming tool.
Thank you Hanny and tecmint.com for publishing this wonderful, step by step, instructional article, covering all aspects of GUI design, including packaging. In fact, I found the “Desktop Recorder” Application in part 3, so useful, that I developed a couple of my own applications, on similar lines and even packaged it for Debian as well.
The entire project ( including packaging for Debian ) that I did, is shared for the benefit of viewers here : https://sourceforge.net/projects/python-glade-application-desig/
It can resolve most of the issues reported here and also give tips on coding and packaging as well. If you need any more inputs, a simple Google Search will do.
Also, tips on Glade File Design can be seen here : https://youtu.be/86QppCSRNkI and tips on icon design here : https://youtu.be/arPVw8VWM_0
P.S. For those interested, my other project source is shared here : https://sourceforge.net/projects/python-glade-application-de-ii/
P.S. While Porting the above sources from Python 2.7 to Python 3.5, I realized a few new things :
1. Support for tabs as an indentation method, has been removed
2. 4 spaces is the preferred method of indentation
3. Modules like subprocess, stringio etc. has undergone changes.
I have upgraded the sources mentioned above, to reflect these new changes. Please download them again to get the latest version.
After gaining confidence, in Coding & Packaging, using Hanny’s Examples & the Sources Shared above, Viewers may try developing a few simple Apps, like for eg.
1. A Manpage Creator/Studio App ( Just Google “linux create man page”. You will find examples / structure of a man page. It is just a matter of Adding a Few Special Keywords, while generating/filing a manpage, with your GUI Text Entry’s / Text View’s )
2. A Diary App ( Just a matter of Reading / Writing to Files, based on the Date Picked, on a Calendar Widget )
3. GUI for OS Commands, that can simplify tasks ( Accept Input on Text Entry’s/Views, Process Them, Show Result on Text Entry’s/Views )
4. Apps listed on your Software Manager, to make them even better
If you have developed a Unique, Well Tested ( Across Python Versions i.e. Change First Line of Script ) ( Across Linux Flavours / Versions i.e. Using Virtual Machines ) & Useful App for the World, then you may contact Debian Developers/Mentors ( Sponsors ) on the Debian IRC Channels List (Country Specific also available), who can help you, Publish Your Apps to the World. Also Sponsors Listed on their ftp-master site can be contacted on their Email for further progress.
Note: Utility Apps may require multiple GIT Setups, for Upstream / Downstream Releases.
Good Luck With Your Apps Development / Publishing !
Some info: The #!/usr/bin/python line in the test.py code file above, refers to python 2 series, which is marked for end-of-life in 2020. Hence, viewers can substitute python with python3 in the test.py file, as well as the debian/control and debian/rules files, explained in the part 4 article of this series.
I have upgraded my sources shared above, to reflect all these, and incremented the version numbers to 2.1-1. Future upgrades to them will not carry a notice here.
I am new in developing GUI Application. Which is the best way to develop GUI App in gtk?
Using Glade and writing GUI interface design code
None of your examples work…copying and pasting the code you provided gives me nothing but errors:
“IndentationError: expected an indented block”
PyGIWarning: Gtk was imported without specifying a version first. Use gi.require_version(‘Gtk’, ‘3.0’) before import to ensure that the right version gets loaded.
from gi.repository import Gtk
I would like to see an answer to this issue as I am having the same problem.
typing the code and make sure the indentation is consistent in python.
this https://python-gtk-3-tutorial.readthedocs.io/en/latest/ is a good website for learning pygtk with python 3
Had the same issue. A bit of Google and I found this:
import gi
gi.require_version('Gtk', '3.0')
from gi.repository import Gtk
Concerning indention:
Seems like the formatting was just lost. In python tabulation is used instead of bracketing. Colon must be followed by tabulated code, meaning that it’s a part of the block. It’s easy to restore if you can read the code for the slightest.
File “./test.py”, line 5
def __init__(self):
^
IndentationError: expected an indented block
Very useful tutorial. Thank you!
You have a minor syntax error in the first script, try to add parentheses to the print command
Nope, I don’t, I just tested the script and it works perfectly.
There is an error in the script of the builder. The name of the function in the Handler() should be the same as the one in glade.
Instead of buttonclicked, it should be button1_clicked ;)
Thanks for this tuto! Really helpful
Thanks Jimmy ! This error will be fixed.
Greetings.
Thanks a lot !!
it’s exactly what I need
Very cool and usefull content.
I’ve put it already in my task list.
Cheers!!