Continuing the Zabbix series, this tutorial will guide you on how you can install and configure Zabbix agents on Linux (Debian-based systems and RHEL-based distros) in order to actively monitor local resources on remote systems.
The main job of Zabbix agents consists in gathering local information from the targets where they run and sending the data to a central Zabbix server to be further processed and analyzed.
Requirements
Install and Configure Zabbix on Debian/Ubuntu and RHEL/CentOS/Fedora and Rocky Linux/AlmaLinux.
- How to Install Zabbix on RHEL/CentOS and Debian/Ubuntu – Part 1
- How to Configure Zabbix to Send Email Alerts to Gmail Account – Part 2
Step 1: Install Zabbix Agents in Linux Systems
1. Depending on the Linux distribution you are running, go to the Zabbix download page, grab the latest version of the available agent’s binary packages using a tool such as wget or curl and install it on your machine using the distribution-specific package manager – Yum, Rpm or Dpkg.
For Debian/Ubuntu systems (including latest releases) use the following steps to download and install Zabbix Agent:
Install Zabbix Agent in Debian
----------------- On Debian 11 -----------------
$ wget https://repo.zabbix.com/zabbix/5.4/debian/pool/main/z/zabbix/zabbix-agent2_5.4.6-1+debian11_amd64.deb
$ sudo dpkg -i zabbix-agent2_5.4.6-1+debian11_amd64.deb

----------------- On Debian 10 -----------------
$ wget https://repo.zabbix.com/zabbix/5.4/debian/pool/main/z/zabbix/zabbix-agent2_5.4.6-1+debian10_amd64.deb
$ sudo dpkg -i zabbix-agent2_5.4.6-1+debian10_amd64.deb
Install Zabbix Agent in Ubuntu
----------------- On Ubuntu 20.04 -----------------
$ wget https://repo.zabbix.com/zabbix/5.4/ubuntu/pool/main/z/zabbix/zabbix-agent_5.4.7-1+ubuntu20.04_amd64.deb
$ sudo dpkg -i zabbix-agent_5.4.7-1+ubuntu20.04_amd64.deb

----------------- On Ubuntu 18.04 -----------------
$ wget https://repo.zabbix.com/zabbix/5.4/ubuntu/pool/main/z/zabbix/zabbix-agent_5.4.7-1+ubuntu18.04_amd64.deb
$ sudo dpkg -i zabbix-agent_5.4.7-1+ubuntu18.04_amd64.deb
Install Zabbix On RHEL-based Systems
For RHEL alike systems, download the .rpm packaged for the distribution-specific release number, using the same page as above, and install it using rpm package manager.
In order to automatically manage missing dependency issues and install the agent using one-shot use the yum command followed by the binary package download link, as in the example below used for installing the agent on CentOS 8:
----------------- On RHEL 8 -----------------
# rpm -Uvh https://repo.zabbix.com/zabbix/5.4/rhel/8/x86_64/zabbix-agent-5.4.6-1.el8.x86_64.rpm

----------------- On RHEL 7 -----------------
# rpm -Uvh https://repo.zabbix.com/zabbix/5.4/rhel/7/x86_64/zabbix-agent-5.4.6-1.el7.x86_64.rpm
Step 2: Configure and Test Zabbix Agent in Linux
2. The next logical step after installing the packages on the system is to open the Zabbix agent configuration file located in /etc/zabbix/ system path on both major distributions and instruct the program to send all the collected information to the Zabbix server in order to be analyzed and processed.
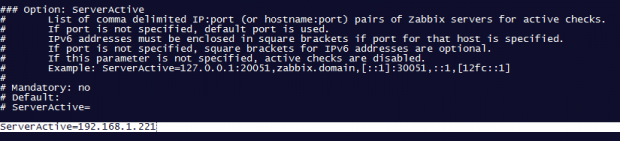
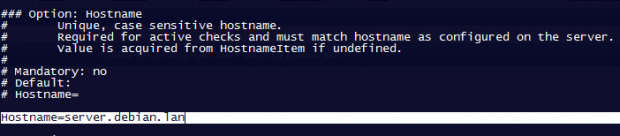
Therefore, open the zabbix_agentd.conf file with your favorite text editor, find the below lines (use the screenshots as a guide), uncomment them and make the following changes:
# nano /etc/zabbix/zabbix_agentd.conf
add Zabbix server IP address and hostname as shown below.
Server=IP of Zabbix Server
ServerActive=IP of Zabbix Server
Hostname=use the FQDN of the node where the agent runs

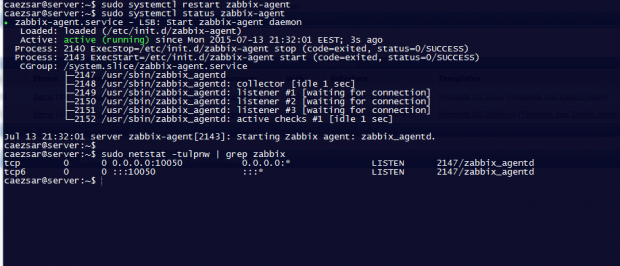
3. Once you’ve finished editing the Zabbix agent configuration file with the required values, restart the daemon using the following command, then use the netstat command to verify if the daemon has been started and operates on the specific port – 10050/tcp:
$ sudo systemctl restart zabbix-agent
$ sudo netstat -tulpn|grep zabbix
For older distributions use the service command to manage Zabbix agent daemon:
$ sudo service zabbix-agent restart
$ sudo netstat -tulpn|grep zabbix
4. If your system is behind a firewall then you need to open 10050/tcp port on the system in order to reach through the Zabbix server.
For Debian based systems, including Ubuntu, you can use the ufw tool to open the port and on RHEL-based, you can use Firewalld utility to manage the firewall rules as the below examples:
$ sudo ufw allow 10050/tcp [On Debian based systems]
$ sudo firewall-cmd --add-port=10050/tcp --permanent [On RHEL based systems]
For older distributions such as RHEL/CentOS 6 or unmanaged firewalls through specific utilities use the powerful iptables command to open ports:
# iptables -A INPUT -p tcp -m tcp --dport 10050 -j ACCEPT
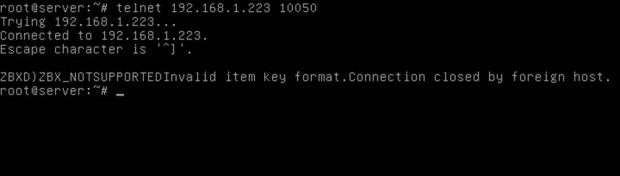
5. Finally, in order to test if you can reach Zabbix Agent from Zabbix Server, use Telnet command from Zabbix server machine to the IP addresses of the machines that run the agents, as illustrated below (don’t worry about the thrown error from agents):
# telnet zabbix_agent_IP 10050
Step 3: Add Zabbix Agent Monitored Host to Zabbix Server
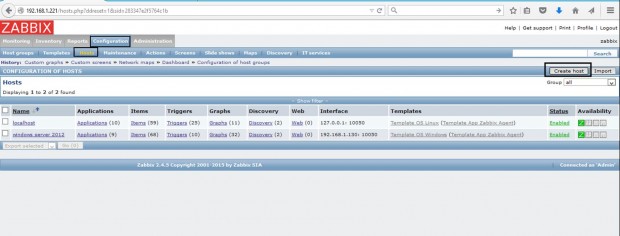
6. On the next step it’s time to move to the Zabbix server web console and start adding the hosts which run zabbix agent in order to be monitored by the server.
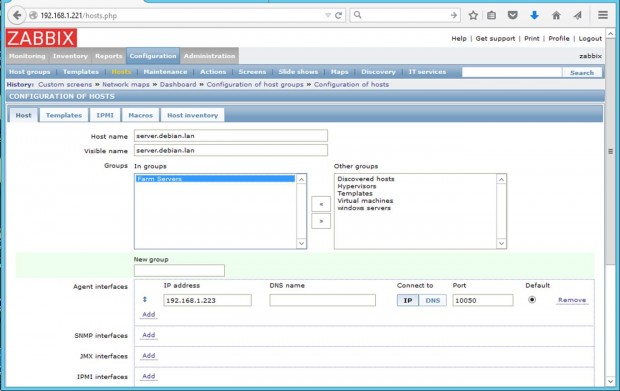
Go to Configuration -> Hosts -> Create Host -> Host tab and fill the Hostname field with the FQDN of the monitored Zabbix agent machine, use the same value as above for the Visible name field.
Next, add this host to a group of monitored servers and use the IP Address of the monitored machine at the Agent interfaces field – alternatively you can also use DNS resolution if it’s the case. Use the below screenshots as a guide.
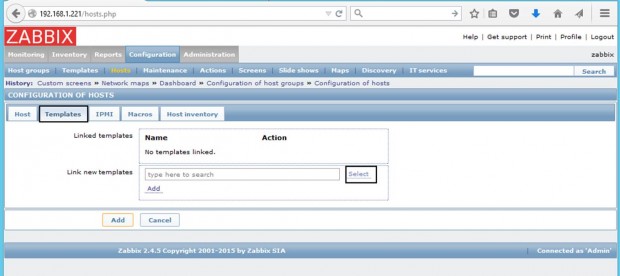
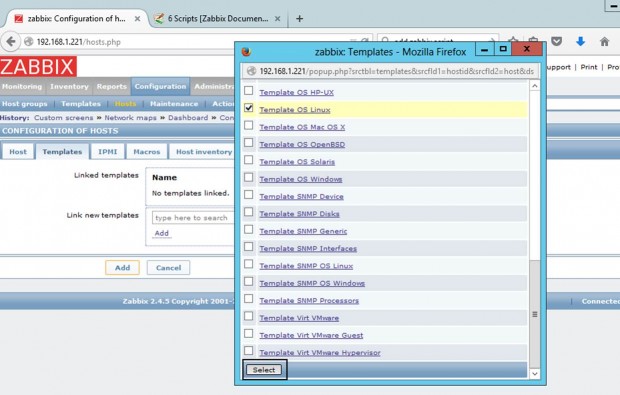
7. Next, move to the Templates tab and hit Select. A new window with templates should open. Choose Template OS Linux then scroll down and hit on Select button to add it and automatically close the window.
8. Once the template appears to Link the new template box, hit on Add text to link it to Zabbix server, then hit on the lower Add button to finish the process and completely add the monitored host. The visible name of the monitored host should now appear hosts window.


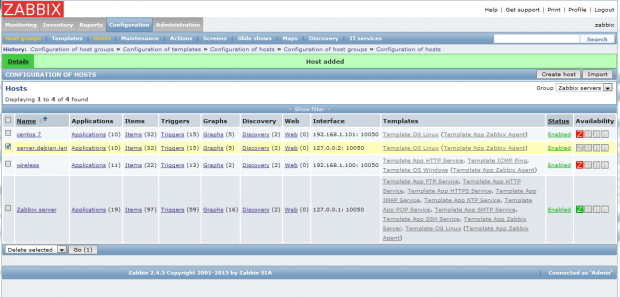
That’s all! Just assure that the host Status is set to Enabled and wait a few minutes in order for the Zabbix server to contact the agent, process the received data, and inform or eventually alert you if something goes bad on the monitored target.


Best tutorial page of zabbix, everything is working fine, you are the best! I hope you could do the same with cacti, it is a little bit more stressful.
@Pedro,
Here is the Cacti guide – How to Install Cacti on Rocky Linux and AlmaLinux
Hello, very good tutorial, I would like you to help me, I would like to be able to monitor the VMs within WMWARE ESXI. Thank you
Hi,
Just one question…
For Debian, the package is zabbix-agent2_*.deb (with the 2), but for Ubuntu and CentOS/RH is zabbix-agent_*.(deb or rpm).
Even the config file is /etc/zabbix/zabbix_agent.conf with zabbix-agent_*.(deb or rpm), but for Debian is zabbix-agent2.conf.
Is that OK??
@Sergio,
Yes, it is okay…
Zabbix agent 2 is a new version of Zabbix agent and may be used in place of the Zabbix agent in Debian’s latest versions…
Hello
Any guide to install and configure the Zabbix agent on Unix Sun Solaris?
thanks ,it was very useful.
How to install zabbix agent on multiple Ubuntu systems connected in lan from a single admin terminal. I need a shell script to do this. Any suggestions?
Thanks in advance
Use an automation program , such as Ansible, Puppet for that. You can use bash, perl or python for that matter also. Nobody will write a script for you. Learn and do it yourshelf. Nobody knows what your requirements are (what distros, IPs, hosts etc)
please can any one add tutorial on how to change alerts of disk usage percentage (average, critical, warning and etc)
Thanks for the detailed how-to.
Now that Zabbix 3 is released, do you have plans to write and upgrade guide on this?
http://www.zabbix.com/whats_new.php
Eu só recomendaria não instalar o pacote no CentOS diretamente do RPM do jeito que você fez, o correto seria criar um repositório (eu acho que o zabbix tem um).
Ou usar o epel (https://fedoraproject.org/wiki/EPEL) que tem uma versão razoávelmente recente do agente, assim você pode simplesmente instalar com: yum install zabbix22-agent
E toda vez que executar yum update, se houver um pacote mais recente no epel, ele já atualiza.
Translated to English
I would recommend not only install the package on CentOS RPM directly the way you did, correct would be to create a repository ( I think the zabbix have one) .
Or use the EPEL ( https://fedoraproject.org/wiki/EPEL ) which has a reasonably recent version of the agent , so you can just install with yum install zabbix22 -agent
And each time you run yum update if there is a newer package in EPEL , it has updated .