Zabbix is an Open Source, high-level enterprise software designed to monitor and keep track of networks, servers, and applications in real-time. Build in a server-client model, Zabbix can collect different types of data that are used to create historical graphics and output performance or load trends of the monitored targets.
The server has the ability to check standard networking services (HTTP, FTP, SMTP, IMAP, etc) without the need to install extra software on the monitored hosts.
However, in order to gather data and create statistics about local services or other specific system resources that run on remote instances, such as CPU, disks, internal system process, RAM, etc, you need to install and configure a Zabbix agent.
Following are the 4-article series about the Zabbix Monitoring application:
This tutorial will focus on how to install the latest version of the Zabbix Server on Debian/Ubuntu and RHEL/CentOS /Fedora/Rocky Linux/AlmaLinux with MySQL/MariaDB backend database to store collected data, PHP and Apache Web Server as the mainly web interface.
Important: The given Zabbix instructions also work on all Debian derivatives and RedHat-based distros like RHEL/CentOS/Fedora and Rocky Linux/AlmaLinux.
Step 1: Install Apache Web Server and PHP
1. First, update the software packages and then install Apache Web Server alongside PHP and its extensions in order to provide the web-backed functionality for Zabbix Server by issuing the following command.
--------------- On Debian/Ubuntu ---------------
$ sudo apt update && sudo apt upgrade
$ sudo apt install apache2 php php-mysql php-mysqlnd php-ldap php-bcmath php-mbstring php-gd php-pdo php-xml libapache2-mod-php

--------------- On RHEL-based Distros ---------------
# yum update && yum upgrade
# yum -y install epel-release
# yum install httpd php php-mysqlnd php-ldap php-bcmath php-mbstring php-gd php-xml
2. Next, you need to tune the PHP interpreter and adjust some values in order to run Zabbix Server. So, open Apache php.ini configuration file for editing by issuing the following command:
$ sudo nano /etc/php/7.X/apache2/php.ini 	[On Debian/Ubuntu]
# vi /etc/php.ini				[On RHEL/CentOS/]
Now, search with CTRL+C and replace the following PHP values as it follows:
post_max_size = 16M
upload_max_filesize = 2M
max_execution_time 300
max_input_time = 300
memory_limit 128M
session.auto_start = 0
mbstring.func_overload = 0
date.timezone = Europe/Bucharest
Replace the date.timezone variable according to your server’s geographical location. A list of PHP-supported Timezones can be found here http://php.net/manual/en/timezones.php.
3. After updating the PHP configuration file, restart Apache daemon to reflect changes by issuing the following command.
$ sudo systemctl restart apache2.service	 [On Debian/Ubuntu]
# systemctl restart httpd.service		 [On RHEL/CentOS]
Step 2: Install MariaDB Database and Library
4. On the next step install the MariaDB database and MySQL development library from binary packages. As MariaDB installs on your system you will be asked to set a password for the database root user during installation (Only on Debian). Choose a strong password, repeat it and wait for the installation to finish.
$ sudo apt-get install mariadb-server mariadb-client libmysqld-dev	 [On Debian/Ubuntu]
# yum install mariadb-server mariadb-client mariadb-devel	         [On RHEL/CentOS]
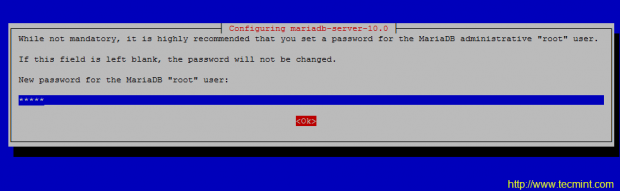
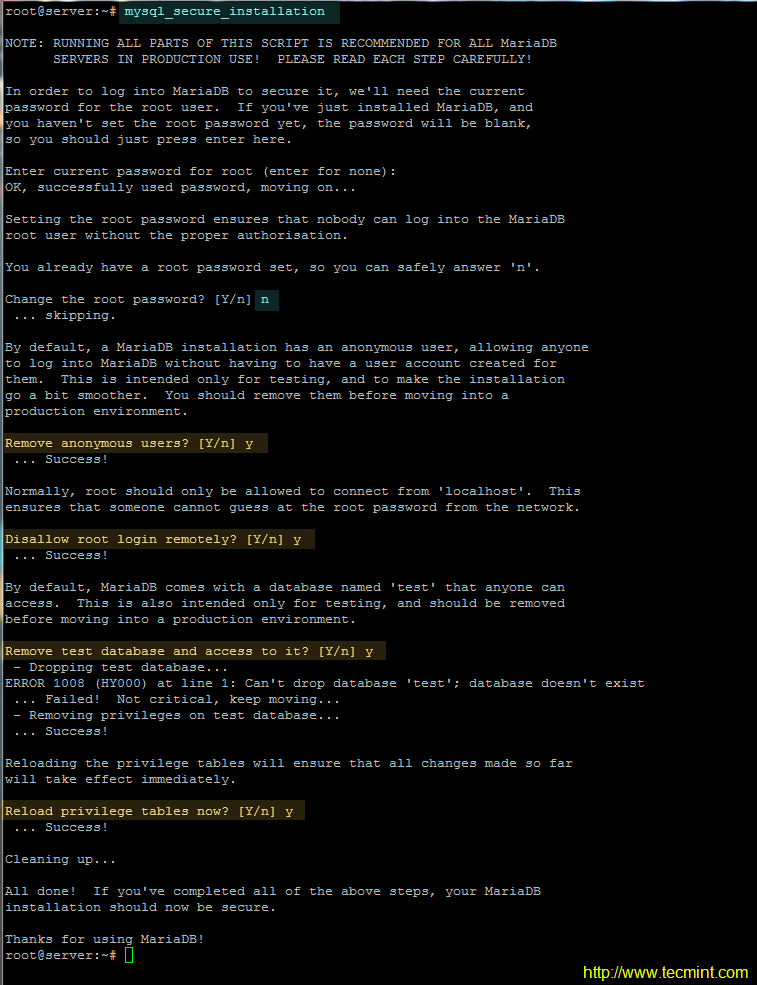
5. When the installation of Mariadb finishes, start and secure the database by issuing mysql_secure_installation command with system root privileges ( answer with yes for removing anonymous users, disable root login remotely, remove test database and access to it and apply all changes).
$ sudo systemctl start mariadb
$ sudo mysql_secure_installation
OR
# systemctl start mariadb
# mysql_secure_installation
Use the below screenshot as a guide.
6. The next requirement for Zabbix is setting up an RDBMS database. Log in to your LAMP stack database component (MySQL or MariaDB) and create a Zabbix database and the credentials required to manage the database, by issuing the following commands.
Make sure you replace the database name, user, and password to match your own settings.
# mysql -u root -p
MariaDB [(none)]> create database zabbixdb character set utf8 collate utf8_bin;
MariaDB [(none)]> grant all privileges on zabbixdb.* to 'zabbixuser'@'localhost' identified by 'password1';
MariaDB [(none)]> flush privileges;
MariaDB [(none)]> exit
Step 3: Install Zabbix Server
7. Now, start to install the Zabbix server and Zabbix PHP frontend application by adding the official Zabbix repositories to your system package manager by issuing the following commands with root privileges.
Install Zabbix on Debian
--------------- On Debian 11 ---------------
$ sudo wget https://repo.zabbix.com/zabbix/5.4/debian/pool/main/z/zabbix-release/zabbix-release_5.4-1+debian11_all.deb
$ sudo dpkg -i zabbix-release_5.4-1+debian11_all.deb
$ sudo apt update
$ sudo apt install zabbix-server-mysql zabbix-frontend-php zabbix-apache-conf zabbix-sql-scripts zabbix-agent

--------------- On Debian 10 ---------------
$ sudo wget https://repo.zabbix.com/zabbix/5.4/debian/pool/main/z/zabbix-release/zabbix-release_5.4-1+debian10_all.deb
$ sudo dpkg -i zabbix-release_5.4-1+debian10_all.deb
$ sudo apt update
$ sudo apt install zabbix-server-mysql zabbix-frontend-php zabbix-apache-conf zabbix-sql-scripts zabbix-agent
Install Zabbix on Ubuntu
--------------- On Ubuntu 20.04 ---------------
$ sudo wget https://repo.zabbix.com/zabbix/5.4/ubuntu/pool/main/z/zabbix-release/zabbix-release_5.4-1+ubuntu20.04_all.deb
$ sudo dpkg -i zabbix-release_5.4-1+ubuntu20.04_all.deb
$ sudo apt update
$ sudo apt install zabbix-server-mysql zabbix-frontend-php zabbix-apache-conf zabbix-sql-scripts zabbix-agent

--------------- On Ubuntu 18.04 ---------------
$ sudo wget https://repo.zabbix.com/zabbix/5.4/ubuntu/pool/main/z/zabbix-release/zabbix-release_5.4-1+ubuntu18.04_all.deb
$ sudo dpkg -i zabbix-release_5.4-1+ubuntu18.04_all.deb
$ sudo apt update
$ sudo apt install zabbix-server-mysql zabbix-frontend-php zabbix-apache-conf zabbix-sql-scripts zabbix-agent
Install Zabbix on RHEL-based Distros
--------------- On RHEL/CentOS 8 ---------------
# rpm -Uvh https://repo.zabbix.com/zabbix/5.4/rhel/8/x86_64/zabbix-release-5.4-1.el8.noarch.rpm
# dnf clean all
# dnf install zabbix-server-mysql zabbix-web-mysql zabbix-apache-conf zabbix-sql-scripts zabbix-agent

--------------- On RHEL/CentOS 7 ---------------
# rpm -Uvh https://repo.zabbix.com/zabbix/5.4/rhel/7/x86_64/zabbix-release-5.4-1.el7.noarch.rpm
# dnf clean all
# dnf install zabbix-server-mysql zabbix-web-mysql zabbix-apache-conf zabbix-sql-scripts zabbix-agent
If you want to download and compile an older version, please visit Zabbix official Sourceforge repositories.
8. On the next step, restart the Apache HTTP server in order to apply the Zabbix configuration file installed for Apache.
$ sudo systemctl restart apache2   [On Debian/Ubuntu]
# systemctl restart httpd     [On RHEL/CentOS]
# setenforce 0                [Disable SELinux on RHEL/CentOS]
Step 4: Configure Zabbix Server and Agent
9. Before configuring the server, first, import Zabbix’s initial database schema to the MySQL database. Import the schema against the database created for the Zabbix application, by issuing the below command.
$ sudo zcat /usr/share/doc/zabbix-sql-scripts/mysql/create.sql.gz | mysql -u zabbixuser zabbixdb -p
OR
# zcat /usr/share/doc/zabbix-sql-scripts/mysql/create.sql.gz | mysql -u zabbixuser zabbixdb -p
10. On the next step, set up the Zabbix server by opening the main configuration file for editing with the following command.
$ sudo nano /etc/zabbix/zabbix_server.conf
OR
# nano /etc/zabbix/zabbix_server.conf
In zabbix_server.conf file search and modify the following lines as presented in the below excerpt. Update the variables to reflect your own database settings.
DBHost=localhost
DBName=zabbixdb
DBUser=zabbixuser
DBPassword=password1
11. Finally, save and close the Zabbix server configuration file by pressing Ctrl+o and Ctrl+x file and restarting the Zabbix daemon to apply changes by issuing the below command.
# systemctl restart zabbix-server.service
12. Next, configure the Zabbix Agent configuration file by updating the following lines. First, open the file for editing.
# nano /etc/zabbix/zabbix_agentd.conf
Zabbix agent configuration file excerpt:
Server=127.0.0.1
ListenPort=10050
13. Save and close the Zabbix agent configuration file and restart Zabbix Agent to reflect changes by issuing the following command.
# systemctl restart zabbix-agent.service
Step 5: Install and Configure Zabbix Frontend Interface
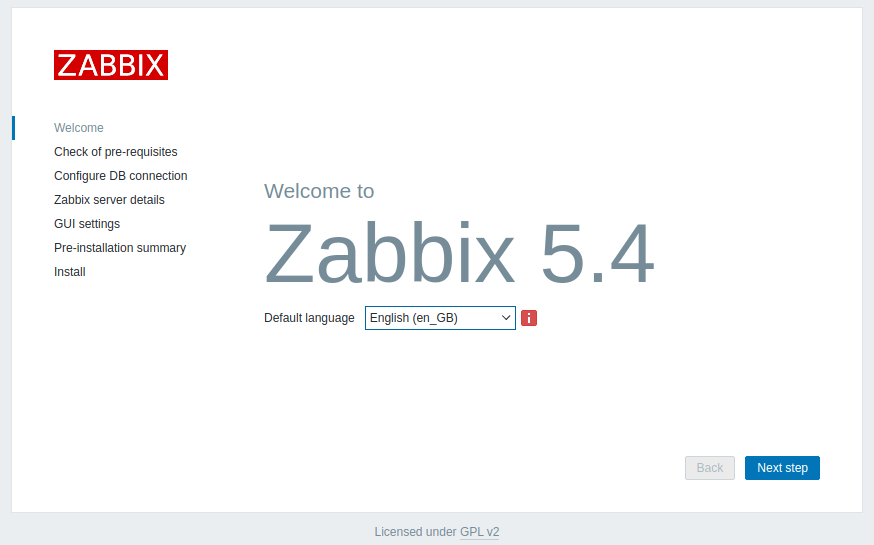
15. Now it’s time to install the Zabbix Server Frontend web interface. In order to accomplish this step open a browser and navigate to your server IP Address using HTTP or HTTPS protocol and the welcome screen should appear. Hit the Next button to move forward.
http://192.168.1.151/zabbix/setup.php
OR
https://192.168.1.151/zabbix/setup.php
On the first welcome screen, just hit the Next step button to move to the new step of the installation process.
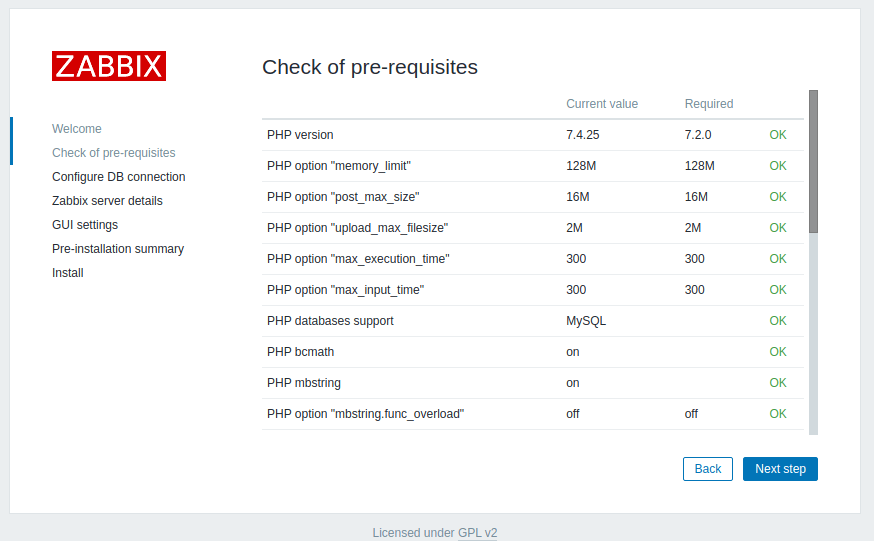
16. After a series of checks, if all pre-requires values are satisfied, hit the Next button to proceed further.
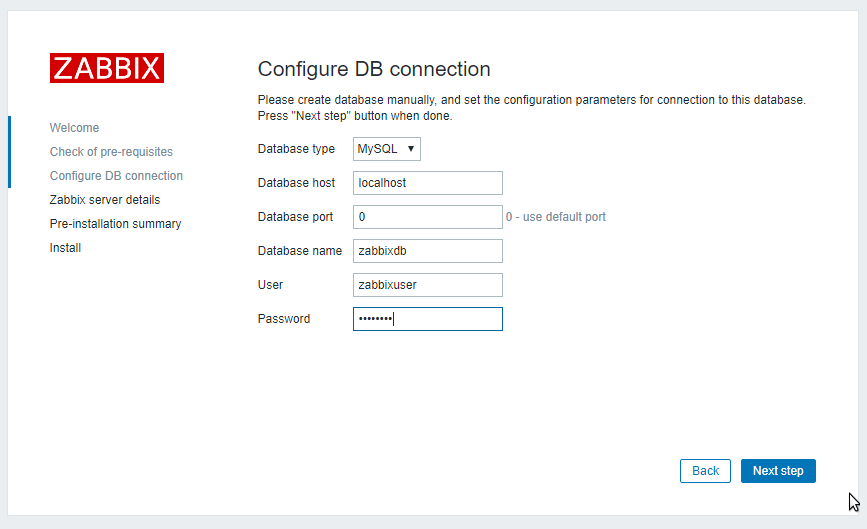
17. On the next step provide the settings for the MySQL database, hit the Test connection button to test MySQL connectivity, and move to the step by pressing the Next button.
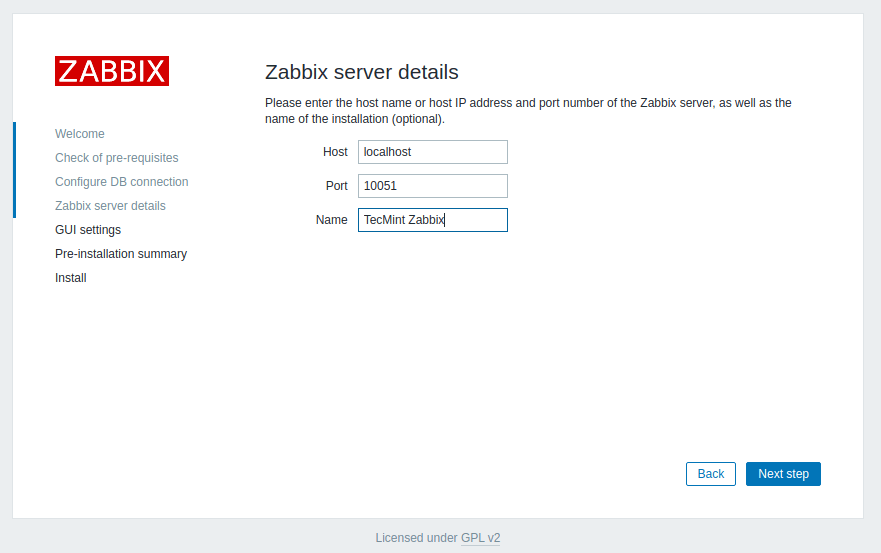
18. Next, supply the Host (or IP Address) and the Port of the Zabbix server (use the host localhost and the port 10051 because Zabbix server is configured to run on the same host as the Zabbix frontend web interface in this tutorial) and a Name for Zabbix frontend installation. When you’re done hit Next to continue.
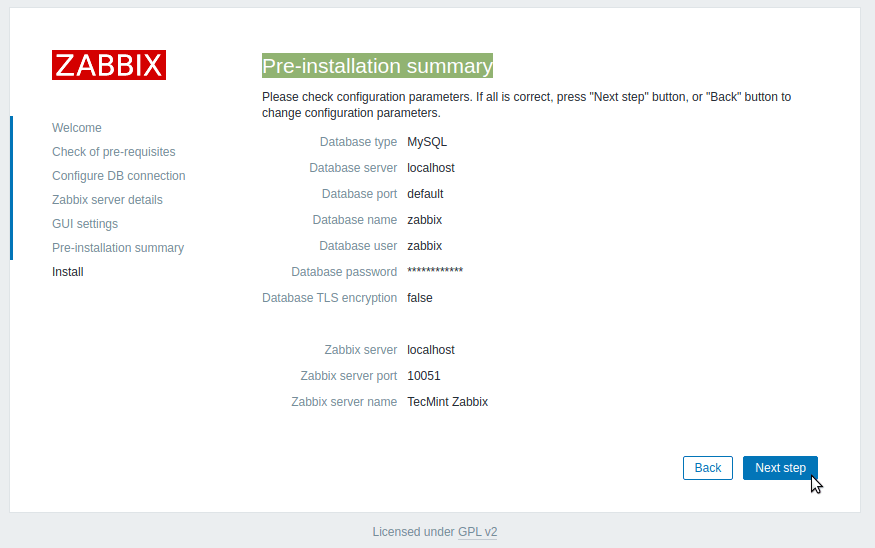
19. Next, check all the configurations parameters.
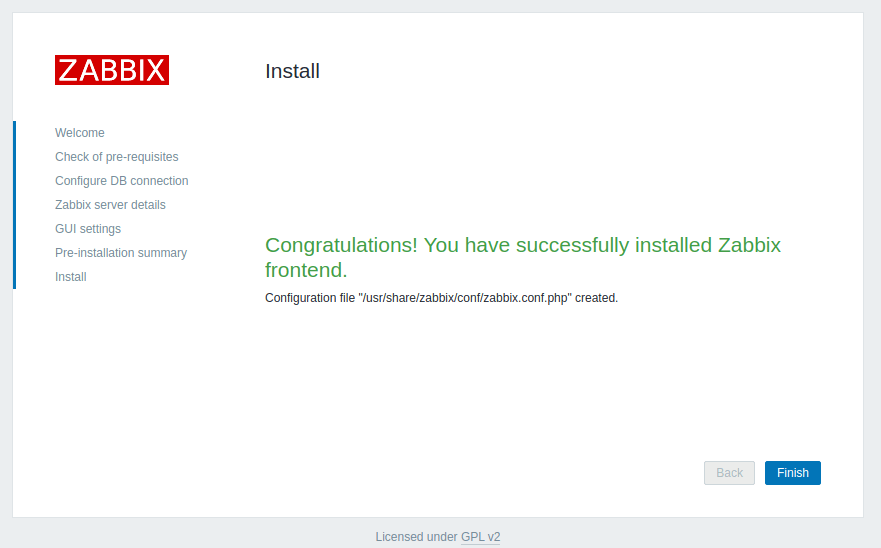
20. After the installation process completes, a congratulations message will appear in your browser. Hit on the Finish button to exit the Zabbix frontend installer.
21. Finally, navigate to your server IP address or domain name by appending /zabbix URL address and log in to the Zabbix web admin panel with the default credentials presented below.
https://your_domain.tld/zabbix/
Username: Admin
Password: zabbix
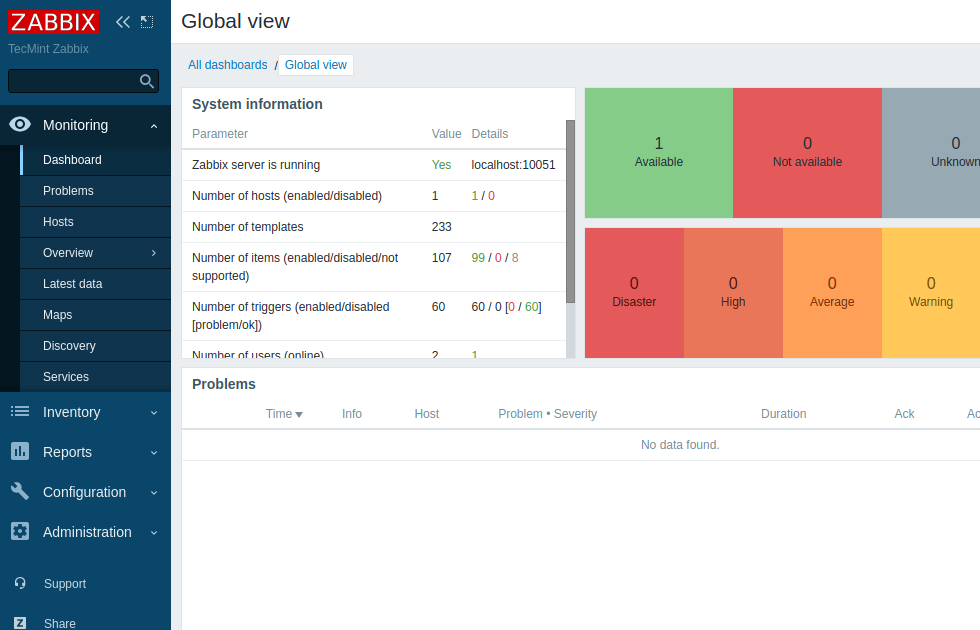
22. After you’ve logged in to the Zabbix admin panel, you can start to configure Zabbix and add new network resources to be monitored by the Zabbix server.
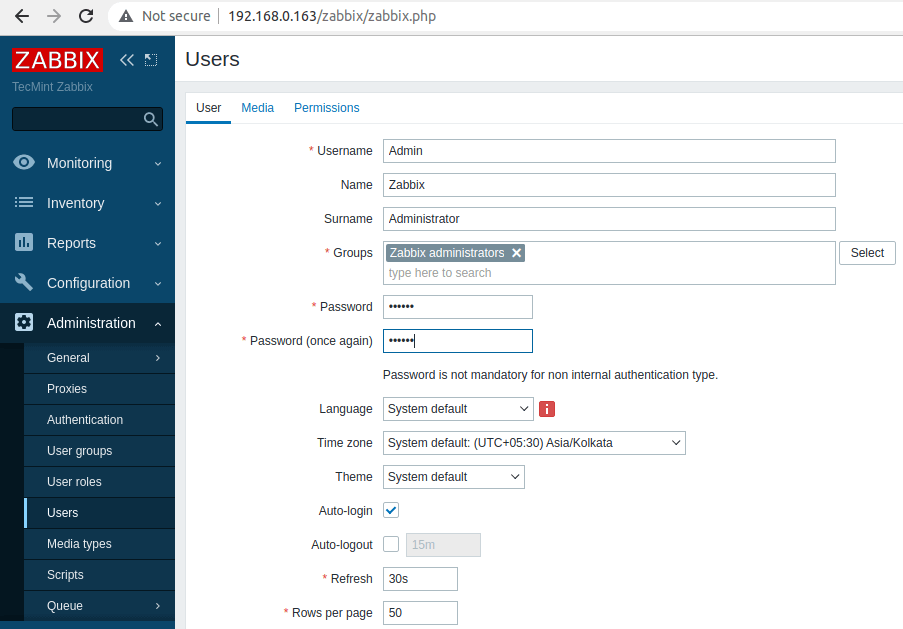
23. To change the Zabbix frontend admin account password, navigate to Administration -> Users –> User and hit on the Change password button and add your new password, as illustrated in the below screenshot. Finally, hit on the bottom Update button in order to save the admin account’s new password.
That’ll! The next series concerning the Zabbix monitoring system will discuss how to set up the server further using the web interface and how to install and configure Zabbix agents on different Linux distributions or even Windows systems.


After completing all the steps, I logged into the Zabbix service website and was prompted that the Zabbix server was not running, and the information displayed may not be current.
@Weidashuai,
First, ensure that the Zabbix server service is running. If not, you can start the service using the following command:
After starting the Zabbix server, monitor the server’s logs to check for any issues or error messages that might provide more information about the problem.
Look for any error messages that might point to the cause of the Zabbix server not running.
Next, you need to check that the Zabbix web interface is properly configured to communicate with the Zabbix server in the configuration settings, including the Zabbix server hostname and port.
After making any necessary configuration changes, restart the Zabbix server to apply the changes:
Finally, make sure that your firewall not blocking Zabbix server communication. Adjust your firewall rules or SELinux policies if needed.
Then, log in again to the Zabbix web interface.
Dear Sir,
I am stuck in installing Zabbix to my centos 7. I tried multiple times so it shows a conflict.
Kindly find below the Details
I checked all the packages by:
# yum search zabbix*
Did clean by
yum clean alland after that, I tried to remove them byyum remove Zabbixbut it shows there is no package installed.Try to delete Zabbix-release by
rpm -e Zabbix-releasebut didn’t find anything.I want 6.2 but Zabbix 50 and 4 conflict with them and also didn’t be deleted. One more thing did anyone let me know where the zabbix.arch files placed.
–> Finished Dependency Resolution
Error: zabbix50 conflicts with zabbix40-4.0.39-1.el7.x86_64
You could try using –skip-broken to work around the problem
You could try running: rpm -Va –nofiles –nodigest
@Desh,
First, you need to remove the already installed zabbix40 which is not Zabbix official package as shown.
After removing all zabbix40 packages, you can follow the guide to install Zabbix from official repo as shown in this article…
How to resolve the error:
skipping https://repo.zabbix.com/zabbix/5.4/rhel/7/x86_64/zabbix-release-5.4-1.el7.noarch.rpm- transfer failed
zabbix.conf file is not found using the above guide?
Awesome article, please post on updated version and troubleshooting solution on Zabbix.
@vishwanjeet,
We’ve updated the Zabbix article to the latest version as requested…
How to add a windows client on the Zabbix server?
I have error date.timezone, can’t install even i did edit
php.inistill have issue any idea?Thanks
I solved installing zabbix 4.0 in Debian 9.
At the point 4 the packet libmysql-dev send package libmysqld-dev is not available and libmariadbd18, libmariadbd-dev is available.
At the point 15, the URL should be:
You don´t create the zabbix user in the system is necessary?
please remove php-bcmath- “-” remove this from command
Hello Matei,
I find a little spelling mistake through the guide:
“MariaDB [(none)]> create database zabbixdb character set utf8 collate utf8_bin;”
Thanks for detailed sharing and hope this helps.
database name has typo error which creates the issues while login.
Good Day,
Finally I found a direct tutorial and to the core of how to install this application so novel, after about 30 failed installation attempts of other pages, this was the only one that actually helped me.
Thank you! I will be attentive to your forum!
I just shared my experience Zabbix with CentOS 7. in case you not yet disabled firewall and selinux you need to some command for allow Zabbix and httpd work together as below:
SELinux rule
and restart apache and zabbix server.
if not like this you will see the message announce that;
your zabbix server is not running….
for who have problem the same as me.
Dear Sir,
please help me to solve this issue in CentOS7 how can i enabled this i am tired to resolve this issue.
PHP bcmath off Fail
PHP mbstring off Fail
Hi,
dnf install php-bcmath php-mbstring
That’s it.
Hi! i’m senegalese and i speak english a little. But i confirm it’s work for me 100% on debian. Thank’s for this topic. Good luck for the next!
I have followed step by step according to this instruction. But it is not working for Debian 8. I am getting an error message: Zabbix server is not running.
My mistake. There were two users (root and zabbix) in zabbix config file, that caused an issue with db connection. After i commented out the root user there the issue has gone.
Good to know is working…
please type the step because it is not work with me ??
i have the same problem but your solution didn’t work with me.
got it !! i just have restart my server on debian
i’am using debian jessie as os
hi guys
installed successfully now i want know whats open port needed in the zabbix server and slave server added to zabbix?
Zabbix server: 10051
Zabbix-agents: 10050
Hy, guys.
I have the same problem, Zabbix server is running No localhost, in debian. After review again the tutorial i realize that when i edit the configuration file line “DBSocket=/var/run/mysqld/mysqld.sock” i keep the default “mysql.sock” in the end. After edit to “mysqld.sock” it works.
Txs for the tutorial.
I am unable to locate file :: /usr/local/etc/zabbix_server.conf
If locate command doesn’t show you the file, update the database with the command: updatedb.
command: updatedb. this did not help me .
Still , unable to locate file :: /usr/local/etc/zabbix_server.conf
Maybe on ./configure you’ve changed the destination path for your installation.
When I am running command:::
# make
# make install
I am getting out :::
[root@network1 zabbix-2.4.5]# make
make: *** No targets specified and no makefile found. Stop.
[root@network1 zabbix-2.4.5]#
[root@network1 zabbix-2.4.5]# make install
make: *** No rule to make target `install’. Stop.
[root@network1 zabbix-2.4.5]#
Check if you installed gcc compiler. Also check if you switched to other directory than sources dir.
While I am running Command :: make install
my output is different from your output . Please help me .
See::
[root@network1 zabbix-2.4.5]# make install
Making install in src
make[1]: Entering directory `/root/zabbix-2.4.5/src’
make[2]: Entering directory `/root/zabbix-2.4.5/src’
make[3]: Entering directory `/root/zabbix-2.4.5/src’
make[3]: Nothing to be done for `install-exec-am’.
make[3]: Nothing to be done for `install-data-am’.
make[3]: Leaving directory `/root/zabbix-2.4.5/src’
make[2]: Leaving directory `/root/zabbix-2.4.5/src’
make[1]: Leaving directory `/root/zabbix-2.4.5/src’
Making install in database
make[1]: Entering directory `/root/zabbix-2.4.5/database’
make[2]: Entering directory `/root/zabbix-2.4.5/database’
make[2]: Nothing to be done for `install-exec-am’.
make[2]: Nothing to be done for `install-data-am’.
make[2]: Leaving directory `/root/zabbix-2.4.5/database’
make[1]: Leaving directory `/root/zabbix-2.4.5/database’
Making install in man
make[1]: Entering directory `/root/zabbix-2.4.5/man’
make[2]: Entering directory `/root/zabbix-2.4.5/man’
make[2]: Nothing to be done for `install-exec-am’.
make[2]: Leaving directory `/root/zabbix-2.4.5/man’
make[1]: Leaving directory `/root/zabbix-2.4.5/man’
When I run the command
$ mysql_secure_installation
I am prompted to “Enter the current password for root” . Since one has not been setup yet, I just press enter. I get the following error
ERROR 2002 (HY000): Can’t connect to local MySQL server through socket ‘/var/lib/mysql/mysql.sock’ (2)
Any thoughts?
Try to start mysql daemon then issue mysql_secure_installation command.
Thank you for tutorial work here.
congratulations.
hai i got the message “Zabbix server is not running, how can i solve this?
port 10050 and 10051 open
Did you used service command to get the output of zabbix daemon? Because zabbix is installed from sources, it can only be started, in this case, with /usr/local/sbin/zabbix_server command. If you run service command against zabbix you won’t get any output, right?
Confirm zabbix is listening on specific ports with netstat command!
Hi, i did all, and i got the message “Zabbix server is not running, how can i solve this?
Run the script /usr/local/sbin/zabbix_server to start Zabbix server. Then run netstat -tlpn to confirm if zabbix service is listening on the default ports.
Hi,
I want to install Zabbix agent without opening the port 10050.Is it possible to install if it so please help me to install the zabbix agent.And also please give me a tutorials on this
If you don’t open the port 10050 how do you expect zabbix agent to communicate with the server. Is there a reason why you don’t want to add this firewall rule? In case you want to change agent port number replace ListenPort zabbix_agentd directive accordingly.
Hi, I am newbie to zabbix and have some clarification on how to restart the zabbix-server agent?
Hi again. It seems to be I’m unable to
zabbix_server start/stop/restart It just does not affect zabbix service.
killall zabbix_server with root permissions to stop.
/usr/local/sbin/zabbix_server to start.
Hi, thanks for the tutorial.
I have a question, I hope you can help me out. I am not that firm with Linux already, but in step 5 you created a zabbix-user in order to run the deamon process with unprevileged rights.
In Step 8-18 you start the deamon. But if i start the deamon as root (which i use), i guess the services run as root? Is that right? How can i make sure to start the services as zabbix-user?
yours D.
Even if the service is started from root account it will automatically switch to zabbix unprivileged user account.
A error message appears when i login in frontend: “zabbix server is not running the information displayed may not be current”
How i can fix it?
Thanks.
Edit /usr/local/etc/zabbix_server.conf file and make sure the line START is set to yes (START=yes). Also verify Selinux config and the firewall to see if it’s blocking zabbix port.
Hi. Thanks for great instruction! I have encountered with following issue. Did everything step by step following your instruction, but noticed my zabbix graphs shows wrong date/time.
I believe this is due to wrong timezone, which must be defined in /etc/apache/conf-enabled/zabbix.conf, but this file (zabbix.conf) is missing. I see from other tutorials, timezone configures exactly in /etc/apache/conf-enabled/zabbix.conf.
Zabbix is running on Deb Jessie and timezone in /etc/php.ini is set correctly.
Please advise, how I may fix it. Thanks in advance.
Do not know what was root cause, but change of:
date.timezone = Asia/Tashkent
to
date.timezone = Etc/GMT+5 solved issue. I have no idea, why date.timezone string in /etc/php5/apache2/php.ini gives wrong date/time in case of my timezone.
Hi,
I have installed and added hosts and templates but how to monitor the cpu, memory utilization. I tried all tabs can only see the configurations setup.
Thanks
Go to Configuration –> Hosts –> Graphs, for your template, select the graph that you want to monitor, then ‘Copy selected to …’, then hit ‘Go’ and select the target host/template.
Hi, I’m installing the Zabbix in RHEL 7.2 server, from Redhat I cannot find ssmtp package, can you please help me from where I can get the same. I google already but found ssmtp package for rhel6/5 not rhel7. Thanks in advance
The ssmtp package does not belong, by default, to RHEL 7 original repositories, but can be found in EPEL repo. Install it with the following command: sudo yum install epel-release
Additional info about epel project can be found here: https://fedoraproject.org/wiki/EPEL
Greate! Very Good!
I like tecmint very much!
@William,
Thanks for appreciating us and liking, keep visiting tecmint..
thanks for the perfect todo
Hi, In the step 3: When the installation of Mariadb finishes, secure the database by issuing mysql_secure_installation command with system root privileges, I ran “# mysql_secure_installation”,
when asked for “Enter current password for root (enter for none):” I gave server root login passowrd it doesn’t accept, i just pressed enter didn’t accept. Kindly assist here.
@pugazhendhi,
No need to type the current root password, just enter and when asked to set new mysql root password, set it there and carry further steps..
good morning.
MariaDB [(none)]> grant all privileges on zabbix.* to zabbix@’localhost’ indentified by ‘password’;
ERROR 1064 (42000): You have an error in your SQL syntaxe; check the manual that corresponds to your MariaDB server version for the right syntax to use near ‘identified by ‘password” at line 1
help-me please.
@Assis,
Yes, there is a error in your MySQL command, the correct way to run the command is:
I got with the command below:
MariaDB [(none)]> grant all privileges on zabbix.* to zabbix@’%’ identified by ‘password’;
Thank you very much,
hi thank you very much for the wonderful tutorial
please i am getting this error
441:20151126:100552.738 [Z3001] connection to database ‘zabbix’ failed: [2002] Can’t connect to local MySQL server through socket ‘/var/run/mysqld/mysql.sock’ (2)
441:20151126:100552.738 database is down: reconnecting in 10 seconds
is there something i am missing
@Donmay,
The error clearly indicates that your MySQL service is not started, try to restart the MySQL service.
thank you i treid restarting the server as well as also the server many times but it does not connect…..
Hello Donmay,
I had the same issue yesterday. Please check your config correspoding the right mysqld.sock filename.
In my case under /etc/mysql/my.cnf:
[mysqld_safe]
socket = /var/run/mysqld/mysqld.sock
nice = 0
This value has to be the same in config file /usr/local/etc/zabbix_server.conf in value “DBSocket”.
After installation my path configuration was:
/var/run/mysqld/mysql.sock
It has step by step to make the update of this version of the most current Zabbix ?
Hi man, don’t exist this path: “/usr/local/etc/zabbix_server.conf” in my installation. Nano creates a new file in blank, but don’t appear something write. I’m trying Zabbix 2.4.6.
Did you changed the installation path while compiling zabbix sources or installed zabbix from binary?
Hi! cool manual! correct…
tar xfz zaBix-2.4.5.tar.gz
# cd /zaBix-2.4.5.tar.gz
zaBBix
@Tokanava,
Thanks for notifying about that typo, corrected in the article..
Thank you for the guide Matei !
But I found a typo when installing PHP you have php5-xmlpc but is php5-xmlrcp (missing R)
@Yael,
Thanks for pointing out that typo, we’ve corrected in the article..
Hy,
What can I do to fix this?
Parameter Value Details
Zabbix server is running No localhost:10051
Hey guys, I found the problem, I edited the file, and changed the following line . It worked but still do not know the main reason .
See you later,
# vi /usr/local/etc/zabbix_server.conf
Before and after:
# Dbhost = localhost
Dbhost = 127.0.0.1
tcp 0 0 0.0.0.0:10050 0.0.0.0:* OUÇA 1162/zabbix_agentd
tcp 0 0 0.0.0.0:10050 0.0.0.0:* OUÇA 1162/zabbix_agentd
tcp 0 0 0.0.0.0:10051 0.0.0.0:* OUÇA 1317/zabbix_server
root@debian:~# telnet localhost 10051
Trying ::1…
Connected to localhost.
Escape character is ‘^]’.
@Fábio
I did same changes but still same error Zabbix server is running No localhost:10051
telnet localhost 10051
Trying ::1…
telnet: connect to address ::1: Connection refused
Trying 127.0.0.1…
# /usr/local/sbin/zabbix_agentd
# /usr/local/sbin/zabbix_agent
# /usr/local/sbin/zabbix_server
replace
# /etc/init.d/zabbix_agentd
# /etc/init.d/zabbix_agent
# /etc/init.d/zabbix_server
Another problem encountered was booting
Hi
Thats Nice !
so thanks, ;)
Good read ! I am looking forward to the monitoring setup. Specially if you could SNMPchecks and nagios plugins a bit that would be nice. Does zabbix provide an agent for Linux/Windows Host like ICinga2 does ? What level of SNMP granularity is built into Zabbix ?
Why are you using /etc/rc.local to startup the services? Seriously?
Yes, because the official zabbix sources does’nt provide any systemd services conf files. Also, the old upstart (init.d) scripts are not fully compatible and run a little bit tricky on systemd, so i suggest you use this method for now to be safe!
will you do Zabbix proxy configuration also ??
Could you please put a post on how to configure sms alerts in zabbix?
@Udaya,
Surely, in our upcoming articles, we will show how to set email and sms alerts to get critical notifications..just stay tuned for the updates..
Can you just give a clue on how to configure SMS alerts? I tried with minicom but it didn’t work for me.