Pandora FMS (Flexible Monitoring System) is a free open-source, modern and highly scalable full-featured IT infrastructure monitoring tool designed for all types of environments. It is used to manage network equipment; Linux and other Unix-like servers and Windows servers; virtual infrastructures and all kinds of applications.
Designed to be modular, multi-platform and easy to customize, Pandora FMS supports monitoring of networks, servers, applications, databases, cloud and virtualization, logs, user experience, and business processes.
It uses powerful agents for all operating systems to collect data from monitored systems and devices, supports both local and remote network monitoring, auto-monitoring where agents detect storage devices, partitions or databases, and many other things. Agents can control system components such as services, execute processes or remove temporary files and more.
It also features a flexible notification and alert system, supports remote access via tools such as eHorus and SSH, auto-discovery of networks, network elements, network topology, etc. And has an integrated reporting system with dozens of different report templates and graphs for analysis. Notably, it is fully compatible with most open-source tools and experienced users can also create custom integrations with the services of their choice and so much more.
Pandora FMS Components:
- Pandora FMS Servers – A Perl-based program in charge of performing checks, collecting, aggregating and processing the data. They save data (generated by them or agents) into the database. All servers are integrated into a single multi-threaded application.
- Pandora FMS Console – A PHP-based user interface (UI) to operate and manage the monitoring system. It is powered by a database(MySQL/MariaDB by default) and a web server (Apache by default). It is also in charge of displaying the information present in the database.
- Database – A data about the monitoring system (administrator configurations from the UI, data from agents, events, etc.) is stored in the database.
- Software Agents – A applications installed on monitored systems, and run as daemons or services to collect the data to send it to the Pandora FMS servers.
System Hardware Requirements:
The following are the minimum requirements for different installation environments.
Small Installation: a few to 500 Agents
- 1 core at 2 GHz
- 4 GB RAM
- 20 GB Hard disk space
Medium Installation: up to 2000 Agents
- 2 cores at 2.5 GHz
- 8 GB RAM
- 60 GB Hard disk space
Large installation: for more than 4000 Agents
- 4 core at 3 GHz
- 16 GB RAM
- 120 GB Hard disk space
In this article, we will walk through you the process of installing the latest version of the Pandora FMS monitoring tool in the Ubuntu 18.04 LTS server.
Step 1: Installing Dependencies and Required Packages
1. Login to your Ubuntu server, update your APT package cache and install all the required dependencies for the Pandora server which includes a number of Perl modules, the Apache HTTP server, PHP and it’s modules, and the MariaDB database server, among others, from the default repositories by running the following commands.
$ sudo apt-get update
$ sudo apt-get installsnmp snmpd libtime-format-perl libxml-simple-perl libxml-twig-perl libdbi-perl libnetaddr-ip-perl libhtml-parser-perl xprobe2 nmap libmail-sendmail-perl traceroute libio-socket-inet6-perl libhtml-tree-perl libsnmp-perl snmp-mibs-downloader libio-socket-multicast-perl libsnmp-perl libjson-perl php libapache2-mod-php apache2 mariadb-server mariadb-client php-gd php-mysql php-pear php-snmp php-db php-gettext graphviz  php-curl php-xmlrpc php-ldap dbconfig-common
2. Once the installation is complete, check if the Apache2 service is up and running. Also check if it is enabled to automatically start at system boot, using the following systemctl commands.
$ sudo systemctl status apache2.service
$ sudo systemctl is-enabled apache2.service

3. Also check if the MariaDB service is up and running, and is enabled.
$ sudo systemctl status mariadb.service
$ sudo systemctl is-enabled mariadb.service

4. Create a password for the MariaDB database root user, using the mysqladmin database server administration utility as shown.
$ sudo mysqladmin password

5. By default on Ubuntu, MySQL/MariaDB is configured to use the UNIX auth_socket plugin. This prevents the console installation script from running successfully especially at the point of the creation of the pandora database by the root user. So you need to update the authentication plugin for the root user to use mysql_native_password.
$ sudo mysql -u root
> USE mysql;
> UPDATE user SET plugin='mysql_native_password' WHERE User='root';
> FLUSH PRIVILEGES;
> EXIT;
6. Next, improve the security of your MariaDB server by running the mysql_secure_installation shell script.
$ sudo mysql_secure_installation
After running the script, follow the prompts (as shown in the screenshot):
- Enter current password for root (enter for none): (enter the password set in step 4).
- Change the root password? [Y/n]
n - Remove anonymous users? [Y/n]
y - Disallow root login remotely? [Y/n]
y - Remove test database and access to it? [Y/n]
y - Reload privilege tables now? [Y/n]
y

7. Another required dependency is WMI client which is not in the Ubuntu repositories. You need to download and install it from the Pandora repository on SourceForge as shown.
$ wget https://sourceforge.net/projects/pandora/files/Tools%20and%20dependencies%20%28All%20versions%29/DEB%20Debian%2C%20Ubuntu/wmi-client_0112-1_amd64.deb
$ sudo dpkg -i wmi-client_0112-1_amd64.deb
Step 2: Installing Pandora Server and Console
8. Now download the Pandora server and console DEB packages by running the following wget commands.
$ wget https://sourceforge.net/projects/pandora/files/Pandora%20FMS%207.0NG/743/Debian_Ubuntu/pandorafms.console_7.0NG.743.deb
$ wget https://sourceforge.net/projects/pandora/files/Pandora%20FMS%207.0NG/743/Debian_Ubuntu/pandorafms.server_7.0NG.743.deb
9. Once you have downloaded both files, install them using the dpkg command as shown. The installation should fail due to some dependency issues as seen in the screenshot. To fix the issues, go to the next step.
$ sudo dpkg -i pandorafms.console_7.0NG.743.deb pandorafms.server_7.0NG.743.deb

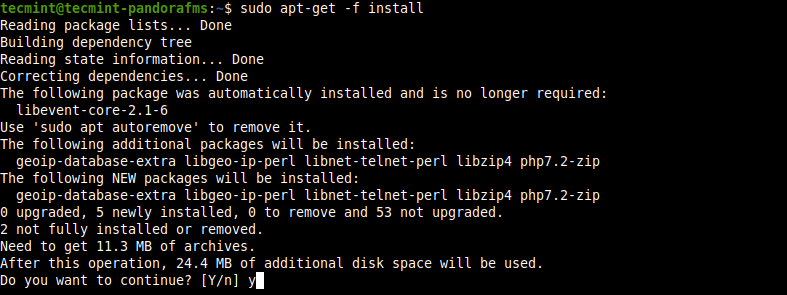
10. Run the following command to automatically fix the dependency issues from the previous step.
$ sudo apt-get -f install
11. After the packages are installed, the installer will restart the Apache2 service and start the Pandora FMS Websocket engine as indicated in the command output.
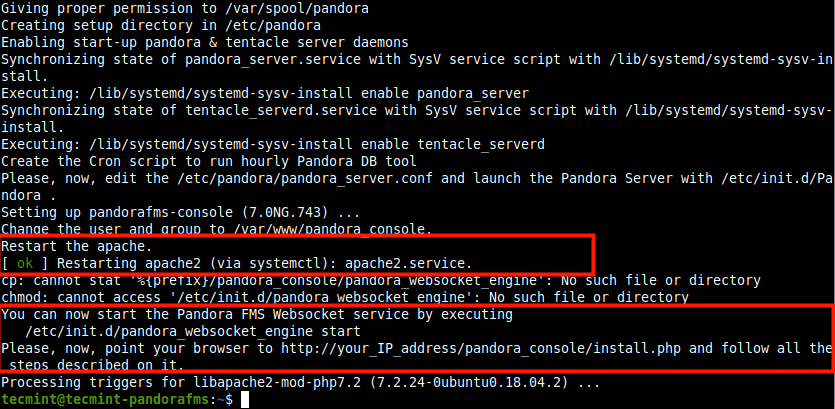
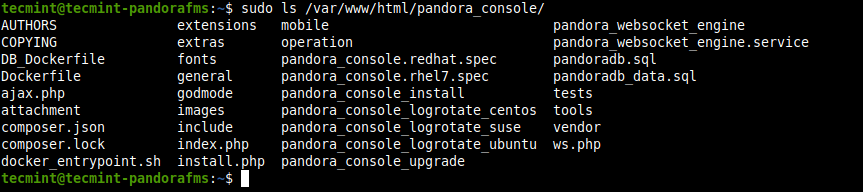
12. The Pandora console is installed in the path /var/www/html/pandora_console/. You can use the ls command to view the directory contents.
$ sudo ls /var/www/html/pandora_console/
13. If you have the UFW firewall service enabled and running, issue the following commands to allow HTTP and HTTPS requests through the firewall to the Apache2 HTTP server before accessing the Pandora console.
$ sudo ufw allow http
$ sudo ufw allow https
$ sudo ufw reload
Step 3: Complete PandoraFMS Installation via Web Wizard
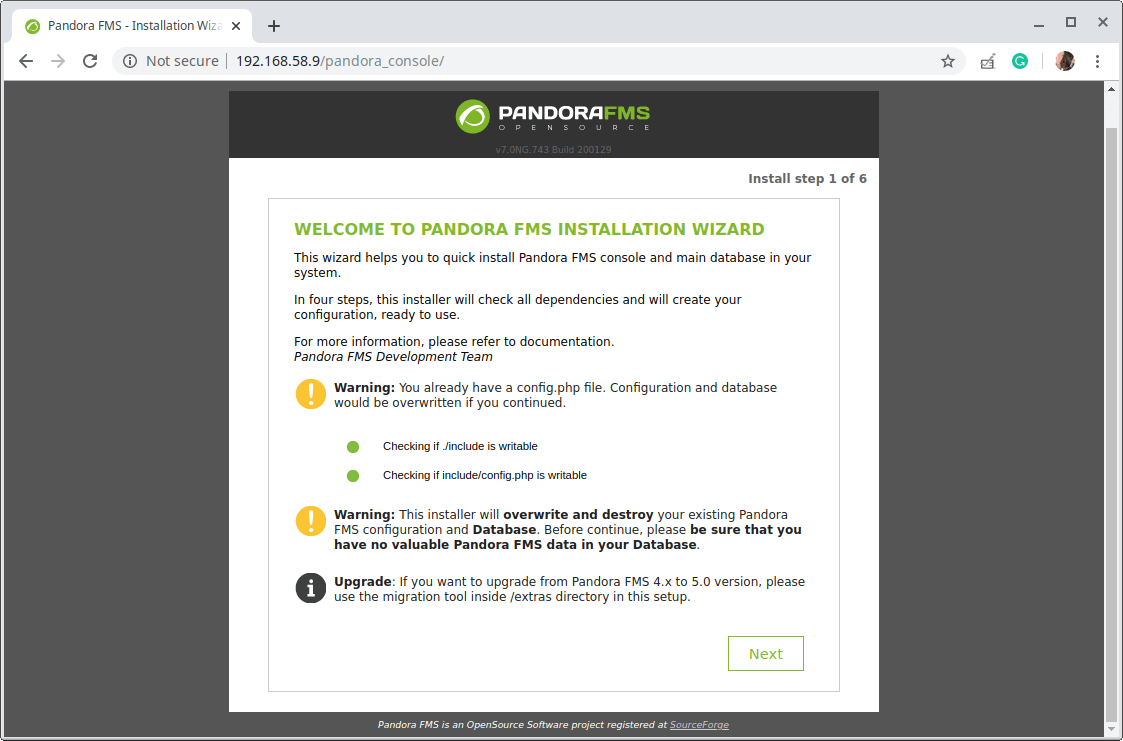
14. Now you need to complete the installation of the Pandora FMS Console from a web browser. Point your browser to the following address to access the console installation wizard.
http://192.168.58.9/pandora_console/
After it loads, read the instructions and click Next to continue.
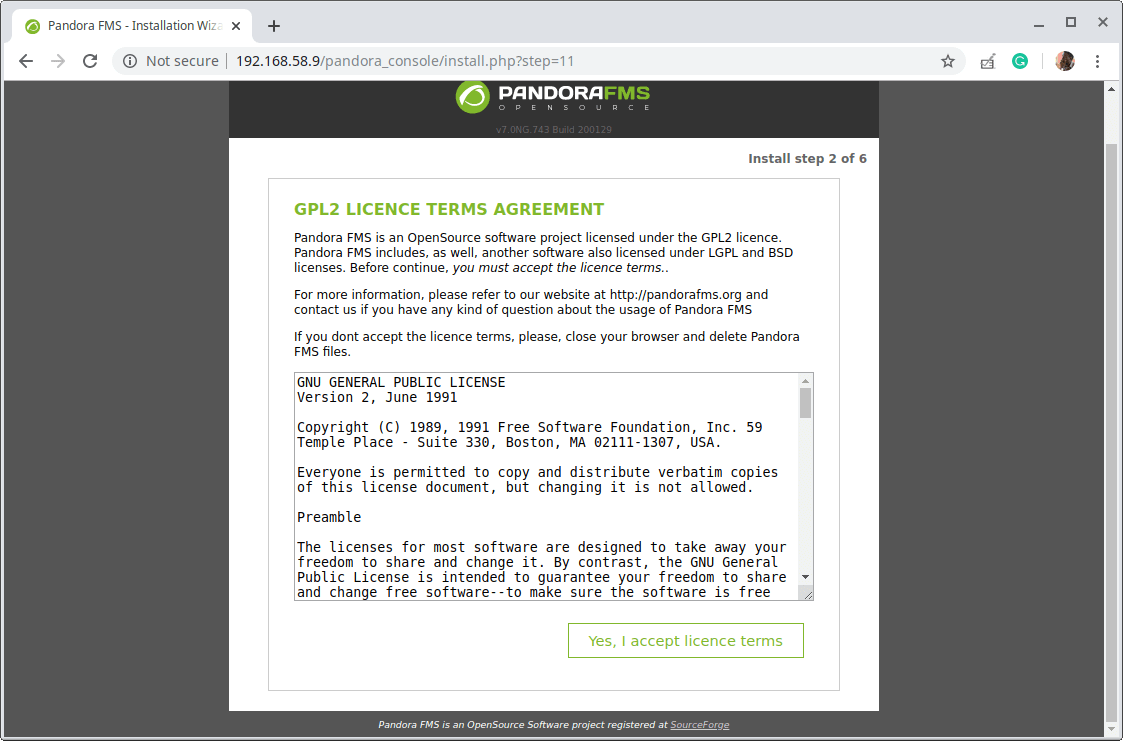
15. Next, agree to the license terms by clicking “Yes, I accept license terms”.
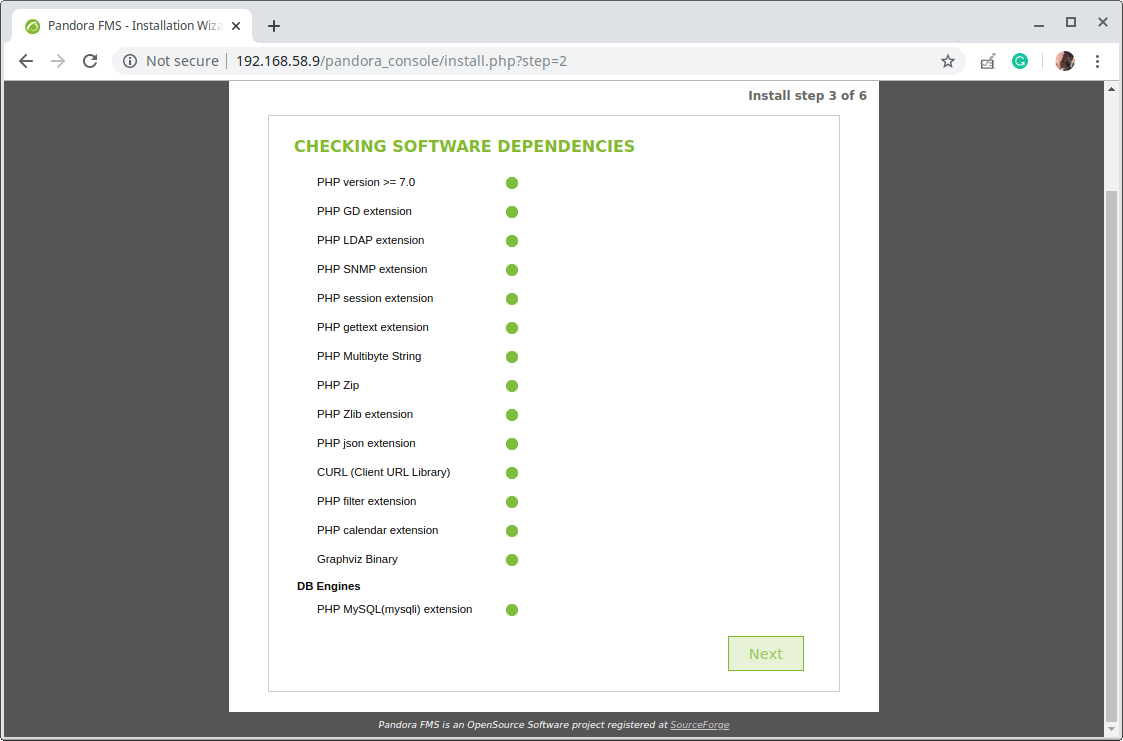
16. Then the installer will check software dependencies. If all is OK, click Next.
17. Now provide the MariaDB database root user password to create the Pandora FMS database and a database user (read the instructions). Then click Next.

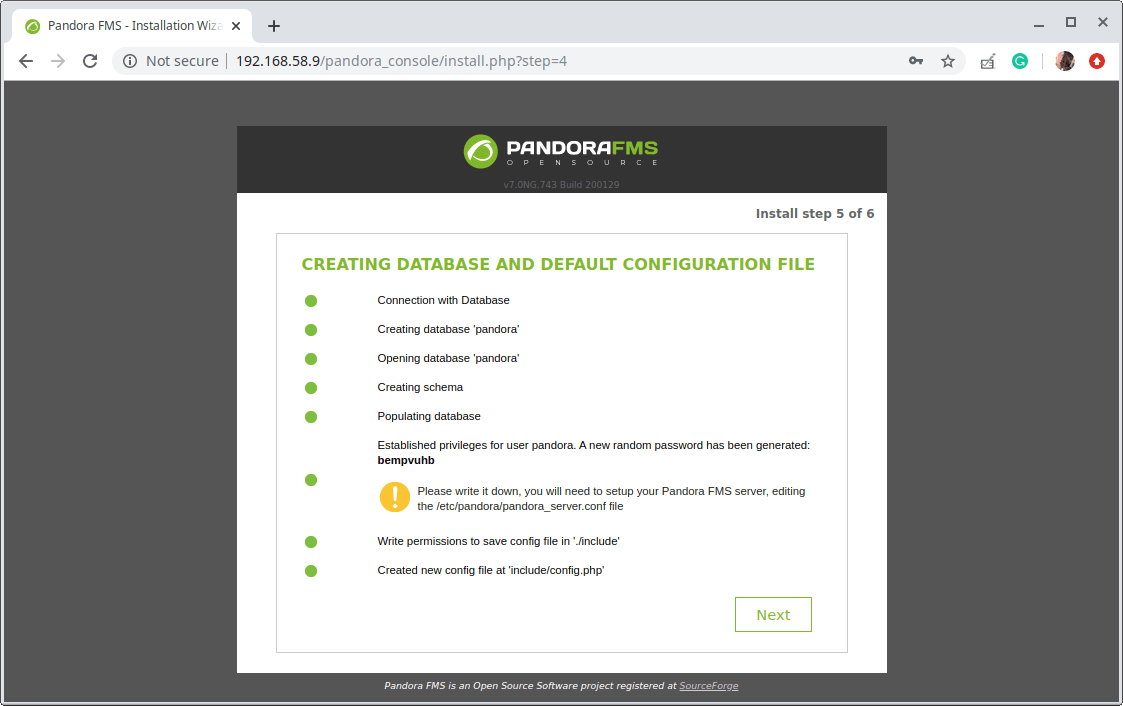
18. Next, the installer will create the Pandora database and a MySQL user to access it, and create a random password for the MySQL user, take note of it (the password), you need to set in the Pandora FM server configuration as explained later on.
Besides, it will create a new configuration file located at /var/www/html/pandora_console/include/config.php. Click Next to complete the installation process.
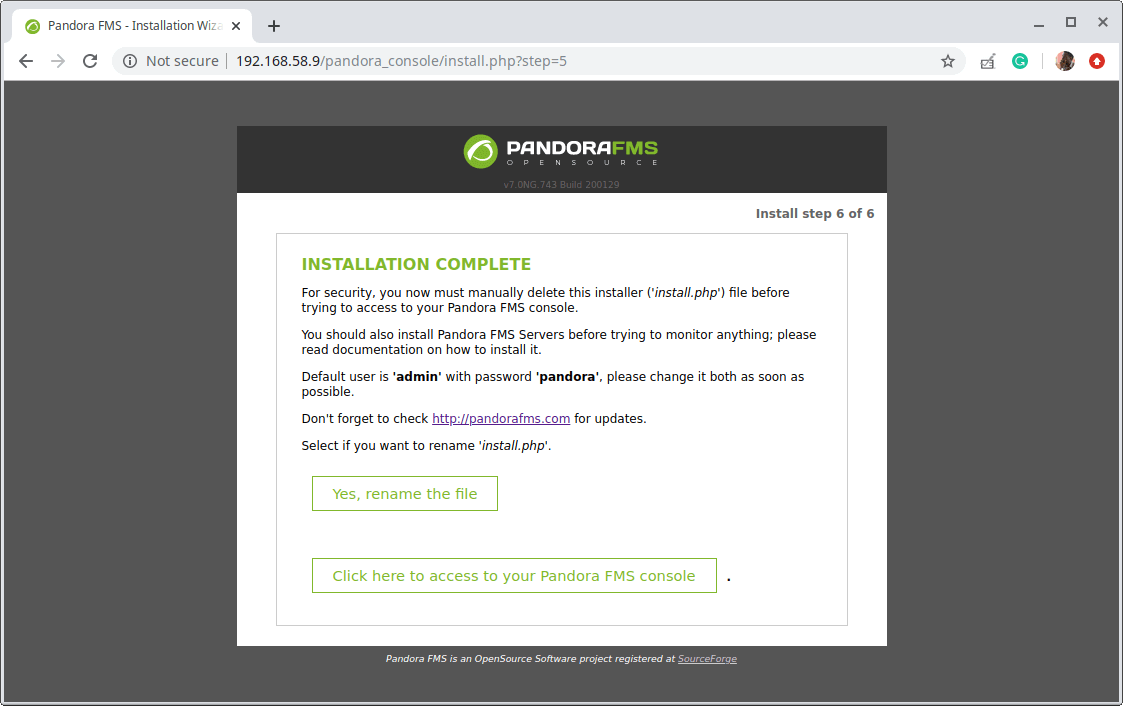
19. When the installation is complete, rename the installation script by clicking on “Yes, rename the file” or completely remove it.
$ sudo rm /var/www/html/pandora_console/install.php
To access the console login page, click on “click here to access your Pandora FMS Console”.
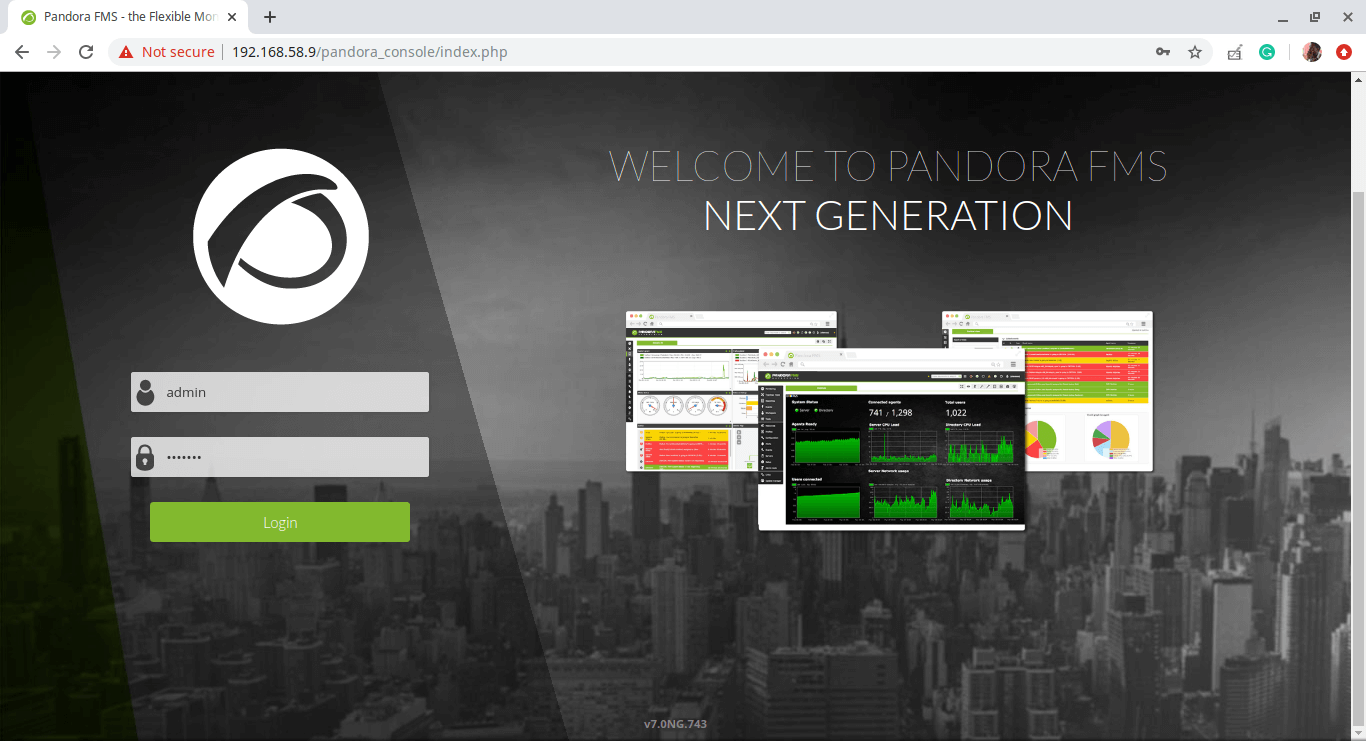
20. At the login page, use the default login credentials to log in:
username: admin
password: pandora
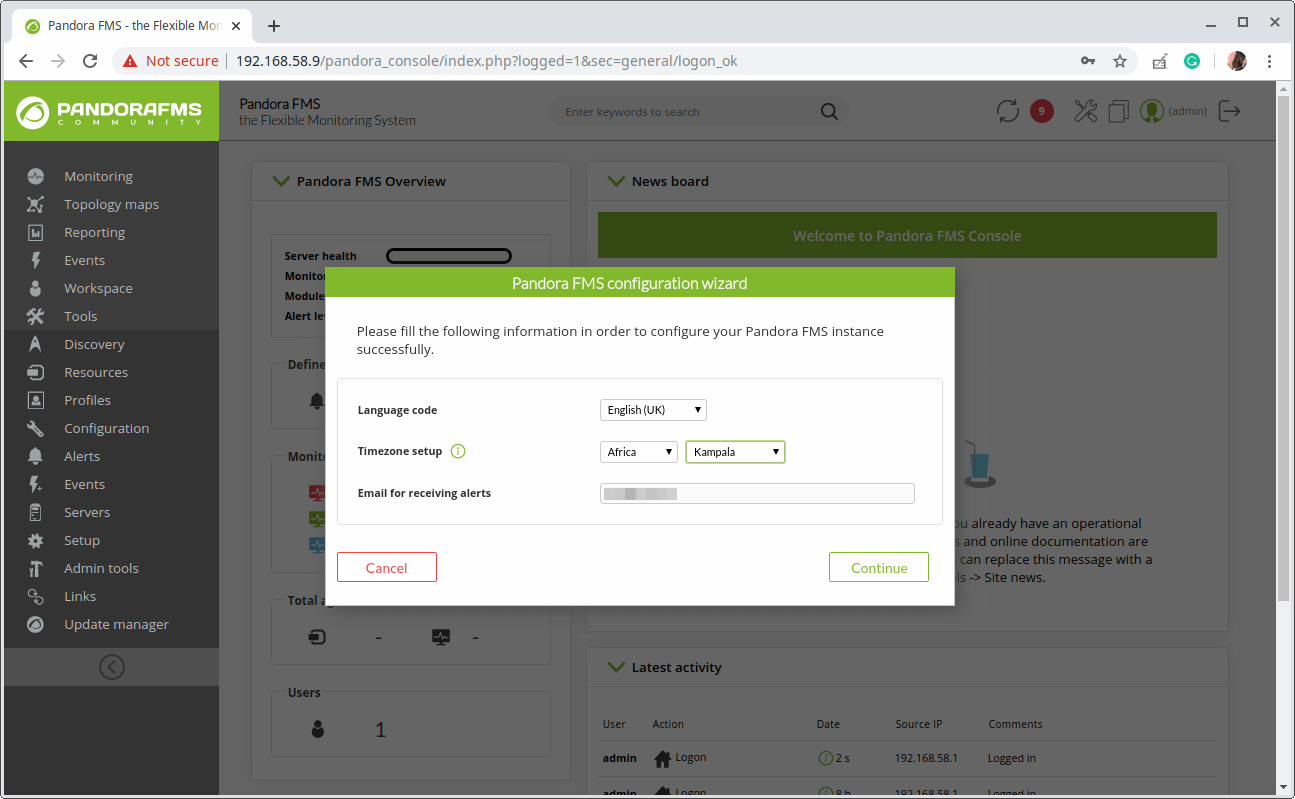
21. Next, configure the console by providing the language code, timezone, and email for receiving alerts.
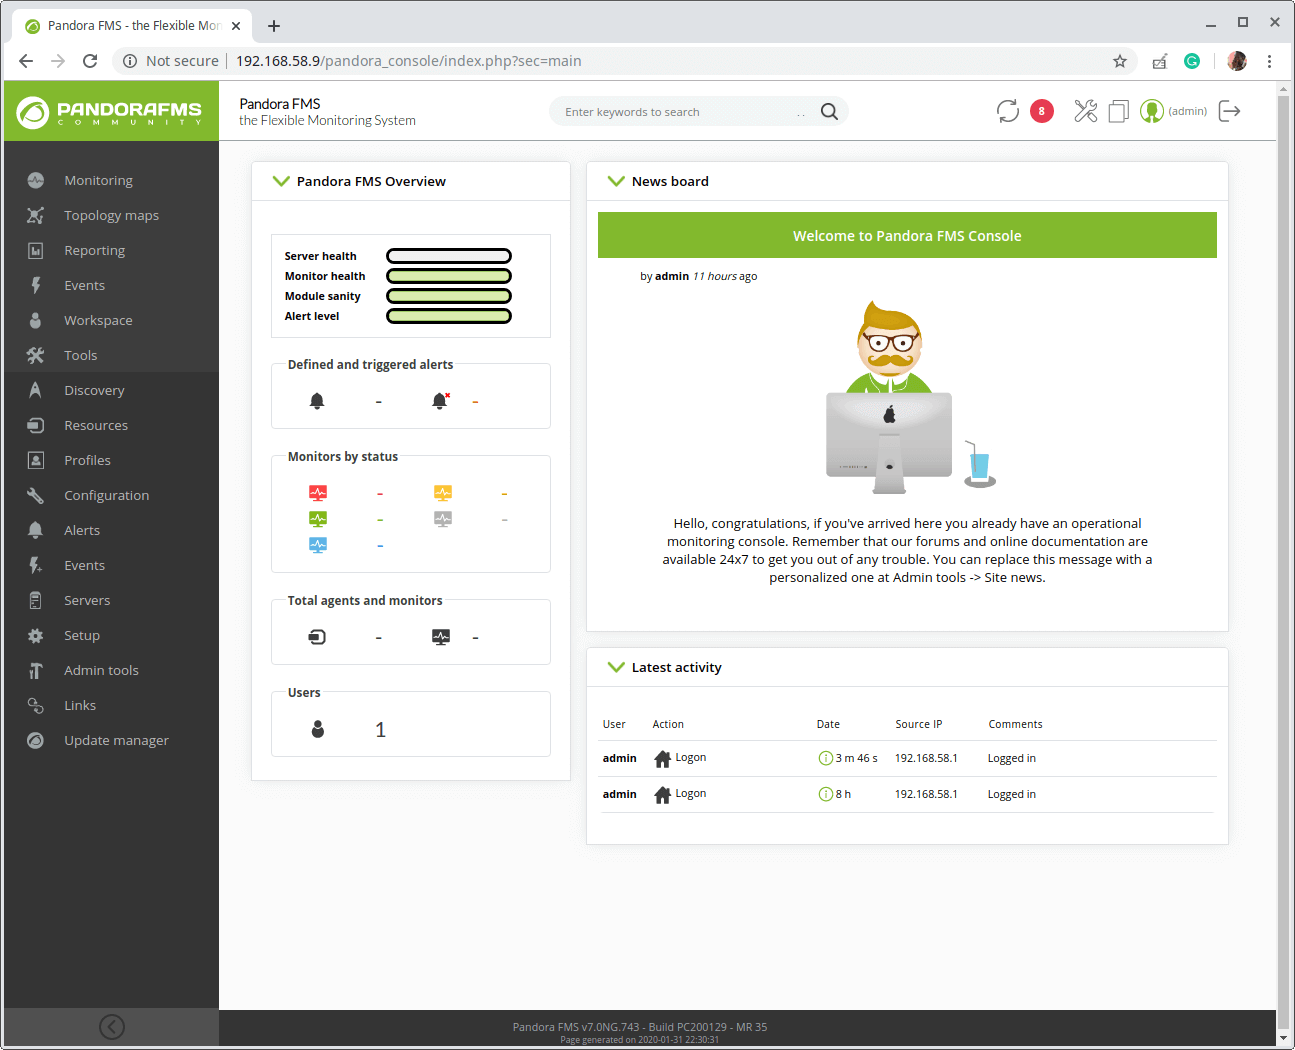
22. The following screenshot shows the Pandora FMS admin users’ default dashboard without any monitoring information.
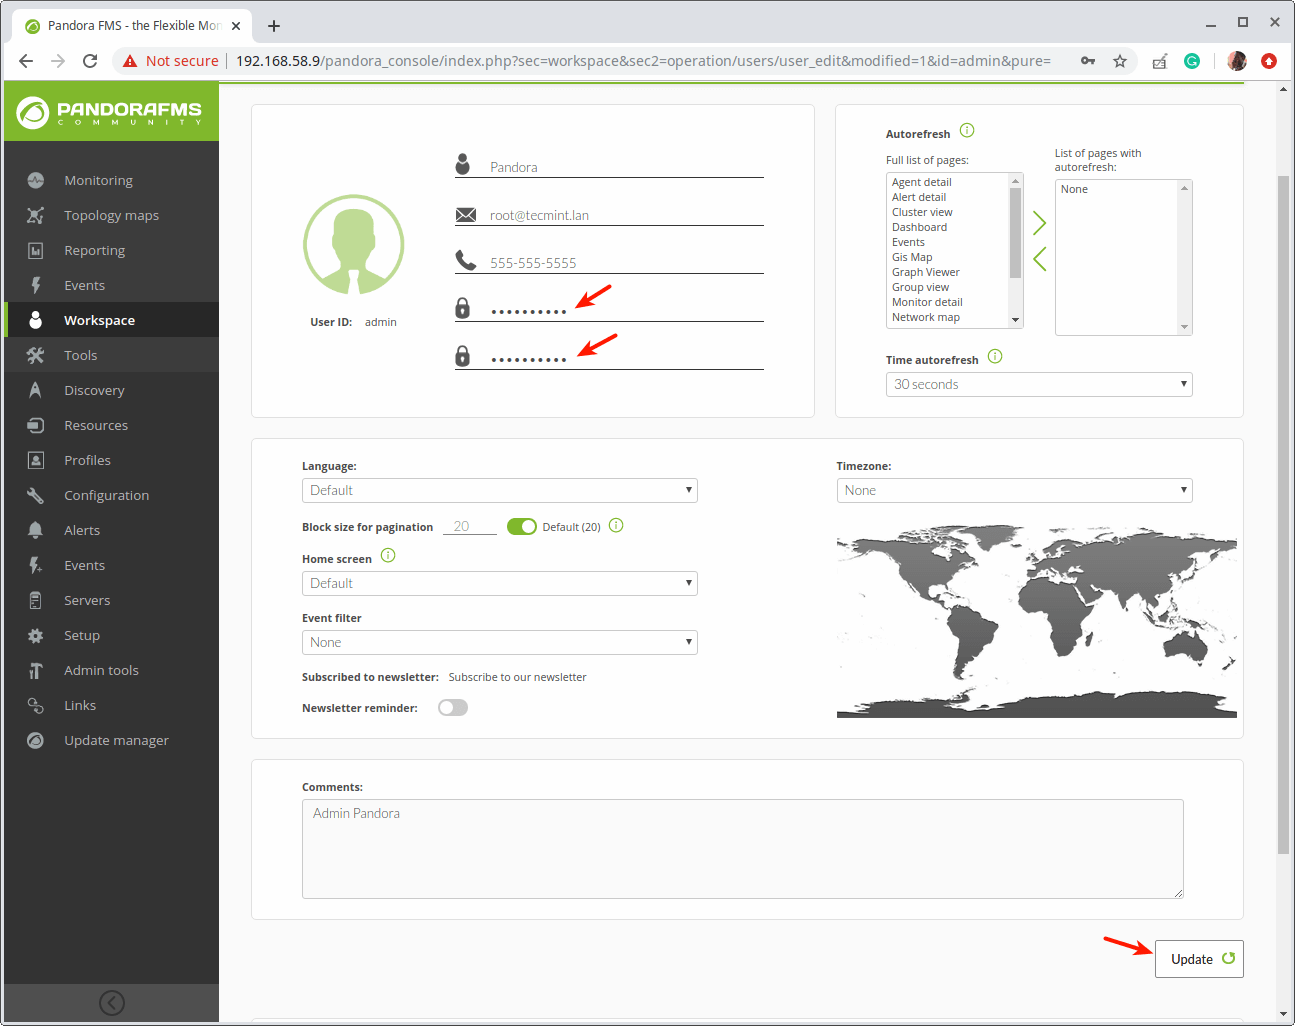
23. Next, to secure the Pandora console admin user’s account, change the default password to something strong and secure. Click on the admin user, then on the profile page, enter a new password and confirm it. Then click Update.
Step 4: Performing Pandora FMS Server Initial and Basic Configuration
24. To start monitoring, you need to configure the Pandora server. Open and edit the file named ‘/etc/pandora/pandora_server.conf‘.
$ sudo vi /etc/pandora/pandora_server.conf
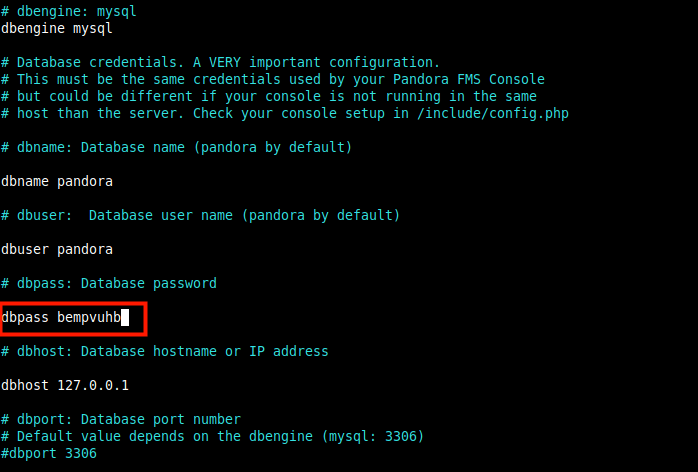
and look for the following line and set the dbpass parameter value to the MySQL user password (from step 18).
dbpass bempvuhb
25. Finally, restart the Pandora service and check if it is up and running (in this case it should fail/die).
$ sudo systemctl restart pandora_server.service
$ sudo systemctl status pandora_server.service
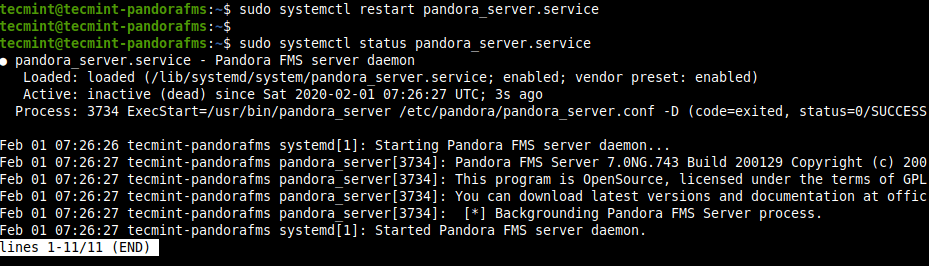
26. The reason the Pandora service dies immediately after being started is that the default service unit file doesn’t have the correct ExecStart command provided by the developers.
$ sudo vi /lib/systemd/system/pandora_server.service
Change the line:
ExecStart=/usr/bin/pandora_server /etc/pandora/pandora_server.conf -D
to
ExecStart=/etc/init.d/pandora_server start
Save the changes and then reload systemd configurations as shown.
$ sudo systemctl daemon-reload
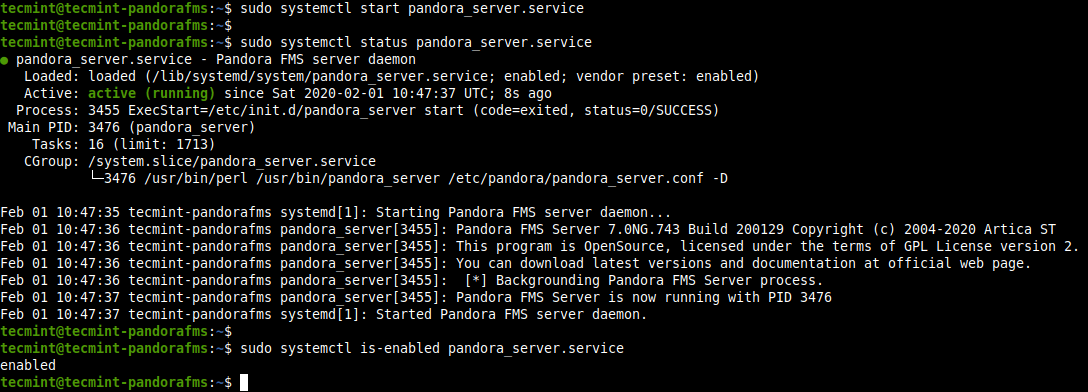
27. Now try to start the Pandora FMS service once more and check if it is up and running, and is enabled to auto-start at system boot as well.
$ sudo systemctl start pandora_server.service
$ sudo systemctl status pandora_server.service
$ sudo systemctl is-enabled pandora_server.service
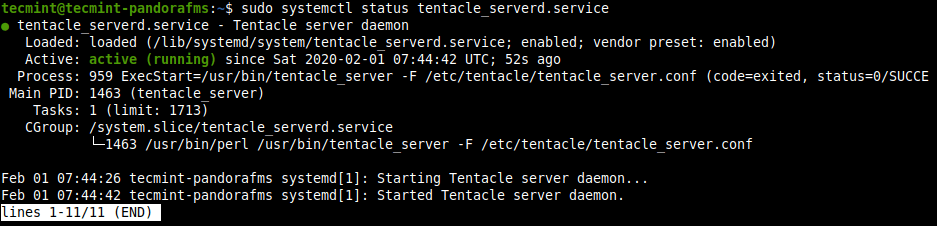
28. Also, ensure that the Tentacle (a client/server file transfer protocol) service is up and running.
$ sudo systemctl status tentacle_serverd.service
29. Finally, go back to the Pandora FMS console and refresh it to start monitoring the installation server. You should be able to get some information about the localhost on the dashboard as highlighted in the following screenshot.
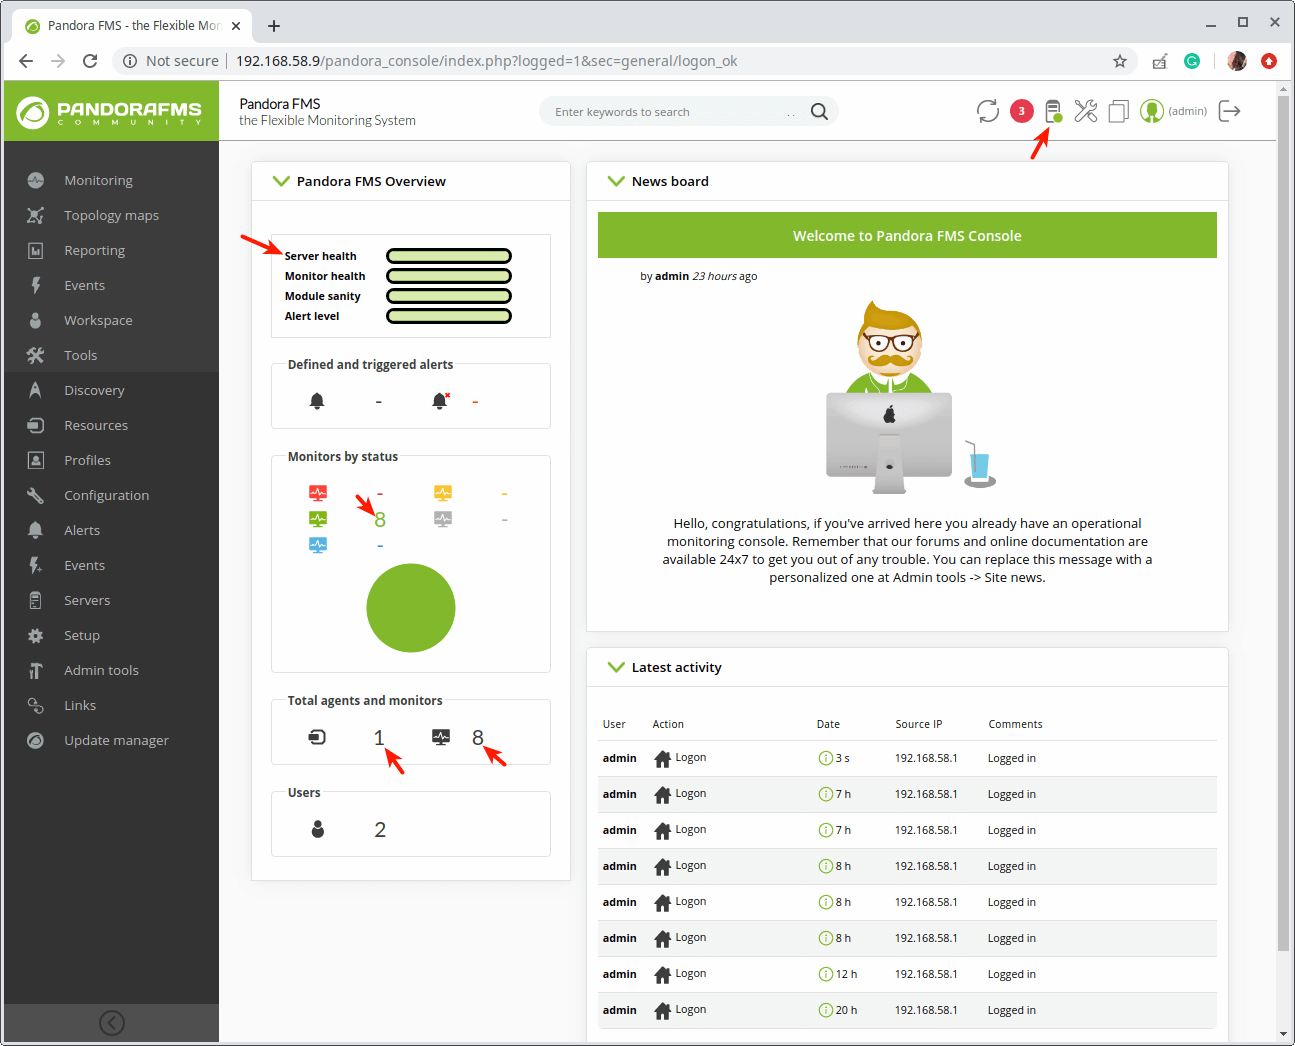
There you are! You have just installed the latest version of the Pandora FMS monitoring tool in the Ubuntu 18.04 server. In the next guide, we will show how to install and connect agents to the Pandora FMS server. Remember you can reach us via the feedback form below.


I can’t wait for the next part :-)
Thanks for your tutorial…
@Stan92
Here is the second part about adding PandoraFMS agents to a server: https://www.tecmint.com/install-and-connect-an-agent-to-pandora-fms-server/. Many thanks for the useful feedback.