Chrony is a flexible implementation of the Network Time Protocol (NTP). It is used to synchronize the system clock from different NTP servers, reference clocks or via manual input.
It can also be used NTPv4 server to provide time service to other servers in the same network. It is meant to operate flawlessly under different conditions such as intermittent network connection, heavily loaded networks, changing temperatures which may affect the clock of ordinary computers.
Chrony comes with two programs:
- chronyc – command line interface for chrony
- chronyd – daemon that can be started at boot time
In this tutorial we are going to show you how to install and use Chrony on your Linux system.
Install Chrony in Linux
On some systems, chrony may be installed by default. Still if the package is missing, you can easily install it. using your default package manager tool on your respective Linux distributions using following command.
# yum -y install chrony    [On CentOS/RHEL]
# apt install chrony       [On Debian/Ubuntu]
# dnf -y install chrony    [On Fedora 22+]
To check the status of chronyd use the following command.
# systemctl status chronyd      [On SystemD]
# /etc/init.d/chronyd status    [On Init]
If you want to enable chrony daemon upon boot, you can use the following command.
# systemctl enable chronyd       [On SystemD]
# chkconfig --add chronyd        [On Init]
Check Chrony Synchronization in Linux
To check if chrony is actually synchronized, we will use it’s command line program chronyc, which has the tracking option which will provide relevant information.
# chronyc tracking
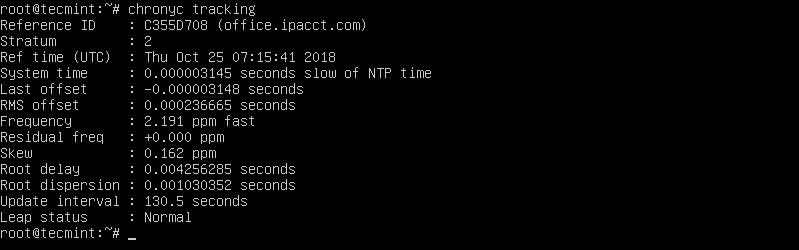
The listed files provide the following information:
- Reference ID – the reference ID and name to which the computer is currently synced.
- Stratum – number of hops to a computer with an attached reference clock.
- Ref time – this is the UTC time at which the last measurement from the reference source was made.
- System time – delay of system clock from synchronized server.
- Last offset – estimated offset of the last clock update.
- RMS offset – long term average of the offset value.
- Frequency – this is the rate by which the system’s clock would be wrong if chronyd is not correcting it. It is provided in ppm (parts per million).
- Residual freq – residual frequency indicated the difference between the measurements from reference source and the frequency currently being used.
- Skew – estimated error bound of the frequency.
- Root delay – total of the network path delays to the stratum computer, from which the computer is being synced.
- Leap status – this is the leap status which can have one of the following values – normal, insert second, delete second or not synchronized.
To check information about chrony’s sources, you can issue the following command.
# chronyc sources

Configure Chrony in Linux
The configuration file of chrony is located at /etc/chrony.conf or /etc/chrony/chrony.conf and sample configuration file may look something like this:
server 0.rhel.pool.ntp.org iburst
server 1.rhel.pool.ntp.org iburst
server 2.rhel.pool.ntp.org iburst
server 3.rhel.pool.ntp.org iburst

stratumweight 0
driftfile /var/lib/chrony/drift
makestep 10 3
logdir /var/log/chrony
The above configuration provide the following information:
- server – this directive used to describe a NTP server to sync from.
- stratumweight – how much distance should be added per stratum to the sync source. The default value is 0.0001.
- driftfile – location and name of the file containing drift data.
- Makestep – this directive causes chrony to gradually correct any time offset by speeding or slowing down the clock as required.
- logdir – path to chrony’s log file.
If you want to step the system clock immediately and ignoring any adjustments currently being in progress, you can use the following command:
# chronyc makestep
If you decide to stop chrony, you can use the following commands.
# systemctl stop chrony          [On SystemD]
# /etc/init.d/chronyd stop       [On Init]
Conclusion
This was a show presentation of the chrony utility and how it can be used on your Linux system. If you wish to check more details about chrony, do review chrony documentation.


“How to Install and Use Chrony in Linux”
That should be “How to use chrony in systemd”. There are dozens of Linux distros that DO NOT use systemd. For those using those distros, your instructions for usage are worthless.
@Dragonmouth,
I understand your point. However, the majority of users are on systemd-based distros, so covering Chrony in that context makes the article relevant to most readers.
It’s challenging to address every possible configuration in a single article, but I appreciate your feedback and will consider it for future content.
Hi,
I am getting a “chronyd[2506]: Could not set SO_TIMESTAMPING socket option” error.
Please help me
@Nayan,
Use RHEL 7.4 or later kernel in order for the advanced timestamping to work.
I get Refusing to operate on linked unit file chronyd.service.
JUST A TYPO
systemctl enable chrony<—— someone forgot the "d" at the end….@Brian,
Thanks for notifying, corrected in the article.