Regardless of Fedora starting to adopt dnf as the new package manager and default package management library, it will not replace good old yum package manager for good in other spinoff distributions (such as Red Hat Enterprise Linux (RHEL) and CentOS) until it has proven to be as reliable as yum and more solid (according to the Fedora Project wiki, as of November 15, 2015, dnf is still in testable state). Thus, your yum-management skills will serve you well for still quite some time.

For that reason, in this guide we will introduce you to yum-utils, a collection of utilities that integrate with yum to extend its native features in several ways, thus making it more powerful and easier to use.
Installing yum-utils in RHEL/CentOS
Yum-utils is included in the base repo (which is enabled by default) so installing it in any Fedora-based distribution is as easy as doing:
# yum update && yum install yum-utils
All of the utilities provided by yum-utils are installed automatically with the main package, which we will describe in the next section.
Explore Utilities Provided by yum-utils Package
The tools provided by yum-utils are listed in its man page:
# man yum-utils
Here are 10 of those yum utilities we thought you would be interested in:
1. Debug a Package
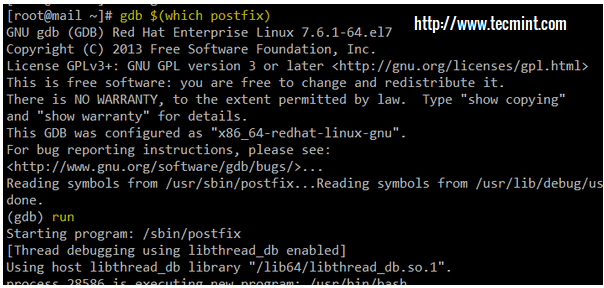
debuginfo-install <package name> installs the debuginfo packages (and their dependencies) required to debug <package name> in case of a crash or while developing applications that use a certain package.
In order to debug a package (or any other executable), we will also need to install gdb (the GNU debugger) and use it to start a program in debugging mode.
For example:
# gdb $(which postfix)
The above command will start a gdb shell where we can type actions to be executed. For example, run (as shown in the image below) will start the program, whereas bt (not shown) will display the stack trace (also known as backtrace) of the program, which will provide a list of function calls that led to a certain point in the program’s execution (using this information, both developers and system administrators can figure out what went wrong in case of a crash).
Other available actions and their expected results are listed in man gdb.
2. Find Repository of Installed Packages
The following command shows which repository the currently installed packages <package 1> <package 2> … <package n> were installed from:
# find-repos-of-install httpd postfix dovecot
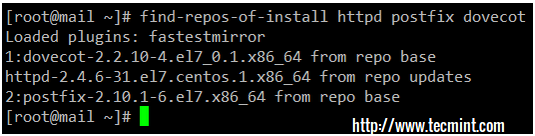
If run without arguments, find-repos-of-install will return the whole list of currently installed packages.
3. Remove Duplicate or Orphaned Packages
package-cleanup manages package cleanup, duplicates, orphaned packages (programs installed from a source other than the currently configured repositories) and other dependency inconsistencies, including removing old kernels as shown in the following example:
# package-cleanup --orphans
# package-cleanup --oldkernels
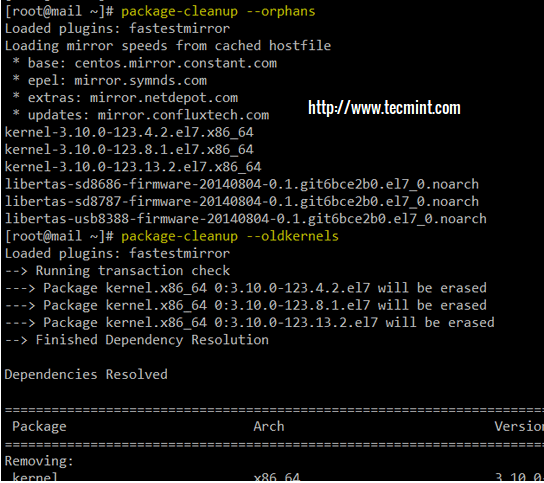
You don’t have to worry about the last command damaging your kernel. It will just affect old kernel packages (versions older than the currently running one) that aren’t needed anymore.
4. Find Out Package Dependency List
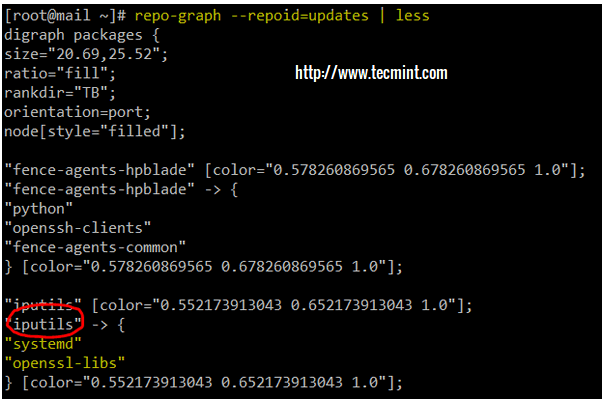
repo-graph returns a full package dependency list in dot format for all of the packages that are available from the configured repositories. Alternatively, repo-graph can return the same information by repository if used with the --repoid=<repo> option.
For example, let’s view the dependencies for each package in the updates repository:
# repo-graph --repoid=updates | less
In the above command we are sending the output of repo-graph to less for easier visualization, but you can alternatively redirect it to a local file for later inspection:
# repo-graph --repoid=updates > updates-dependencies.txt
In either case, we can see that the iputils package depends on systemd and openssl-libs.
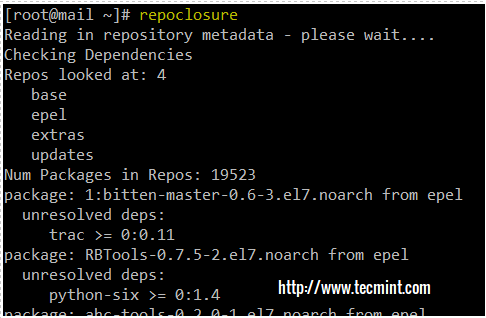
5. Check List of Unresolved Dependencies
repoclosure reads the metadata of configured repositories, checks dependencies of packages included in them and displays list of unresolved dependencies for each package:
# repoclosure
6. How to Check Newest or Oldest Packages in a Directory
repomanage queries a directory with rpm packages and returns a list of newest or oldest packages in a directory. This tool can come in handy if you have a directory where you store several .rpm packages of different programs.
When executed without arguments, repomanage returns the newest packages. If run with the --old flag, it will return the oldest packages:
# ls -l
# cd rpms
# ls -l rpms
# repomanage rpms
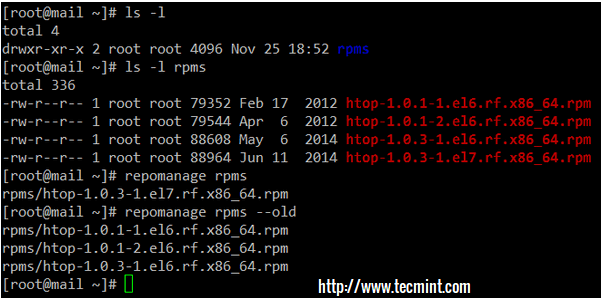
Please note that changing the name of the rpm packages will NOT affect how repomanage works.
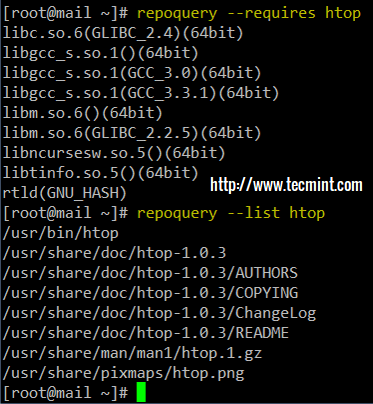
7. Query Yum Repositories to Get Information about Package
repoquery queries yum repositories and gets additional information on packages, whether they are installed or not (dependencies, files included in the package, and more).
For example, htop (Linux Process Monitoring ) is not currently installed on this system, as you can see below:
# which htop
# rpm -qa | grep htop

Now suppose we want to list the dependencies of htop, along with the files that are included in a default installation. To do so, execute the following two commands, respectively:
# repoquery --requires htop
# repoquery --list htop
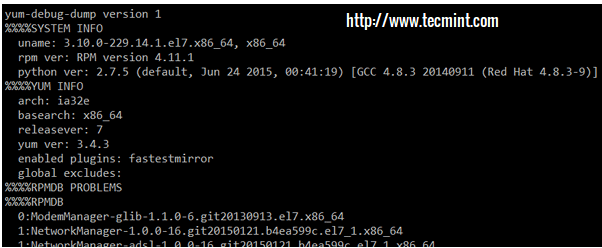
8. Dump All Installed RPM Packages into Zip File
yum-debug-dump allows you to dump a complete list of all packages you have installed, all packages available in any repository, important configuration and system information into a zipped file.
This can come in handy in case you want to debug a problem that has occurred. For our convenience, yum-debug-dump names the file as yum_debug_dump-<hostname>-<time>.txt.gz, which allows us to track the changes over time.
# yum-debug-dump

As with any compressed text file, we can view its contents using zless command:
# zless yum_debug_dump-mail.linuxnewz.com-2015-11-27_08:34:01.txt.gz
Should you need to restore the configuration information provided by yum-debug-dump, you can use yum-debug-restore to do so:
# yum-debug-restore yum_debug_dump-mail.linuxnewz.com-2015-11-27_08:34:01.txt.gz

9. Downloading Source RPMs from Yum Repositories
yumdownloader downloads source RPM files from repositories, including their dependencies. Useful to create a network repository to be accessed from other machines with restricted Internet access.
Yumdownloader allows you to not only download the binary RPMs but also the source ones (if used with the --source option).
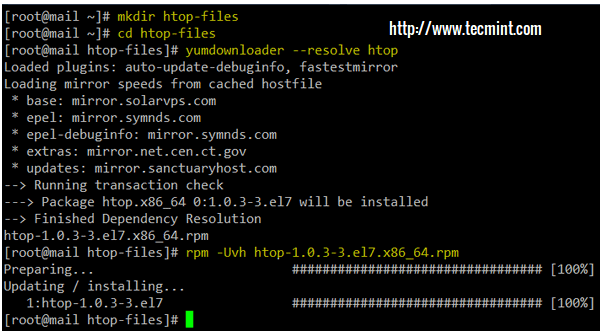
For example, let’s create a directory named htop-files where we will store the RPM(s) needed to install the program using rpm. To do so, we need to use the --resolve switch along with yumdownloader:
# mkdir htop-files
# cd htop-files
# yumdownloader --resolve htop
# rpm -Uvh
10. Synchronize a Remote Yum Repository to a Local Directory
reposync is closely related to yumdownloader (in fact, they support almost the same options) but offers a considerable advantage. Instead of downloading binary or source RPM files, it synchronizes a remote repository to a local directory.
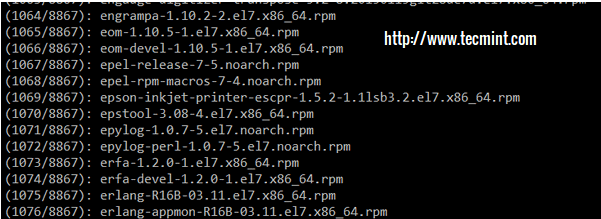
Let’s sync the well-known EPEL repository to a subdirectory called epel-local inside the current working directory:
# man reposync
# mkdir epel-local
# reposync --repoid=epel --download_path=epel-local

Note that this process will take quite a while as it is downloading 8867 packages:
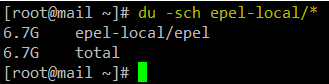
Once the synchronization has completed, let’s check the amount of disk space used by our newly-created mirror of the EPEL repository using du command:
# du -sch epel-local/*
Now it’s up to you if you want to keep this EPEL mirror or use it to install packages instead of using a remote one. In the first case, please keep in mind that you will need to modify /etc/yum.repos.d/epel.repo accordingly.
11. Fix Unfinished or Aborted Yum Transactions
yum-complete-transaction is a part of yum-utils program which catch unfinished or aborted yum transactions on a system and try to complete them.
For example, when we update the Linux servers via yum package manager sometimes it throws an warning message which read as follows:
There are unfinished transactions remaining. You might consider running yum-complete-transaction first to finish them.
To fix such warning messages and resolve such issue, yum-complete-transaction command comes into picture to complete the unfinished transactions, it finds those incomplete or aborted yum transactions in transaction-all* and transaction-done* files which can be found in /var/lib/yum directory.
Run yum-complete-transaction command to finish incomplete yum transactions:
# yum-complete-transaction --cleanup-only
Now yum commands will run without the incomplete transaction warnings.
# yum update
Note: This tip is suggested by one of our regular reader Mr. Tomas in the comments section here.
Summary
In this article we have covered some of the most useful utilities provided through yum-utils. For a complete list, you can refer to the man page (man yum-utils).
Additionally, each of these tools has a separate man page (see man reposync, for example), which is the primary source of documentation you should refer to if you want to learn more about them.
If you take a minute to check the man page of yum-utils, perhaps you will find another tool you would like us to cover in greater depth in a separate article. If so, or if you have questions, comments, or suggestions on this article, feel free to let us know which one by dropping us a note using the comment form below.


The yum-complete-transaction is also worth adding to the list. It can save your day completing aborted yum transactions.
@Tomas,
Thanks for the tip, we’ve added to the list as suggested…:)