Continuing to move forward with the XenServer series, this article will approach the creation of the actual guests themselves (often called virtual machines).
Update: In May 2016, Citrix released the new version of the XenServer 7 platform. For installation follow: Fresh Installation of XenServer 7.
This article will assume all the previous articles covering networking, patching, and storage have been completed. Thankfully, no more new terminology really needs to be discussed and the creation of the guests can begin!
System Review
At this point, a lot has been configured on this XenServer host. This will serve as a quick review about what has been configured and which article the topic was discussed.
- XenServer 6.5 was installed to the server
- All XenServer 6.5 patches have been applied
- Network interface teaming and VLANs were created
- iSCSI and ISO storage repositories were created to hold operating system installation files and the virtual harddisks used by the guests
Creation of Virtual Guests in XenServer
This portion of the guide will be relying on ISO installers to actually boot the newly created guest machine and install an operating system. Be sure to review the fourth article for information on creating an ISO repository.
XenServer comes with a series of templates that can be used to quickly provision a virtual guest. These templates provide common options for the chosen operating system. Options include things such as hard drive space, CPU architecture, and amount of ram available among other options.
These options can be manually modified later but for now a simple template will be used to illustrate their usage. To obtain the list of available templates, the traditional 'xe' command can be passed different arguments to prompt the system to return the templates available.
# xe template-list
This command is likely to return a lot of output. To make the output easier to read, it is suggested that the output be piped into ‘less’ as follows:
# xe template-list | less
This will allow for easier parsing of the available templates to locate the necessary UUID information. This article is going to be working with Debian 8 Jessie but will require the use of the older Debian 7 Wheezy template until Citrix releases the new template.
Selecting Debian 7 won’t affect anything in the operation of the actual operating system. (The screen shot below used the UUID in the command to trim out some of the normal output).

# xe sr-list name-label=”Tecmint iSCSI Storage”
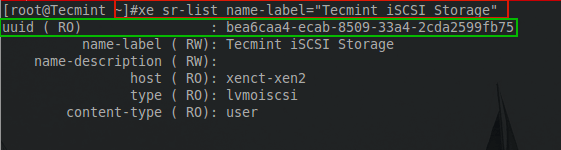
With this UUID, all of the initial information to setup this guest has been obtained. As with almost everything in XenServer, another ‘xe’ command will be used to provision the new guest.
# xe vm-install template=”Debian Wheezy 7.0 (64-bit)” new-name-label="TecmintVM" sr-uuid=bea6caa4-ecab-8509-33a4-2cda2599fb75

The highlighted UUID is the UUID of the newly provisioned guest. There are a couple of house keeping steps that can potentially make things easier in the future. The first is to provide a name-label to the newly created VDI and the second is modifying any of the default hardware specifications provisioned by the template.
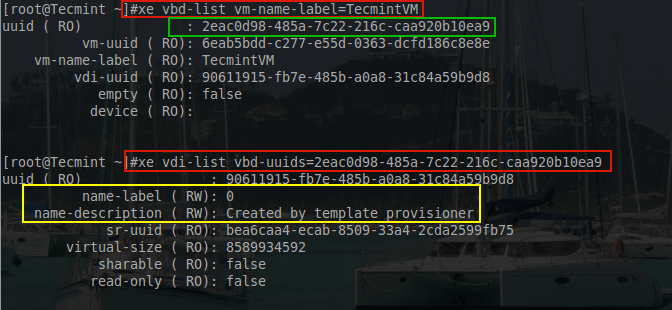
To see why it would be important to name the VDI, take a look at what the system will automatically assign to the VDI when provisioned using the following ‘xe’ commands:
# xe vbd-list vm-name-label=TecmintVM – Used to get the VDI UUID
# xe vdi-list vbd-uuids=2eac0d98-485a-7c22-216c-caa920b10ea9    [Used to show naming issue]
Another option available is to gather both pieces of information is the following command:
# xe vm-disk-list vm=TecmintVM
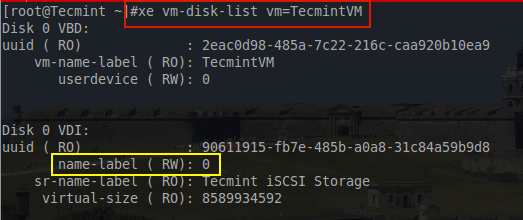
The part in yellow is the concern. To many people this issue is minor but for house keeping purposes a more descriptive name is desired to keep track of the purpose of this particular VDI. To rename this particular VDI, the UUID in the above output is needed and another ‘xe’ command needs to be created.
# xe vdi-param-set uuid=90611915-fb7e-485b-a0a8-31c84a59b9d8 name-label="TecmintVM Disk 0 VDI"
# xe vm-disk-list vm=TecmintVM

This may seem trivial to set but from experience, this has prevented a serious issue when detaching a storage repository from one XenServer and attempting to attach it to another XenServer. This particular scenario, a metadata backup of all the guest information failed to be restore-able on the new XenServer and thankfully by naming the VDI on each of the guests, proper mapping of the guest to its VDI was able to be done simply by the name-label.
The next house keeping step for this article is to provide this particular guest with more resources. As provisioned this guest will only have about 256 MiB (Mebibytes) worth of memory. Most guests this isn’t enough so it is beneficial to know how to increase a guest’s available memory. As with anything in XenServer this can be accomplished with ‘xe’ commands.
# xe vm-param-list uuid=6eab5bdd-c277-e55d-0363-dcfd186c8e8e | grep -i memory

The box in green above indicates that the most memory that this particular guest could ever have is about 256 MiB. For testing purposes this would be okay but for any sort of heavy use system, this would prove to be insufficient.
To modify this value to give the guest access to more RAM, a simple ‘xe’ command can be issued with the guest powered off. In this example, the amount of ram to be given to this machine will be represented in bytes but will equal 2 Gibibytes worth of ram.
# xe vm-memory-limits-set dynamic-max=2147483648 dynamic-min=2147483648 static-max=2147483648 static-min=2147483648 name-label=TecmintVM
Notice that this will reserve two GiB of ram for this guest all the time.

Now this particular guest is ready to have an operating system installed. From the previous article about Storage Repositories, a Samba share was added to this XenServer to store ISO installer files. This can be confirmed with the following ‘xe’ command:
# xe sr-list name-label=Remote\ ISO\ Library\ on:\ //<servername>/ISO

Be sure to replace <servername> with the name of the proper Samba server for the environment in which this configuration is taking place. Once the XenServer is confirmed to see the ISO storage repository, a virtual CD-ROM needs to be added to the guest in order to boot the ISO file. This guide will assume that the Debian Net Installer ISO exists on the ISO storage repository.
# xe cd-list | grep debian

# xe vm-cd-add vm=TecmintVM cd-name=debian-8-netinst.iso device=3
# xe vbd-list vm-name-label=TecmintVM userdevice=3

The above commands first list out the name for the Debian ISO. The next command will add a virtual CD-ROM device to the TecmintVM guest and assigns it the device ID of 3.
The third command is used to determine the UUID for the newly added CD-ROM to continue setting up the device to boot the Debian ISO.
The next step is to make the CD-ROM bootable as well as instruct the guest to install an operating system from the CD-ROM.
# xe vbd-param-set uuid=3836851f-928e-599f-dc3b-3d8d8879dd18 bootable=true
# xe vm-param-set uuid=6eab5bdd-c277-e55d-0363-dcfd186c8e8e other-config:install-repository=cdrom
The first command above sets the CD-ROM to be bootable by using its UUID highlighted in green in the above screen-shot. The second command instructs the guest to use the CD-ROM as the method for installing the operating system. The UUID for the Tecmint guest is highlight in the above screen-shot in yellow.

The last step in setting up the guest is to attach a virtual network interface (VIF). This is especially important for this install method since the Debian Network installer is being used and will need to pull packages from the Debian repositories.
Looking back at the XenServer networking article, a special VLAN was already created for this guest and it was VLAN 10. Using ‘xe’ the necessary network interface can be created and assigned to this guest.
# xe network-list name-description="Tecmint test VLAN 10"
# xe vif-create vm-uuid=6eab5bdd-c277-e55d-0363-dcfd186c8e8e network-uuid=cfe987f0-b37c-dbd7-39be-36e7bfd94cef device=0
The first command is used to obtain the UUID of the network created for this guest. The next command is used to create a network adapter for the guest and attach the network adapter to the proper network.

Congrats! At this point, the virtual machine is ready to boot and install! To start the guest, issue the following ‘xe’ command.
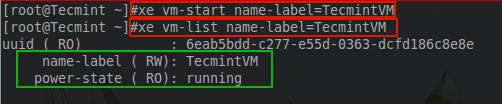
# xe vm-start name-label=TecmintVM
If the terminal doesn’t produce any errors, then the guest started successfully. Proper starting of the guest can be confirmed with the following ‘xe’ command:
# xe vm-list name-label=TecmintVM
Now the big question. How to access the installer? This is a valid question. Citrix’s approved method is to use XenCenter. The issue here is that XenCenter doesn’t run on Linux! So a workaround exists so that users don’t have to create a special Windows station simply to access the console of a running guest.
This process involves creating an SSH tunnel from the Linux computer to the XenServer host and then port forwarding a VNC connection through that tunnel. It is very clever and works wonderfully but this method does assume that the user can access the XenServer over SSH.
The first step is to determine the guest’s domain number on the XenServer. This is done through the use of several different commands.
# xe vm-list params=dom-id name-label=TecmintVM
# xenstore-read /local/domain/1/console/vnc-port
The order of these commands is important! The first command will return a number that is needed for the second command.
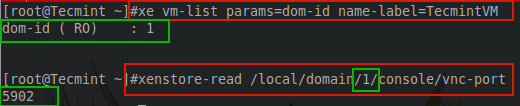
The output from both commands is important. The first output states the domain ID that the guest is running in; 1 in this case. The next command requires that number in order to determine the VNC port for the guest console session. The output from this command provides the VNC port that can be used to connect to the video out of this particular guest.
With the above information obtained, it is time to switch to a Linux station and connect to the XenServer to view the console session of this guest. To do this, an SSH tunnel will be created and port forwarding will be setup to direct a local VNC connection through the SSH tunnel. This connection will be done from a Linux Mint 17.2 workstation but should be similar for other distributions.
The first step is to ensure that OpenSSH client and xtightnvcviewer are installed on the Linux host. In Linux Mint this can be accomplished with the following command:
$ sudo apt-get install openssh-client xtightvncviewer
This command will install the necessary utilities. The next step is to create an SSH tunnel to the XenServer host and setup port forwarding to the VNC port determine earlier on the XenServer host (5902).
# ssh -L <any_port>:localhost:<VM_Port_Above> root@<server> -N
# ssh -L 5902:localhost:5902 root@<servername> -N
The ‘-L’ option tells ssh to port forward. The first port can be any port above 1024 that isn’t in use on the Linux Mint machine. The ‘localhost:5902’ indicates that the traffic should be forwarded to the remote localhost port 5902 in this case that is the XenServer VNC port of the TecmintVM.
The ‘root@<server>’ is the login credentials to SSH into the XenServer host. Finally the ‘-N’ tells SSH to simply open a port forwarding connection. Using ‘lsof’ command the tunnel can be viewed in the output.
$ sudo lsof -i | grep 5902

Here the tunnel is setup and listening for connections. Now it is time to open a VNC connection to the guest on the XenServer. The utility installed is ‘xvncviewer’ and the ssh connection to forward traffic to the XenServer is listening on ‘localhost:5902’ so the appropriate command can be built.
$ xvncviewer localhost:5902
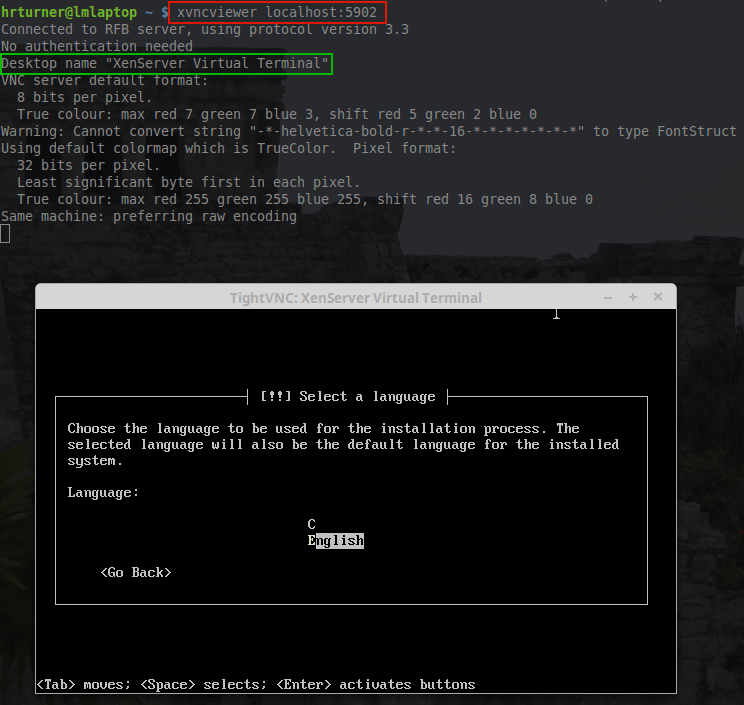
Voila! There is the TecmintVM console session running the Debian Network Installer waiting for the installation process to begin. At this point, the installation proceeds just like any other Debian installation.
Up to this point, everything with XenServer has been done via command line interface (CLI). While many Linux users enjoy the CLI, there are utilities that exist to simplify the process of managing XenServer hosts and pools. The next article in this series will cover the installation of those tools for users who wish to use graphical systems rather than CLI.

When I tried to add a virtual CD-ROM to the guest (for booting the ISO) with xe vm-cd-add vm=TecmintVM cd-name=debian-8-netinst.iso device=3, I got an error indicating there was already something with that name in the device of the VM – unfortunately, I didn’t note the message but it sounded like it was detecting the ISO in the CD-ROM drive and not allowing me to add it a 2nd time. So, I randomly started changing the device number. I tried 0 but it didn’t work. When I changed it to 1, it seemed to accept it ad the ISO appeared in the CD-ROM drive as expected. After this occurred, I aborted the rest of the process – the concern I had was that there is another line with device=# that comes up (device=0 when creating the VIF) and I wasn’t sure how that line was going to react there based on the error for device=3. Any idea why it wouldn’t take device=3 but allowed device=1?