Systemd is a modern software suite that provides many components on a Linux system including a system and service manager. It is compatible with SysV and LSB init scripts and works as a replacement for sysvinit.
A systemd service is defined in a unit file (a unit is a representation of a service and system resources such as devices, sockets, mount points, etc.). Custom service unit files should be stored in the /etc/systemd/system/ directory and must have an .service extension. For example, a custom test-app service uses /etc/systemd/system/test-app.service unit file.
A unit file is a plain text ini-style file that usually includes three common sections. The first section is usually the Unit section which carries generic information about the unit that is not dependent on the type of unit.
The next section is the unit type section, for a service, it is a Service section. And the final section is the Install section which carries installation information for the unit.
In this guide, we will show how to create a new systemd service and manage the service using the systemctl command, in Linux.
Creating Custom Systemd Service File in Linux
To run an application or program or script as a service under systemd, you can create a new systemd service as follows. Start by creating the service unit file named test-app.service (remember to replace test-app with the actual name of your service or application), under /etc/systemd/system/:
# vi /etc/systemd/system/test-app.service
The following configuration is used to define a service for running a Flask application using Gunicorn, a Python WSGI HTTP Server for UNIX.
[Unit]
Description=Gunicorn daemon for serving test-app
After=network.target

[Service]
User=root
Group=root
WorkingDirectory=/apps/test-app/
Environment="PATH=/apps/test-app/bin"
ExecStart=/apps/test-app/bin/gunicorn --workers 9  -t 0  --bind 127.0.0.1:5001 -m 007 wsgi:app --log-level debug --access-logfile /var/log/gunicorn/test_app_access.log --error-logfile /var/log/gunicorn/test_app_error.log
ExecReload=/bin/kill -s HUP $MAINPID
RestartSec=5

[Install]
WantedBy=multi-user.target
Let’s briefly describe each configuration directive in the configuration above:
- Description – is used to specify a description for the service.
- After – defines a relationship with a second unit, the network.target. In this case, the test-app.service is activated after the network.target unit.
- User – is used to specifying the user with whose permissions the service will run.
- Group – is used to specify the group with whose permissions the service will run.
- WorkingDirectory – is used to set the working directory for executed processes.
- Environment – is used to set environment variables for executed processes.
- ExecStart – is used to define the commands with their arguments that are executed when this service is started.
- ExecReload – is used to define the commands to execute to trigger a configuration reload in the service.
- WantedBy – enables a symbolic link to be created in the
.wants/or.requires/directory of each of the listed unit(s), multi-user.target in this case, when the test-app.service unit is enabled using the systemctl enable command.
You can find all service unit configuration parameters, well described in the Service unit configuration documentation.
Save the unit file and close it. Then reload systemd with this new service unit file by running:
# systemctl daemon-reload command
Remember to always run this command after editing a unit file.
Manage Systemd Service in Linux
To start/activate the service, run the systemctl command as follows:
# systemctl start test-app.service
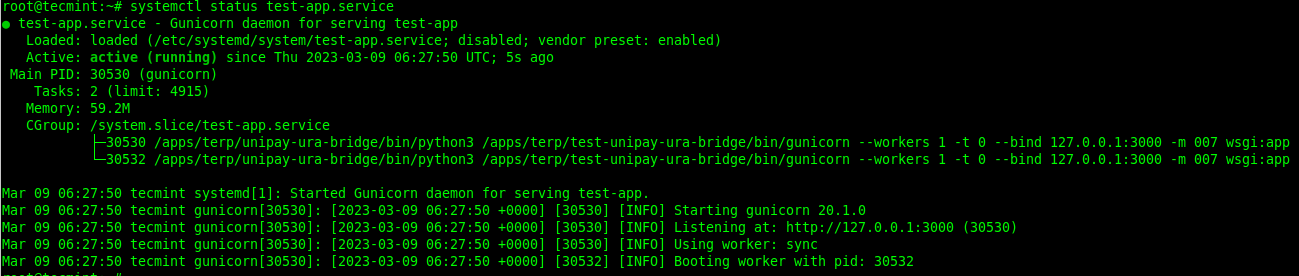
To check if the service is running or not, issue the systemctl command as shown.
# systemctl status test-app.service
To enable the service to start at system boot, use the systemctl enable command. You can check if the service has been enabled using the systemctl is-enable command as follows:
# systemctl enable test-app.service
# systemctl is-enabled test-app.service

Alternatively, you can also enable and start the service at the same time as shown.
# systemctl enable --now test-app.service
To stop/deactivate the service, run the systemctl stop command as follows:
# systemctl stop test-app.service
To restart the service, run the systemctl restart command as follows:
# systemctl restart test-app.service
You can also disable a service to prevent it from starting at system boot, using the systemctl disable command. You can check if the service has been enabled using the systemctl is-enable command as follows:
# systemctl disable test-app.service
# systemctl is-disabled test-app.service
Alternatively, you can disable and stop it at the same time as shown.
# systemctl disable --now test-app.service
For more details about managing systemd services and other resources, run:
# man systemctl


