In a previous article, we showed you how to create a shared directory in Linux. Here, we will describe how to give read/write access to a user on a specific directory in Linux.
There are two possible methods of doing this: the first is using ACLs (Access Control Lists) and the second is creating user groups to manage file permissions, as explained below.
For the purpose of this tutorial, we will use following setup.
Operating system: CentOS 7
Test directory: /shares/project1/reports
Test user: tecmint
Filesystem type: Ext4
Make sure all commands are executed as root user or use the the sudo command with equivalent privileges.
Let’s start by creating the directory called reports using the mkdir command:
# mkdir -p /shares/project1/reports
Using ACL to Give Read/Write Access to User on Directory
Important: To use this method, ensure that your Linux filesystem type (such as Ext3 and Ext4, NTFS, BTRFS) support ACLs.
1. First, check the current file system type on your system, and also whether the kernel supports ACL as follows:
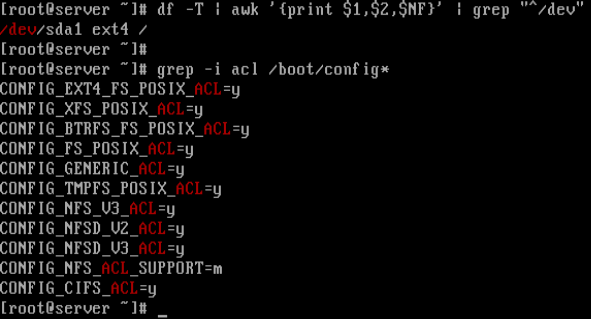
# df -T | awk '{print $1,$2,$NF}' | grep "^/dev"
# grep -i acl /boot/config*
From the screenshot below, the filesystem type is Ext4 and the kernel supports POSIX ACLs as indicated by the CONFIG_EXT4_FS_POSIX_ACL=y option.
2. Next, check if the file system (partition) is mounted with ACL option or not:
# tune2fs -l /dev/sda1 | grep acl

From the above output, we can see that default mount option already has support for ACL. If in case it’s not enabled, you can enable it for the particular partition (/dev/sda3 for this case):
# mount -o remount,acl /
# tune2fs -o acl /dev/sda3
3. Now, its time to assign a read/write access to a user tecmint to a specific directory called reports by running the following commands.
# getfacl /shares/project1/reports       		  # Check the default ACL settings for the directory
# setfacl -m user:tecmint:rw /shares/project1/reports     # Give rw access to user tecmint
# getfacl /shares/project1/reports    			  # Check new ACL settings for the directory
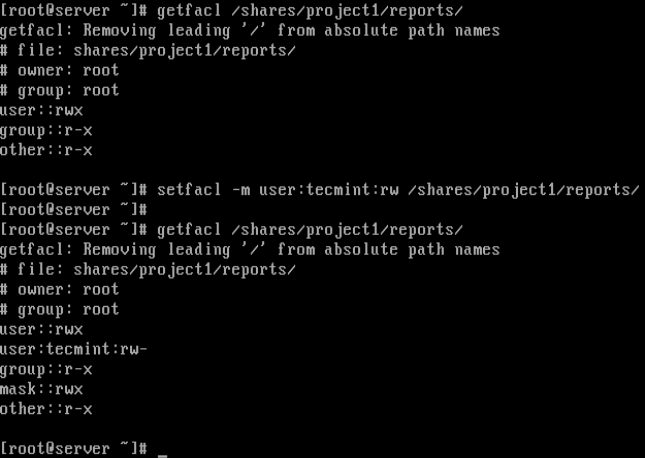
In the screenshot above, the user tecmint now has read/write (rw) permissions on directory /shares/project1/reports as seen from the output of the second getfacl command.
For more information about ACL lists, do check out our following guides.
- How to Use ACLs (Access Control Lists) to Setup Disk Quotas for Users/Groups
- How to Use ACLs (Access Control Lists) to Mount Network Shares
Now let’s see the second method of assigning read/write access to a directory.
Using Groups to Give Read/Write Access to User on Directory
1. If the user already has a default user group (normally with same name as username), simply change the group owner of the directory.
# chgrp tecmint /shares/project1/reports
Alternatively, create a new group for multiple users (who will be given read/write permissions on a specific directory), as follows. However, this will create a shared directory:
# groupadd projects
2. Then add the user tecmint to the group projects as follows:
# usermod -aG projects tecmint	    # add user to projects
# groups tecmint	            # check users groups
3. Change the group owner of the directory to projects:
# chgrp projects /shares/project1/reports
4. Now set read/write access for the group members:
# chmod -R 0760 /shares/projects/reports
# ls  -l /shares/projects/	    #check new permissions
That’s it! In this tutorial, we showed you how to give read/write access to a user on a specific directory in Linux. If any issues, do ask via the comment section below.


Is there a way you can ban the: change root password?
Here I have a case where the user is granted root privileges, the user enters the admin’s root change password by themselves.
@Nguyentony,
Actually not possible, but you can do it with the following exception.
1. First, add the users you want to lock down to a group.
2. Next, edit the sudoer’s file with the
visudocommand.3. Add the following lines to the sudoer’s file (testgroup is the group you added the users to).
Note: This prevents the sudo users from changing the root password.
Hi,
I need to let the normal users create their own subdirectories and upload any document to that directories. I have enabled a shared location via nginx, and I could see the shared location when I type the server’s IP in a web browser. But I am not sure how to enable the other part of the requirement. Can you help, please?
I have given full permission to the group thru setfacl. but it is not giving me any option in the web browser to create any directory there itself and upload files. Please suggest