Cloning is the meticulous process of creating an exact replica of a live Linux server by employing the powerful rsync command-line tool, which is an efficient file synchronization and transfer tool.
Cloning entails the utilization of two server instances: the source server, which serves as the server to be cloned, and the destination server, where the actual cloning process takes place.
Through the employment of the rsync command, an intricate synchronization of all files and directories from the source server to the destination server is accomplished.
In this guide, you will learn how to hot clone a Linux server with the Rsync file synchronization tool.
Lab Setup
Here’s the lab setup that we are using for this guide, you can clone any Linux distribution using the rsync command.
- Source Server – RHEL 9 – 192.168.2.103
- Destination Server – RHEL 9 – 192.168.2.110
The source server is the one we are going to clone onto the destination server.
Setup and Requirements
Before proceeding, ensure that you have met the prerequisites below:
- Both servers need to be running the same release of the operating system i.e. RHEL 9.x or RHEL 8.x, etc.
- Additionally, the servers should have identical file systems and the same hard disk configuration i.e. whether single-disks or in RAID configuration.
Install Rsync in Linux
For cloning to be successful the rsync command-line tool needs to be present on both servers, which will be used for mirroring the source server to the destination server and syncing all the differences between the two systems.
Thankfully, modern Linux systems come with rsync already pre-installed and you can check the version of rsync installed by running:
$ rsync --version
If you want to view additional information about rsync, execute the following rpm command or dpkg-query command:
$ rpm -qi rsync               [On RHEL/CentOS/Fedora and Rocky/AlmaLinux]
$ dpkg-query --status rsync   [On Debian, Ubuntu and Mint]

If rsync is missing, use the default package manager to install it on your system.
$ sudo apt install rsync         [On Debian, Ubuntu and Mint]
$ sudo yum install rsync         [On RHEL/CentOS/Fedora and Rocky/AlmaLinux]
$ sudo emerge -a sys-apps/rsync  [On Gentoo Linux]
$ sudo apk add rsync             [On Alpine Linux]
$ sudo pacman -S rsync           [On Arch Linux]
$ sudo zypper install rsync      [On OpenSUSE]
Configure Source Linux Server
There are directories and files that you may want to exclude from cloning because they are either already available in the destination server or are autogenerated. These include the /boot, /tmp and /dev directories.
Therefore, create an exclusion file /root/exclude-files.txt and add the following entries:
/boot
/dev
/tmp
/sys
/proc
/backup
/etc/fstab
/etc/mtab
/etc/mdadm.conf
/etc/sysconfig/network*
Save and exit the configuration file.
Cloning a Linux Server
With everything set, proceed and rsync your server to the remote or destination server using the command:
$ sudo rsync -vPa -e 'ssh -o StrictHostKeyChecking=no' --exclude-from=/root/exclude-files.txt / REMOTE-IP:/
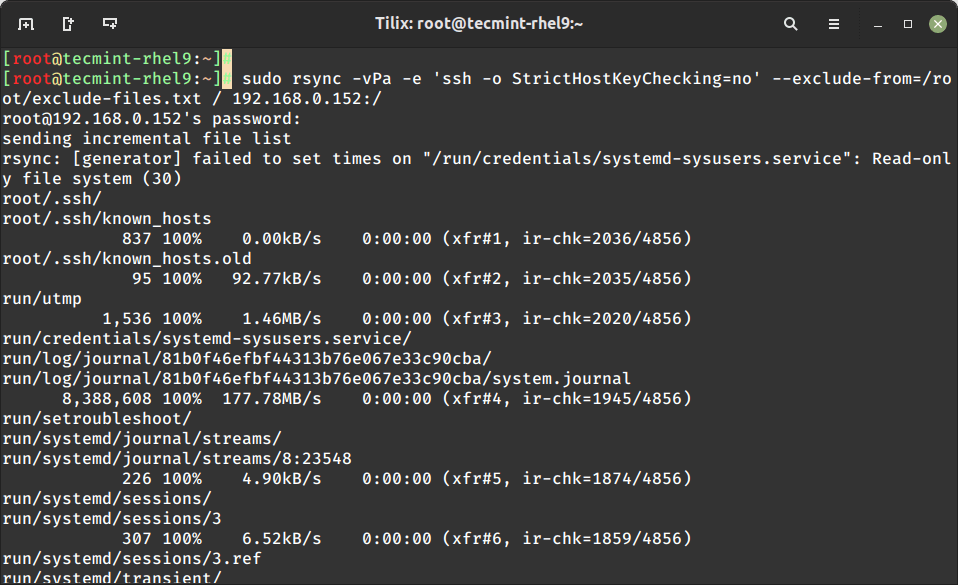
The command will rsync everything from the source server to the destination server while excluding the files and directories you defined earlier on. Be sure to replace the REMOTE-IP: option with your destination server’s IP address.
Let’s break down the command and its components:
sudo– It is a command that allows the execution of a command with administrative privileges.rsync– The rsync command itself, is used for file synchronization and transfer.-v: This option enables verbose output, providing detailed information about the progress of the synchronization.-P– This option is equivalent to--progressand enables partial file transfers and displays the progress of each file during the synchronization.-a– This option stands for “archive mode” and is a shorthand for preserving important file attributes such as permissions, ownership, timestamps, etc.-e– This option specifies the remote shell to use for the synchronization.-o StrictHostKeyChecking=no– Disables strict host key checking, which means that the SSH connection will not prompt for confirmation if the remote server’s host key is unknown.--exclude-from=/root/exclude-files.txt– This option allows you to specify a file that contains a list of patterns or paths to be excluded from the synchronization./– The forward slash represents the source directory or root directory that will be cloned.REMOTE-IP:/– Specifies the destination server’s IP address or hostname followed by a colon and forward slash. It indicates the remote directory where the cloned files will be copied.
After the synching is done, reboot the destination system to reload the changes and thereafter, boot into the server using the source server’s credentials. Feel free to decommission the old server since you now have a mirror copy of it.


Just wanted to share that I could successfully clone a server to another, thank you! I found it’s much faster and has a lot fewer conflicts to boot to a live ISO, attach block storage to the source server, `dd` an image, and then rsync the relevant parts to the destination server.
Probably /etc/crypttab should be excluded too, particularly if a multiple disk/lvm setup differs.
Thank you for your article.
But I am not sure we can use “clone” expression in your example. It seems to me, in that case, we can use rsync as a copy-paste tool only, not a cloning one. Here we can see only some folders are copied from one server to another one.
In my opinion, the most robust cloning tool in Linux is dd command. In that case, there is no requirement to have a pre-installed OS on a destination server before running dd command.
“Additionally, the servers should have identical file systems and the same hard disk configuration i.e whether single-disks or in RAID configuration.” – what will happen if the size of HDD is larger on a destination server?
Thank you!
Capacity isn’t an issue for the destination, provided the filesystem is structured in the same way.