This tutorial will guide you on how to install and configure a complete mail server with Postfix in Debian 9 release. It will also cover how to configure accounts mailboxes using Dovecot in order to retrieve and compose mails via IMAP protocol. The users will use Rainloop Webmail interface as the mail user agent to handle mail.
Requirements
- Debian 9 Minimal Installation
- A static IP address configured for the network interface
- A local or a public registered domain name.
In this tutorial we’ll use a private domain account for mail server setup configured via /etc/hosts file only, without any DNS server involved in handling DNS resolution.
Step 1: Initial Configurations for Postfix Mail Server on Debian
1. In the first step, login to your machine with an account with root privileges or directly with the root user and make sure your Debian system is up to date with the latest security patches and software and packages releases, by issuing the following command.
# apt-get update
# apt-get upgrade
2. On the next step install the following software packages that will be used for system administration, by issuing the following command.
# apt-get install curl net-tools bash-completion wget lsof nano
3. Next, open /etc/host.conf file for editing with your favorite text editor and add the following line at the beginning of the file in order for DNS resolution to read the hosts file first.
order hosts,bind
multi on
4. Next, setup your machine FQDN and add your domain name and your system FQDN to /etc/hosts file. Use your system IP address to resolve the name of the domain and FQDN as illustrated in the below screenshot.
Replace IP address and domain accordingly. Afterwards, reboot the machine in order to apply the hostname properly.
# hostnamectl set-hostname mail.tecmint.com
# echo "192.168.0.102 tecmint.com mail.tecmint.com" >> /etc/hosts
# init 6

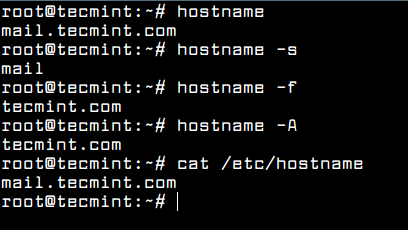
5. After reboot, verify if the hostname has been correctly configured by issuing the following series of commands. The domain name, the FQDN, the hostname and the IP address of the system should be returned by hostname command.
# hostname
# hostname -s
# hostname -f
# hostname -A
# hostname -i
# cat /etc/hostname
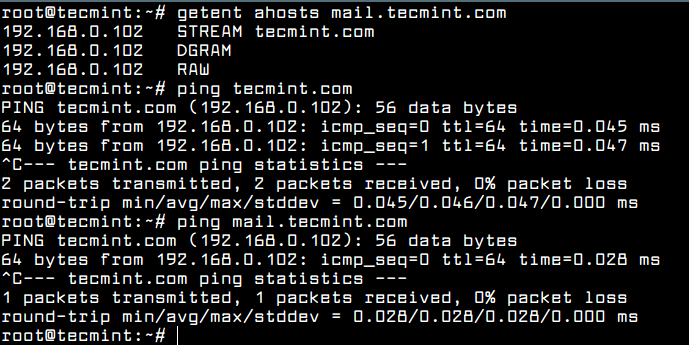
6. Also, test if the domain correctly replies to local queries by issuing the below commands. Be aware that the domain won’t replay to remote queries issued by other systems in your network, because we’re not using a DNS server.
However, the domain should reply from other systems if you manually add the domain name to each of their /etc/hosts file. Also, be aware that the DNS resolution for a domain added to /etc/hosts file won’t work via host, nslookup or dig commands.
# getent ahosts mail.tecmint.com
# ping tecmint.com
# ping mail.tecmint.com
Step 2: Install Postfix Mail Server on Debian
7. The most important piece of software required for a mail server to function properly is the MTA agent. The MTA is a software built in a server-client architecture, which is responsible for mail transfer between mail servers.
In this guide we’ll use Postfix as the mail transfer agent. To install postfix in Debian from official repositories execute the following command.
# apt-get install postfix
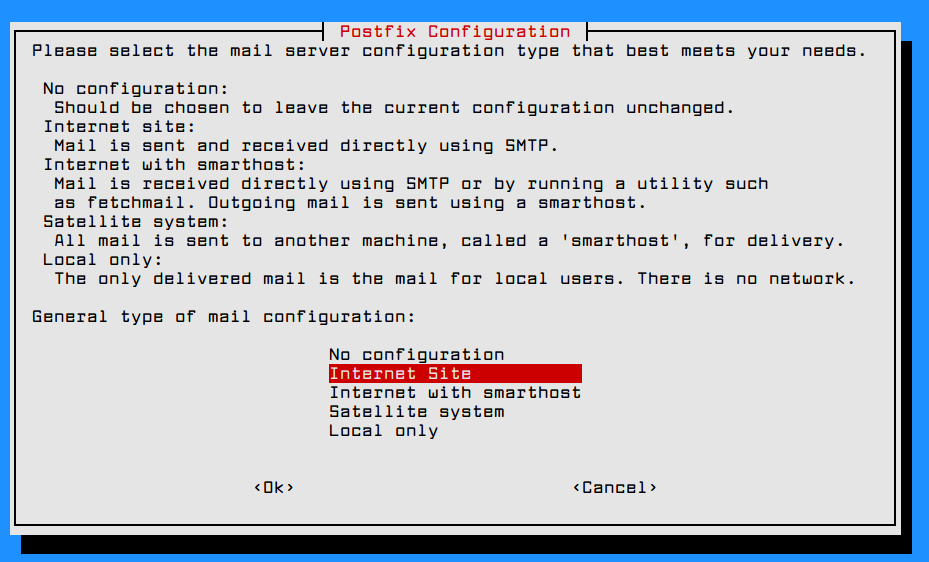
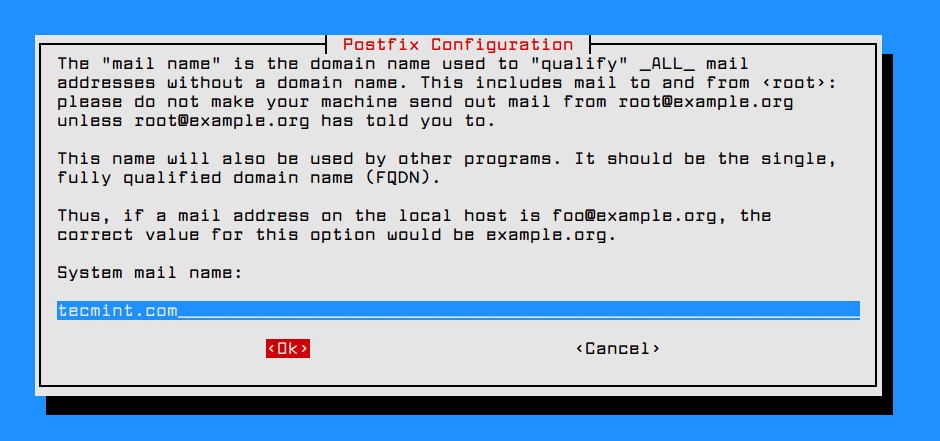
8. During the installation process of Postfix you will be asked a series of questions. On the first prompt, select Internet Site option as the general type for Postfix configuration and press [enter] key to continue and then add your domain name to system mail name, as illustrated in the following screenshots.
Step 3: Configure Postfix Mail Server on Debian
9. Next, backup Postfix main configuration file and configure Postfix for your domain by using the following commands.
# cp /etc/postfix/main.cf{,.backup}
# nano /etc/postfix/main.cf
Now configure Postfix configuration in the main.cf file as shown.
# See /usr/share/postfix/main.cf.dist for a commented, more complete version

smtpd_banner = $myhostname ESMTP
biff = no
# appending .domain is the MUA's job.
append_dot_mydomain = no
readme_directory = no

# See http://www.postfix.org/COMPATIBILITY_README.html -- default to 2 on
# fresh installs.
compatibility_level = 2

# TLS parameters
smtpd_tls_cert_file=/etc/ssl/certs/ssl-cert-snakeoil.pem
smtpd_tls_key_file=/etc/ssl/private/ssl-cert-snakeoil.key
smtpd_use_tls=yes
smtpd_tls_session_cache_database = btree:${data_directory}/smtpd_scache
smtp_tls_session_cache_database = btree:${data_directory}/smtp_scache

# See /usr/share/doc/postfix/TLS_README.gz in the postfix-doc package for
# information on enabling SSL in the smtp client.

smtpd_relay_restrictions = permit_mynetworks permit_sasl_authenticated defer_unauth_destination
myhostname = mail.debian.lan

mydomain = debian.lan

alias_maps = hash:/etc/aliases
alias_database = hash:/etc/aliases

#myorigin = /etc/mailname
myorigin = $mydomain

mydestination = $myhostname, $mydomain, localhost.$mydomain, localhost
relayhost =
mynetworks = 127.0.0.0/8, 192.168.1.0/24
mailbox_size_limit = 0
recipient_delimiter = +
inet_interfaces = all
#inet_protocols = all
inet_protocols = ipv4

home_mailbox = Maildir/

# SMTP-Auth settings
smtpd_sasl_type = dovecot
smtpd_sasl_path = private/auth
smtpd_sasl_auth_enable = yes
smtpd_sasl_security_options = noanonymous
smtpd_sasl_local_domain = $myhostname
smtpd_recipient_restrictions = permit_mynetworks,permit_auth_destination,permit_sasl_authenticated,reject
Replace the myhostname, mydomain and mynetworks variables to match your own configurations.
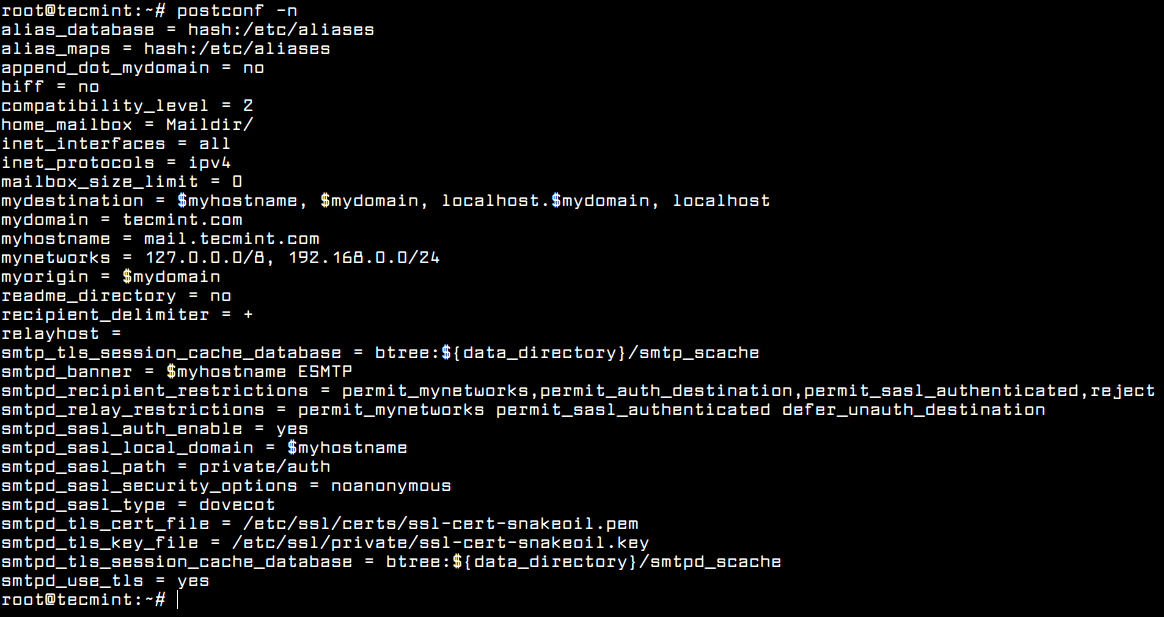
You can run postconf -n command in order to dump Postfix main configuration file and check eventual errors, as shown in the below screenshot.
# postconf -n
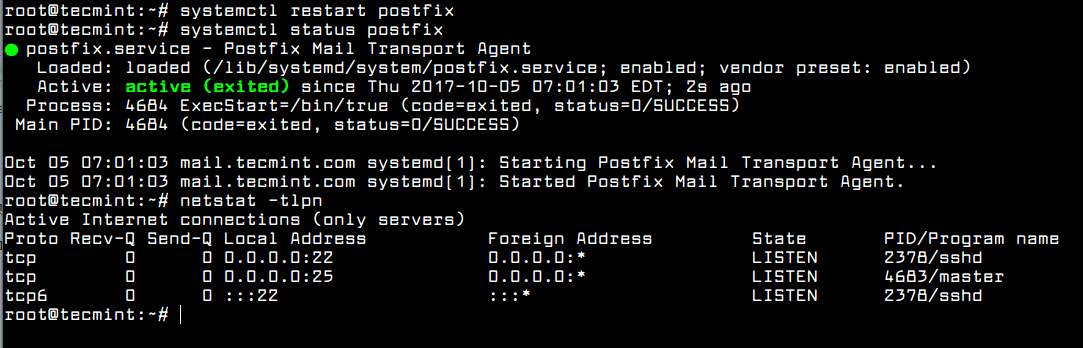
10. After all configurations are in place, restart Postfix daemon to apply changes and verify if the service is running by inspecting if Postfix master service is binding on port 25 by running netstat command.
# systemctl restart postfix
# systemctl status postfix
# netstat -tlpn
Step 3: Test Postfix Mail Server on Debian
11. In order to test if postfix can handle mail transfer, first install mailutils package by running the following command.
# apt-get install mailutils
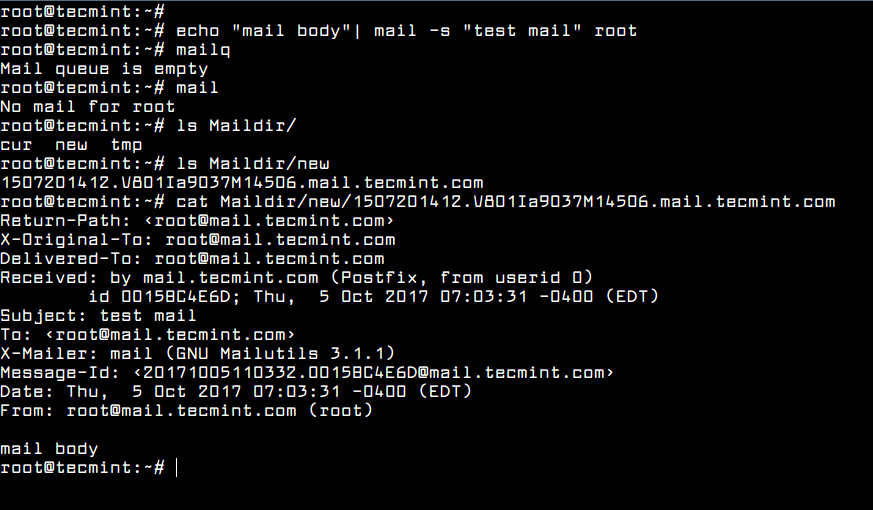
12. Next, using mail command line utility, send a mail to the root account and check if the mail was successfully transmitted by issuing the below command in order to check mail queue and listing the content of the root’s home Maildir directory.
# echo "mail body"| mail -s "test mail" root
# mailq
# mail
# ls Maildir/
# ls Maildir/new/
# cat Maildir/new/[TAB]
13. You can also verify in what manner the mail was handled by postfix service by inspecting the content of the mail log file by issuing the following command.
# tailf /var/log/mail.log
Step 4: Install and Configure Dovecot IMAP on Debian
14. The mail delivery agent that we’ll be using in this guide to deliver e-mail messages to a local recipient’s mailboxes is Dovecot IMAP. IMAP is a protocol which runs on 143 and 993 (SSL) ports, which is responsible reading, deleting or moving mails across multiple email clients.
The IMAP protocol also uses synchronization in order to assure that a copy of each message is saved on the server and allows users to create multiple directories on the server and move mails to this directories in order to sort the e-mails.
This is not the case with POP3 protocol. POP3 protocol won’t allow users to create multiple directories on the server to sort your mail. You only have the inbox folder to manage mail.
To install Dovecot core server and Dovecot IMAP package on Debian execute the following command.
# apt install dovecot-core dovecot-imapd
15. After Dovecot has been installed in your system, open the below dovecot files for editing and make the following changes. First, open /etc/dovecot/dovecot.conf file, search and uncomment the following line:
listen = *, ::

16. Next, open /etc/dovecot/conf.d/10-auth.conf for editing and locate and change the below lines to look like in the below excerpt.
disable_plaintext_auth = no
auth_mechanisms = plain login
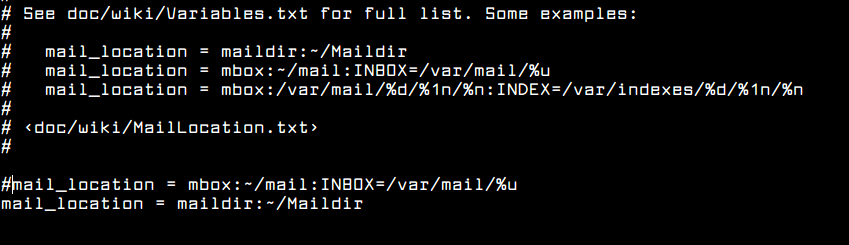
17. Open /etc/dovecot/conf.d/10-mail.conf file and add the following line to use Maildir location instead of Mbox format to store emails.
mail_location = maildir:~/Maildir
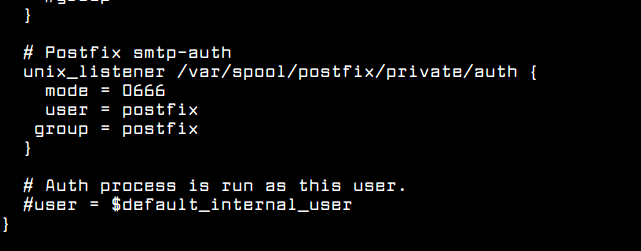
18. The last file to edit is /etc/dovecot/conf.d/10-master.conf. Here search for Postfix smtp-auth block and make the following change:
# Postfix smtp-auth
unix_listener /var/spool/postfix/private/auth {
  mode = 0666
  user = postfix
  group = postfix
 }
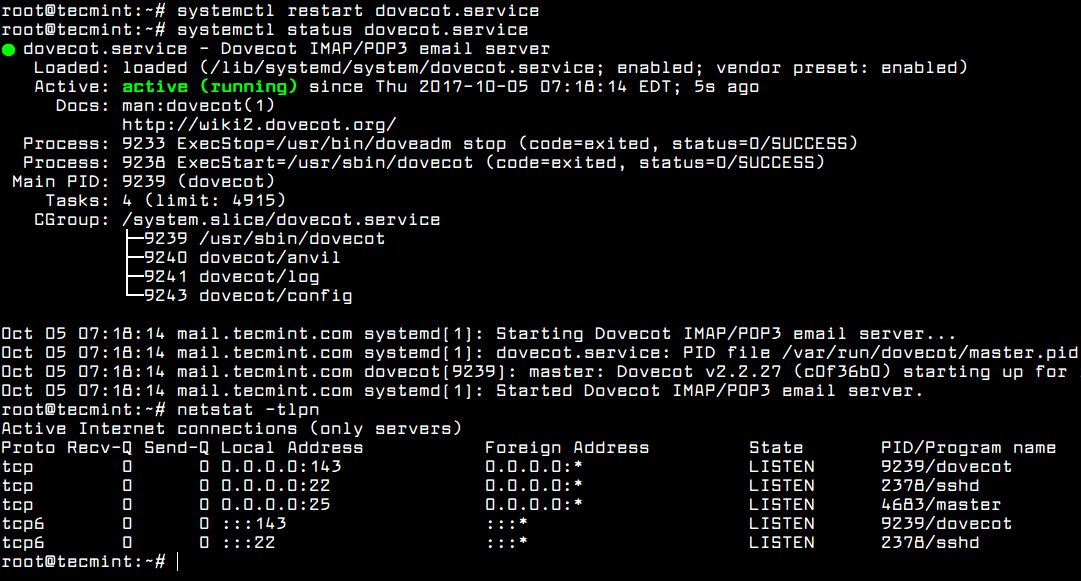
19. After you’ve made all the above changes, restart Dovecot daemon to reflect changes, check its status and verify if Dovecot is binding on port 143, by issuing the below commands.
# systemctl restart dovecot.service
# systemctl status dovecot.service
# netstat -tlpn
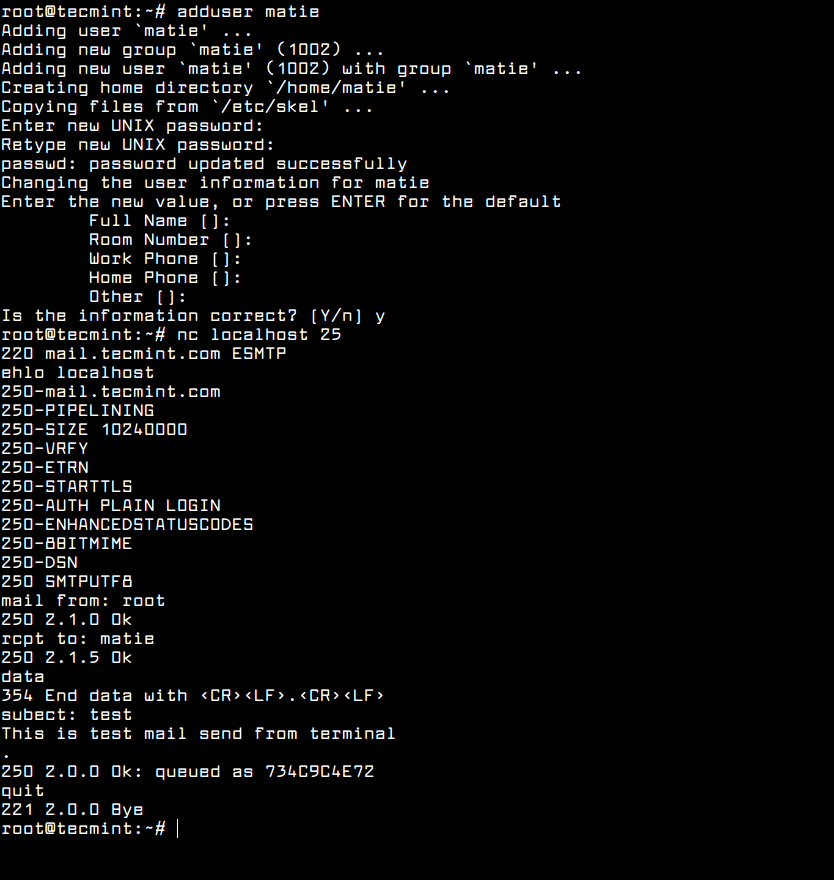
20. Test if the mail server is running properly by adding a new user account to the system and use telnet or netcat command to connect to the SMTP server and send a new mail to the new added user, as illustrated in the below excerpts.
# adduser matie
# nc localhost 25
# ehlo localhost
mail from: root
rcpt to: matie
data
subject: test
Mail body
.
quit
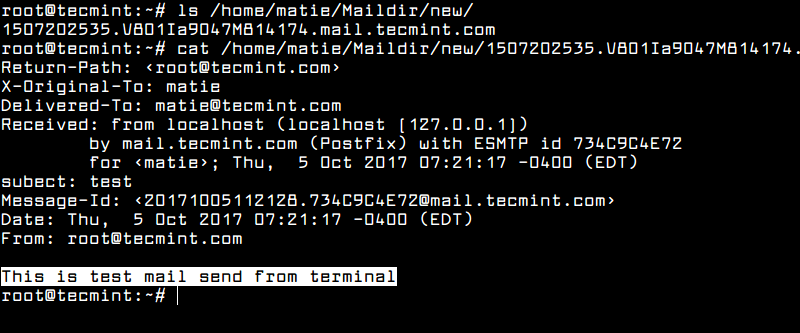
21. Check if the mail has arrived to the new user mailbox by listing the content of user’s home directory as shown in the below screenshot.
# ls /home/test_mail/Maildir/new/
22. Also, you can connect to user’s mailbox from command line via IMAP protocol, as shown in the below excerpt. The new mail should be listed in user’s Inbox.
# nc localhost 143
x1 LOGIN matie user_password
x2 LIST "" "*"
x3 SELECT Inbox
x4 LOGOUT
Step 5: Install and Configure Webmail in Debian
23. Users will manage their emails via Rainloop Webmail client. Before installing Rainloop mail user agent, first install Apache HTTP server and the following PHP modules required by Rainloop, by issuing the following command.
# apt install apache2 php7.0 libapache2-mod-php7.0 php7.0-curl php7.0-xml
24. After Apache web server has been installed, change directory path to /var/www/html/ directory, remove the index.html file and issue the following command in order to install Rainloop Webmail.
# cd /var/www/html/
# rm index.html
# curl -sL https://repository.rainloop.net/installer.php | php
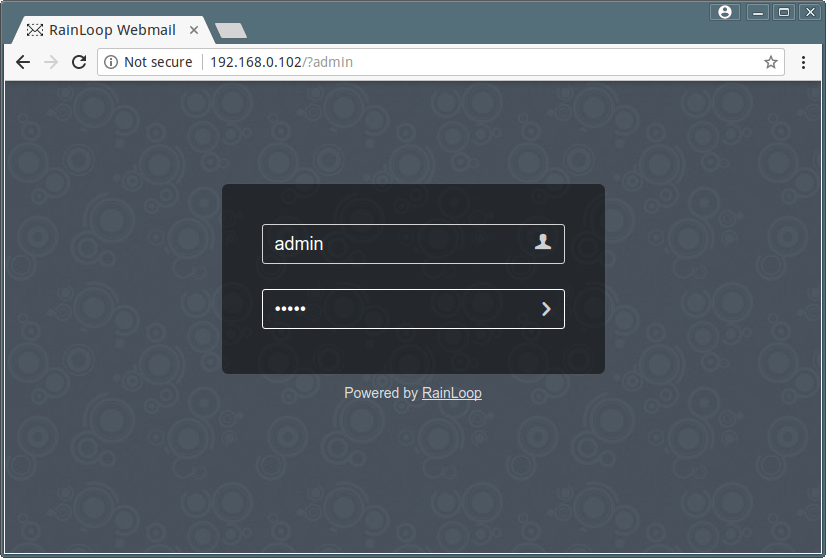
25. After Rainloop Webmail client has been installed in the system, navigate to your domain IP address and login to Rainloop admin web interface with the following default credentials:
http://192.168.0.102/?admin
User: admin
Password: 12345
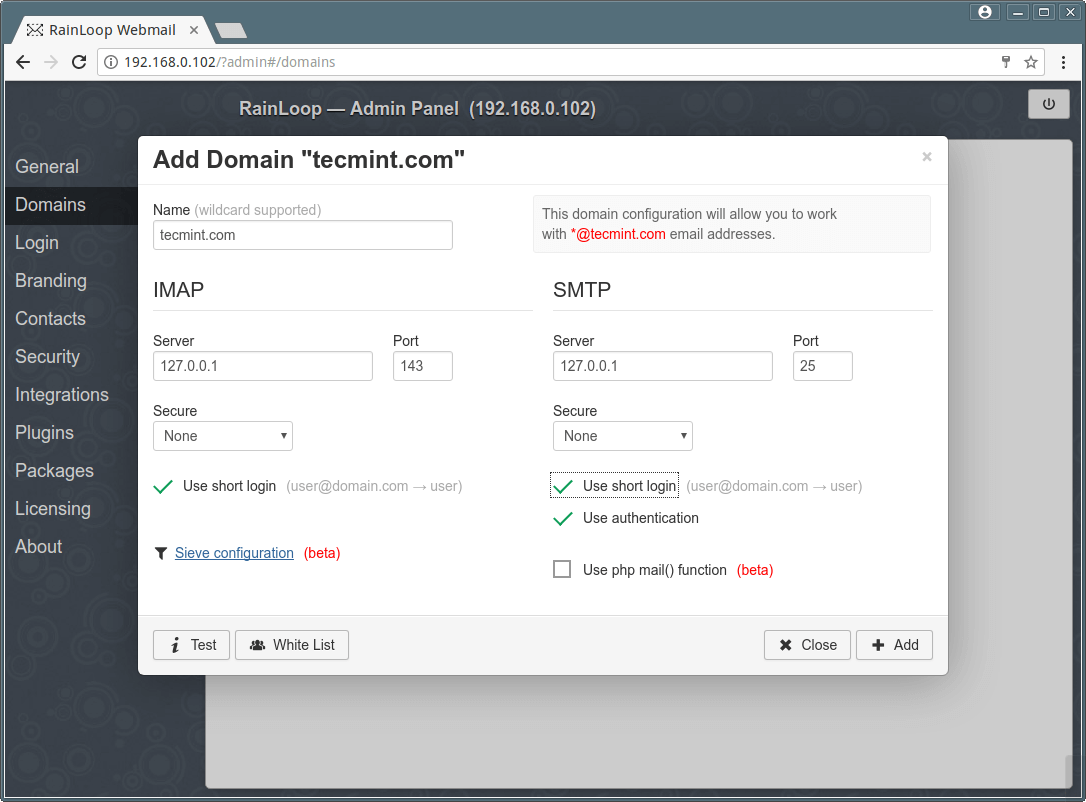
26. Navigate to Domains menu, hit on Add Domain button and add your domain name settings as shown in the below screenshot.
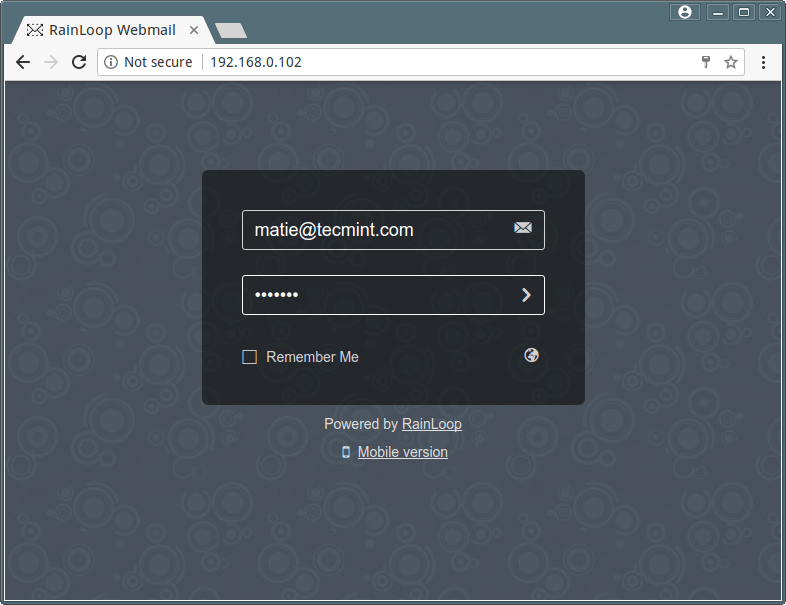
27. After you’ve finished adding your domain settings, log out from Ranloop admin interface and point the browser to your IP address in order to log in to webmail client with an e-mail account.
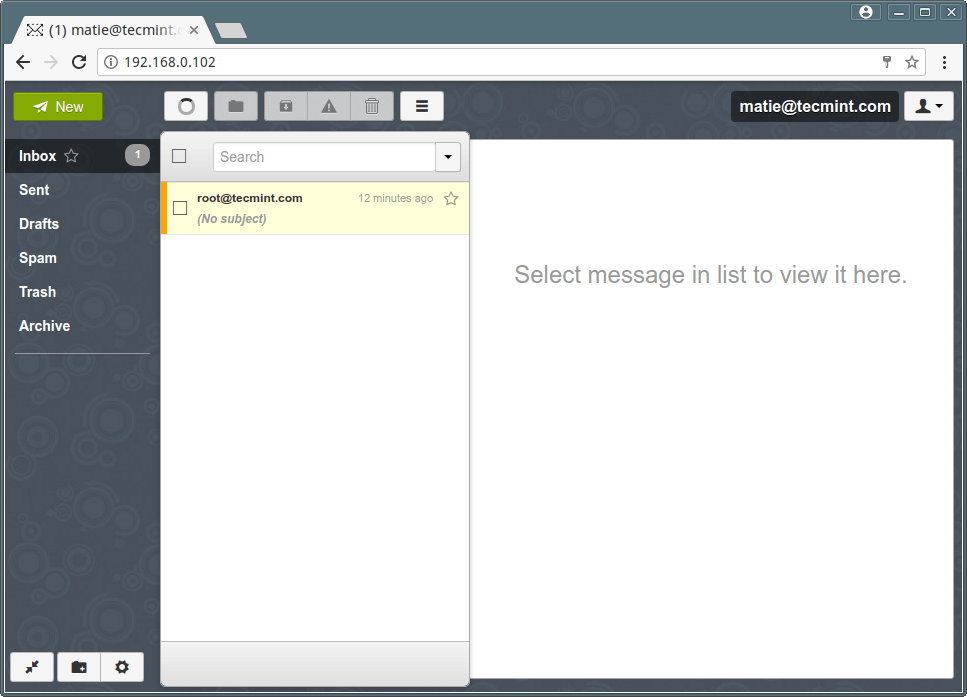
After you’ve successfully logged in to Rainloop webmail you should see the email sent earlier from command line into your Inbox folder.
http://192.168.0.102
User: [email protected]
Pass: the matie password
27. To add a new user issue useradd command with -m flag in order to create the user home directory. But, first make sure you configure the Maildir path variable for every user with the following command.
# echo 'export MAIL=$HOME/Maildir' >> /etc/profile
# useradd -m user3
# passwd user3
28. If you want to redirect all root’s email to a specific local mail account from the system, run the below commands. All mails redirected or destined to root account will be forwarded to your mail user as shown in the below image.
# echo "root: test_mail" >> /etc/aliases
# newaliases
That’s all! You have successfully installed and configured a mail server at your premises in order for local users to communicate via e-mails. However, this type of mail configuration is not secured in any way and it’s advisable to be deployed only for small setups in systems and networks under your full control.
Pretty nice guide. Thank you a lot. For the php7 package, the repo should be updated in most systems, so it could be interesting to add a little extra step or link https://stackoverflow.com/questions/35152778/debian-php7-not-working/35153351
Any mail server we can configure on windows.
Currently, I am using mailhog.
How do I enable TLS 1.2 in this email server, please?
Really nice guide. I got my local email server up and running and the guide works for Debian 10 as well, with minor changes. I would like to enable support for TLS 1.2 and 1.3.
What do i have to do in this guide in order to make it work for TLS 1.2 and 1.3, please?
On our server, we installed a Magento shop. It is an Ubuntu server. Is it possible installing on the same Server a Mail-Server like in this tutorial?
I would be happy if someone answers the question because I am afraid to install the mail service because I found nothing on the internet.
Thank you!
@Johannes,
Yes, you can install a Mail server on the same Magento shop.
Very good tutorial, but I would suggest to make new directory under
/var/www/htmlfor the webmail.E.g.
and there you install rainloop.
So you still can use webserver and only if you enter folder webmail you see webmail login.
Very nice tutorial! First working after few days of searching. I have only one question.
What if I need to have few domains? I need to change hostname? Is it possible to handle few domains with this solution?
Thank you in advice and for this great tutorial!
Hello, could you please tell us the name of that font of your console? If you have a link for download it would be great. I like it a lot, please and thank you.
Hello,
I am having a few issues with this tutorial.
#1 No.20 does not create an email in any folder I can’t find.
#2 No.22 Returns an error message when selecting Inbox.
#3 No.27 tells me I don’t have curl installed in my PHP library.
I have followed your instructions verbatim. Can you provide any assistance with these errors?
@Samuel,
It seems you’ve not followed instructions correctly, I request you to try again and follow the instructions step-by-step as explained here..
Late reply, but got same issues here:
Had to add this for homedir mail:
sudo postconf -e "home_mailbox = Maildir/".For some of the PHP libraries, a repository had to be added:
sudo add-apt-repository ppa:ondrej/php.I still got an error on curl and dom. I had to install php7.2-curl and php7.2-dom.
Many thanks for this great tutorial! it worked at the first attempt for me too and saved a lot of time. I could install everything in a docker container running on a Raspberry Pi without any problems.
Thank you so much for these instructions. I know how much of a headache it is to write such an article, but everything worked at the first attempt. Just great!
Hello I can’t connect with my user it tells me that my domain is not allowed but I have followed the tutorial step by step
I get everything correct but when I logged in to rain loop account (ex. matie) i get red color error message “can’t get message list”.
Please help!
Thanks in advance
wathsala
Hi,
If I do this along a web server, could it be an issue?
Thanks.
@Swemg,
Not an issue, you can setup Mail server on a running apache web server or nginx.
Hi, I am having problem at 12th line, where we have to create Mailsdir?.
I did not get any files in the folder.
Hi Guys,
I’m having some problem at step 20: I type nc lohalhost 25 and nothing happens.
it just stays there.
I have a problem on line 20 I type
nc localhost 25and nothing happensIt is working perfectly,
I only have one question, as long as I log in using the domain mail.etc.com, log in correctly to the Rain Loop site, but the domain is no longer used and the ip server is always used in the url, how could I configure this?
Thank you
Inbox appears to be empty on Rainloop Webmail client! To resolve comment the line main.cf # HOME / Maildir now change in 10-auth.conf
All emails now appear.
Somebody knows what is the font on the screenshots?
Everything’s worked of the installation, only i don’t get the
/Maildirfolder. So no mails for root of other users. What can i do?I strongly discourage following the directions in this article, without understanding what you are doing. These technologies are dated from the 1980’s, do not include any modern security, and transmit your login information across the Internet in plain text. This article asks you to override the more secure Dovecot default options here:
There is a reason those mechanisms are disabled by default today.
I’d like to see this article cover proper outgoing mail delivery (as in, send mail FROM tecmint.com to Internet hosts, as well as being able to receive messages). Most ISPs would prevent you from sending outgoing messages because they prohibit outgoing traffic on port 25.
Additionally, security is mandatory nowadays, and any e-mail sent using a system that actually worked with just these directions, would go straight to your recipient’s spam folder (or be rejected outright) because this does not cover TLS encryption in transit. Additionally, it doesn’t address DNS requirements such as MX records, SPF validation, or DKIM signing. This is hardly a “complete” mail server.
Mr Saive,
I got as far as step 21.
In the /home/matie/ part of my file system, there was no Maildir directory so I created a Maildir and new. (/home/matie/Maildir/new/).
Should I repeat step 20 keep the following syntax?
I have done this several times and logged in as matie and root and used the command “mail” only to get “No mail for root/matie.”
Anything helps
Thanks
Works! Thanks a lot
Hello
I’m failing at step 20 can someone please help:
Hello Sir,
Thanks in advance for your help and your great article. I followed your guide and now I am at step20:
and then my command-line hangs. i waited several minutes to make sure. only way to process is
ctrl+c.any hint whats wrong?
netstat -tlpnfrom step19 showed me correct values.greetings, Sam
@Samuel,
Nothing wrong, your setup is working perfectly….
@Ravi Saive
Thank you for your fast response! So when you said my setup is working I finished the other steps in your guide.
Now i can send E-Mails via mail() (PHP) or via Web mail-Interface.
But i cannot receive Mails from Outside. I get following Error-MSG as response from my test-gmail-Account:
> Delivery Status Notification (Failure)
> Error occurred at sending your message to [email protected]
>
> Response from Remote-Server
>
> 550 Unroutable address
Any hint? You really would save my day <3
Thanks in advance, with best regards
Sam
@Samuel,
You are sending the email to a non-existing recipient domain, it shows a ‘550-Unrouteable address’ error.
@Ravi,
I feel like a moron ;) Everything works like a charm. You are a hero! Thank you sir
Hello, when I try to log in to RainLoop with my login, a message will appear indicating “Authentication failed”, I said that all the previous steps work perfectly.
The log window shows me this:
"imap-login: Disconnected (auth failed, 1 attempts in 4 secs): user = , method = PLAIN, rip = 127.0.0.1, lip = 127.0.0.1, secured, session = "I can not find where the problem comes from, does anyone have an idea? Thank you in advance :)
Pierre
Does it work with multiple mail domains? (say
[email protected],[email protected], and so on).Thanks
Thanks for your perfect article. it workes without any problem :))
Hi, When I execute the following code:
The return is: x1 OK ……. Logged in. But I can’t login with those credentials in the web interface
Any ideas?
Hi, would this work with an apache server running at the same time?
@James,
Yes it should work with Apache without any issues..
Hello,
I’m getting a ‘Temporary lookup failure’ when trying to send an email to a valid mail address. From logs:
Any suggestion?
Thanks
Simone
Please consider the mail sending is failing from any host outside the mail server. In main.cf parameter I put the corresponding host ip but the mail sending is failing.
Thanks
Simone
Hello
In postfix main.cf (install mailserver rainlop)
should i change it to
@Igaz,
The ssl-cert-snakeoil.pem and ssl-snakeoil.key is created by ssl-cert for snakeoil user and should not be deleted:..
Hi, I’m following this article to install mail server at work. I’m stuck at this step:
But I am sure from user and pass, I created it from the guide, you used “Matie“, I user “imed”, username and password are the same.
Any Idea?
Hi Imed, Did you find a solution?
Yes, I changed the setting, the server was searching for user from an SQL DB, I changed the userdb to search from passwd.
Can you tell how to enable registration?
Registration of what?
Thanks. Great work! It saved me lots of hours.
Hi, thanks for this tutorial, but if we want to change our domain name, would it work if we just update the postfix config file (Main.cf) ?
Awesome tutorial. How would I go about to use this with multiple domains? step 4,5 and 6 for each?
Multiple domains with postfix is a complex subject and requires more expertise with postfix and databases. It all depends on where you want to store your virtual domains and accounts (flat files, mysql, postgres databases …)
Really good tutorial!
Thanks for all your effort
I’m having the same problem, everything is working perfectly.
I can only send emails through Webmail, but I do not receive any.
Sorry guys, I’m getting the emails now usually,
Thanks for the great tutorial, every thing works perfect but only one issues when I am sending email from webmail, it is showing error message as Authentication Failure when I press sent any suggestions on this please ? what might be wrong..
Thanks
Hello ! First of all great tutorial ! Really ! :D
Then, Actually I follow all the steps of the tutorial and it works, I just have one issue. When I sent a email from a user from the webmail, the destination user receive the email in his Maildir but not in his webmail. Maybe you have some advices or answers to my questions ?
Thanks again.
Great tutorial. I hope you do some on how to use virtual users in postfix with a MySql database
Great tutorial. I encourage you to create the second part about mail server security (DKIM, SPF, Spamassassin, etc.).
That would be perfect tutorial how to create complete Linux mail server on Debian.
Thanks again.